---
title: Texture
slug: software/texture
description: Carbon Design Engine offers the ability to apply textures to your mesh parts. Two categories of texture are available: random noise textures or tile textures that apply a decorative pattern.
docTags:
createdAt: 2024-05-23T18:09:37.809Z
---
Design Engine offers the ability to apply textures to your mesh parts. Two categories of texture are available: random **noise textures **or **tile textures **that apply a decorative pattern.
Jump to section:
::::VerticalSplit{layout="middle"}
:::VerticalSplitItem
- [Texture Tool Fields](docId\:kZYsdZ5GGoWa_aJxP-az2)
- [Input Mesh](docId\:kZYsdZ5GGoWa_aJxP-az2)
- [Texture Patch](docId\:kZYsdZ5GGoWa_aJxP-az2)
- [Pattern](docId\:kZYsdZ5GGoWa_aJxP-az2)
- [Depth](docId\:kZYsdZ5GGoWa_aJxP-az2)
- [Boundary Decay](docId\:kZYsdZ5GGoWa_aJxP-az2)
:::
:::VerticalSplitItem
- [Tile Textures](docId\:kZYsdZ5GGoWa_aJxP-az2)
- [Tile Size](docId\:kZYsdZ5GGoWa_aJxP-az2)
- [Tile Rotation](docId\:kZYsdZ5GGoWa_aJxP-az2)
- [Tile Translation](docId\:kZYsdZ5GGoWa_aJxP-az2)
- [Inverse Image](docId\:kZYsdZ5GGoWa_aJxP-az2)
- [Custom Tiles](docId\:kZYsdZ5GGoWa_aJxP-az2)
- [UV Mapping](docId\:kZYsdZ5GGoWa_aJxP-az2)
- [Basic Texture Workflows](docId\:kZYsdZ5GGoWa_aJxP-az2)
- [FAQ & Troubleshooting](docId\:kZYsdZ5GGoWa_aJxP-az2)
:::
::::
# Texture Tool Fields
## Input Mesh
::::VerticalSplit{layout="middle"}
:::VerticalSplitItem
:::
:::VerticalSplitItem
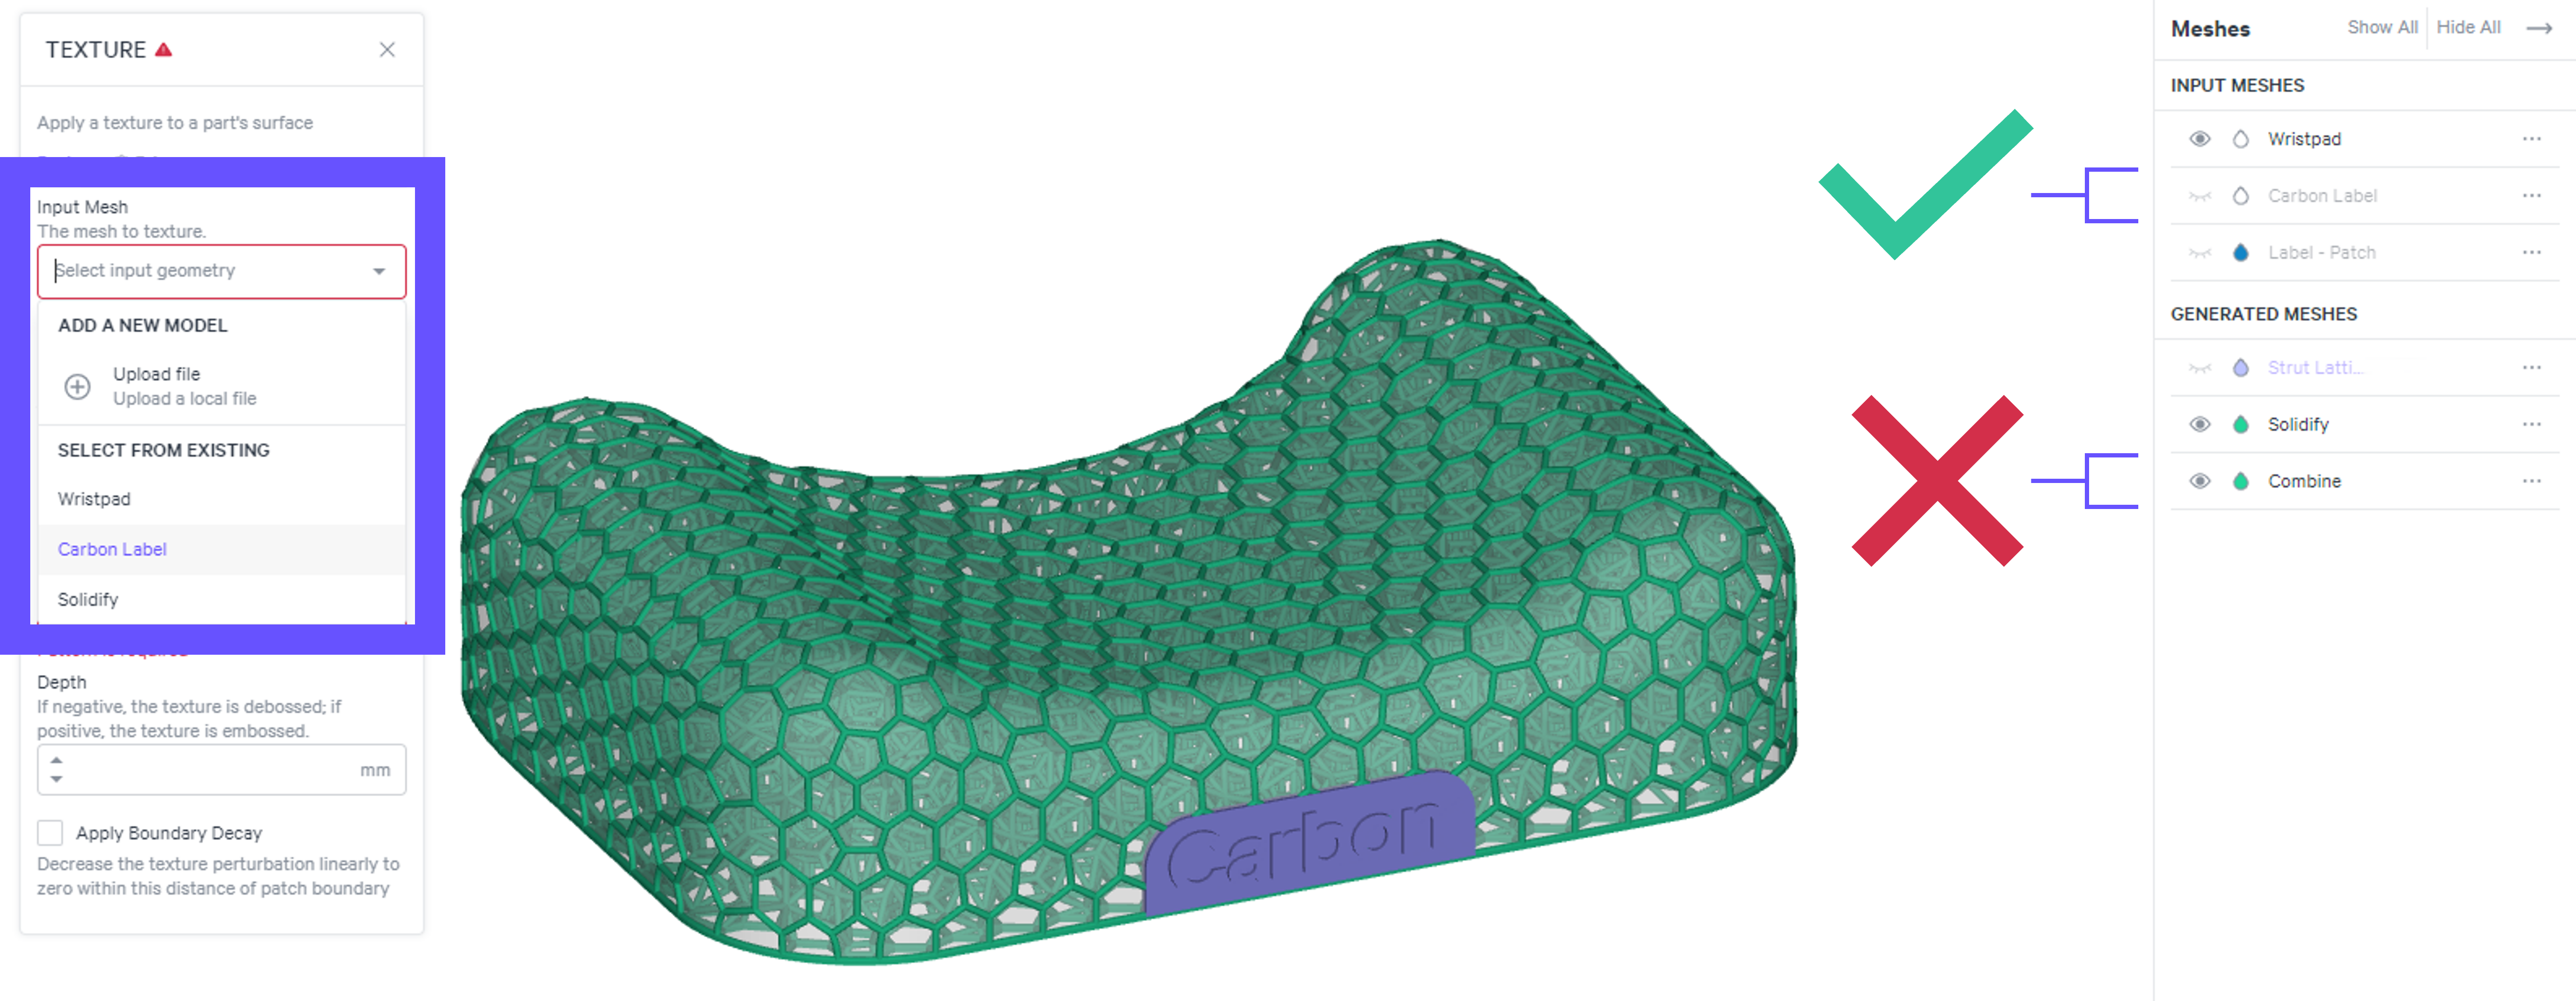
**Select input meshes before combining**
For parts that will be combined with a lattice, it is recommended that you texture the part before combining.
Generated meshes that include a lattice are larger, more complicated STLs.
:::
::::
## Texture Patch
The patch is the area to which you want texture applied.
Reference the **Extract Patch **lesson for details on selecting surfaces.
::::VerticalSplit{layout="middle"}
:::VerticalSplitItem
**Noise Texture Patches**
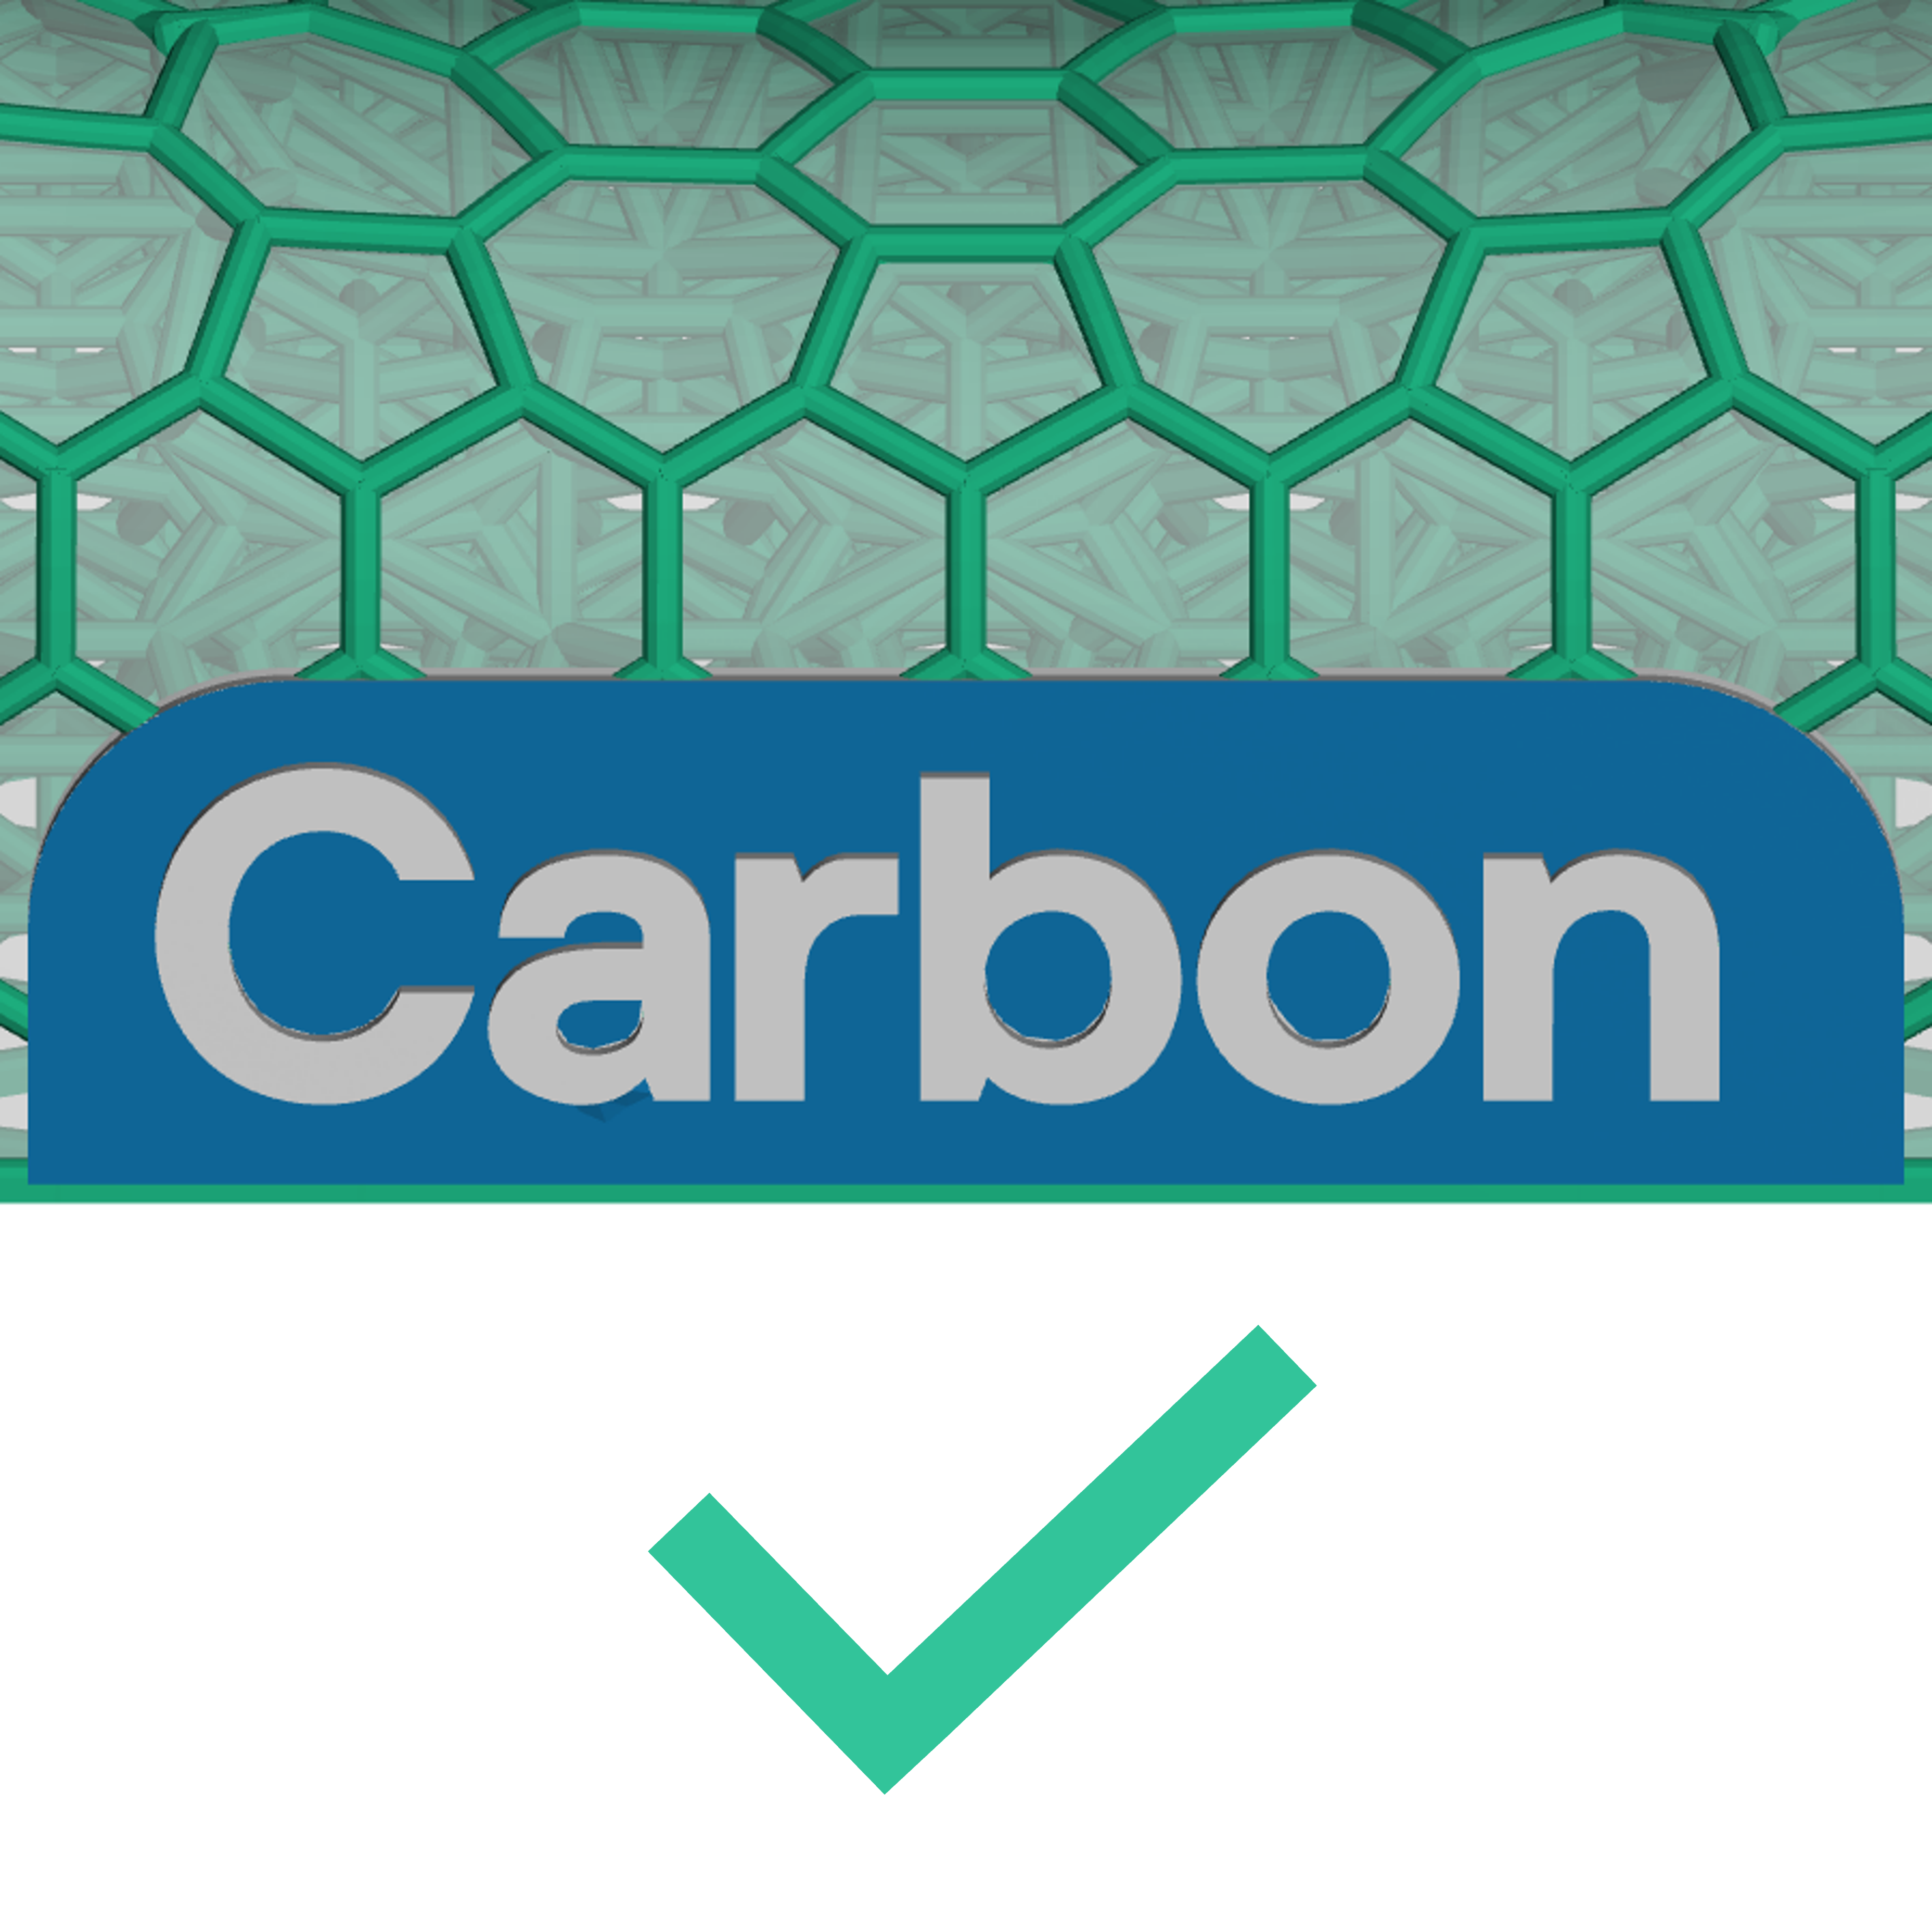
Patches for noise textures can be noncontiguous, ie with disconnected areas.
:::
:::VerticalSplitItem
**Tile Texture Patches**
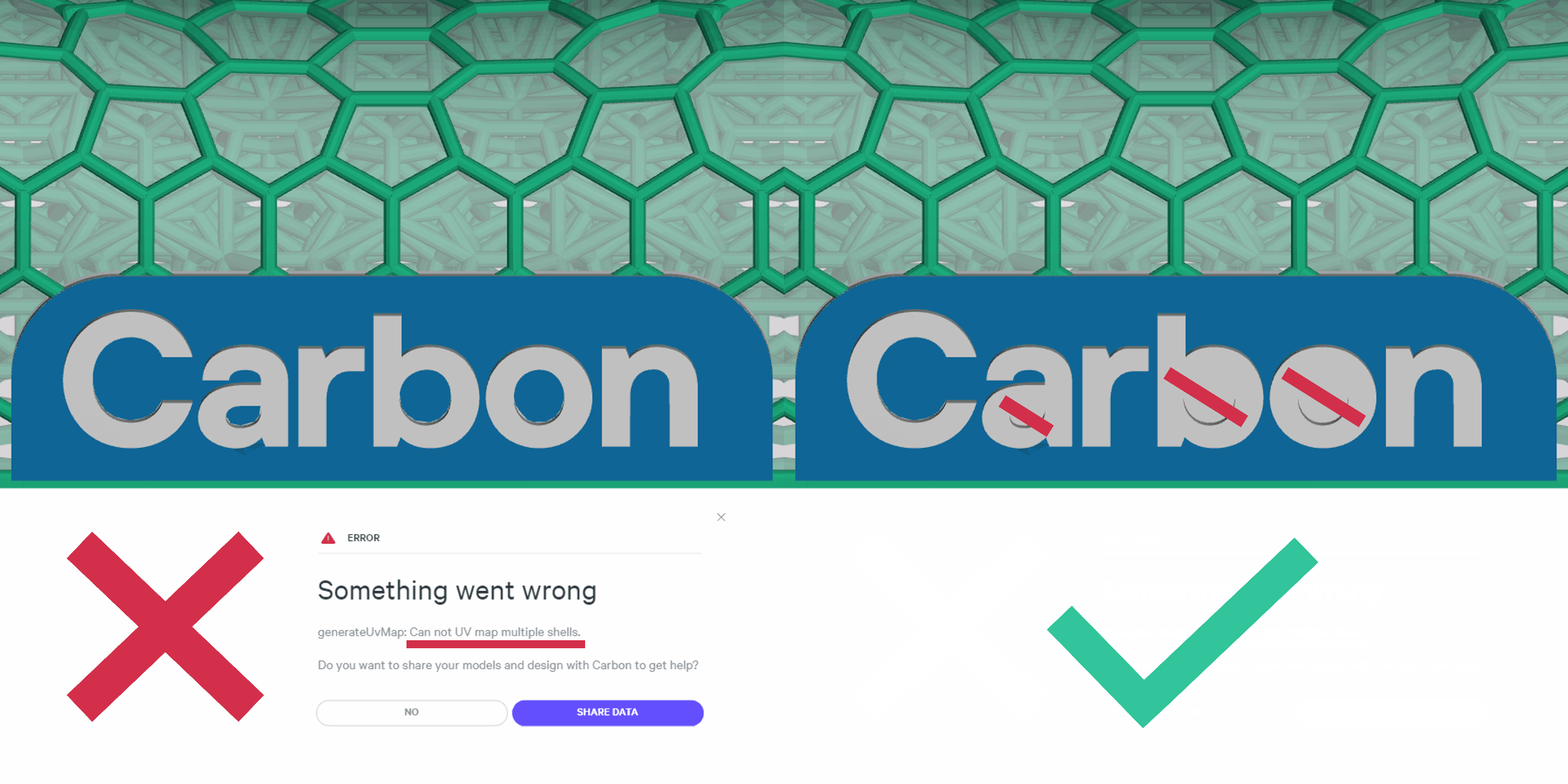
Patches for tile textures must be contiguous, ie patch cannot have disconnected areas. A warning will be provided if the software finds a noncompliant patch.
:::
::::
## Pattern
### Noise Textures
Design Engine offers three densities of noise texture.
*Examples have a 0.2 mm depth and a 0.1 mm boundary decay.*
::::LinkArray
:::LinkArrayItem{headerType="IMAGE" headerImage="https://api.archbee.com/api/optimize/3CesIL2dYMCHPZvRjp8S0/9G4aj6i-pAuDemhYHIz0f_close-noise-2.png"}
**Noise**
0.3 mm Interval
:::
:::LinkArrayItem{headerType="IMAGE" headerImage="https://api.archbee.com/api/optimize/3CesIL2dYMCHPZvRjp8S0/LwpYg_EUKKzX_8Q2RFHrQ_close-noise-fine-2.png"}
**Noise (Fine)**
0.2 mm Interval
:::
:::LinkArrayItem{headerType="IMAGE" headerImage="https://api.archbee.com/api/optimize/3CesIL2dYMCHPZvRjp8S0/EJo3wwWon0ZDb-ik9_ReK_close-noise-super-fine-2.png"}
**Noise (Super Fine)**
0.166 mm Interval
:::
::::
### Tile Textures
Design Engine offers six tile texture patterns.
See below for more information on using [tile textures](docId\:kZYsdZ5GGoWa_aJxP-az2).
*Examples have a tile size of 2 mm, a 0.2 mm depth, and a 0.1 mm boundary decay.*
::::LinkArray
:::LinkArrayItem{headerType="IMAGE" headerImage="https://api.archbee.com/api/optimize/3CesIL2dYMCHPZvRjp8S0/sim4ut-Vy6dJAOxHp2kT3_cube-pattern-ab.png"}
**Cube**
:::
:::LinkArrayItem{headerType="IMAGE" headerImage="https://api.archbee.com/api/optimize/3CesIL2dYMCHPZvRjp8S0/AzPLtyEgpqB_UR_up6ME__diamond-pattern-ab.png"}
**Diamond**
:::
:::LinkArrayItem{headerType="IMAGE" headerImage="https://api.archbee.com/api/optimize/3CesIL2dYMCHPZvRjp8S0/P176ab3dM-znuxY2qLydM_dot-pattern-ab.png"}
**Dot**
:::
:::LinkArrayItem{headerType="IMAGE" headerImage="https://api.archbee.com/api/optimize/3CesIL2dYMCHPZvRjp8S0/bGX4em6qjx7uBOzRFBkj7_grid-pattern-ab.png"}
**Grid**
:::
:::LinkArrayItem{headerType="IMAGE" headerImage="https://api.archbee.com/api/optimize/3CesIL2dYMCHPZvRjp8S0/iFwypFqUjOEpD0OLZOqMW_hex-pattern-ab.png"}
**Hex**
:::
:::LinkArrayItem{headerType="IMAGE" headerImage="https://api.archbee.com/api/optimize/3CesIL2dYMCHPZvRjp8S0/R3zChbTu1lDsfaww5rRBD_pyramid-pattern-ab.png"}
**Pyramid**
:::
::::
### Custom Texture
Design Engine allows custom textures via a PNG image import. Custom textures have the same functionality as tile textures, with the tile being your own image.
See below for more information on using [custom texture tiles](docId\:kZYsdZ5GGoWa_aJxP-az2).
::Image[]{src="https://res.cloudinary.com/carbon3d/image/upload/v1717198844/Education/Software/Design-Engine/Tools-Features/Texture/custom-texture/Texture-blurred-done.png" size="70" width="950" height="700" position="flex-start" showCaption="false"}
## Depth
The depth is the dimension the texture either sits proud of the surface (+) or inset into the surface (-).**
*Section cut shown in blue for clarity. Examples have a 0.2 mm depth and a 0.1 mm boundary decay using the noise (fine) texture.*
::::VerticalSplit{layout="middle"}
:::VerticalSplitItem
**Embossed Texture (+)**
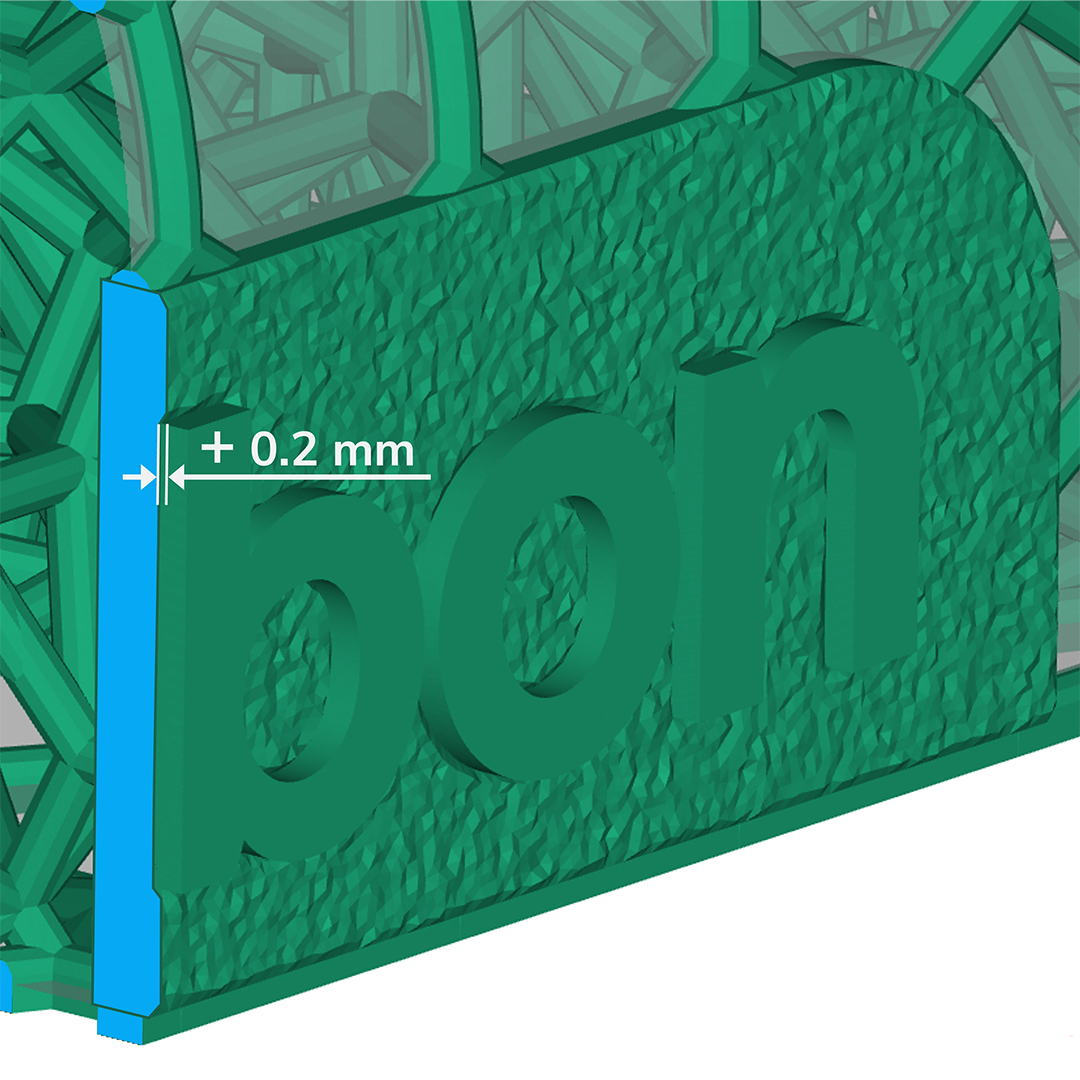
Texture sits proud of the design space surface by the specified positive depth.
Be aware that the part is larger than the original design space.
:::
:::VerticalSplitItem
**Debossed Texture (-)**
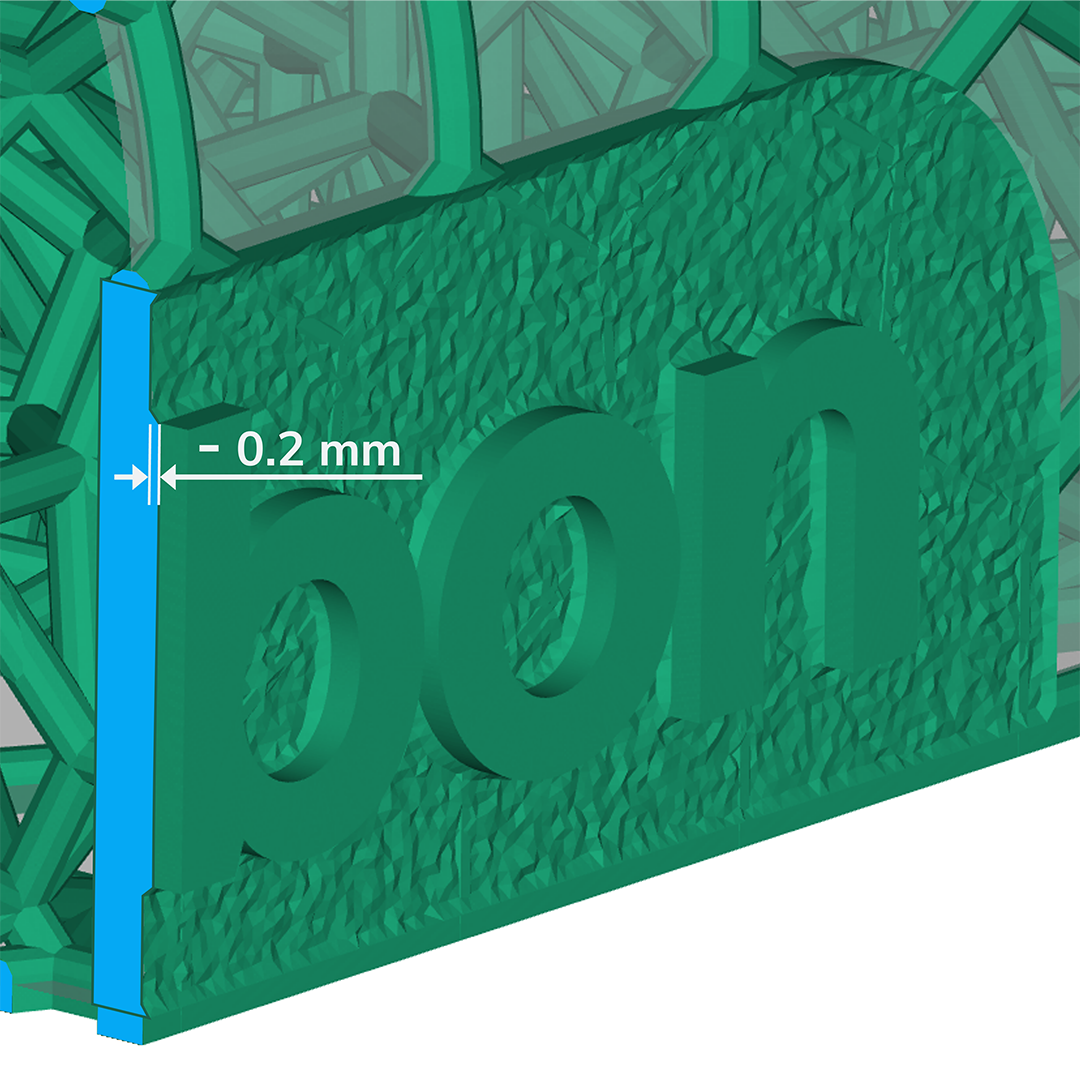
Texture sits inset of the design space surface by the specified negative depth.
Be aware of the depth of your part and how the part intersects with combined parts. In this example, the lattice that intersects this label would start to show through if the texture was any deeper.
:::
::::
::::VerticalSplit{layout="middle"}
:::VerticalSplitItem
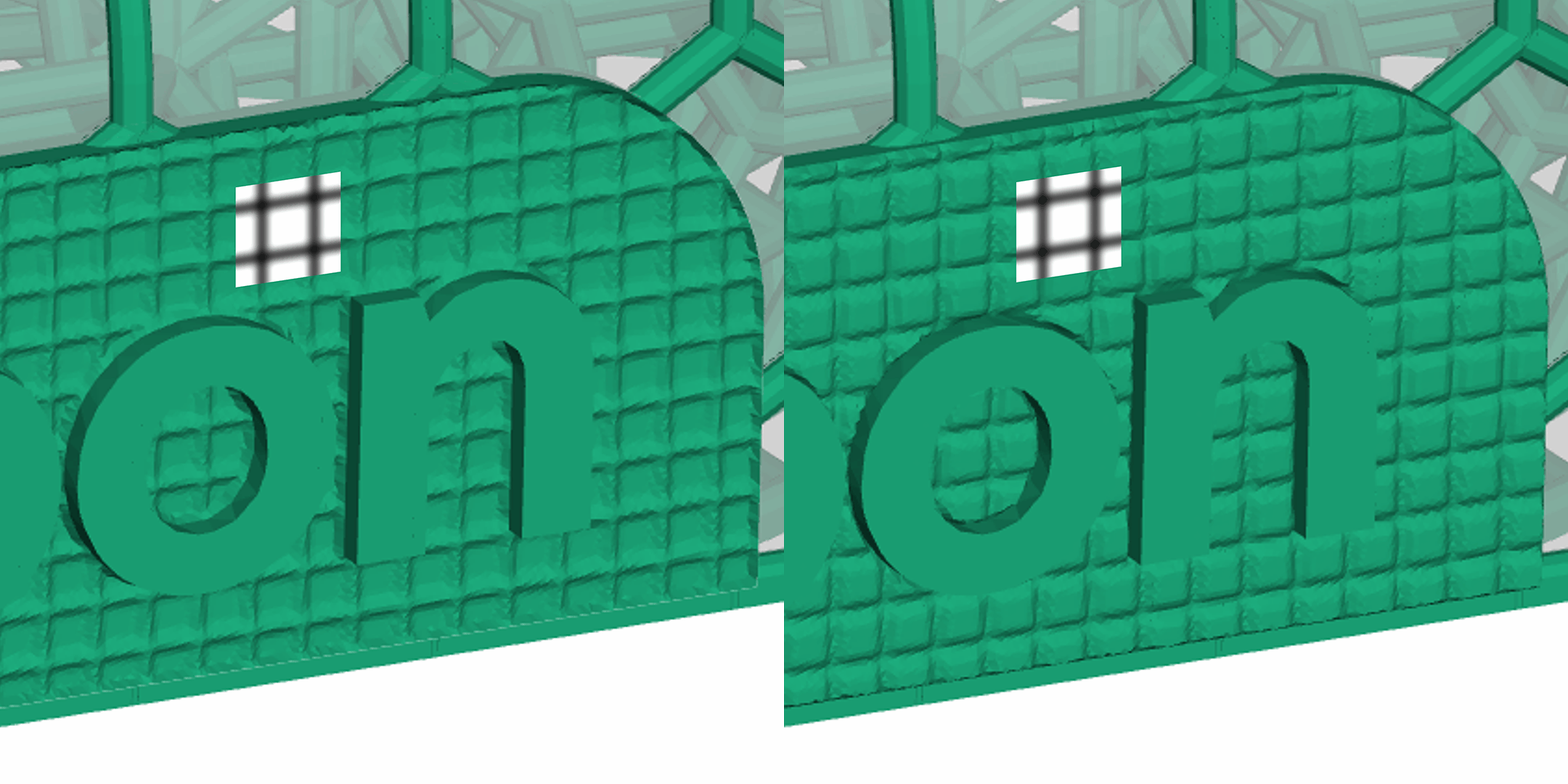
**Tile Texture Depth**
When using the tile texture patterns, the black & white images build the texture as follows:
- **Embossed (+)**: *White builds outward*, black sits flush with the design space
- **Debossed (-): ***White is inset*, black sits flush with the design space
:::
:::VerticalSplitItem
:::
::::
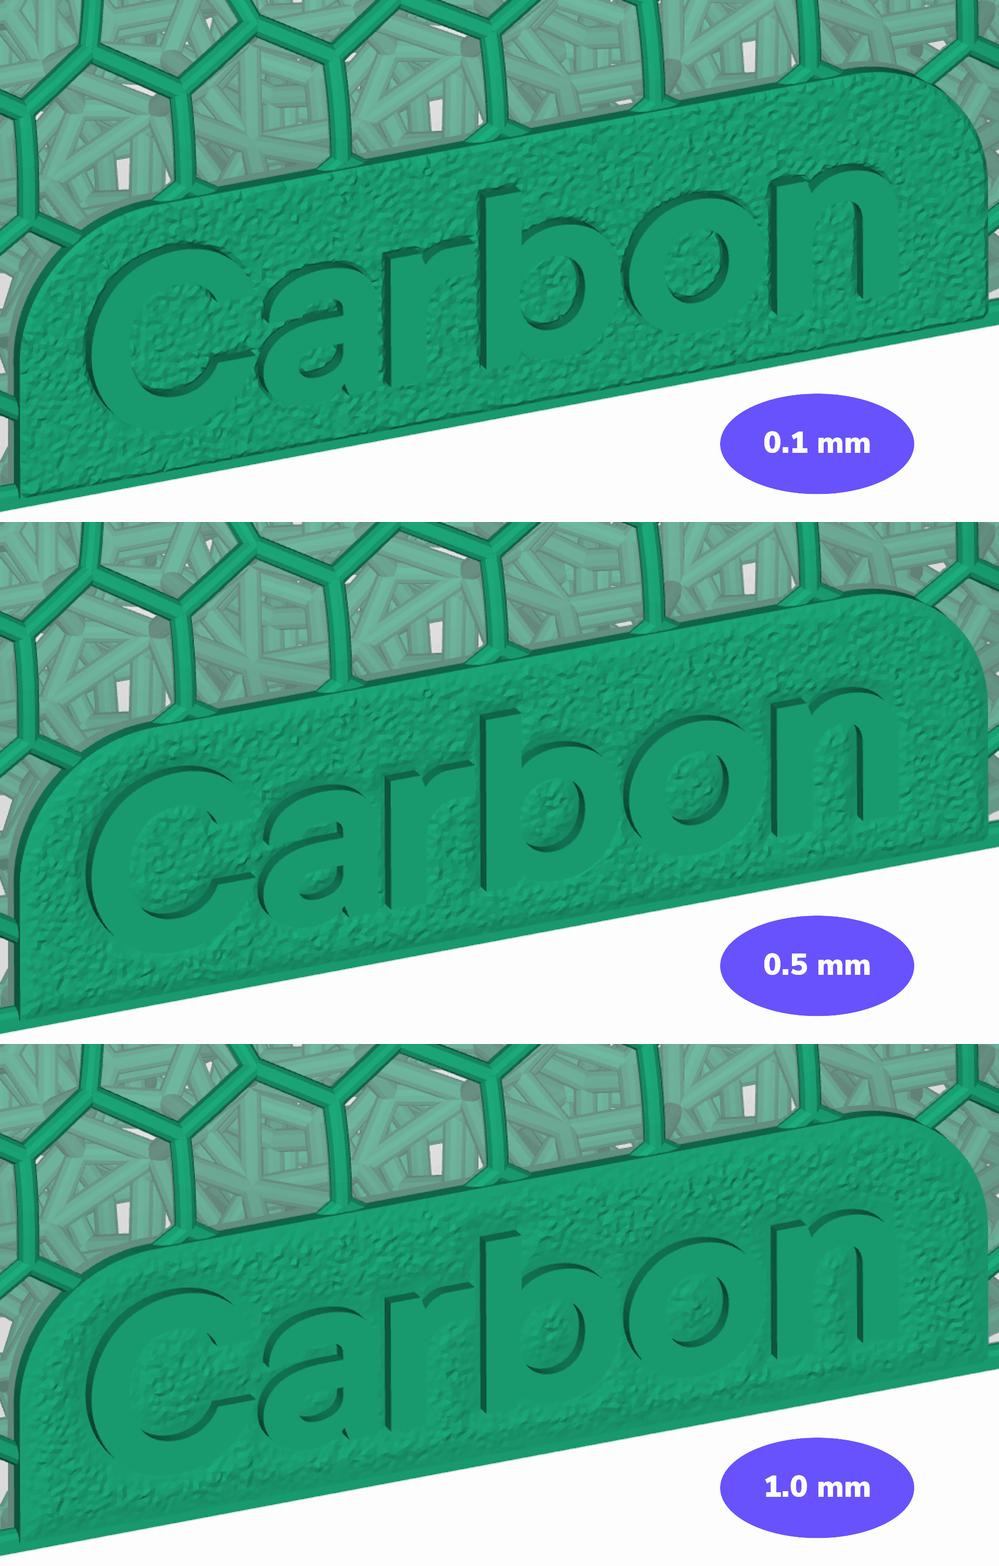
## Boundary Decay
Boundary decay allows for an optional distance for fading the texture at the edges of the surface patch.
# Tile Textures
## Tile Size
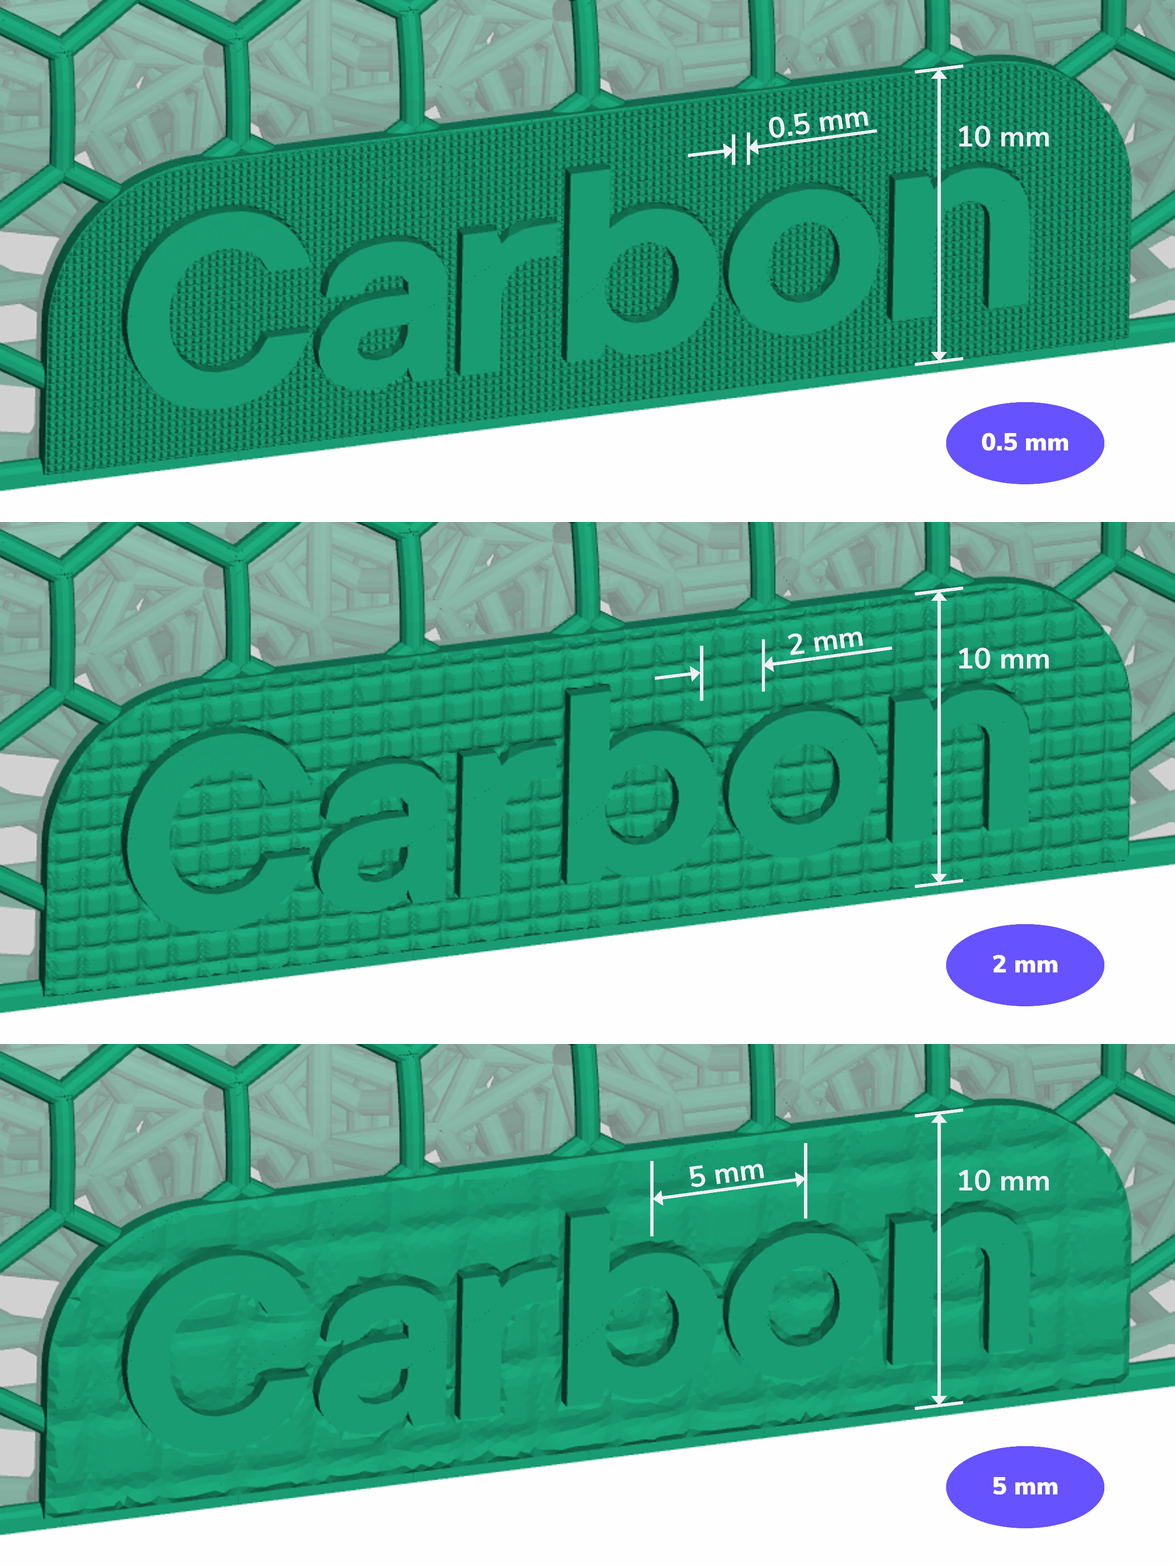
Tile textures require a dimension to define the scale of the pattern.
This example shows a few sizes on a 10 mm tall patch: 0.5 mm, 2 mm, and 5 mm (default).
## Tile Rotation
::::VerticalSplit{layout="middle"}
:::VerticalSplitItem
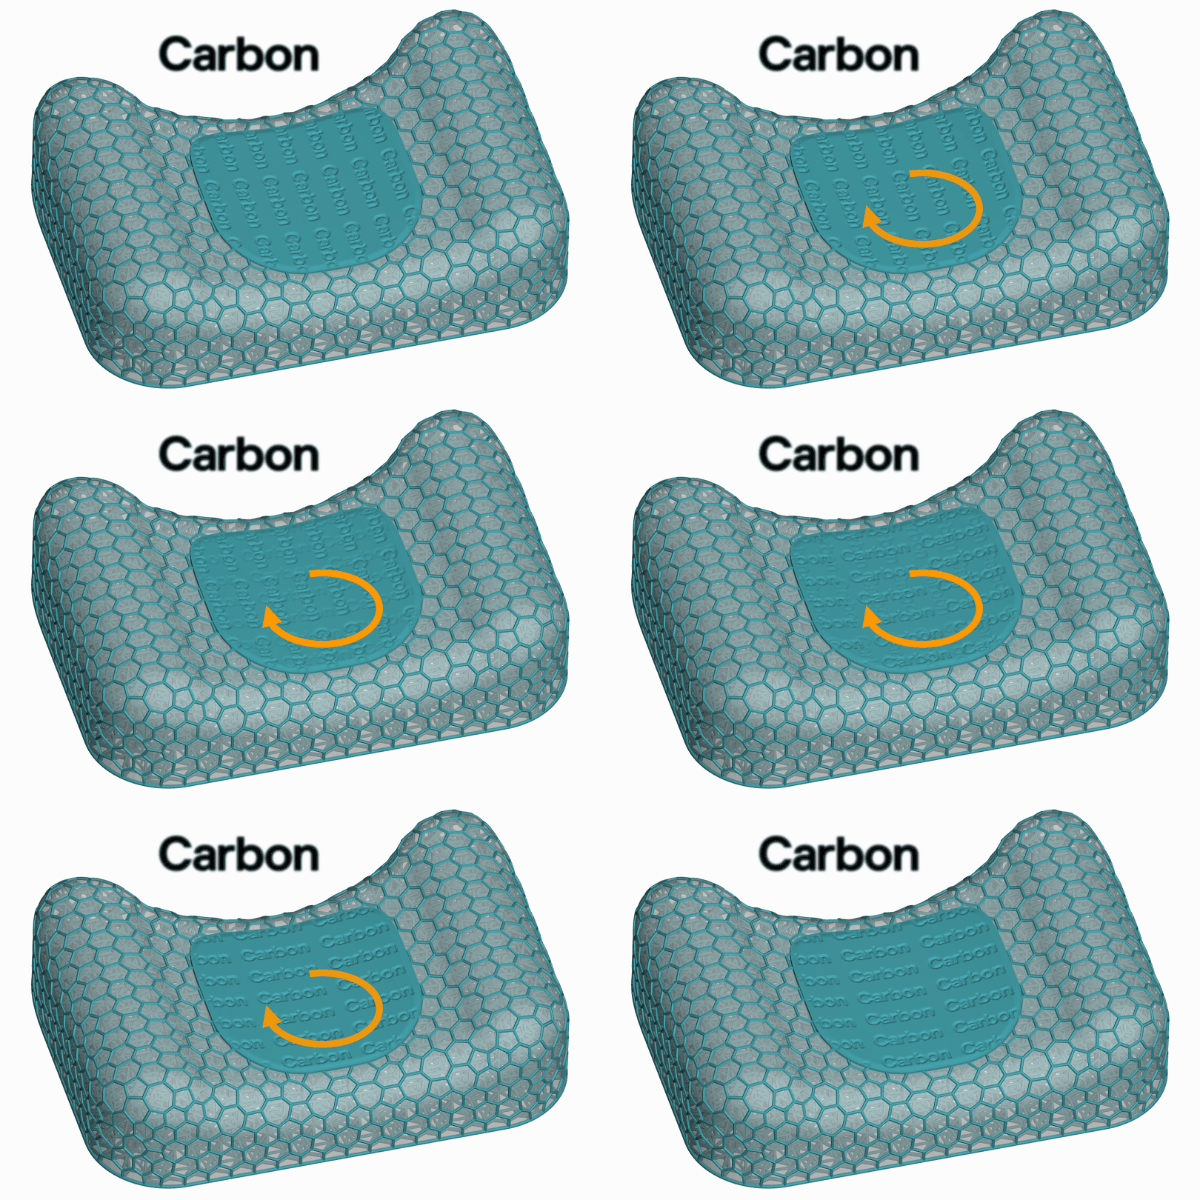
Texture tiles may not align with your geometry in the way you want by default. Generate the texture first and then adjust the rotation angle as needed.
Rotation spins **clockwise**.
The rotation angle will always be measured against the imported orientation. For example, if you rotated the tile 10 degrees and then decided to rotate an additional 10 degrees, you would enter 20 degrees.
:::
:::VerticalSplitItem
:::
::::
## Tile Translation
::::VerticalSplit{layout="middle"}
:::VerticalSplitItem
:::
:::VerticalSplitItem
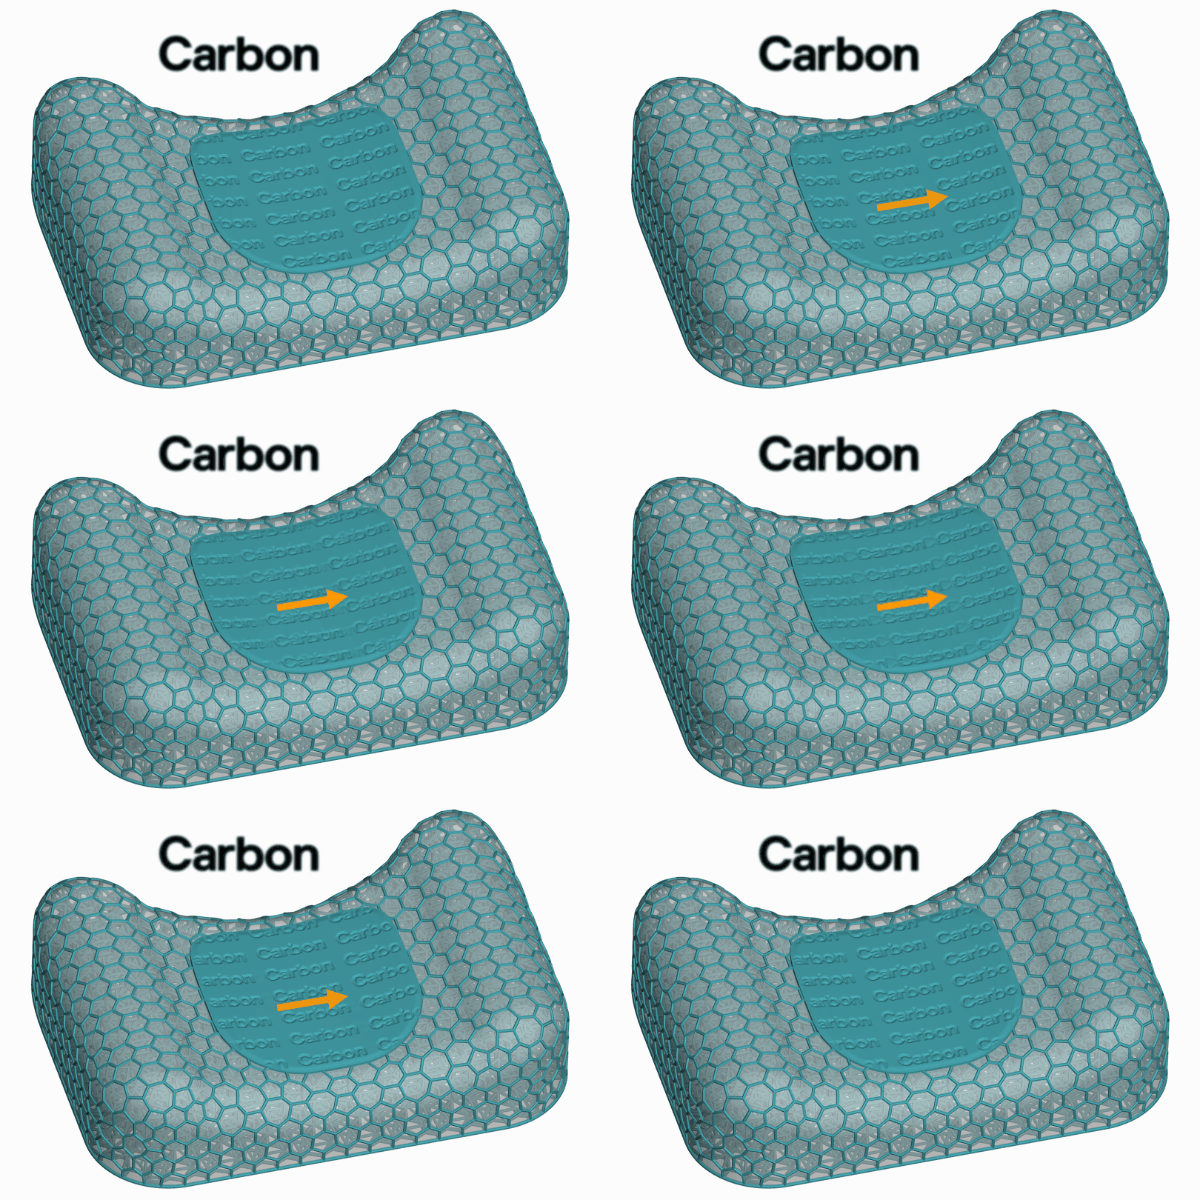
The tile pattern may not be positioned with your geometry in the way you want by default. Generate the texture after applying desired rotation and then adjust the position of the pattern as needed.
Translation operates in **XY relative to the generated rotation angle**.
:::
::::
## Inverse Image
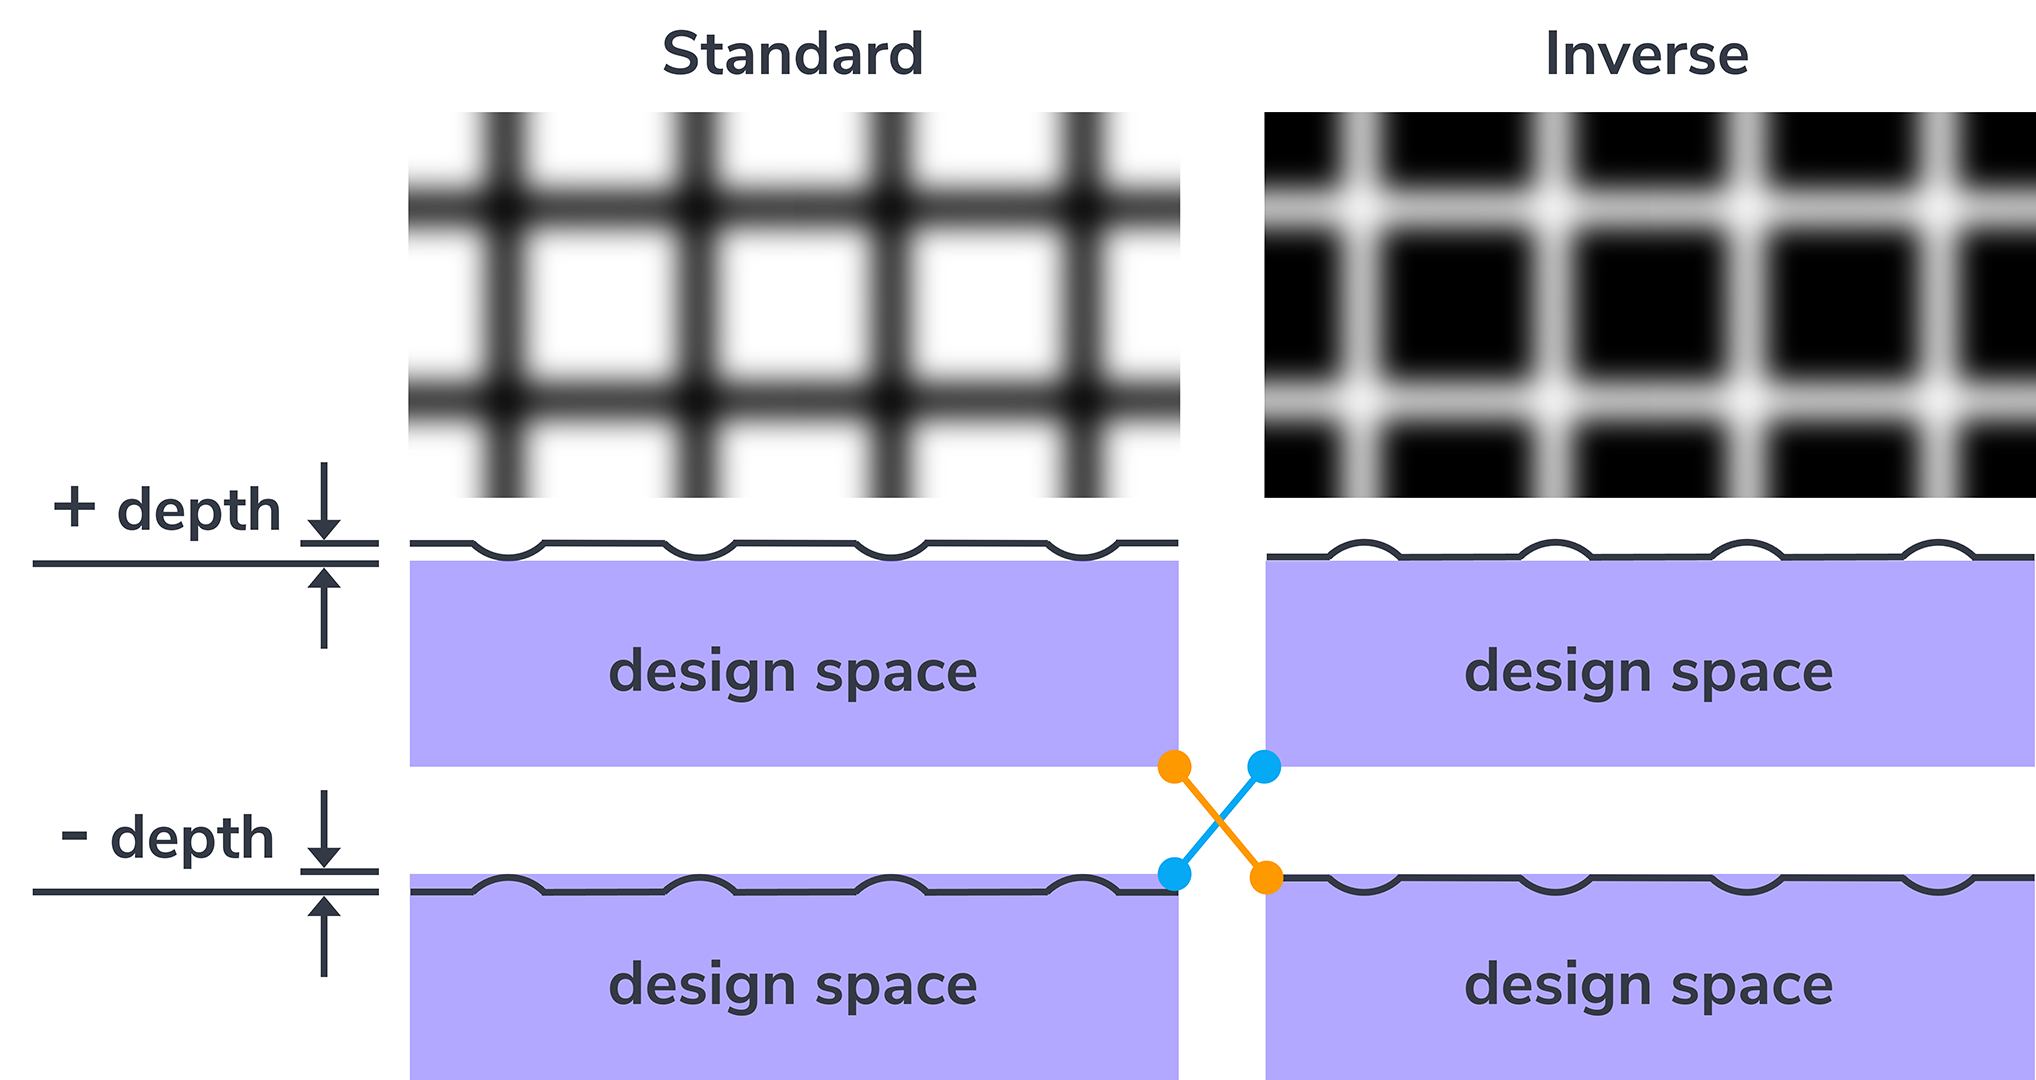
While choosing a positive (+) or negative (-) depth will influence the way a pattern looks on the surface, you can also influence that pattern by choosing the inverse of a pattern's image. Select the **Apply Inverse Image** checkbox as needed.
How you choose to manifest the preferred pattern depends on where you want the texture to sit relative to the original design surface.
In this example, the grid pattern can manifest in two ways: as raised squares or as depressed squares like a waffle pattern.
::::VerticalSplit{layout="middle"}
:::VerticalSplitItem
- **Raised** squares can either sit
- **On top **of the design surface with a **+ depth **of the **standard **pattern
- **Below **the design surface with a **- depth **of the **inverse **pattern
- **Depressed** squares can either sit
- **On top **of the design surface with a **+ depth **of the **inverse **pattern
- **Below **the design surface with a **- depth **of the **standard **pattern
:::
:::VerticalSplitItem
:::
::::
## Custom Tiles
Custom textures can provide many options for the design and function of your applications. Applying logos, functional grips, and more are all possible via an imported PNG image file, which then functions as a tile texture.
For best results, there are recommended **guidelines** to follow in creating the **PNG** image.
*Only PNG file types are supported.*
### Blur the Image
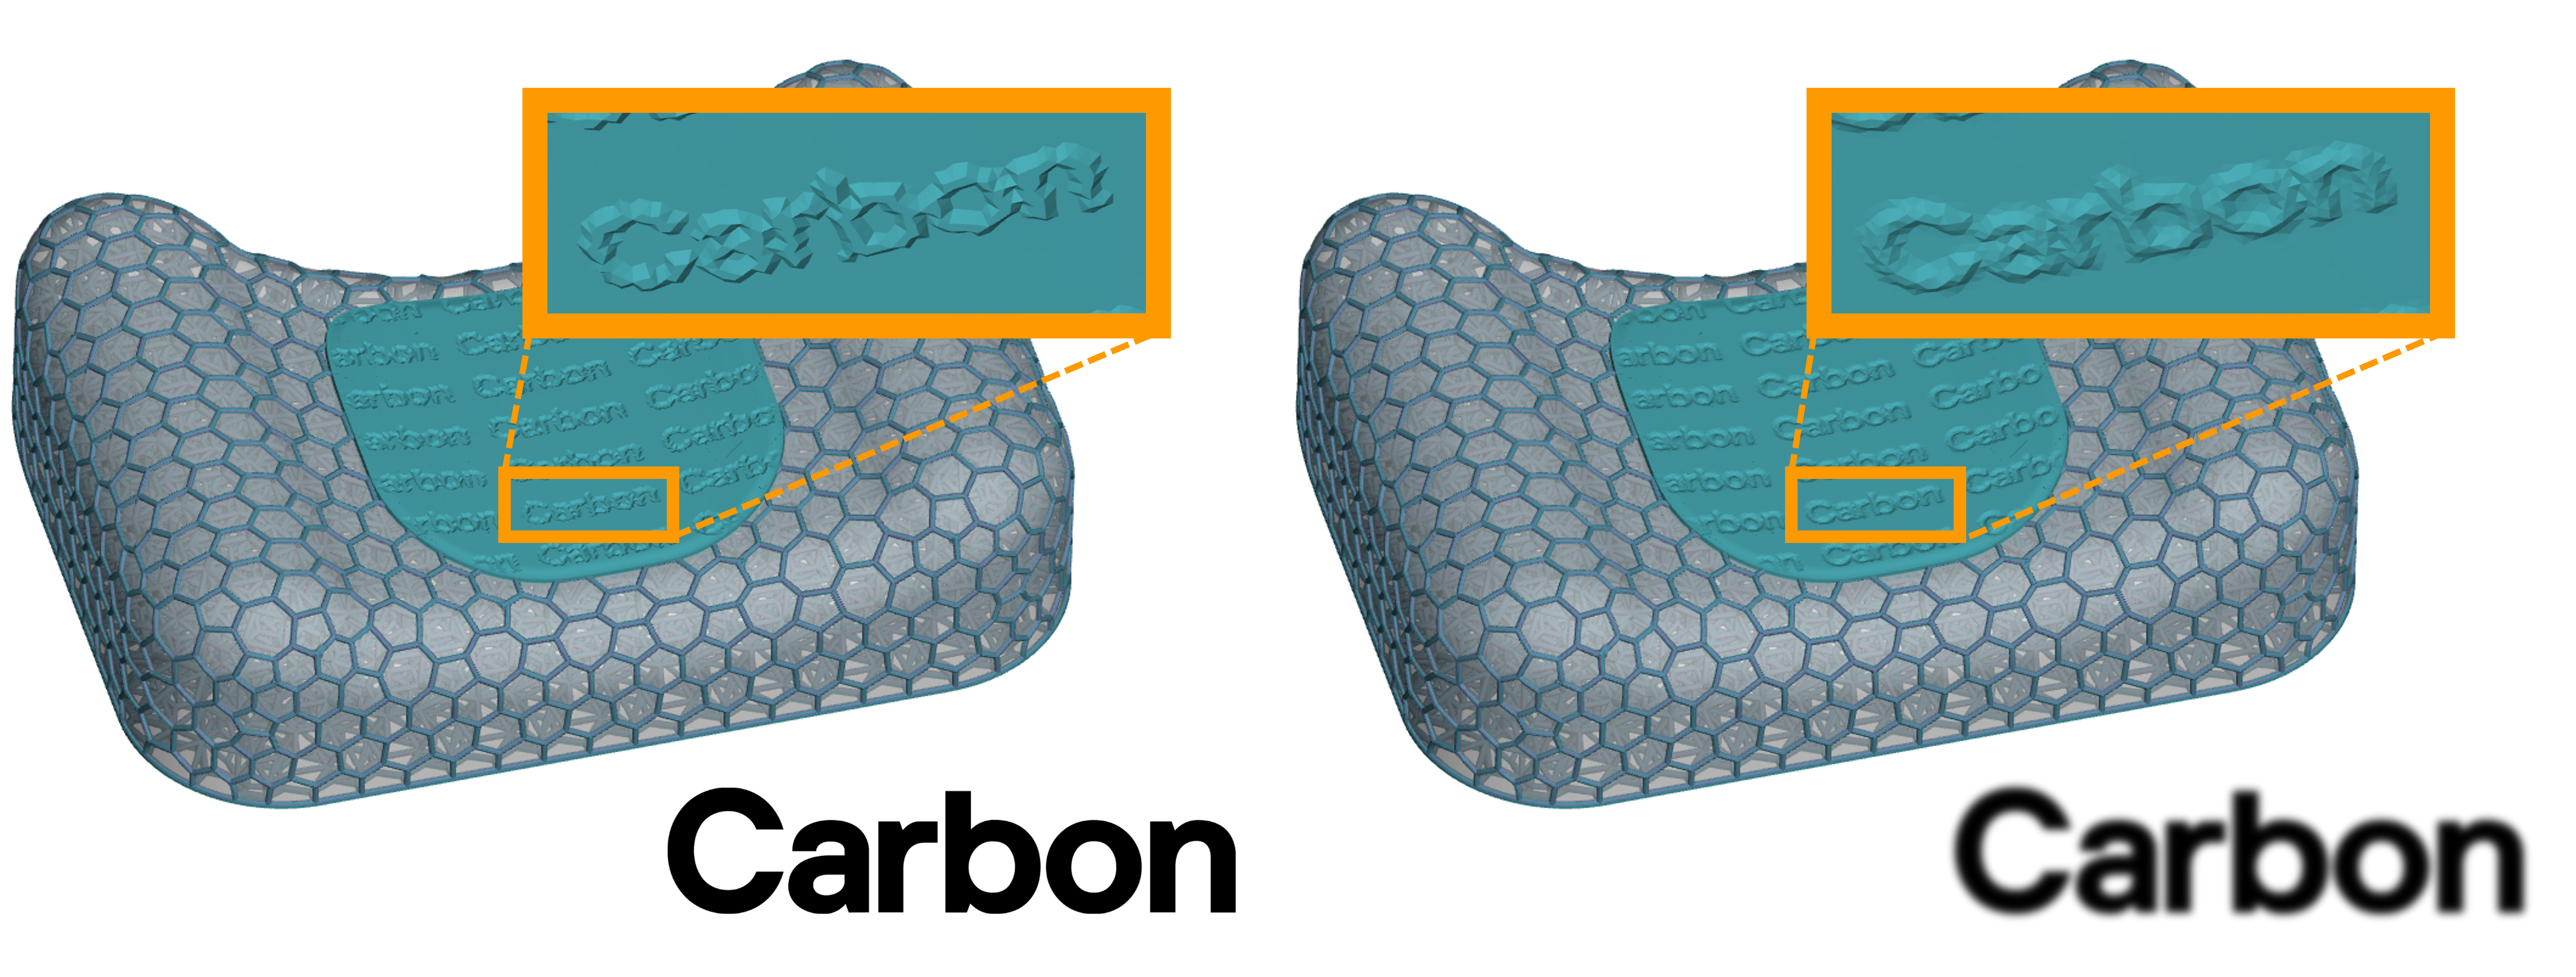
It sounds counterintuitive, but a blurred image will have cleaner edges on the part than one with crisp black & white edges. Because the image is essentially converted to STL triangles when applied as a texture, the triangles appear very jagged when the image has crisp edges.
::::VerticalSplit{layout="middle"}
:::VerticalSplitItem
:::
:::VerticalSplitItem
Use photo editing software as follows
- Use a **gaussian blur **for best results
- Start with a **blur radius pixel size of \~1% **of the total pixel width or height, whichever is longer
- Results will vary depending on the size, depth and detail within the texture, so expect some iteration.
:::
::::
### Tiling
::::VerticalSplit{layout="middle"}
:::VerticalSplitItem
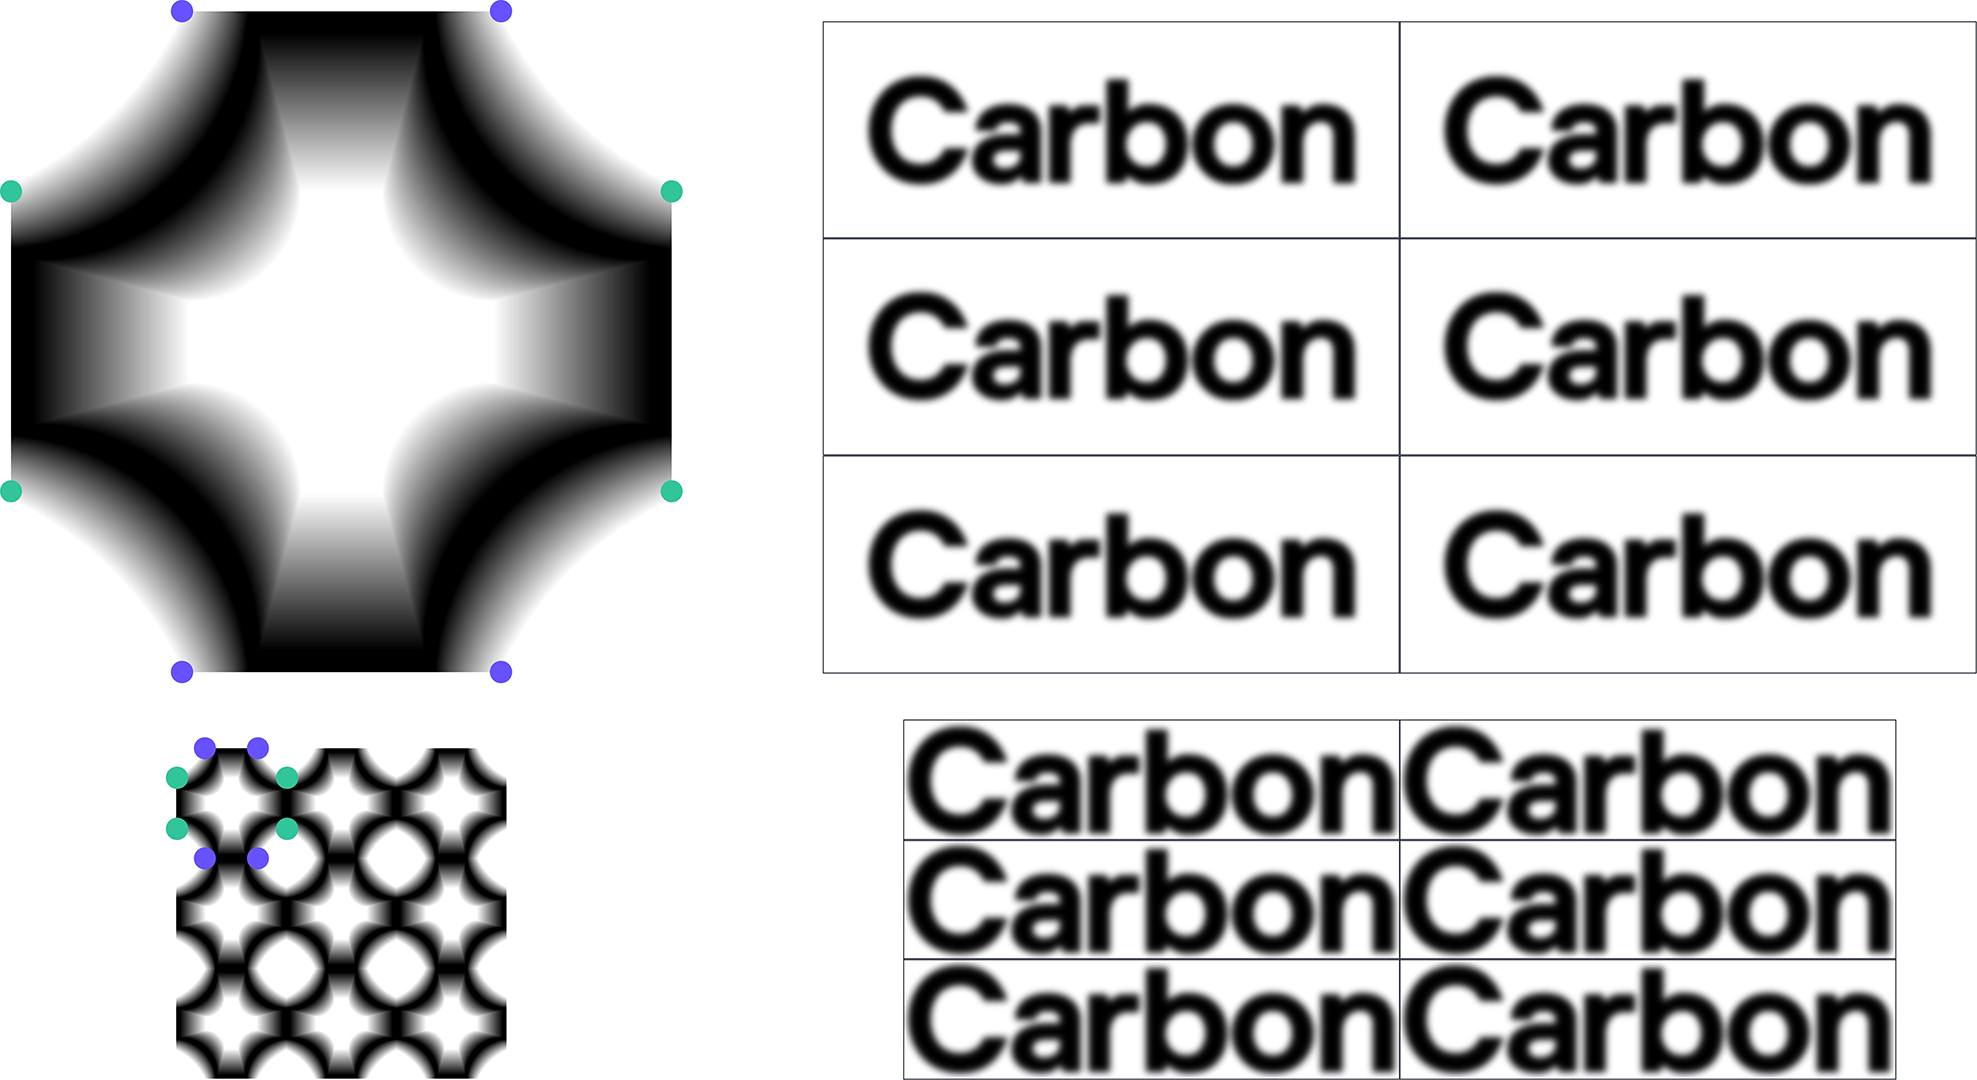
- For textures that need to tile seamlessly, ensure that the pattern lines up in the two **X **and **Y **axis.
- For textures where the pattern does not connect edge to edge, ensure that you providing **background padding **in your image size to get the **spacing **you desire.
:::
:::VerticalSplitItem
:::
::::
### Custom Tile Size
::::VerticalSplit{layout="middle"}
:::VerticalSplitItem
:::
:::VerticalSplitItem
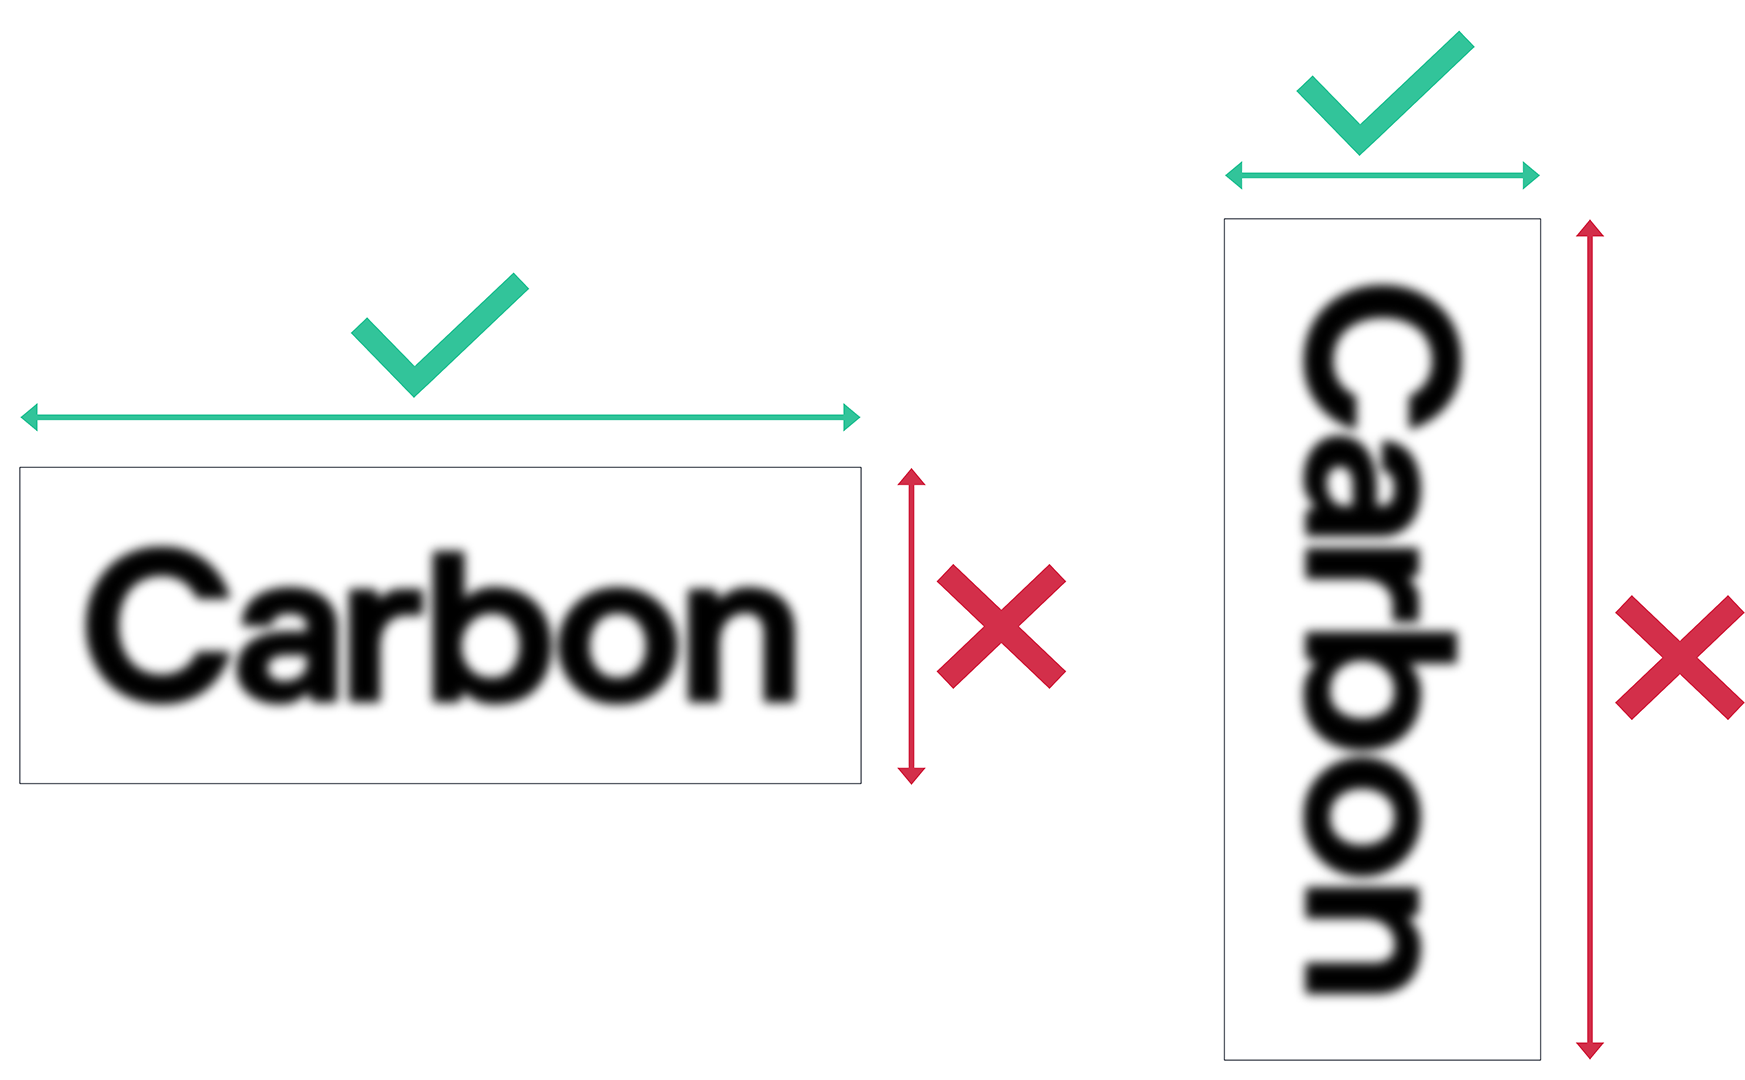
- Tile size is set by the top/bottom of the imported image's rotation.
Small file sizes are best, aiming for less than 1 MB.
:::
::::
### Color
Upon image import, the software will automatically apply the following formatting:
- Transparent backgrounds will be flattened to a white background
- Color will be converted to grayscale
Be advised that you may wish to perform photo editing in advance to achieve desired results in certain situations:
- When color is converted to grayscale, any shade other than black will be read as gray by the software and therefore not achieve the full depth of texture as specified.
- Convert these images to grayscale in advance and adjust any grays that want to be full depth to black.
- White images on a transparent background will be flattened to white and therefore will not provide a pattern for the software texture.
- Invert white images to black before importing into the software.
::::LinkArray
:::LinkArrayItem{headerType="IMAGE" headerImage="https://api.archbee.com/api/optimize/3CesIL2dYMCHPZvRjp8S0/uVfeJY35OeaWntwj1Gc9W_black-ab.png"}
**Black Image**
:::
:::LinkArrayItem{headerType="IMAGE" headerImage="https://api.archbee.com/api/optimize/3CesIL2dYMCHPZvRjp8S0/rB9SPXEqe2N9yjt3TjyjR_burple-ab.png"}
**Color Image**
:::
:::LinkArrayItem{headerType="IMAGE" headerImage="https://api.archbee.com/api/optimize/3CesIL2dYMCHPZvRjp8S0/cEPUxKW-gIdUHI4hN-ZWa_white-ab.png"}
**White Image**
:::
::::
## UV Mapping
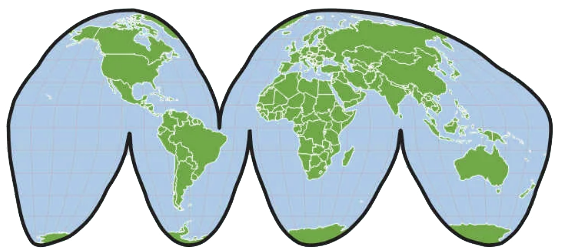
Tile textures rely on the use of UV mapping to place a 2D representation (the texture) on a 3D object (the design space). A UV map is created by unwrapping the surfaces of a 3D object and laying them out on a flat 2D plane, the U (horizontal) and V (vertical) are the lines, or axes on the plane. The texture is then mapped onto that flat surface and rewrapped around the 3D object.
::::VerticalSplit{layout="middle"}
:::VerticalSplitItem
:::
:::VerticalSplitItem
**UV Map**
UV unwrapping is similar to familiar map projections of the globe, where seam cuts and distortions are carefully managed to preserve as much integrity of the earth's map as possible.
Similarly, Design Engine makes choices for your design to unwrap the surfaces and apply the texture pattern.
:::
::::
:::hint{type="info"}
Currently Design Engine does not provide seam selection capabilities, but additional control features are forthcoming in future software releases. Continue to check back here for increased functionality.
:::
::::VerticalSplit{layout="middle"}
:::VerticalSplitItem
:::
:::VerticalSplitItem
**What will additional controls of the UV mapping allow?**
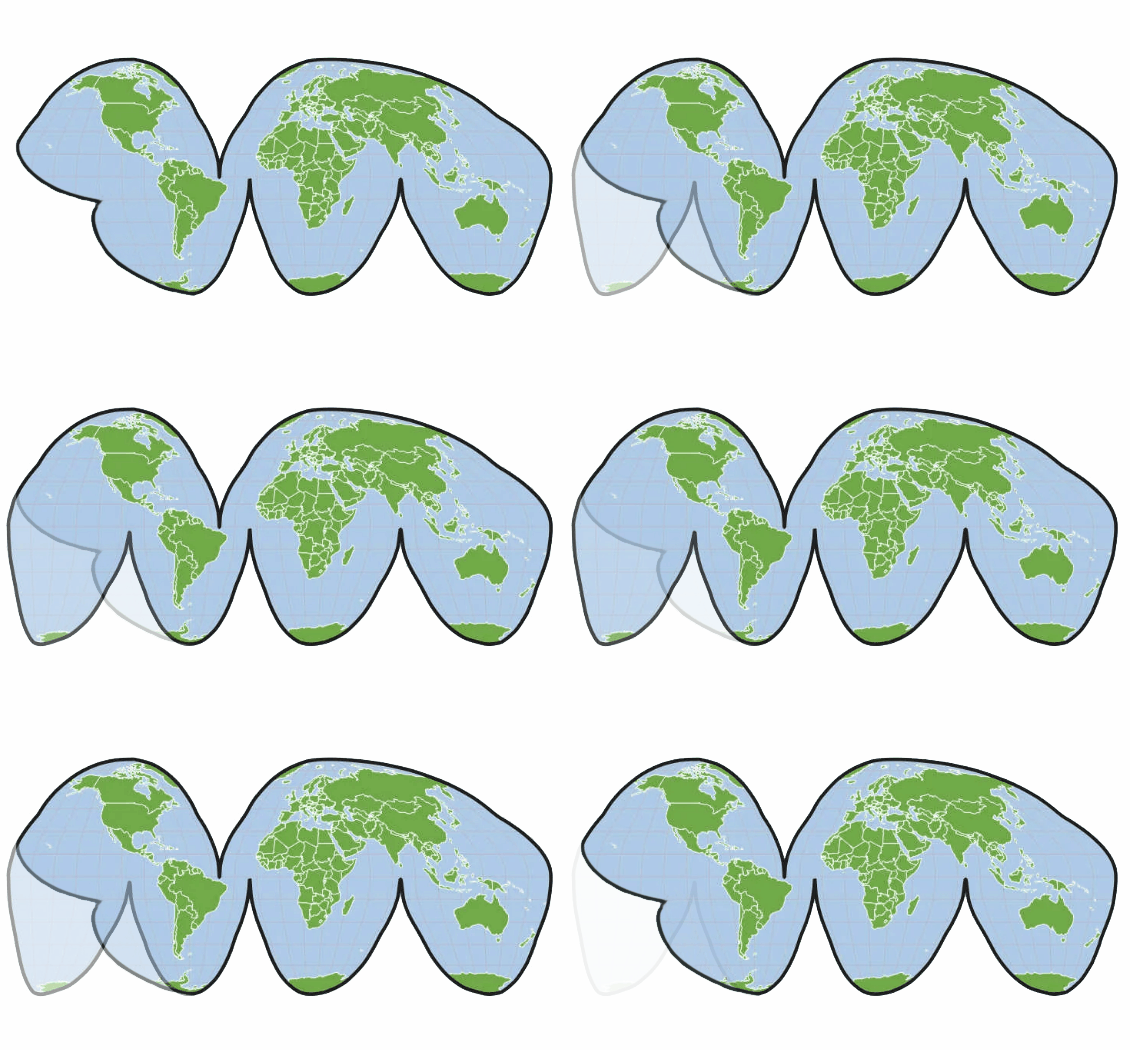
Referencing the globe above, the Goode Homolosine map projection has made calculated choices about where seams are cut to unwrap the globe.
Seam selection will allow the user to select where seams are cut to best suit the design.
:::
::::
:::hint{type="info"}
Tip - Try building a tiny groove into your CAD model or leave out a row of triangles in patch selection to influence UV mapping seams.
:::
# Basic Texture Workflows
::embed[]{url="https://vimeo.com/859998302"}
:::ExpandableHeading
### Noise Texture
1. **Texture**
• Select Input Mesh
• Select Patch to Texture
• Select Noise Pattern
• Select Depth of texture
• Optionally set a distance for fading the texture at edges
2. **Click Generate**
:::
::embed[]{url="https://vimeo.com/920565124"}
:::ExpandableHeading
### Tile Texture
1. **Remesh (for best results)**
• Select input mesh
• Select target edge size
• Select default 1% target edge percentage in most cases
• Select default settings for remaining options in most cases
2. **Click Generate**
• \[Before/after] Original mesh - Remesh
3. **Texture**
• Select the remesh as input mesh
• Extract patch to texture
• Select a contiguous patch
• Patch cannot have disconnected areas
• Select tile pattern
• Select size of texture tile
• Select depth of texture
• Optionally set a distance for fading the texture at edges
4. **Click Generate**
5. **Repeat to texture remaining areas as needed**
:::
# FAQ & Troubleshooting
:::ExpandableHeading
### Can I texture a solid?
Yes! You can **texture a part completely** in two ways in Design Engine.
**Solid Patch**
- Solid patch will provide an **alert**
- Output will be completely textured
- Result is the same with or without boundary decay
**No Patch**
- Output will be completely textured
- Boundary decay will result in an **error** with no patch

:::
:::ExpandableHeading
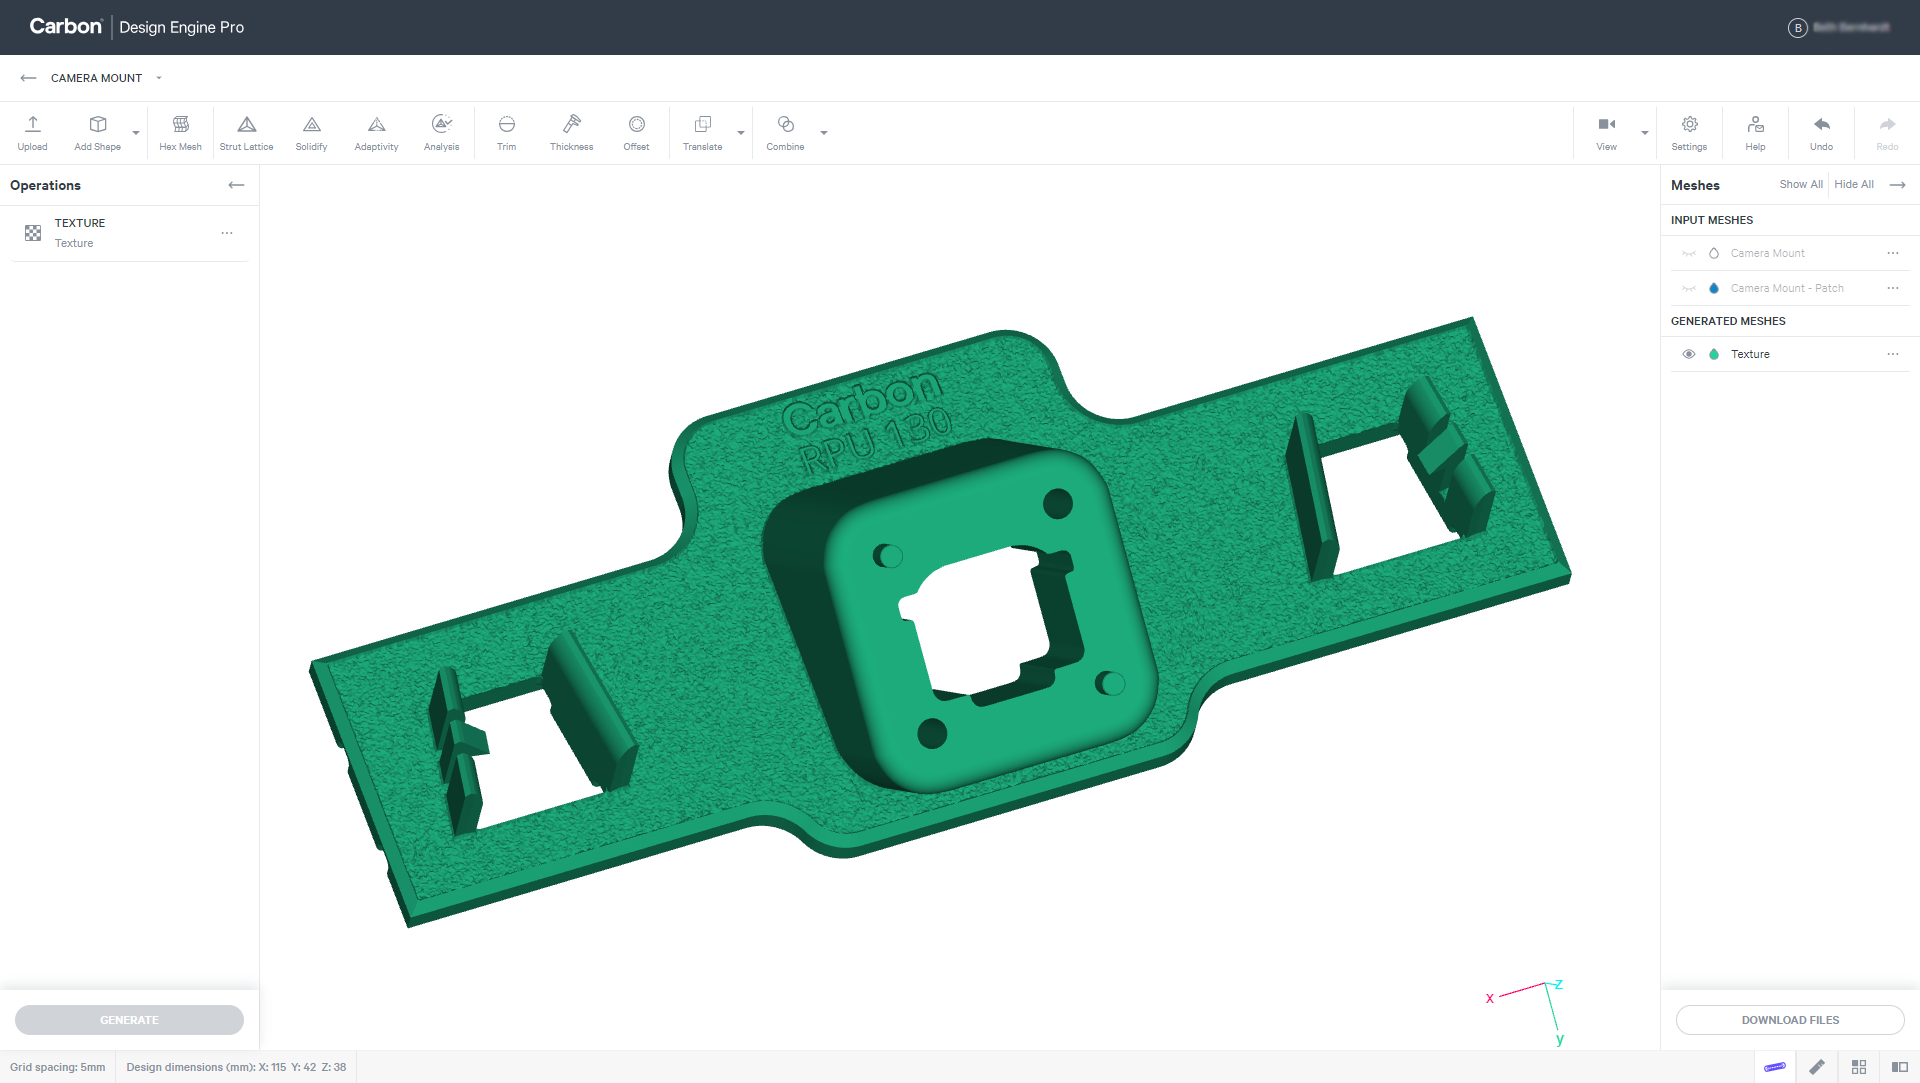
### Do I need to have a latticed part to use the texture tool?
No! You can **texture any imported STL file **without using the latticing features in Design Engine.
:::
:::ExpandableHeading
### Can I apply texture to a lattice?
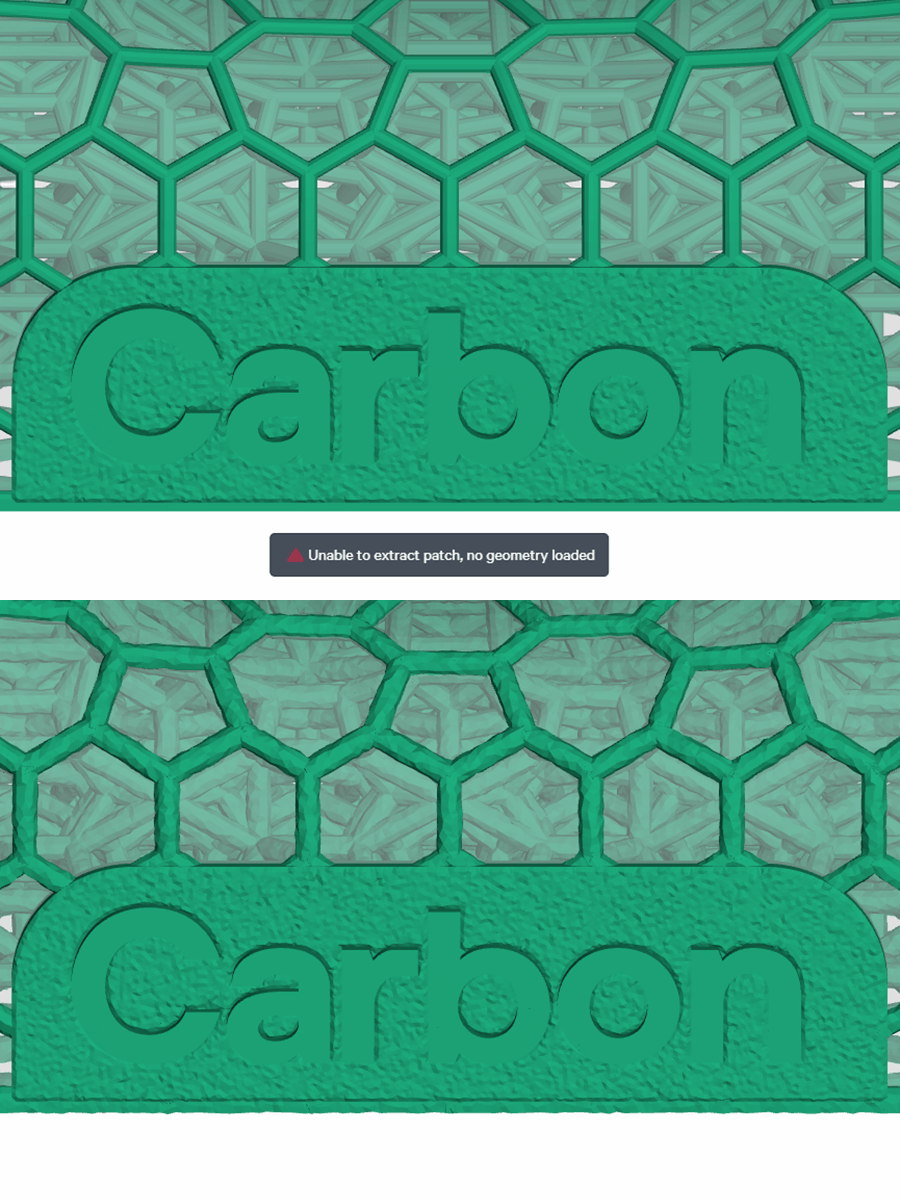
Generally it is **not recommended** to texture a lattice mesh because they are larger, more complicated STLs. If you wish to try a texture on your lattice, the following guidelines may help:
- Use a **noise **texture
- UV mapping for a tile texture is less likely to succeed
- If you receive an error, **try downloading and re-uploading the lattice**
- If the re-uploaded mesh continues to fail, it is likely that the mesh is too complex for a successful outcome
:::
:::ExpandableHeading
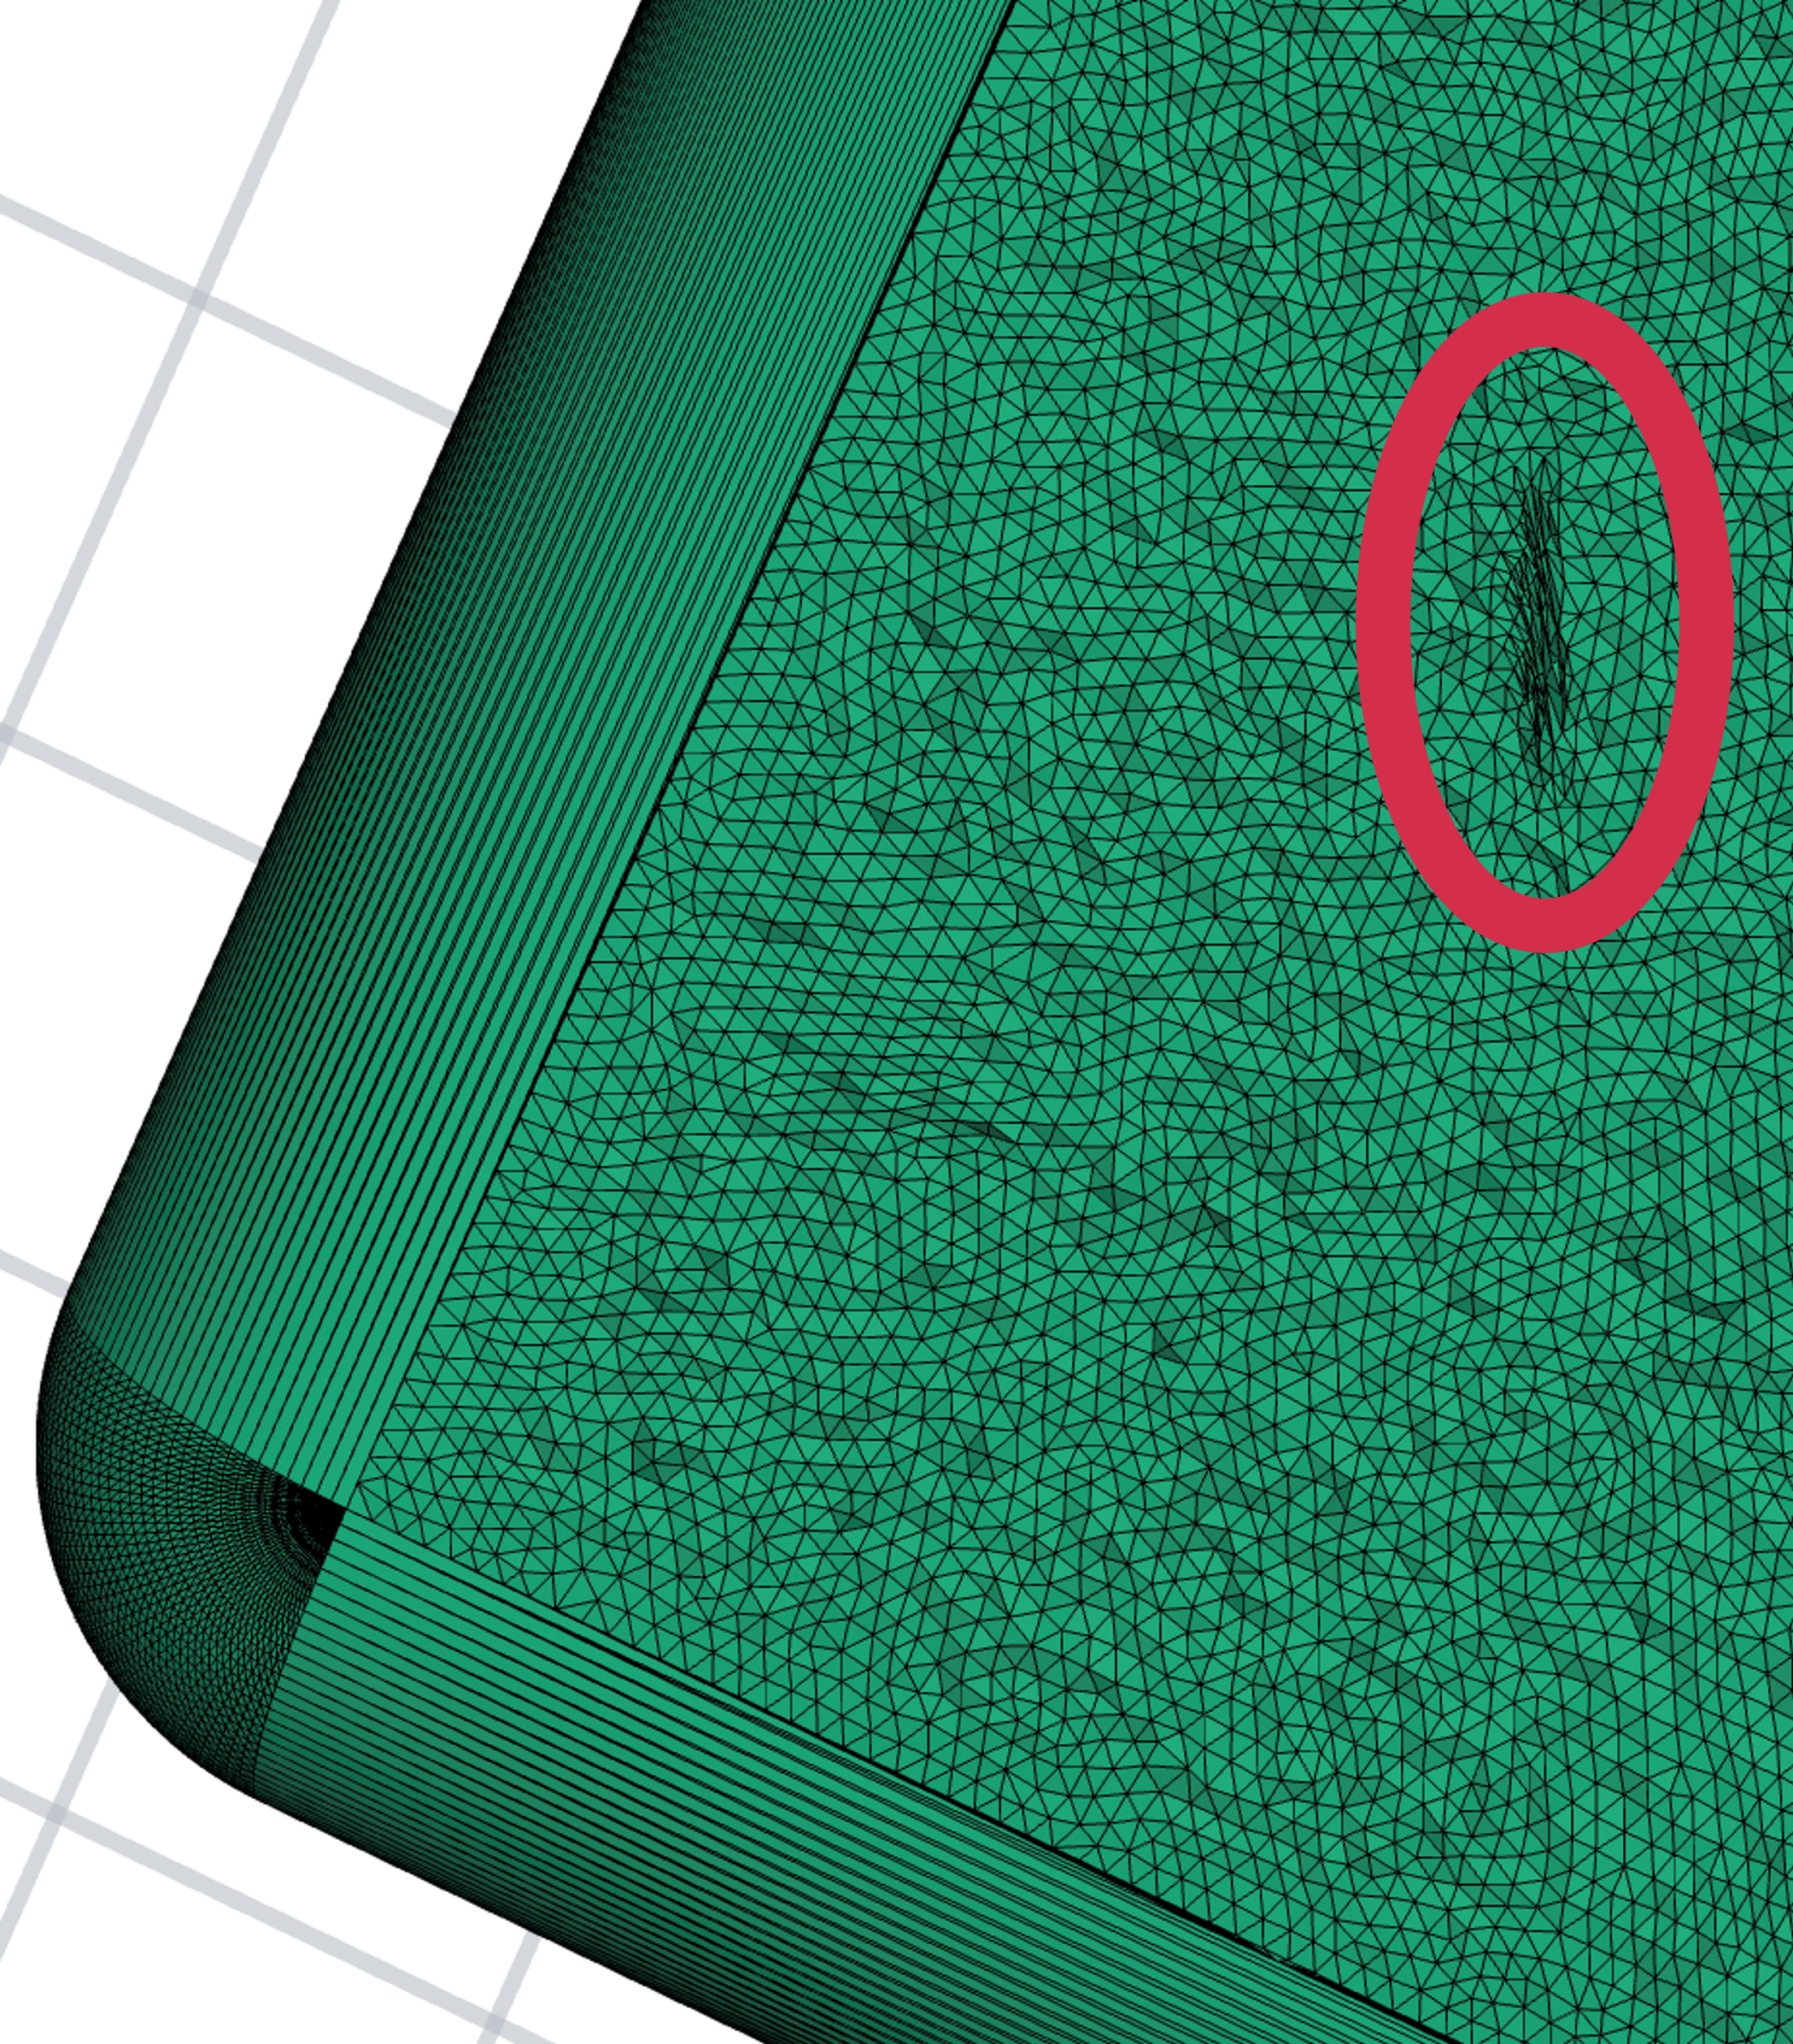
### Why does my texture appear to have streaks in it?
Design Engine remeshes your STL file while generating textures to create even patterns. That automatic remeshing may not be able to fully solve all issues in a poor quality mesh.
**Try remeshing your STL file**
- In Design Engine, use the **remesh **tool
- If you have already used the remesh tool , trying adjusting the number of iterations higher to resolve any poorly meshed areas.
- Or use a 3rd party mesh editing software
:::