---
title: Quick Start Guide
slug: software/quick-start-guide
description: Get started quickly in Carbon Design Engine and get all of your questions answered in this quick start guide to use Carbon's design software for lattices, textures, and more.
docTags:
createdAt: 2024-06-28T17:48:27.295Z
---
# Accessing Design Engine
- **Direct Link | **[design.carbon3d.com](http://design.carbon3d.com/)
::::VerticalSplit{layout="middle"}
:::VerticalSplitItem
* **Carbon Website | **[carbon3d.com
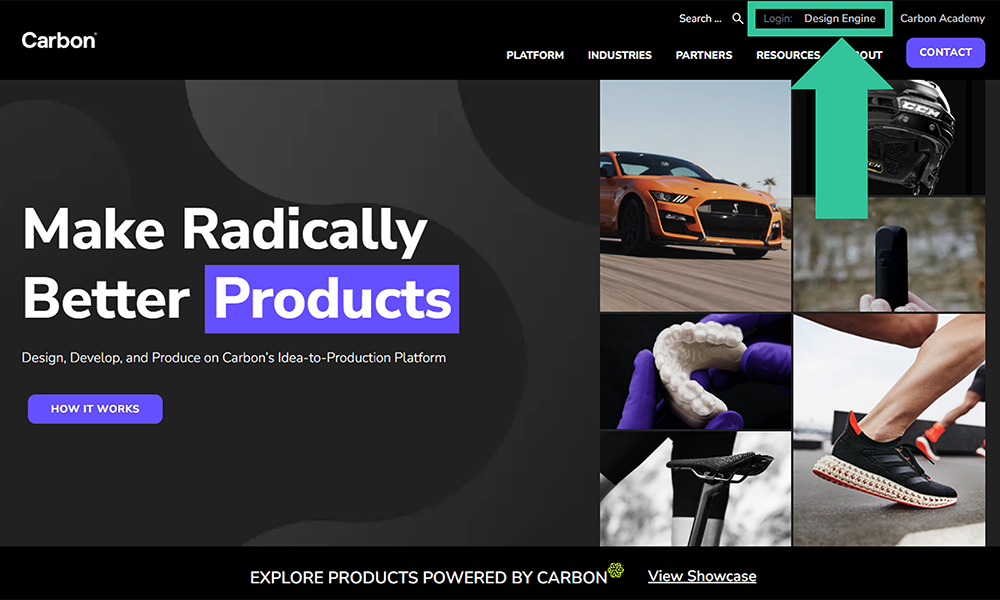
](http://carbon3d.com/)A login link for **Design Engine **is persistent at the top of all pages on Carbon's website.
:::
:::VerticalSplitItem
:::
::::
::::VerticalSplit{layout="middle"}
:::VerticalSplitItem
- **Carbon Printer Dashboard | **[print.carbon3d.com
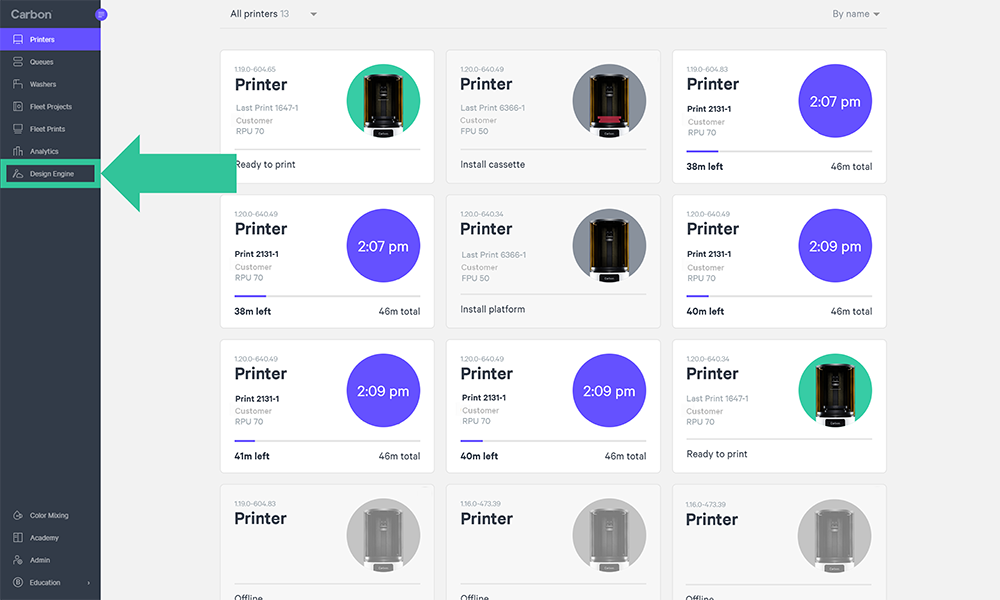
](http://print.carbon3d.com/)Carbon printer users can access **Design Engine **on the printer dashboard.
:::
:::VerticalSplitItem
:::
::::
:::hint{type="success"}
**Need a Design Engine Account? **Sign up [here](https://store.carbon3d.com/s/design-engine-special-offer) for a 1 month free trial.
:::
# Basic Workflows
## Create New Design
Design Engine is a software that modifies design spaces in a variety of ways for additive manufacturing. The first step is to create a design by importing your design space or optionally begin with provided shapes.
::embed[]{url="https://player.vimeo.com/video/887011479"}
:::ExpandableHeading
Video Text
1. Create New Design
2. Sample parts available without a model or...
3. Upload one or more models (STL or STEP format)
1. Adjust name (optionally)
2. Choose a material (optionally)
3. Adjust units
4. Click Create
:::
:::hint{type="info"}
You can also use the **Add Shape **tool to create simple design spaces (cube, cylinder, or sphere) directly within Design Engine.
:::
## Design Workflows
Design Engine offers many design functions. Below are the most common workflows to get you started, each generating a downloadable mesh for your application.
::::LinkArray
:::LinkArrayItem{headerType="IMAGE" headerImage="https://api.archbee.com/api/optimize/3CesIL2dYMCHPZvRjp8S0/EGJS6ZjMKFhEvudMrTior_tet-strut-lattice-blue.png"}
[Tet Strut Lattice](docId\:JjWZIDzC2ZD7yo0ABsfGu)
with underlying tet mesh
:::
:::LinkArrayItem{headerType="IMAGE" headerImage="https://api.archbee.com/api/optimize/3CesIL2dYMCHPZvRjp8S0/wvl7my9mJ1yMfDwz4DFO5_hex-strut-lattice-blue.png"}
[Hex Strut Lattice](docId\:JjWZIDzC2ZD7yo0ABsfGu)
with underlying hex mesh
:::
::::
::::LinkArray
:::LinkArrayItem{headerType="IMAGE" headerImage="https://api.archbee.com/api/optimize/3CesIL2dYMCHPZvRjp8S0/IdUl_jPb2dOPGxqOt0QEp_combine-blue.png"}
[Combine](docId\:JjWZIDzC2ZD7yo0ABsfGu)
multiple STLs into one part
:::
:::LinkArrayItem{headerType="IMAGE" headerImage="https://api.archbee.com/api/optimize/3CesIL2dYMCHPZvRjp8S0/UXC_cJlh4GPiJgNwva_py_texture-noise-blue.png"}
[Texture - Noise](docId\:JjWZIDzC2ZD7yo0ABsfGu)
random noise pattern on surface
:::
:::LinkArrayItem{headerType="IMAGE" headerImage="https://api.archbee.com/api/optimize/3CesIL2dYMCHPZvRjp8S0/9bmd5f8uCdXc6vUPUwzV3_texture-tile-blue.png"}
[Texture - Tile](docId\:JjWZIDzC2ZD7yo0ABsfGu)
tiling pattern on surface
:::
::::
:::hint{type="info"}
Images shown above are representative of their design category. More choices are available within each.
:::
***
### Tet Strut Lattice
::embed[]{url="https://player.vimeo.com/video/671768270"}
:::ExpandableHeading
Video Text
1. **Strut Lattice**
1. Select input mesh (design space)
2. Select population type (Uniform most common)
3. Click lattice type
1. Use Lattice search
2. Or manually select unit cell parameters
1. Lattice type
2. Cell size
3. Strut diameter
4. Optionallly add Zones or Advanced options
2. **Solidify**
1. Select strut lattice
2. Select options
3. **Generate**
1. Processing takes approx 1 minute
(or up to 5 minutes with advanced options)
:::
***
### Hex Strut Lattice
::embed[]{url="https://player.vimeo.com/video/916841365"}
:::ExpandableHeading
Video Text
1. **Hex Mesh**
1. Select input mesh (design space)
2. Select preview to visualize
3. Select population type - Choose Gridded or Loft
4. Define and adjust cells
5. Preview regenerates after a few seconds of inactivity
2. **Strut Lattice**
1. Select the hex mesh
2. Select lattice type
3. Select strut diameter
3. **Solidify**
1. Select strut lattice
4. **Generate**
Reference [Hex Mesh](docId:2s1MLNX3Yfvzt6F5Rge5h) training for more details on gridded and loft hex mesh options.
:::
***
### Combine
::embed[]{url="https://player.vimeo.com/video/569979609"}
:::ExpandableHeading
Video Text
1. **Upload** model file(s) to combine
2. **Combine**
1. Select Combine
2. Select the input meshes to combine
3. Overlap parts to obtain a proper connection
3. **Click Generate**
:::
***
### Texture - Noise
::embed[]{url="https://player.vimeo.com/video/859998302"}
:::ExpandableHeading
Video Text
1. **Texture**
1. Select Input Mesh
2. Select Patch to Texture
3. Select Noise Pattern
4. Select Depth of texture
5. Optionally set a distance for fading the texture at edges
2. **Click Generate**
:::
***
### Texture - Tile
::embed[]{url="https://player.vimeo.com/video/920565124"}
:::ExpandableHeading
Video Text
1. **Remesh (for best results)**
1. Select input mesh
2. Select target edge size
1. Select default 1% target edge ratio in most cases
3. Select default settings for remaining options in most cases
2. **Click Generate**
1. \[Before/after] Original mesh - Remesh
3. **Texture**
1. Select the remesh as input mesh
2. Extract patch to texture
1. Select a contiguous patch
2. Patch cannot have disconnected areas
3. Select tile pattern
4. Select size of texture tile
5. Select depth of texture
6. Optionally set a distance for fading the texture at edges
4. **Click Generate**
5. **Repeat to texture remaining areas as needed**
:::
## Download Design
The final step in Design Engine is to download the mesh file(s) to use in additive manufacturing.
::embed[]{url="https://player.vimeo.com/video/939361497"}
:::ExpandableHeading
Video Text
- **Option 1: Download from mesh menu**
Select file type: STL, PLY, OBJ
- **Option 2: Download Files from button**
Select files to download - STL type only
:::
# Essential Lattice Information
Understanding the core behavior of Design Engine will give you the keys to make the most successful lattice design. Below are the topics that all new users should be aware of when creating a lattice.
## The Mesh and Unit Cell
The mesh is the underlying 3-dimensional scaffold upon which your lattice is built.
The mesh is comprised of **unit cells** upon which the strut lattice is applied.
Design Engine offers two mesh types:
::::VerticalSplit{layout="middle"}
:::VerticalSplitItem
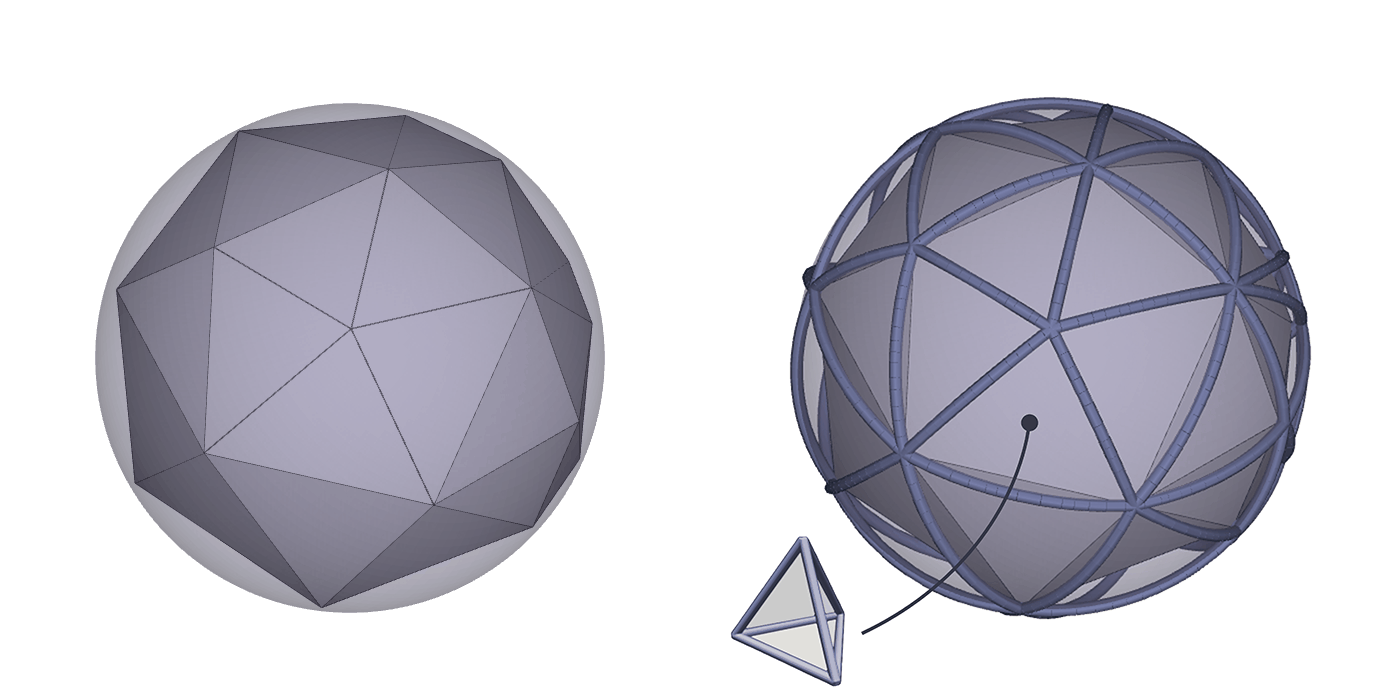
**Tetrahedron Mesh **(Tet)
Composed of polyhedrons with 4 faces
One unit cell = one tetrahedron
:::
:::VerticalSplitItem
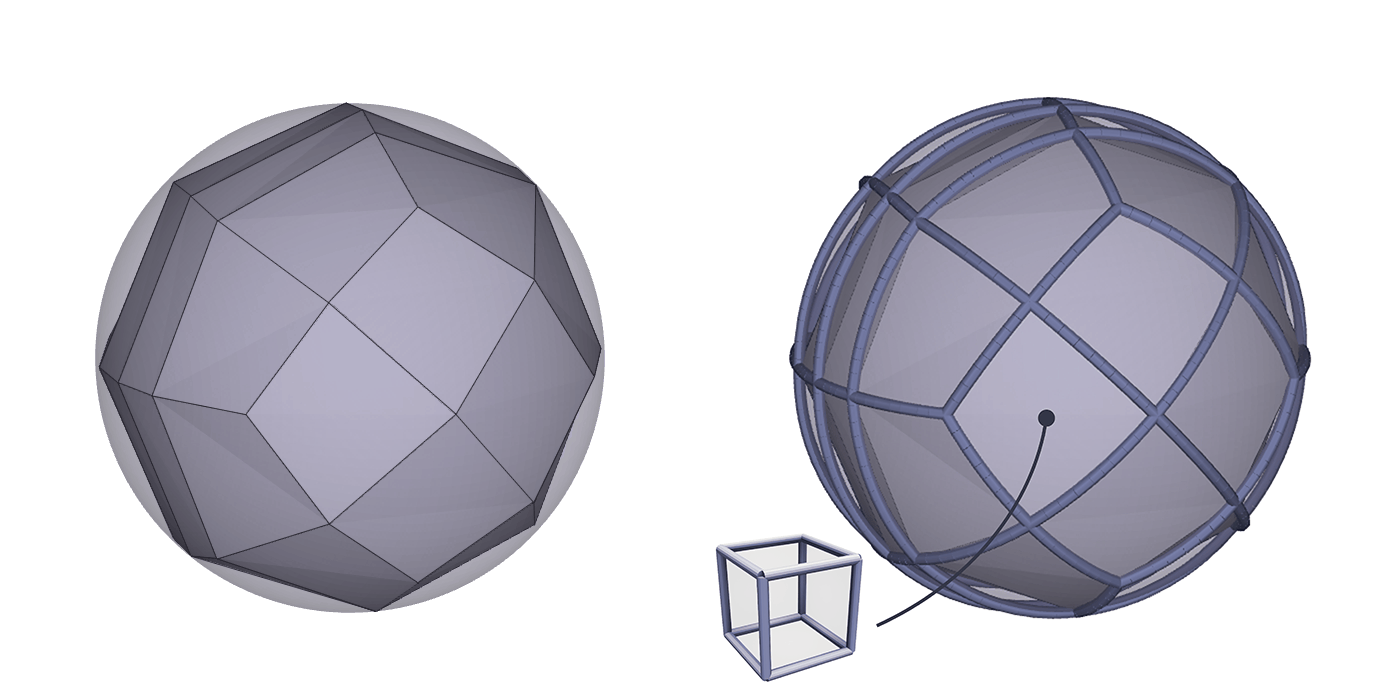
**Hexahedron Mesh **(Hex)
Composed of polyhedrons with 6 faces
One unit cell = one hexahedron
:::
::::
## Lattice Parameters
There are four parameters that further define the lattice.
First is the **material**, which could be any printable material in additive manufacturing.
*Design Engine lattices are not limited to only Carbon resins.*
The strut lattice fills in the **unit cell **with the remaining three parameters:
- Lattice type
- Cell size
- Strut diameter
::::VerticalSplit{layout="middle"}
:::VerticalSplitItem
**Material**
::Image[]{src="https://res.cloudinary.com/carbon3d/image/upload/v1721439174/Education/Software/Design-Engine/Lattice-parameters/Material-EPU-46.png" size="60" width="800" height="800" position="center" caption="Material properties of the resin/other" showCaption="true"}
:::
:::VerticalSplitItem
**Lattice Type**
::Image[]{src="https://res.cloudinary.com/carbon3d/image/upload/v1721439175/Education/Software/Design-Engine/Lattice-parameters/Lattice_Type_v4.png" size="60" width="800" height="800" position="center" caption="Pattern of the lattice structure" showCaption="true"}
:::
::::
::::VerticalSplit{layout="middle"}
:::VerticalSplitItem
**Cell Size**
::Image[]{src="https://res.cloudinary.com/carbon3d/image/upload/v1721439173/Education/Software/Design-Engine/Lattice-parameters/Cell_Size_v5.png" size="60" width="800" height="800" position="center" caption="Dimensional size of the cells that define the scale of the lattice" showCaption="true"}
:::
:::VerticalSplitItem
**Strut Diameter**
::Image[]{src="https://res.cloudinary.com/carbon3d/image/upload/v1721439173/Education/Software/Design-Engine/Lattice-parameters/Strut_Diameter_v5.png" size="60" width="800" height="800" position="center" caption="Diameter of the struts that build the structure" showCaption="true"}
:::
::::
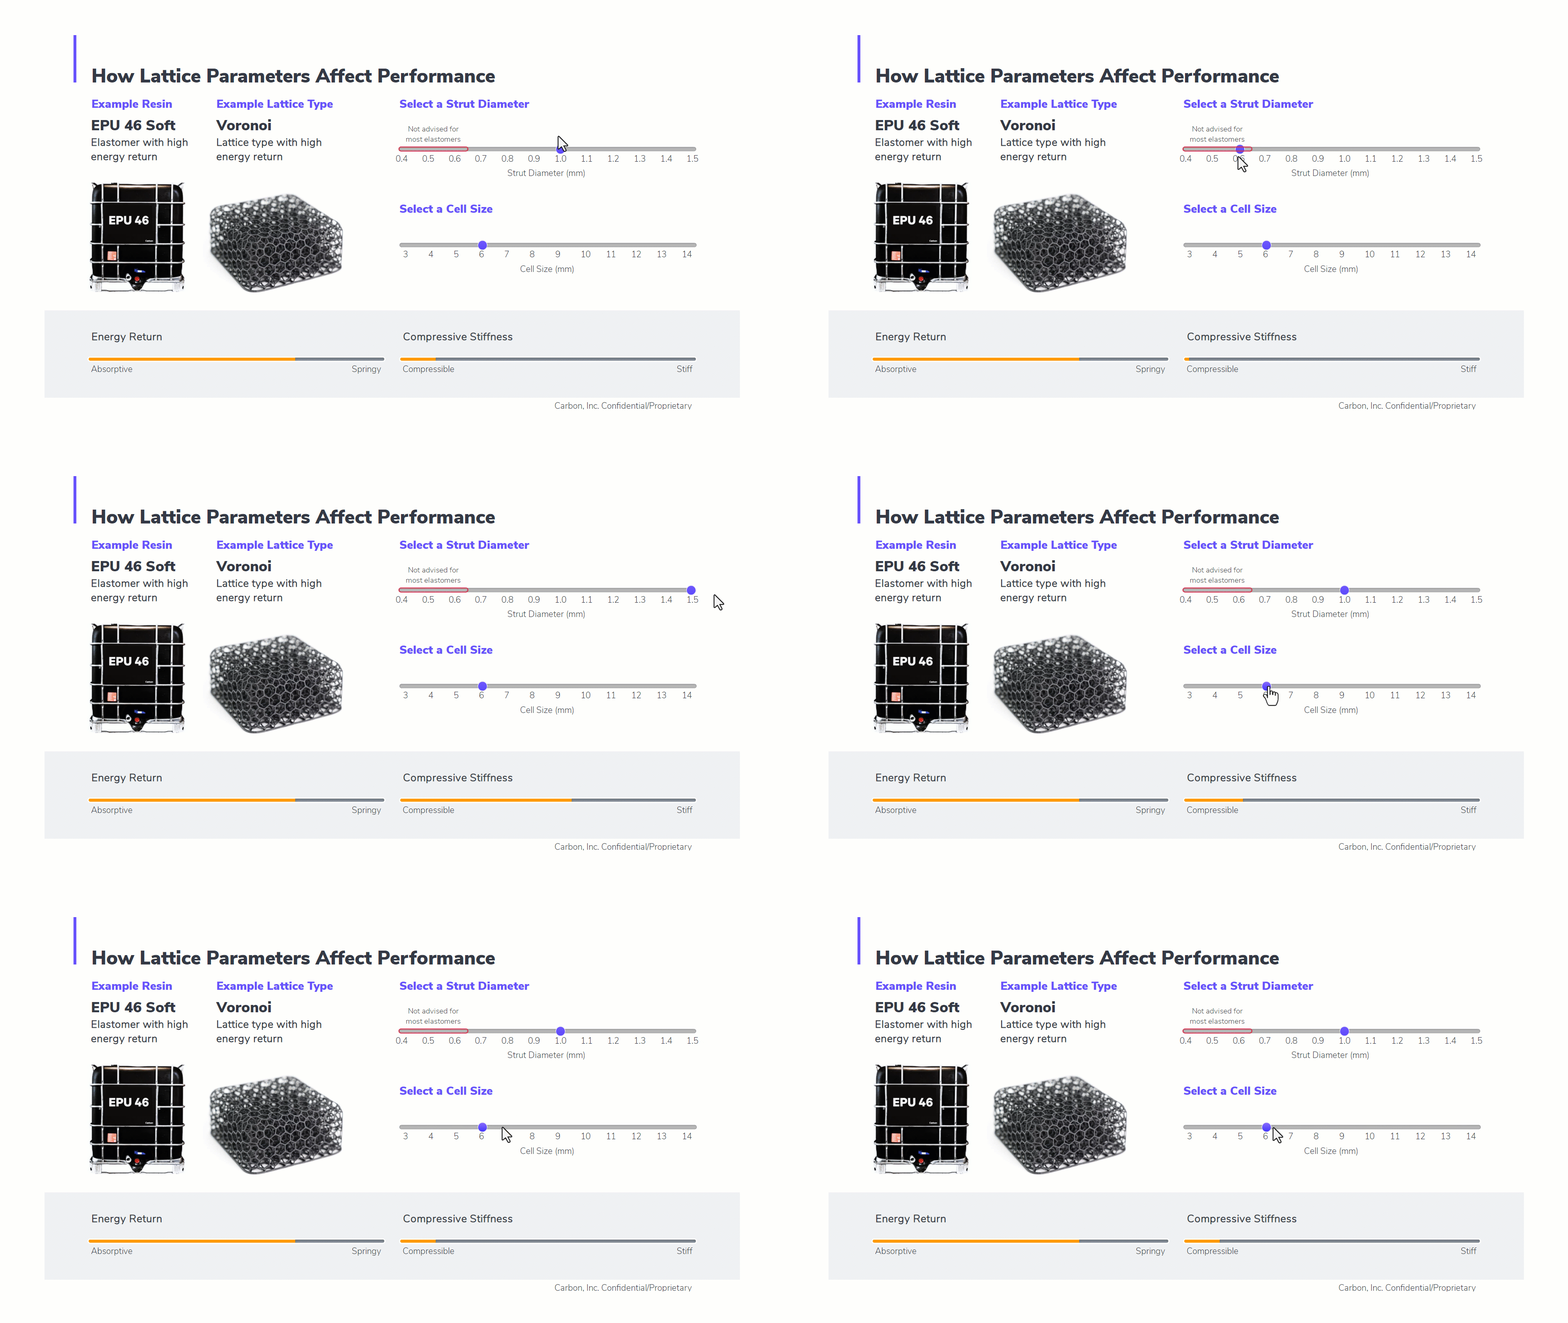
## Performance and Feel
Choosing your mesh and lattice parameters provides a vast array of options for the performance of your lattice, but the relationships between these variables is simple.
::::VerticalSplit{layout="middle"}
:::VerticalSplitItem
**Energy Return or Impact**
Two variables influence the energy return or impact of a lattice, which determines how absorptive or springy the lattice performs.
- **Material**- resin selection
- **Lattice Type **- pattern selection
:::
:::VerticalSplitItem
**Compressive Strain**
Two dimensional variables affect the compressive strain of a lattice, which affects how compressible or stiff the lattice performs. *Some materials and lattice types are also stiffer than others.*
- **Strut Diameter **- direct relationship
- **Cell Size **- inverse relationship
:::
::::
::::VerticalSplit{layout="middle"}
:::VerticalSplitItem

:::
:::VerticalSplitItem

:::
::::
## Strut Lattice and Solidify
**Strut Lattice and Solidify are a Team**
Both tools must be used to create a printable strut lattice.
::::VerticalSplit{layout="right"}
:::VerticalSplitItem
**Strut Lattice**
Strut Lattice is the foundational structure, derived from your specified parameters. At its core, this is a structure of unprintable lines and nodes.
**Solidify**
Solidified lattices are derived from Strut Lattices but have been converted into a triangulated mesh, or STL file, for printing.
:::
:::VerticalSplitItem
::Image[]{src="https://res.cloudinary.com/carbon3d/image/upload/v1721438481/Education/Software/Design-Engine/Quick-Start-Guide/Strut_Lattice_and_Solidify.png" size="80" width="1340" height="1469" position="center" showCaption="false"}
:::
::::
**Strut Lattice and Solidify Visibility**
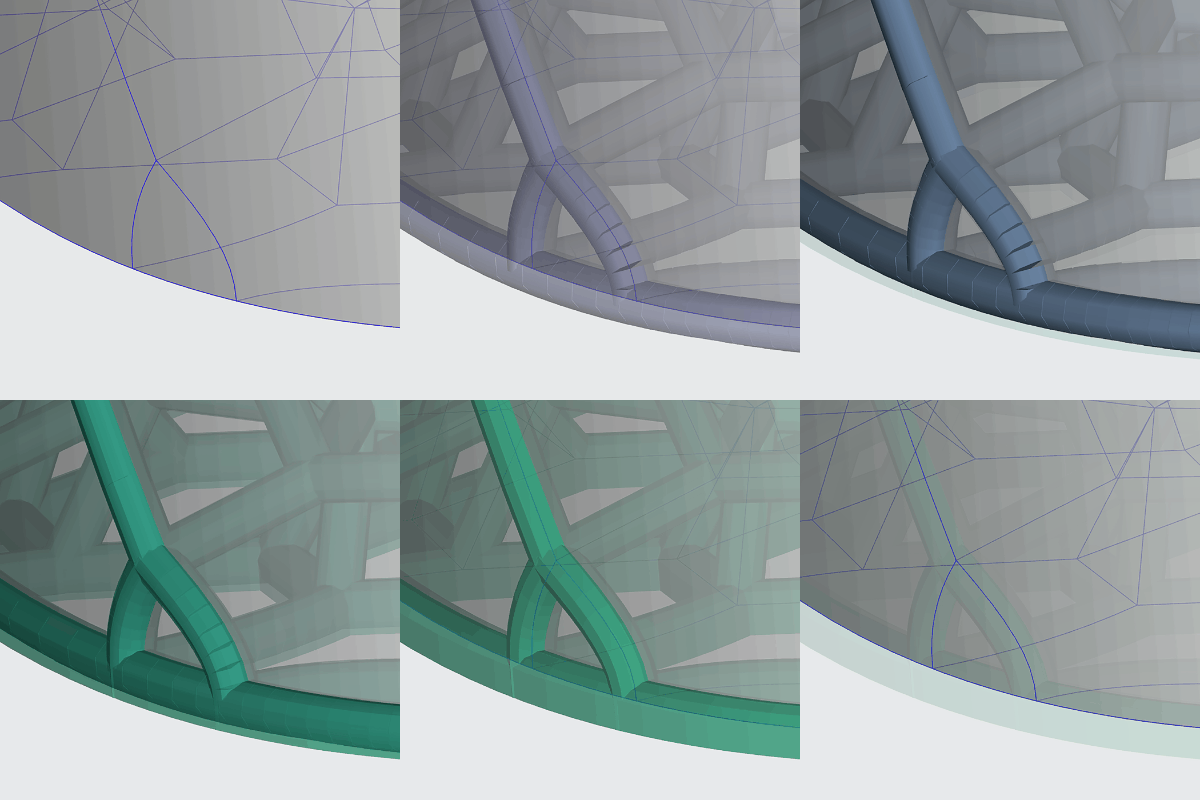
- **Strut Lattice **can be viewed volumetrically (Preview or Diameter) or as lines (Paths & Nodes).
- **Solidify **accurately depicts the printable STL file, with all utilized features in play.
*If you are not seeing a feature depicted in a volumetric strut lattice view, you may need to view the solidified lattice.*
::::VerticalSplit{layout="left"}
:::VerticalSplitItem
:::
:::VerticalSplitItem
**Strut Lattice**
The strut lattice lines are polylines, not splines, made up of line segments. The default view for Strut Lattices is to display them volumetrically with the specified strut diameter, helping you visualize the lattice in 3D. This view expands each line segment with a circular cross section of the specified diameter. Line segments along a curved strut may appear not fully connected on the outside of the curve. However, this is only a temporary visual representation and does not affect the integrity of your struts.
**Solidify**
In the mesh conversion, all seemingly disconnected line segments are fully connected in the printable lattice.
:::
::::
## Design Space Boundary Interface
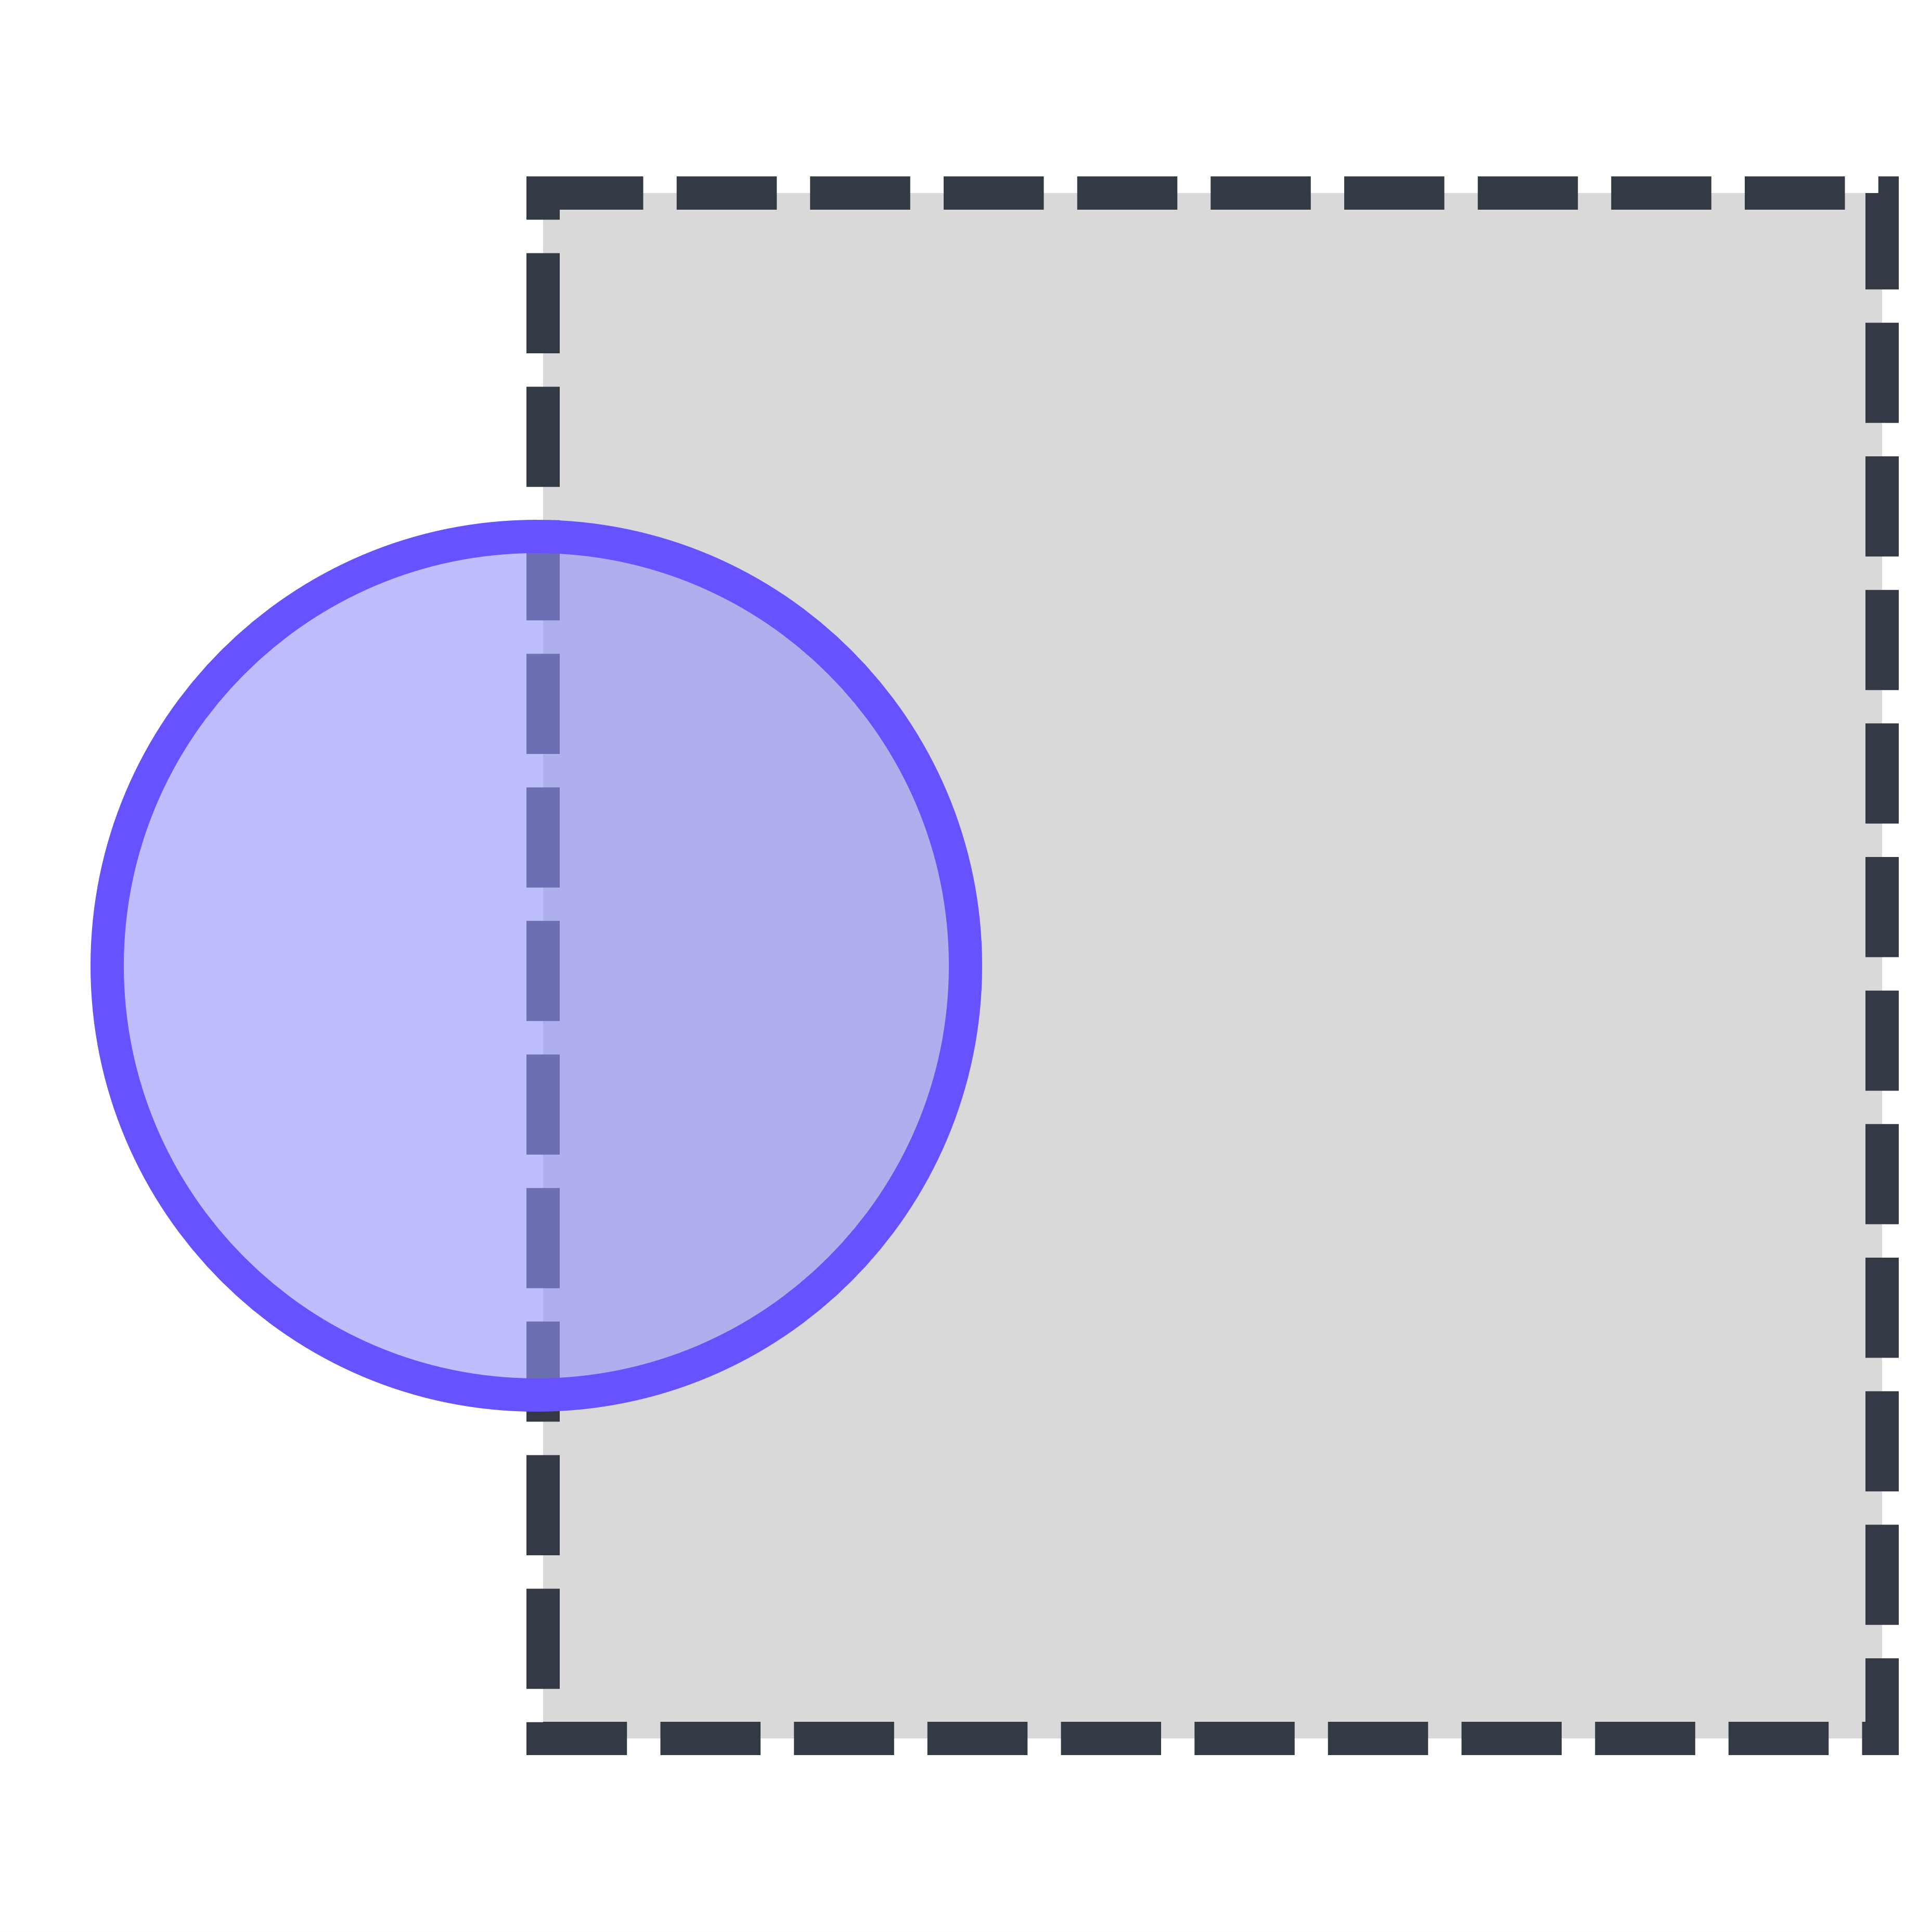
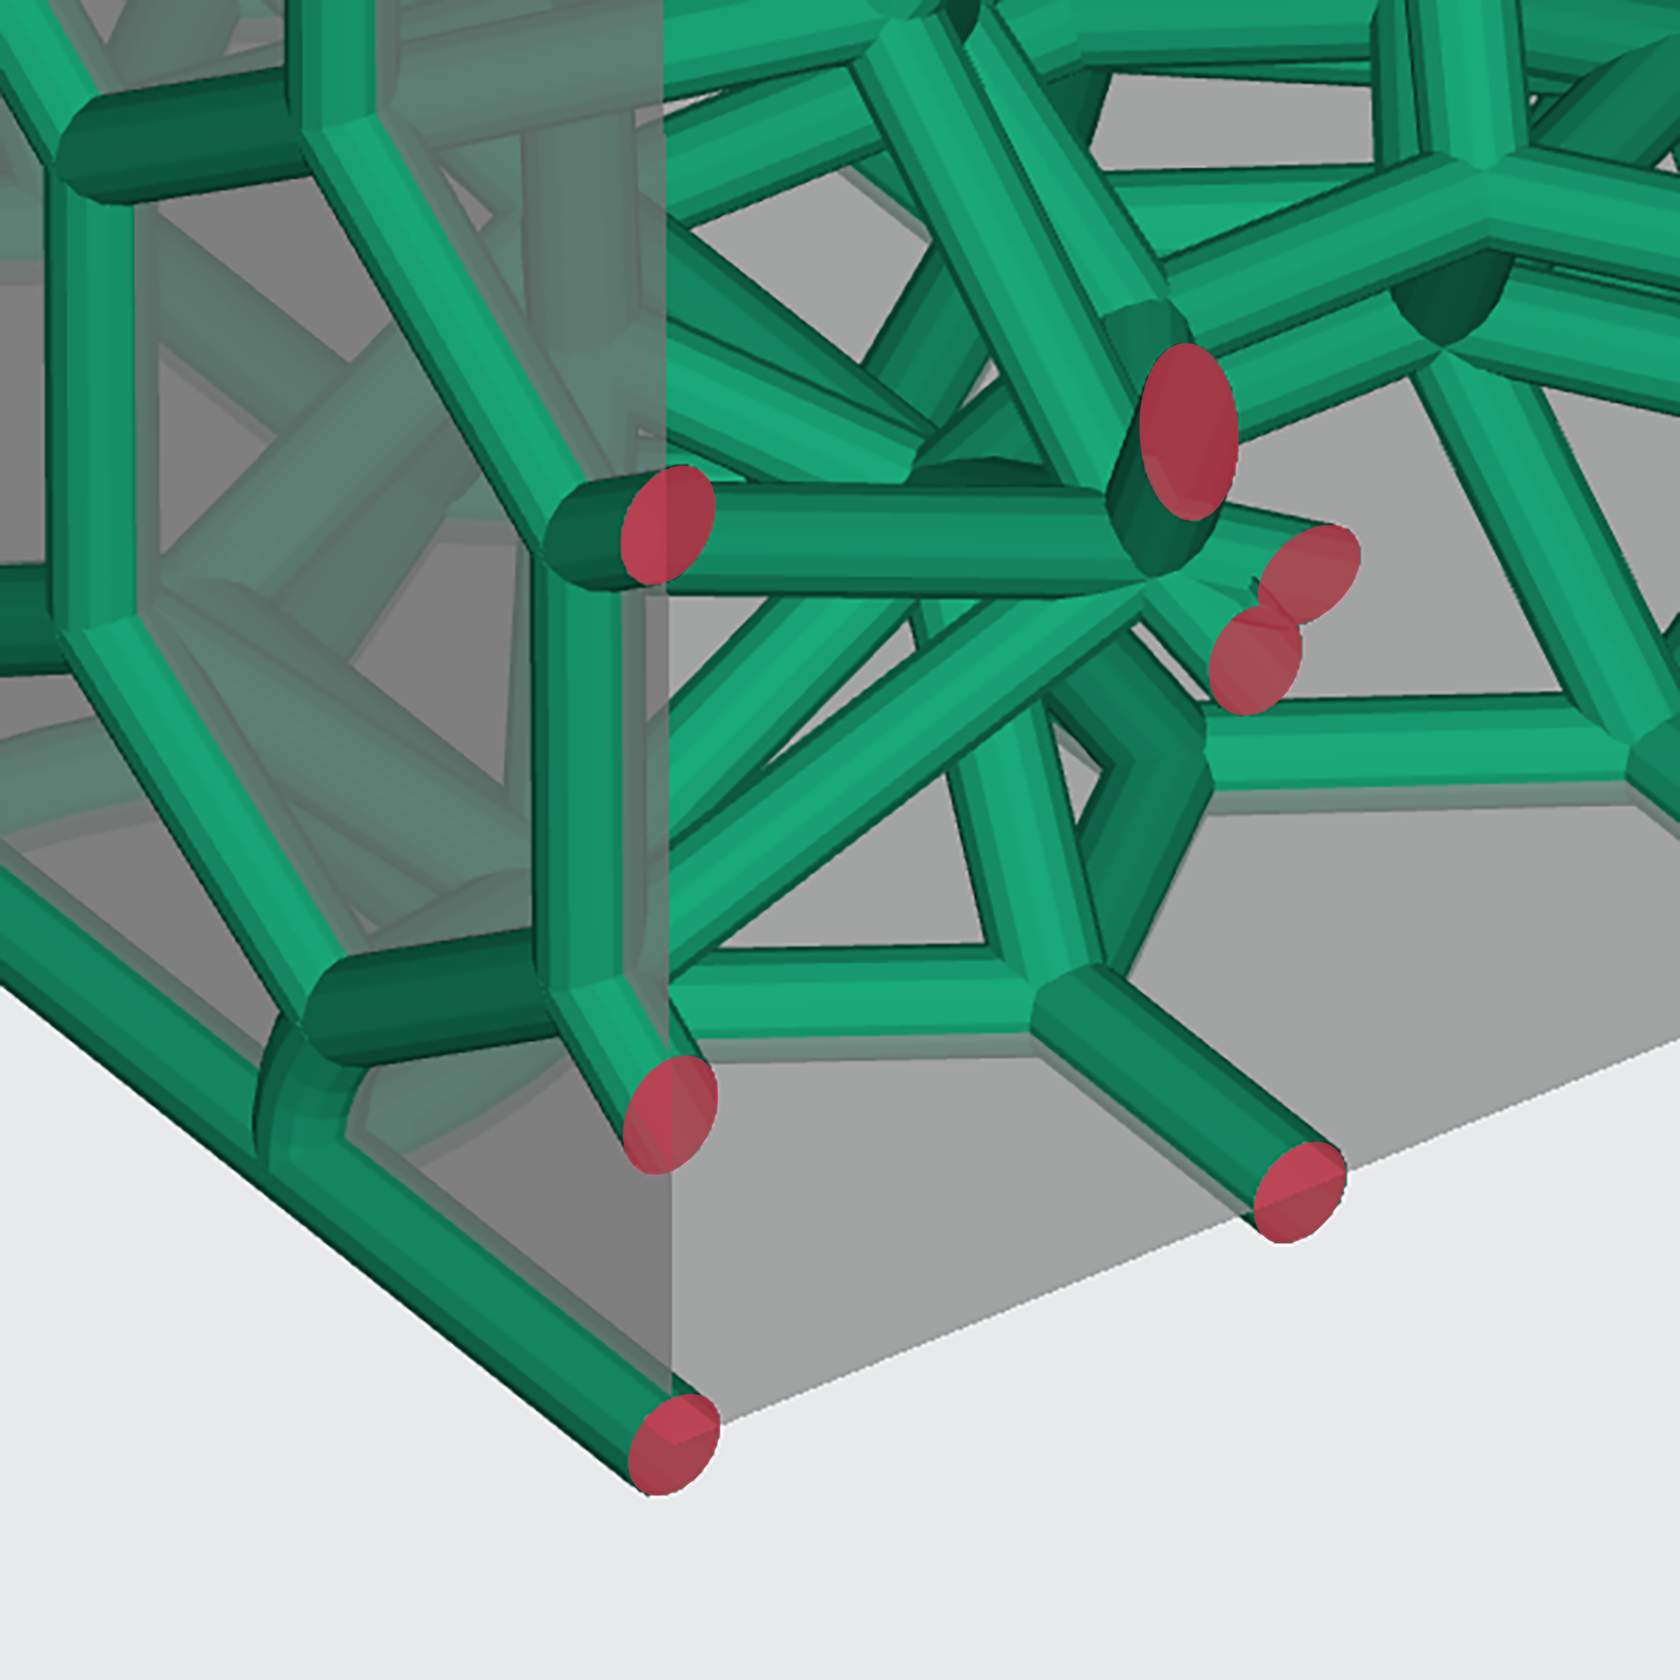
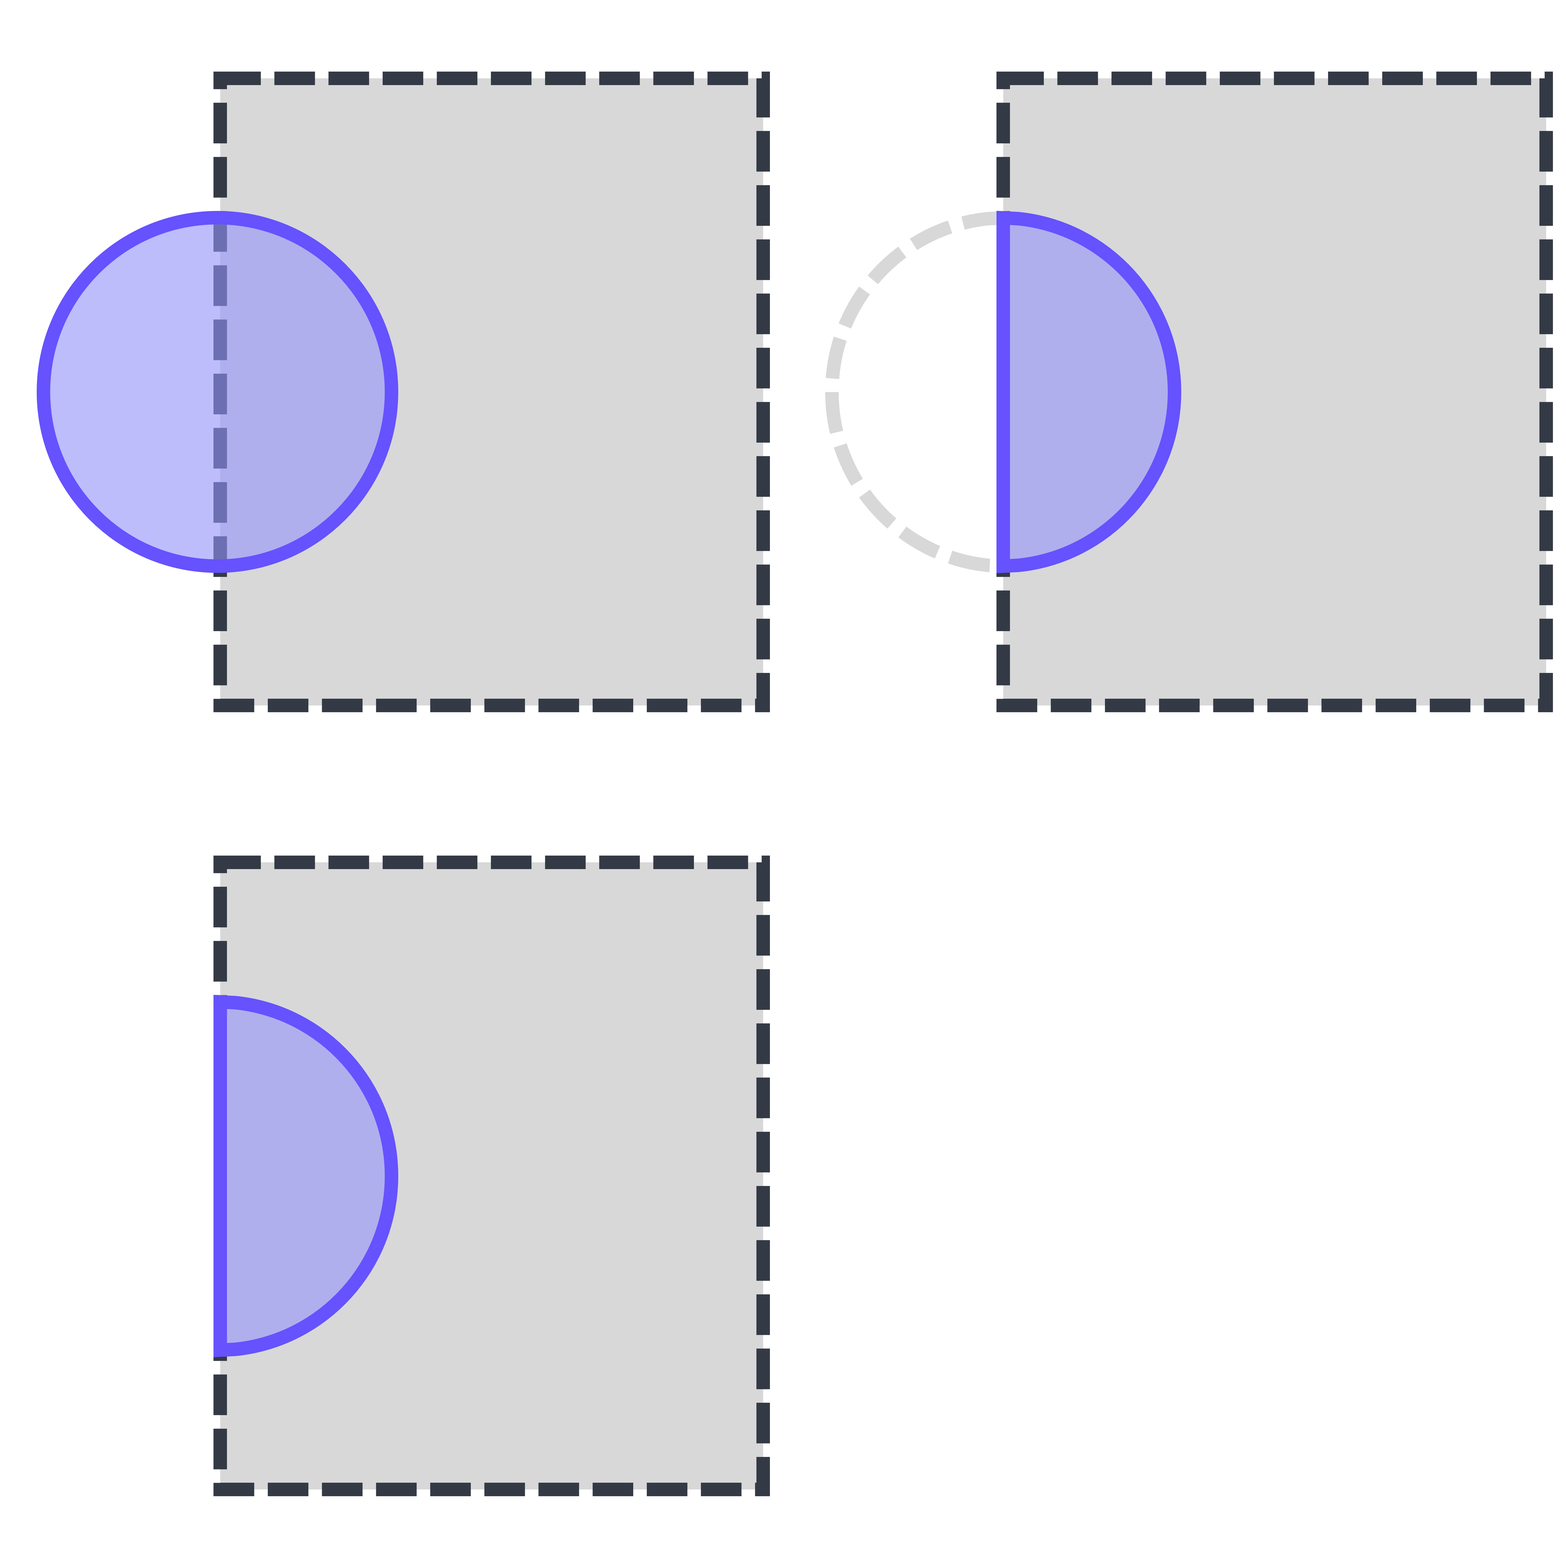
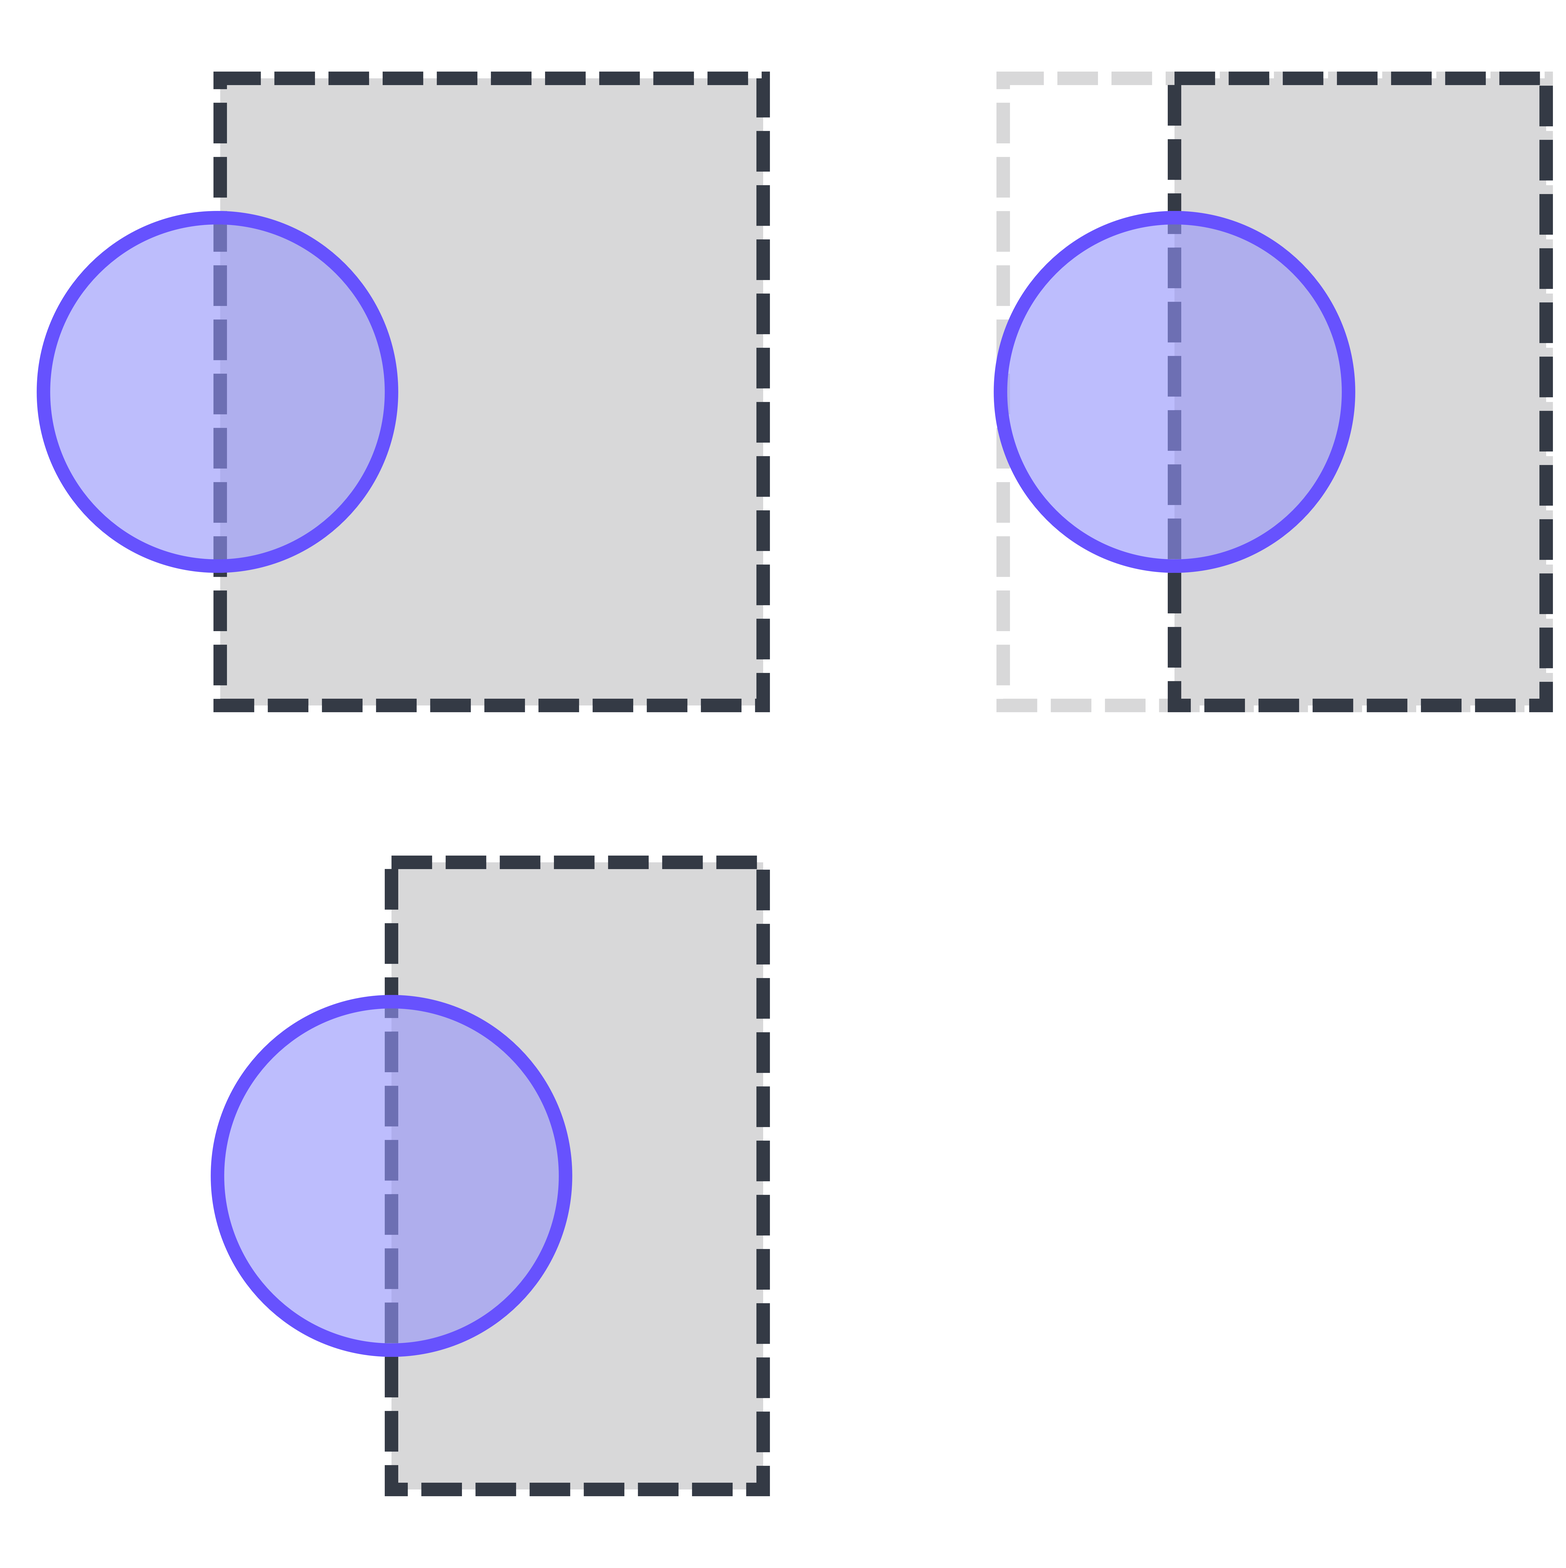
The **default strut lattice **generation builds **outwards **from the boundary mesh (your design space) by 1/2 the strut diameter.
::::VerticalSplit{layout="middle"}
:::VerticalSplitItem
:::
:::VerticalSplitItem
:::
::::
:::hint{type="info"}
Design Engine offers to adjust the default lattice if the boundary mesh is a hard boundary. Reference [Trim](docId\:uydTCMwoLksw6rwSV2yHA) and [Offset](docId:5VOJDsScE3JSUfQR1Wl_Z).
:::
::::VerticalSplit{layout="middle"}
:::VerticalSplitItem
:::
:::VerticalSplitItem
:::
::::
# Essential Resources
| **Help Topic** | **Reference** | |
| ------------------------------------------- | -------------------------------------------------------------------------------------------------------------------------------------------------------------- | ---------------------------------------------------------------------------------------------------------------------------------------------------------------------------------------------------------------------------------------- |
| **Setting up CAD Design Files** | [File Preparation](docId\:iA0qX01VB-VsxJGbK0lE5) | :inlineImage[]{src="https://res.cloudinary.com/carbon3d/image/upload/t_auto_quality_format/Education/Software/Design-Engine/Quick-Start-Guide/Resources/File-Prep_1920x1080.png" alt="Cad Design File" caption} |
| **Navigating Design Engine** | [Navigation and Options](docId\:IgTMBndAl41qlotU4RxuA) | :inlineImage[]{src="https://res.cloudinary.com/carbon3d/image/upload/t_auto_quality_format/Education/Software/Design-Engine/Quick-Start-Guide/Resources/Design-UI_06-2024_w-num.png" alt="Design Engine Workspace" caption} |
| **Choosing Mesh Type** | [Mesh Guidelines](docId\:f-f8ROxDabcRrBEUDh6Q1) | :inlineImage[]{src="https://res.cloudinary.com/carbon3d/image/upload/t_auto_quality_format/Education/Software/Design-Engine/Quick-Start-Guide/Resources/Mesh-type_straight.png" alt="Mesh Types" caption} |
| **Selecting a Material** | [Material Guidelines](docId\:f-f8ROxDabcRrBEUDh6Q1) | :inlineImage[]{src="https://res.cloudinary.com/carbon3d/image/upload/t_auto_quality_format/Education/Software/Design-Engine/Quick-Start-Guide/Resources/Elastomers.png" alt="Materials" caption} |
| **Selecting Unit Cell Manually** | [Lattice Type](docId\:f-f8ROxDabcRrBEUDh6Q1)
[Cell Size](docId\:f-f8ROxDabcRrBEUDh6Q1)
[Strut Diameter](docId\:f-f8ROxDabcRrBEUDh6Q1) | :inlineImage[]{src="https://res.cloudinary.com/carbon3d/image/upload/t_auto_quality_format/Education/Software/Design-Engine/Quick-Start-Guide/Resources/Unit-cell-parameters.png" alt="Lattice Type, Cell Size, Strut Diameter" caption} |
| **Selecting Unit Cell via Lattice Search** | [Lattice Search](docId\:LlWKO8SuVfs2j3cEjz6YR) | :inlineImage[]{src="https://res.cloudinary.com/carbon3d/image/upload/t_auto_quality_format/Education/Software/Design-Engine/Quick-Start-Guide/Resources/MML-tet-240610.png" alt="Lattice Search" caption} |
| **Understanding What Design Engine Can Do** | [Tools and Features](docId\:EmTA0u58vE4r8HKXmrdZV) | :inlineImage[]{src="https://res.cloudinary.com/carbon3d/image/upload/t_auto_quality_format/Education/Software/Design-Engine/Quick-Start-Guide/Resources/Tools-features-list.png" alt="Tools and Features" caption} |
| **Assessing Manufacturability** | [Unit Cell Manufacturability](docId\:f-f8ROxDabcRrBEUDh6Q1) | :inlineImage[]{src="https://res.cloudinary.com/carbon3d/image/upload/t_auto_quality_format/Education/Software/Design-Engine/Quick-Start-Guide/Resources/Voronoi.png" alt="Unit Cell Manufacturability" caption} |
# FAQ
## General Design Engine
:::ExpandableHeading
**How do I get a Design Engine subscription?**
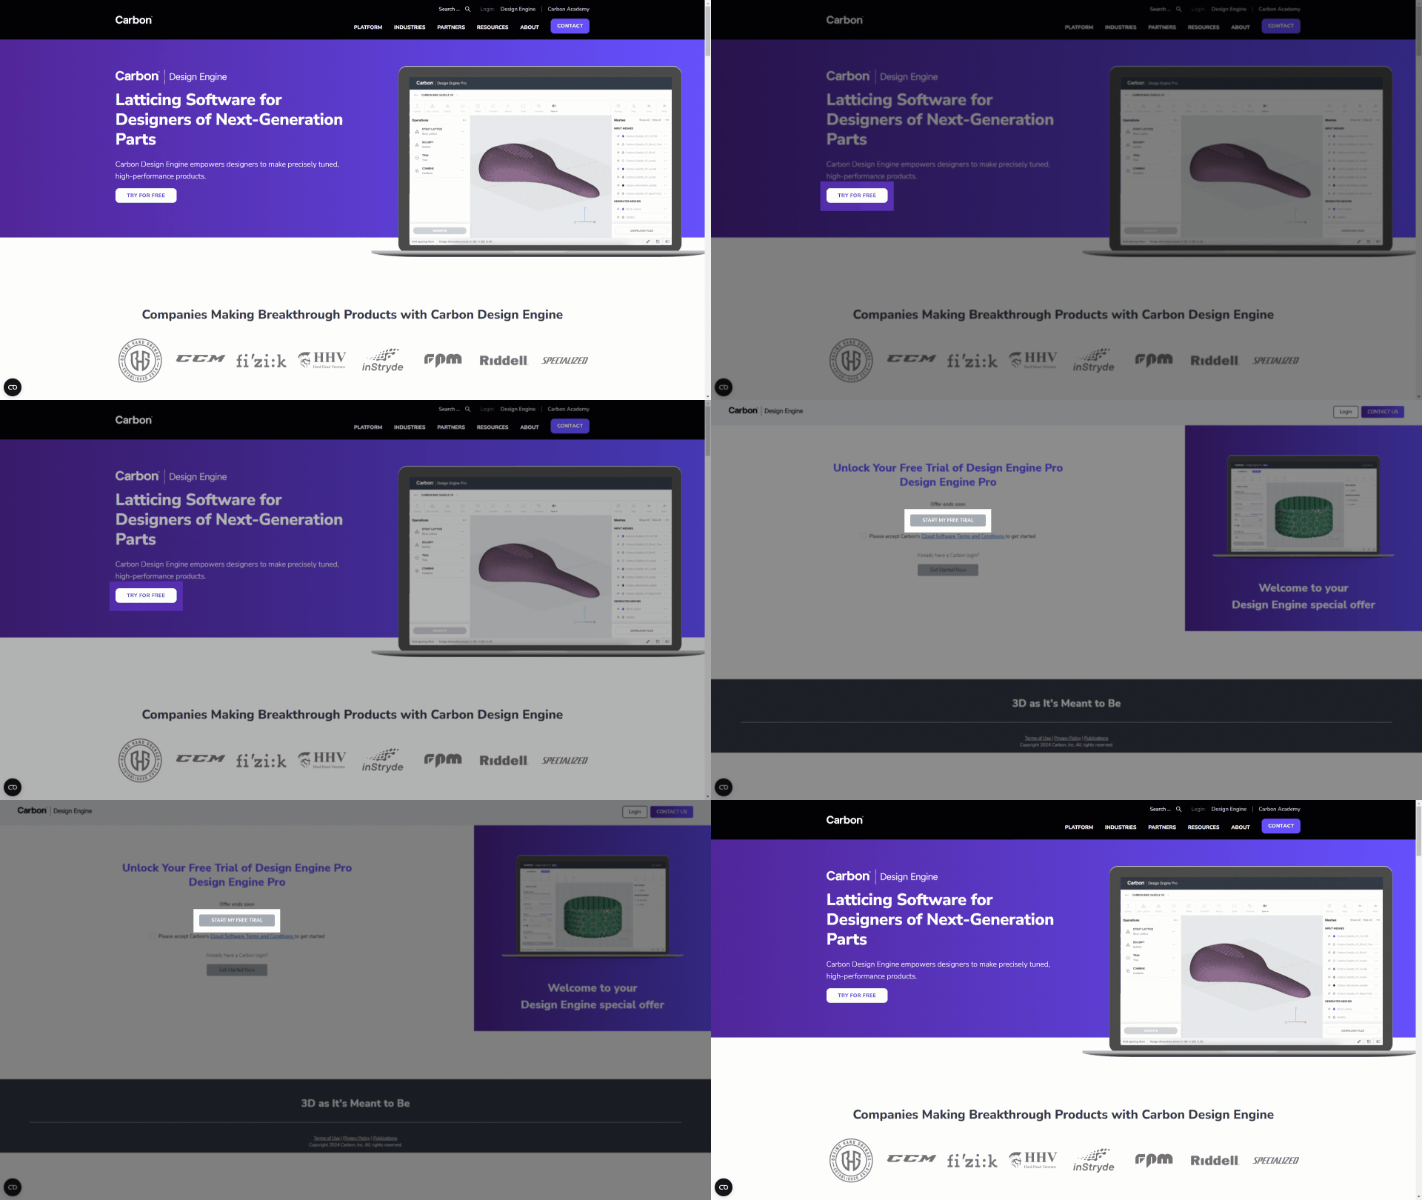
On Carbon’s [Design Engine product page](https://www.carbon3d.com/products/carbon-design-engine), click **TRY FOR FREE** to begin a trial.
You will have the option to continue with a paid subscription when the trial ends.
:::
:::ExpandableHeading
**Can I import and/or export a STEP file?**
- Parts must be an **STL **or **STEP file **type to import into Carbon Design Engine.
- All STEP files will be converted to an STL upon import. Meshes **cannot be downloaded in STEP format **(STL, PLY, and OBJ are the available download format options).
:::
:::ExpandableHeading
**What is the datum point of the model?**
The origin of the model is preserved from the originating CAD software.
:::
:::ExpandableHeading
**Why does my imported model appear very small or large?**
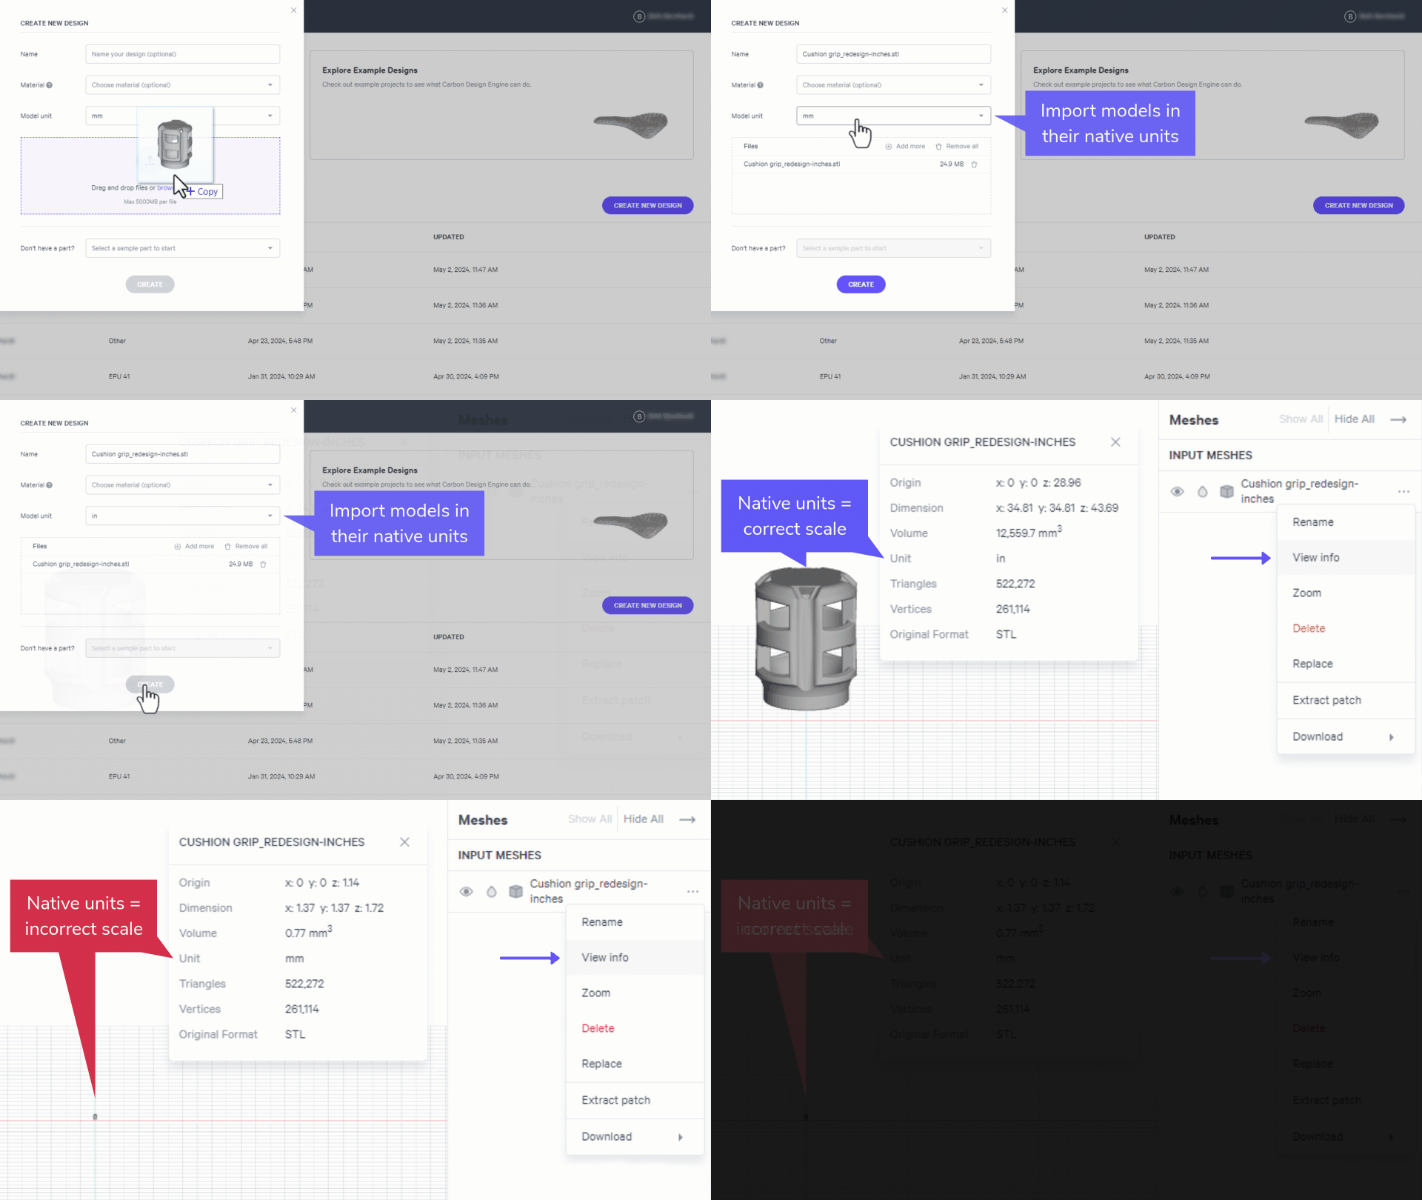
- Check that your model was** imported in its native units**.
- Click **View info** on the mesh menu to see the units in which the model was imported
- Models imported with the units in which they built will be converted to their correct scale. *Note that Design Engine operates in mm only, so any models imported in inches will be converted to metric units.*
- Tip: If your model imports at a very small or large scale, use the Zoom to Fit (F) functionality to fit the model to the screen.
:::
:::ExpandableHeading
**How do I download a file?**
- **Option 1: Download from mesh menu**
Select file type: STL, PLY, OBJ
- **Option 2: Download Files from button**
Select files to download - STL type only
::embed[]{url="https://player.vimeo.com/video/939361497"}
:::
:::ExpandableHeading
**Why can't I download my strut lattice as an STL?**
- A **strut lattice must be solidified** to be downloaded as an STL.
- **Strut Lattice** is the foundational structure, derived from your specified parameters. At its core, this is a structure of unprintable lines.
- **Solidified** lattices are derived from Strut Lattices but have been converted into a triangulated mesh, or STL file, for printing.
:::
:::ExpandableHeading
**Why is the software running slow?**
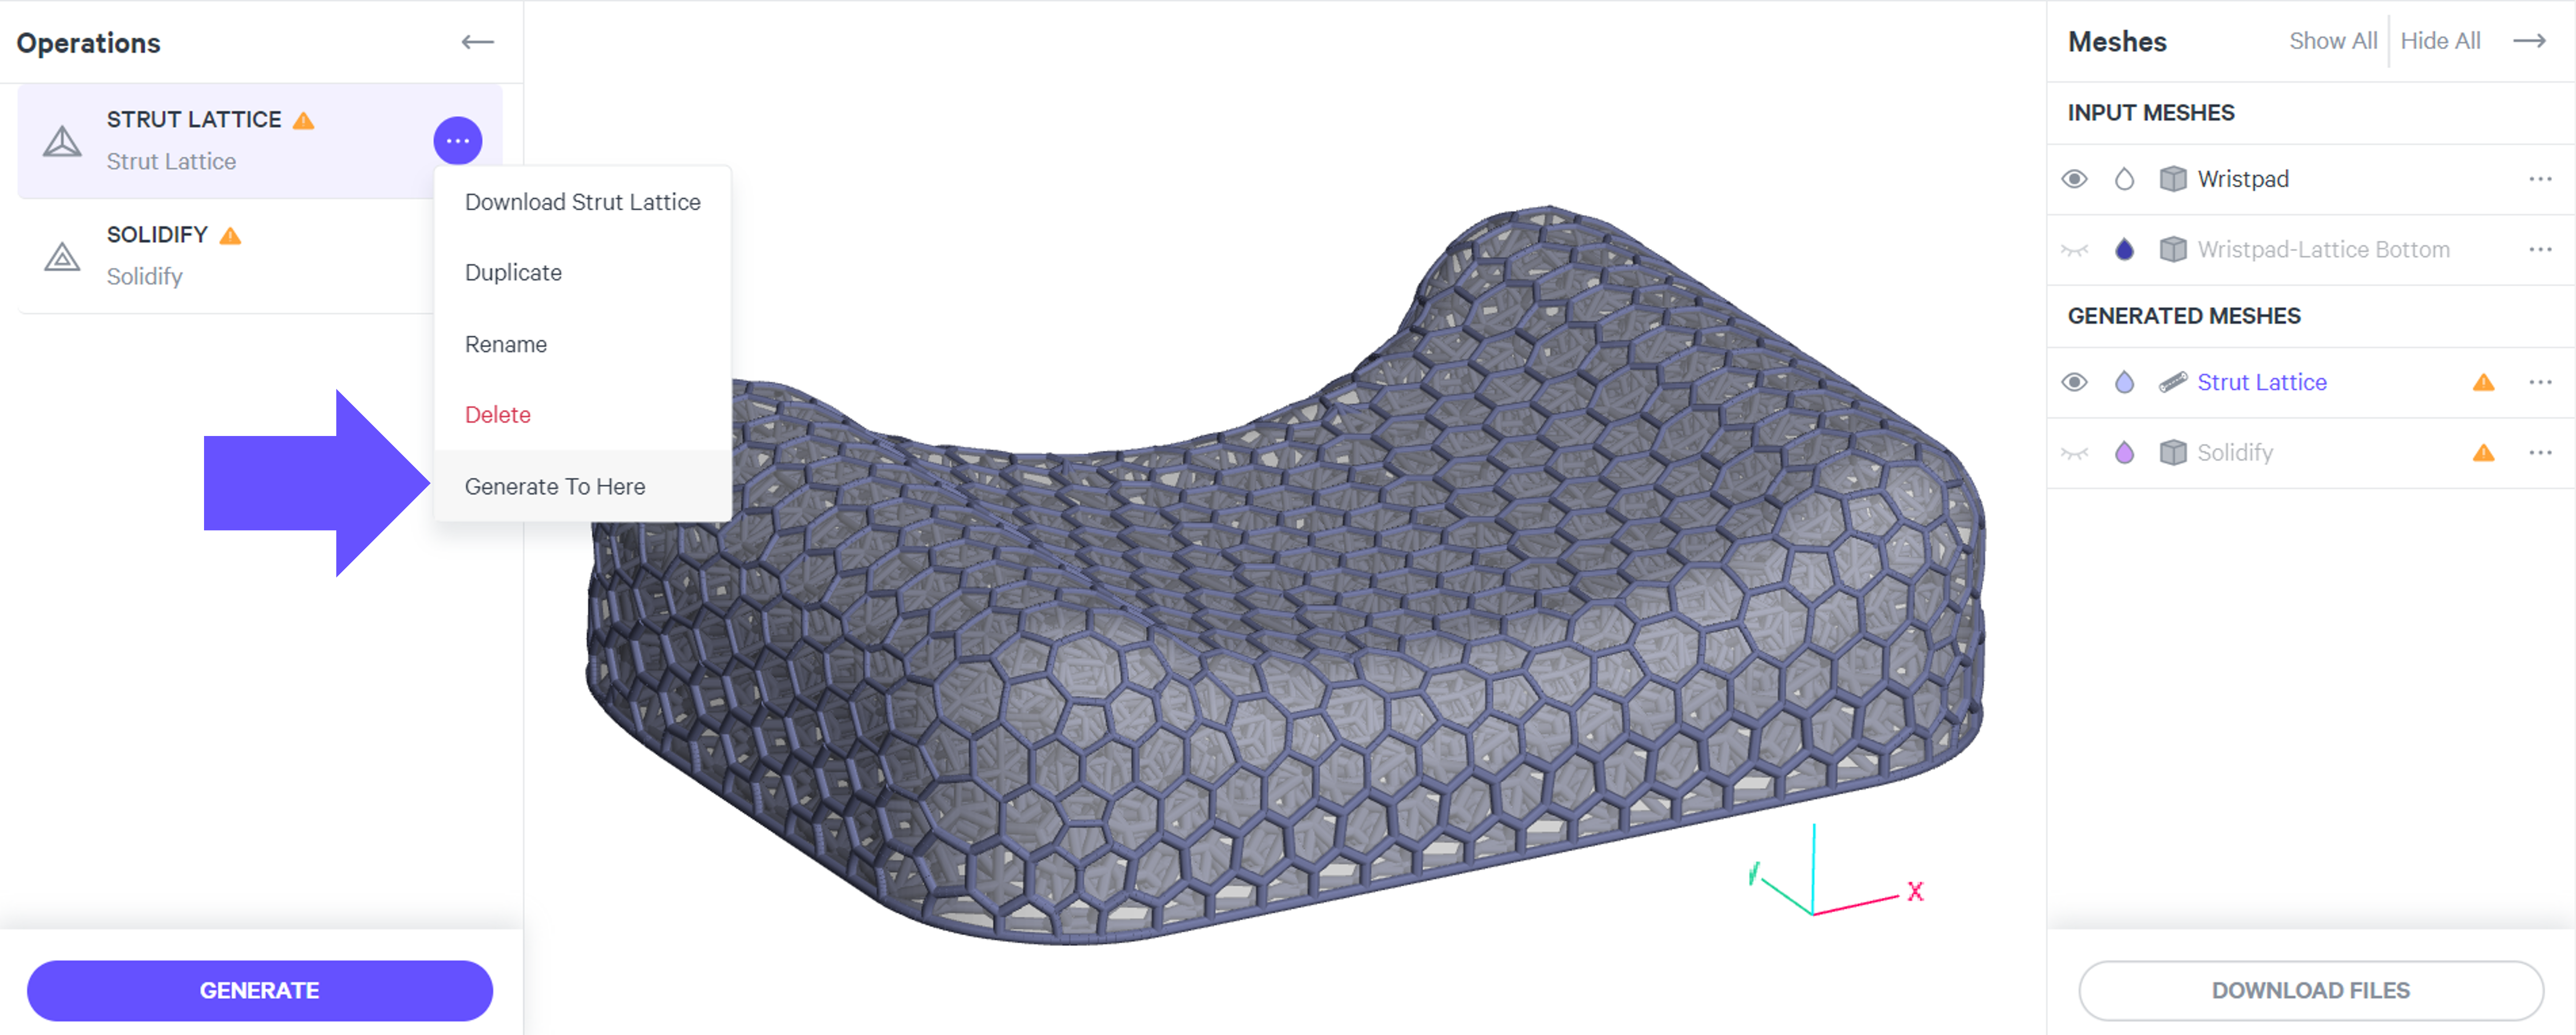
Many operations in combination with large files of high triangle count may take a few minutes for processing.
- Try using the **Generate to Here **function to limit the number of operations generated at once.
- Use the **Decimate **tool to reduce the complexity and triangle count of large meshes.
:::
:::ExpandableHeading
**I generated a design (lattice, texture, etc.) but can't see the results?**
- Typically this occurs when another mesh is covering up the results you are looking for. Hide or adjust transparency of other meshes to view operation output(s). Reference [Mesh Options](docId\:IgTMBndAl41qlotU4RxuA).
:::
:::ExpandableHeading
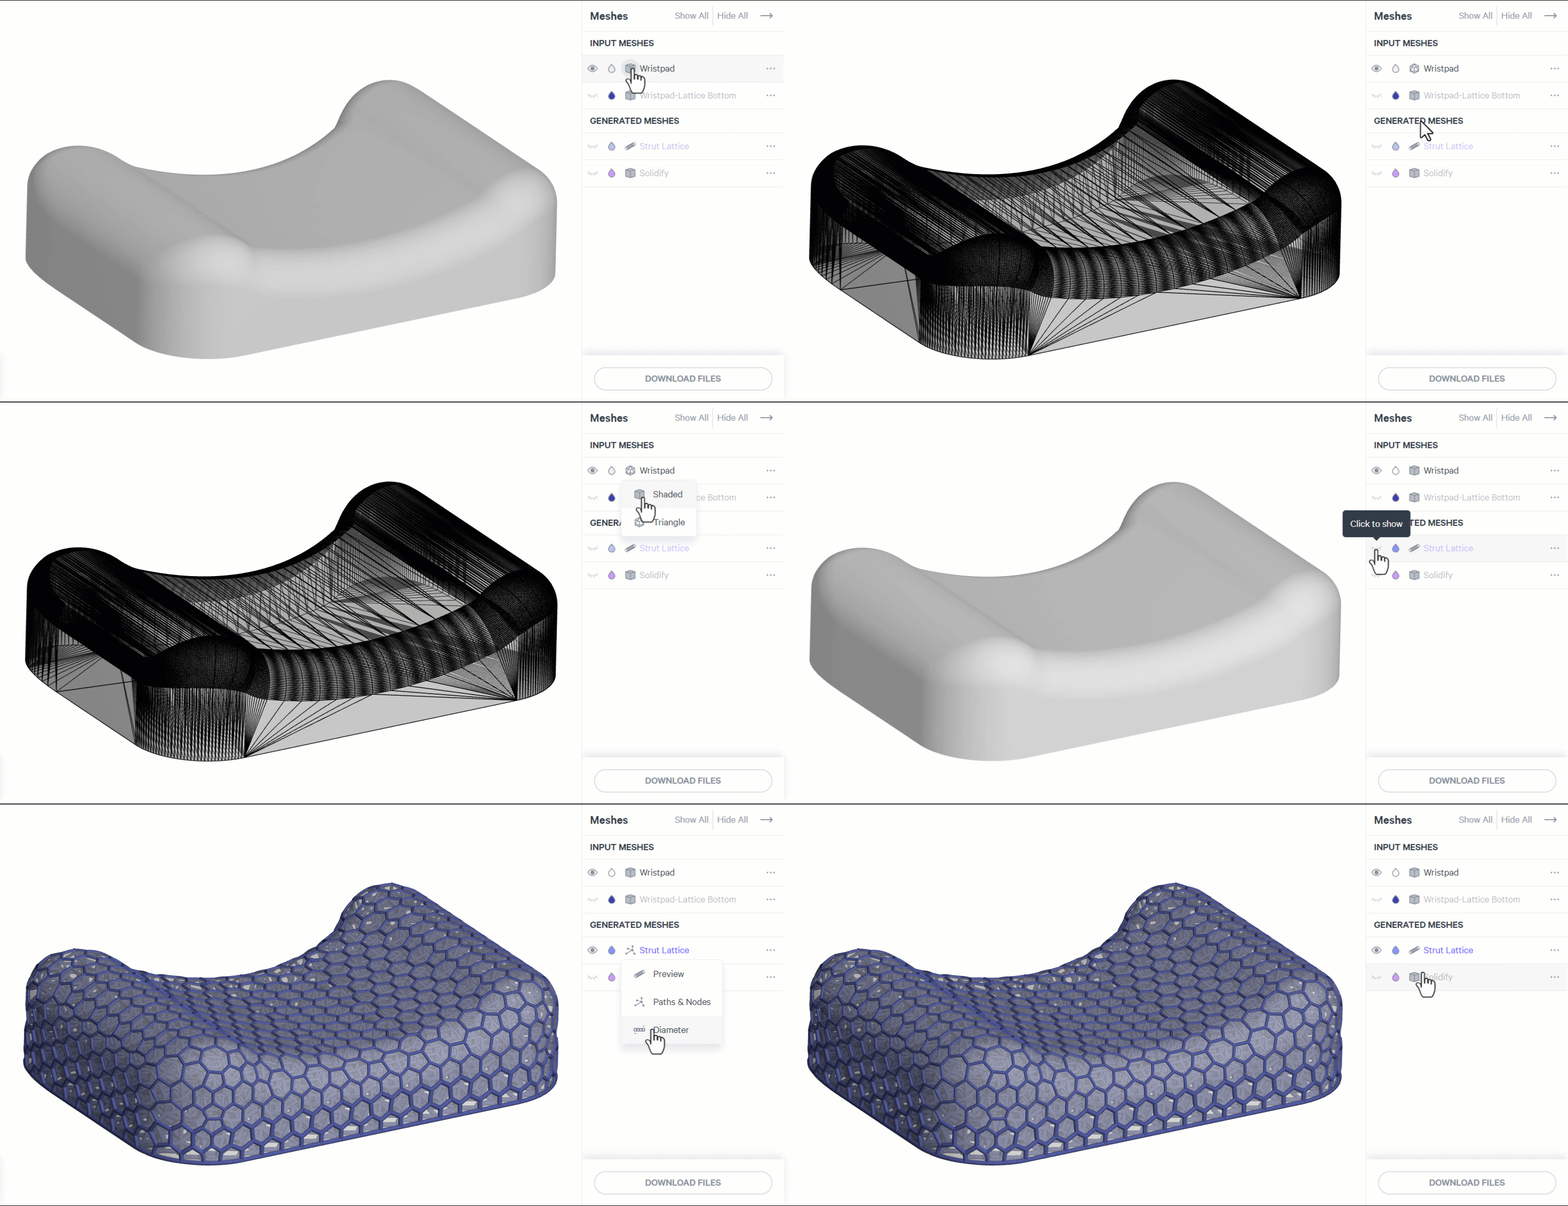
**Can I view the triangles comprising the imported STL mesh?**
- **Yes**. You have options on how to view meshes in the design.
- Input Meshes: Shaded | Triangle
- Generated Meshes
- Strut Lattice: Volumetric | Paths & Nodes | Diameter
- Solidify: Default View Only
Reference [Mesh Options](docId\:IgTMBndAl41qlotU4RxuA) for more information on visibility.
:::
:::ExpandableHeading
**Can the software provide customized automation?**
- **Yes. **Your work in Design Engine on a single model can be turned into a repeatable program that can be used to automatically create custom or personalized parts according to the rules and parameters in your program. Design automation can be integrated seamlessly with other systems (eg, ordering system; MES...).
- [Contact Carbon](mailto\:support@carbon3d.com) for assistance with this functionality.
::Image[]{src="https://res.cloudinary.com/carbon3d/image/upload/v1721438860/Education/Software/Design-Engine/Quick-Start-Guide/FAQ/Automation_v0102.gif" size="70" width="1248" height="1080" position="center" showCaption="false"}
:::
## Strut Lattices
:::ExpandableHeading
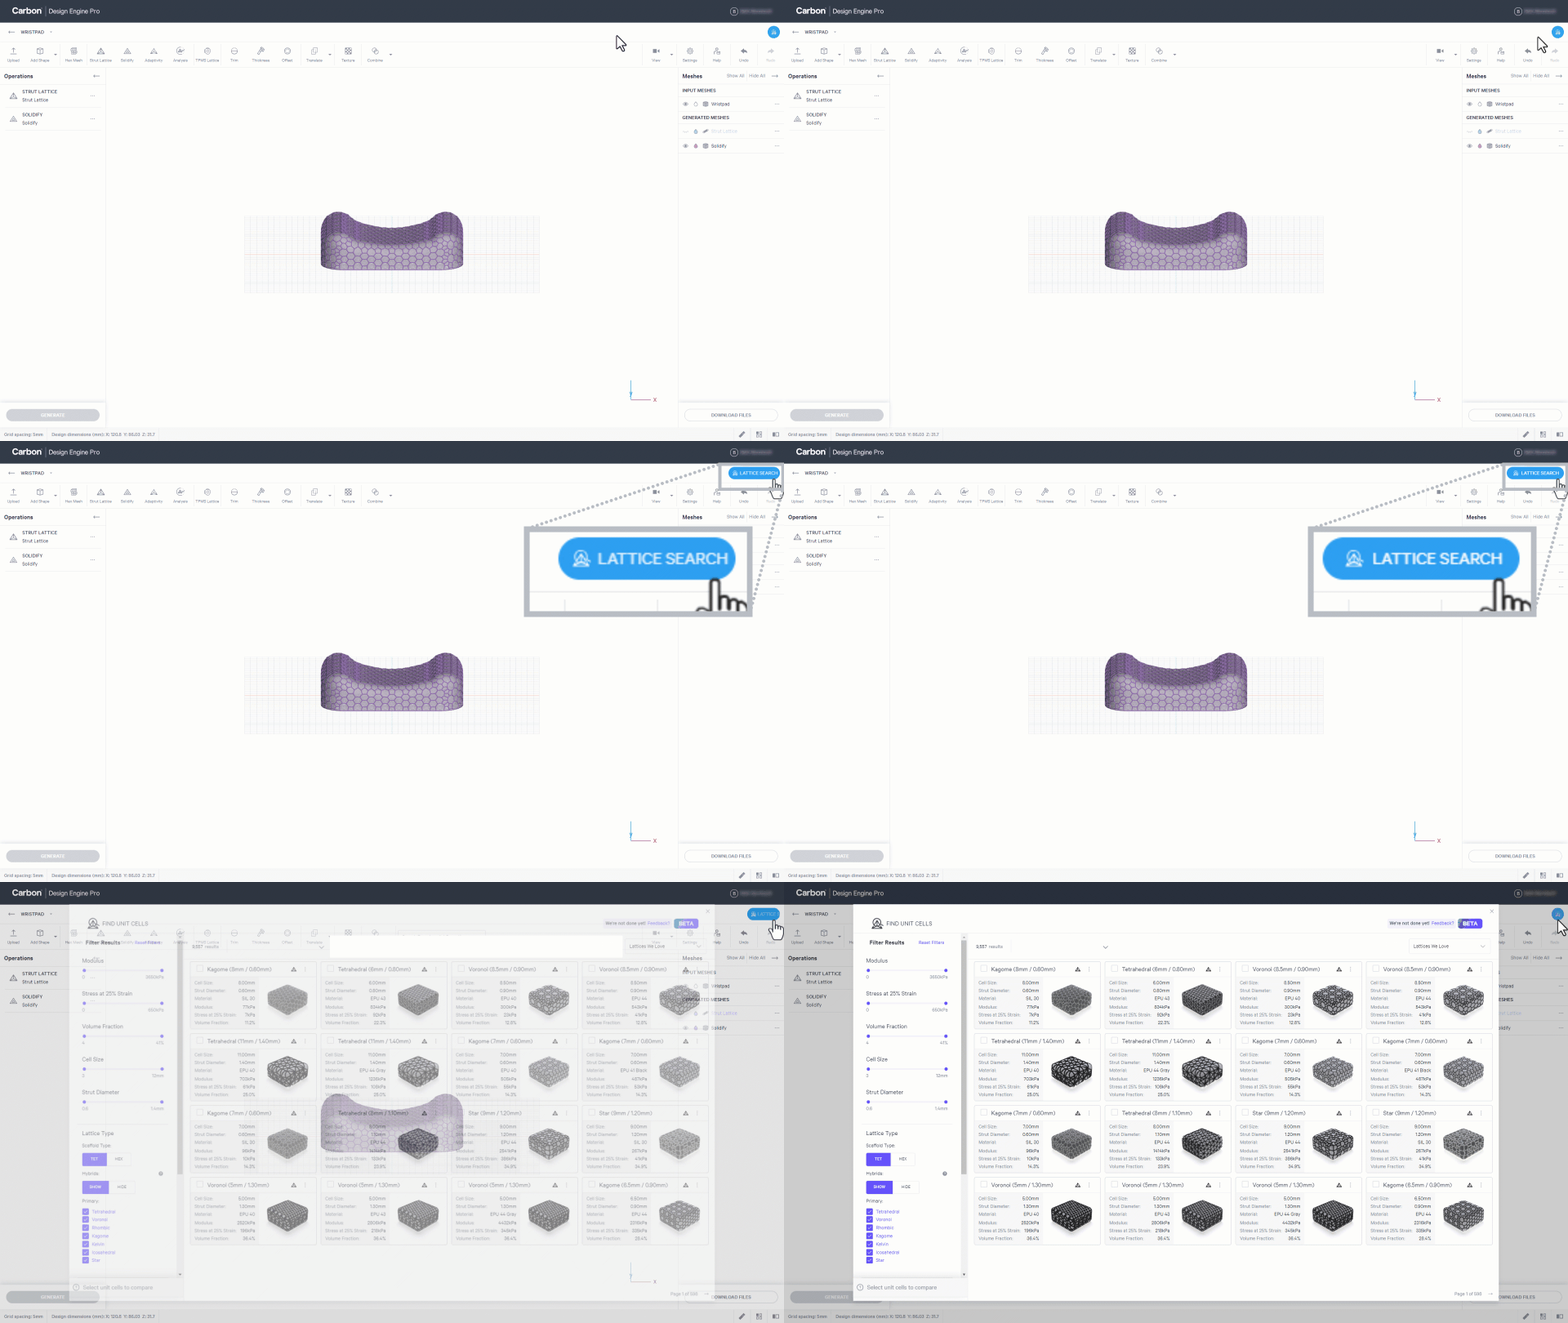
**How do I find a lattice in the metamaterials library?**
- Launch [Lattice Search](docId\:LlWKO8SuVfs2j3cEjz6YR) from the quick-access button on the upper right of the design user interface.
- You can also launch **Lattice Search** from inside the [Strut Lattice](docId\:IDhmaxmVU97UzzIHV0Pdk) tool, under **Lattice Type**. This will enable you to apply a unit cell that you find directly to an input mesh.
:::
:::ExpandableHeading
**What is a good range for a soft lattice?**
- The Stress at 25% Strain will be approximately 0-20 kPa for an extra soft lattice and 20-80 kPa for soft lattices. Use [Lattice Search](docId\:LlWKO8SuVfs2j3cEjz6YR) to find performance criteria for lattices.
- Generally a 10-15% volume fraction is also a good rule of thumb for soft lattices, although lattice type and material will vary results.
:::
:::::ExpandableHeading
**How do I make zones?**
::::VerticalSplit{layout="middle"}
:::VerticalSplitItem
- There are two options to set up your design space for multiple zones.
- Use the [Add Shape](docId\:OUc3sfErqDSUQDeguVIBz) tool in Design Engine.
- Set up zones in your **CAD** file.
Reference [Multi-Zone File Preparation](docId\:iA0qX01VB-VsxJGbK0lE5)
- Define zones in the **Strut Lattice** operation under the [Zones](docId\:eFk8RIevt0JGCmQHe2IFV) tab.
:::
:::VerticalSplitItem
::Image[]{src="https://res.cloudinary.com/carbon3d/image/upload/v1721438790/Education/Software/Design-Engine/Quick-Start-Guide/FAQ/Zones-in-strut-lattice.png" size="60" width="267" height="377" position="center" showCaption="false"}
:::
::::
:::::
:::ExpandableHeading
**When is it best to use zones?**
- Multi-zone lattices enable **control over the performance** of your lattice across a single design space. Lattice type, cell size and strut diameter can be modified in zones, along with specifying a transition distance to maintain connection between varying parameters.
- Changing strut diameter is the most common use case, enabling the lattice to feel stiffer in some areas and softer in others.
*Tip: Hovering over a strut will reveal the strut's attributes.*
:::
:::ExpandableHeading
**What is Uniform vs Point Cloud in the Strut Lattice operation?**
- The [Uniform](docId\:IDhmaxmVU97UzzIHV0Pdk) population type uses the same lattice parameters across the entire design space, unless zones are utilized in tandem.
- The [Point Cloud](docId\:IDhmaxmVU97UzzIHV0Pdk) population type creates a lattice by mapping parameters to XYZ coordinates that are imported via a CSV file. One common use case is to use pressure sensor data to define your lattice, utilizing personalized or aggregated data to build your applications.
:::
::::ExpandableHeading
**How do I get a regular surface pattern?**
- There are a few ways you can influence the surface pattern of your lattice:
- [Cell Size](docId\:f-f8ROxDabcRrBEUDh6Q1)
- Ensure that the cell size fits within the design space, following recommended guidelines.
- If you are not seeing the primary pattern on a tet mesh lattice, try adjusting the cell size in small increments (0.1 +/-).
- The **Strut Lattice** operation provides features under the **Advanced** tab, [Surface Controls](docId\:IDhmaxmVU97UzzIHV0Pdk):
- **Symmetry**
- Apply a symmetry option if you are looking for the surface pattern to manifest around a selected XYZ axis or plane.
- **Surface Isotropy**
- Enable surface isotropy for uniformity.
- **Surface Tolerance**
- For the most control to fine tune the surface pattern, use the surface tolerance feature. Try values based on the recommended guidelines.
:::hint{type="info"}
Reference [Lattice Type Guidelines](docId\:f-f8ROxDabcRrBEUDh6Q1) for more information about surface patterns. Hex mesh and tet mesh strut lattices manifest surface patterns differently, with tet mesh lattices having both a primary and secondary pattern.
:::
::::
:::ExpandableHeading
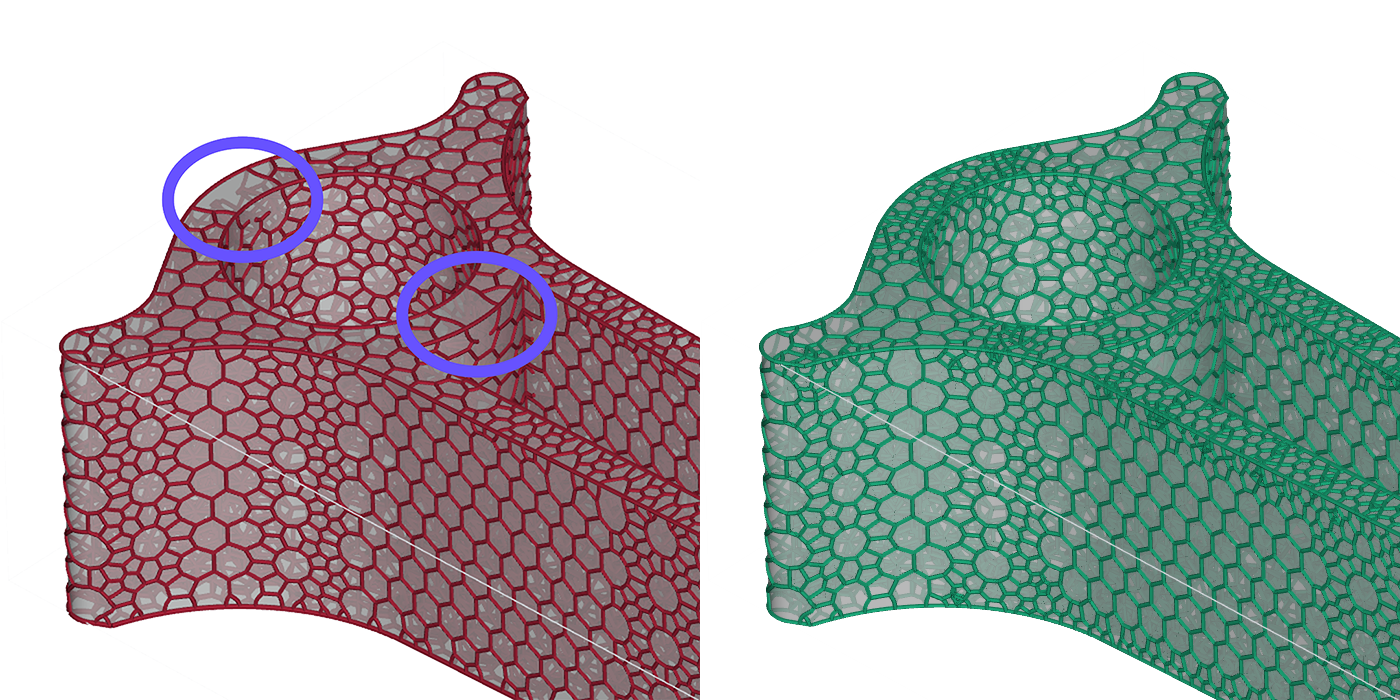
**Why does my lattice appear underpopulated, with struts missing in some areas?**
- Small features may not populate correctly if the cell size is too large for the feature. Ensure that the cell size fits within the design space, following recommended [Cell Size Guidelines](docId\:f-f8ROxDabcRrBEUDh6Q1).
- If you want the cell size to be larger in most of the design space, but want to ensure that smaller features are still properly filled in, use [Cell Size Adaptivity](docId\:UpBQxWWLjaafbScteZwEd) to adjust the cell size in only those areas that need adjustment.
:::
:::ExpandableHeading
**Can I manually edit struts?**
- **Yes**. You can delete, modify, or add individual struts.
Reference [Edit Strut Lattice](docId:5lIpVKkLMW4AdtrleeGaG)
:::
:::ExpandableHeading
**Can I keep part of my design space solid or apply a skin over a section of my lattice?**
- **Yes!** You can use the [Combine - AI Error](docId\:qgtfrFw3wkjEOb0eY5hYv) tool to merge separate parts (individual STL mesh files) into one mesh file for printing. Use CAD software to create the parts to combine with a lattice.
:::
## Carbon Manufacturing
:::ExpandableHeading
**How do I know if my part fits on my Carbon printer's build platform?**
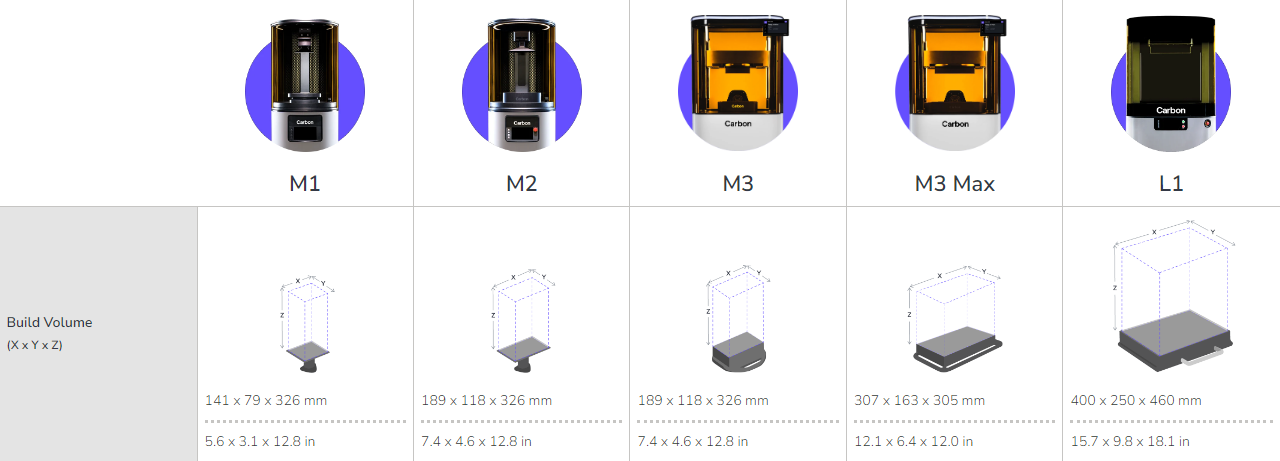
- Reference the Design Dimensions in the lower left of your project screen to see the bounding box dimensions of your design.
- Compare the dimensions to the specifications for your printer. All of Carbon’s printer’s build volumes can be found on the [printer product page](https://www.carbon3d.com/products).
:::
:::ExpandableHeading
**Does Design Engine have overhang warnings for printability?**
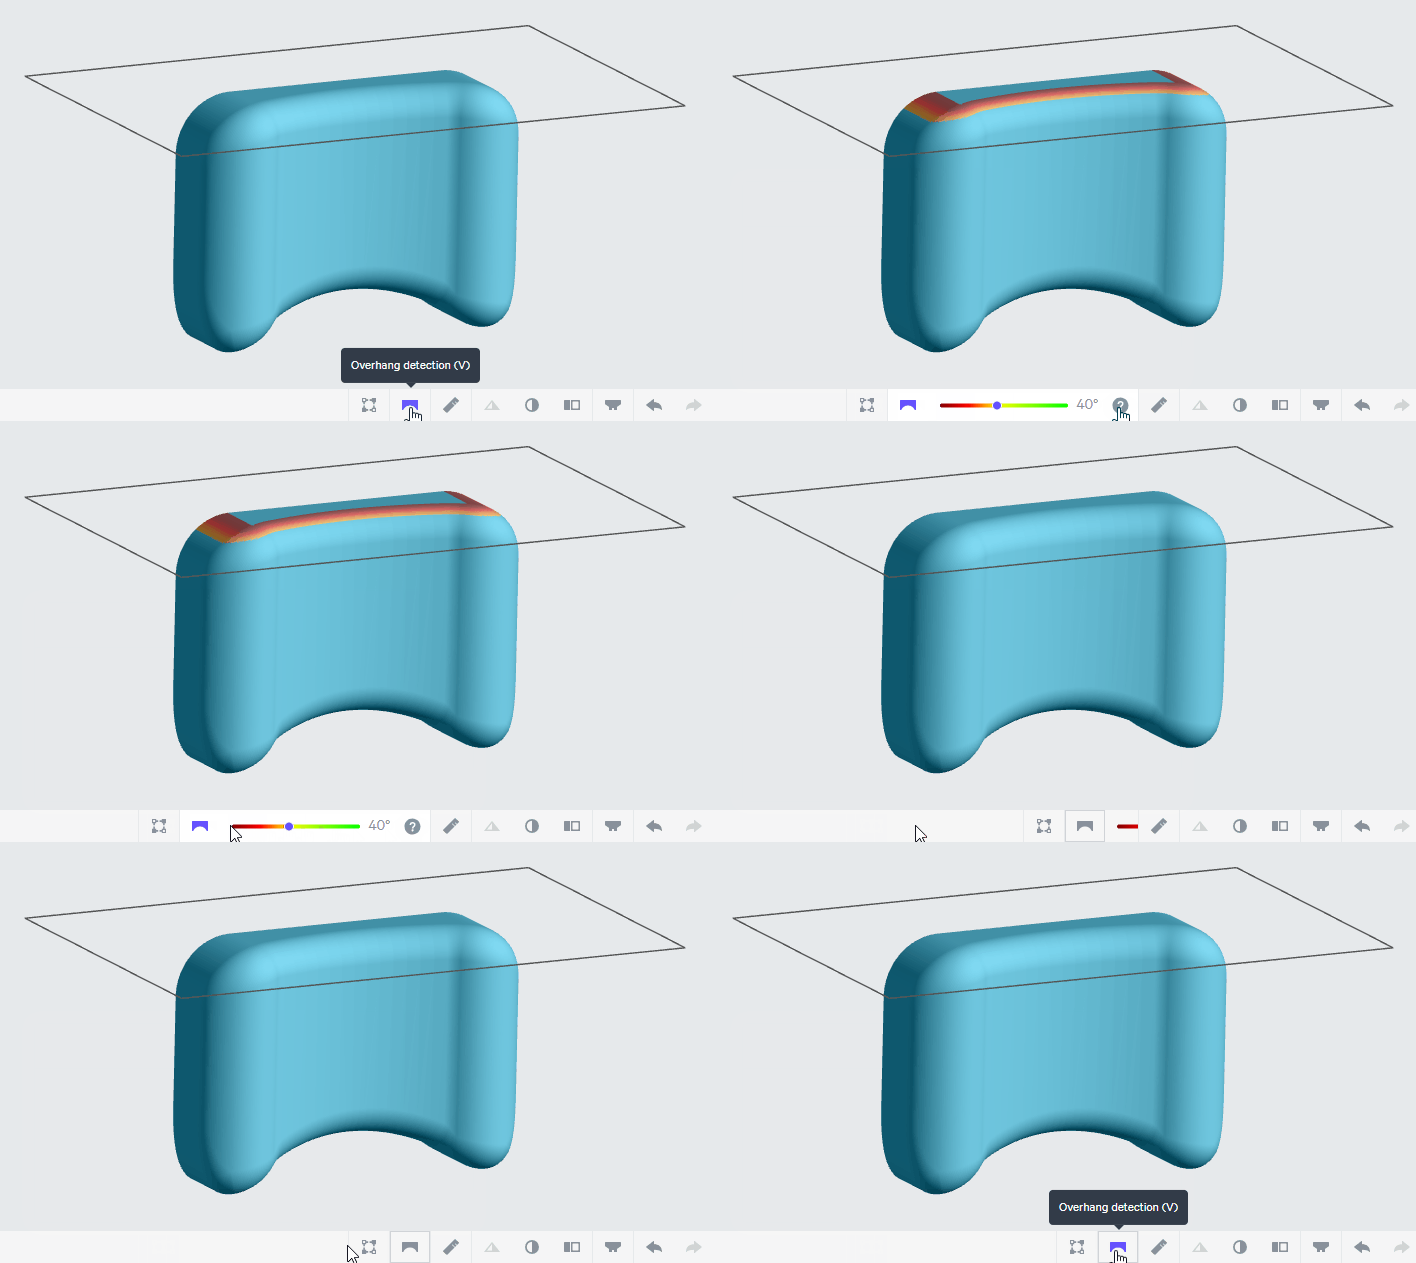
- **Design Engine does not offer overhang detection**, which is set up to retain model orientation from native CAD software, rather than print orientation.
- **Carbon’s printer software offers overhang detection** to assist with part orientation and supports. When working with lattices, it can be helpful to assess the non-latticed design space first to eliminate the distraction of strut overhangs, and then consider any strut overhangs after an optimal orientation is selected.
Reference **Printer UI - **[UI Layout & Features](docId:2HKeWUMXyhZSgZlp8GjBI) for more information on overhang detection.
:::
:::ExpandableHeading
**Are Technical Data Sheets (TDS) available for Carbon materials?**
- All TDS’s can be found on the [materials product page](https://www.carbon3d.com/materials/elastomeric).
:::