---
title: Orient
slug: software/orient
description: This document explores essential tools within Carbon's Printer UI for establishing part orientation for printing.
docTags:
createdAt: 2024-07-01T22:39:54.098Z
---
::::VerticalSplit{layout="left"}
:::VerticalSplitItem
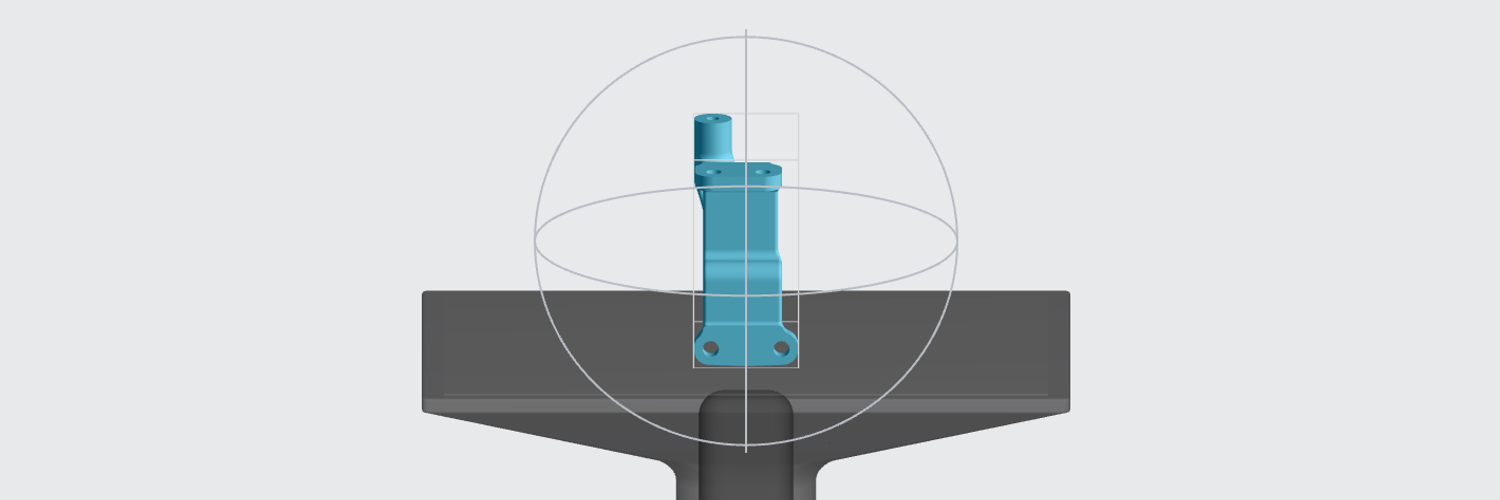
Orientation is the position a part sits in XYZ relative to the platform and print direction.
:::
:::VerticalSplitItem
:::
::::
After importing your STL file and selecting your resin, orienting the part is the next step to setting up the build/print.
This guide will show you what **tools** you have available inside the Printer UI and **how to use them**.
Part orientation **strategy** is a topic covered in detail in the [Orientation and Supports](docId\:DoBa4qKKoXpi-52yw3nCr) guide.
## Part Position
While orienting and supporting your part, you will need to decide if the part should be **Above Platform **or **On Platform**. The primary considerations are as follows. Assess each consideration for each potential orientation.
::::VerticalSplit{layout="middle"}
:::VerticalSplitItem
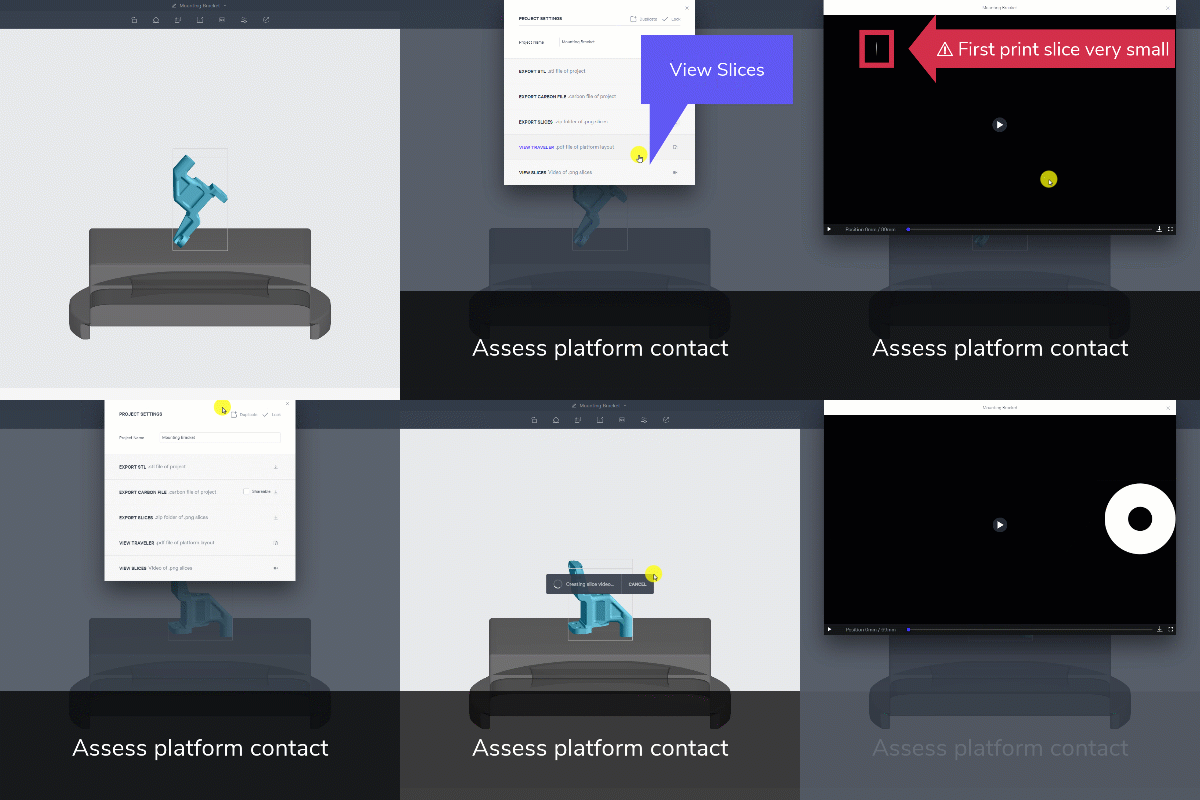
**Platform Contact**
- Open Project Settings
- View Slices
**⚠ ****First print slice very small**** - Above Platform**
**First print slice good contact**** - On Platform**
:::
:::VerticalSplitItem
:::
::::
***
::::VerticalSplit{layout="middle"}
:::VerticalSplitItem
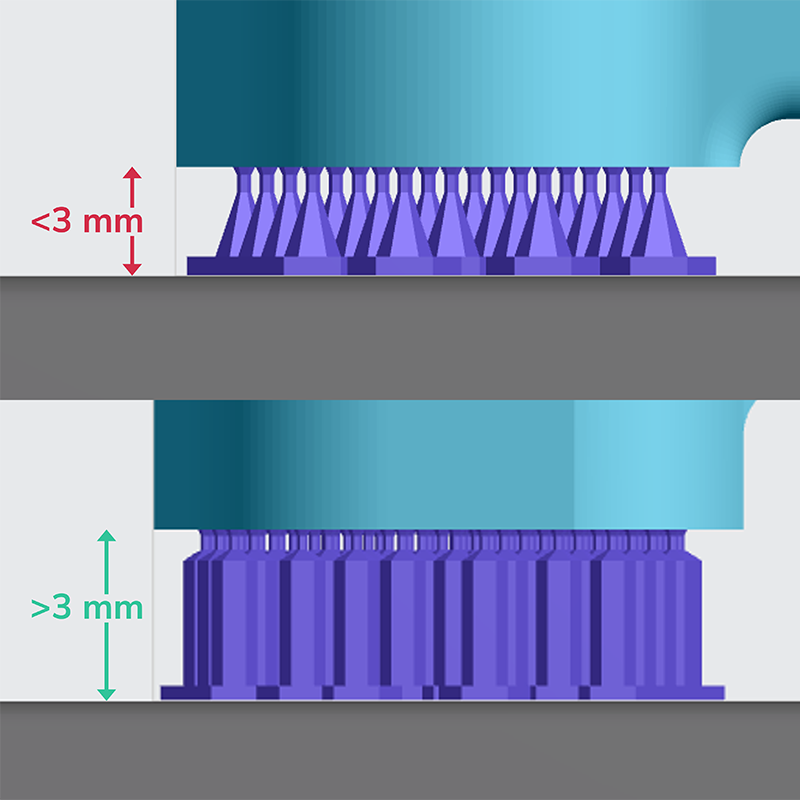
**Feature Distance from Platform**
- **Less than 3 mm** **- Above Platform**
- **Greater than 3 mm**** - On Platform**
Supports \<3mm tall are less effective and more difficult to remove.
:::
:::VerticalSplitItem
:::
::::
***
::::VerticalSplit{layout="middle"}
:::VerticalSplitItem
**Unvented Volumes**
- Print defect from unvented volume
- Unvented volume with on platform auto orientation
- No unvented volume lifted above platform
**Above Platform**
Lifting a part onto supports will eliminate unvented volumes when the unvented cavity sits on the platform.
:::
:::VerticalSplitItem

:::
::::
:::hint{type="info"}
Your part will be lifted **Above Platform** if you select that option and run **Auto Orientation** in the Orient tab.
:::
:::hint{type="warning"}
If you did not Auto Orient your part, then you will need to actively select **Above Platform** in the **Supports** tab (the part will not default to Above Platform).
:::
:::hint{type="info"}
Note that the **Above Platform **choice lifts your part **6 mm** above the platform.
Above Platform orientations always **require supports**, but more options are available.
:::
:::hint{type="info"}
If you prefer to change the default part position to **On Platform**, you may do so in your project settings. The setting is named **Default part position for auto orientation **(printer requires 1.36 software version).
:::
# Orient Features
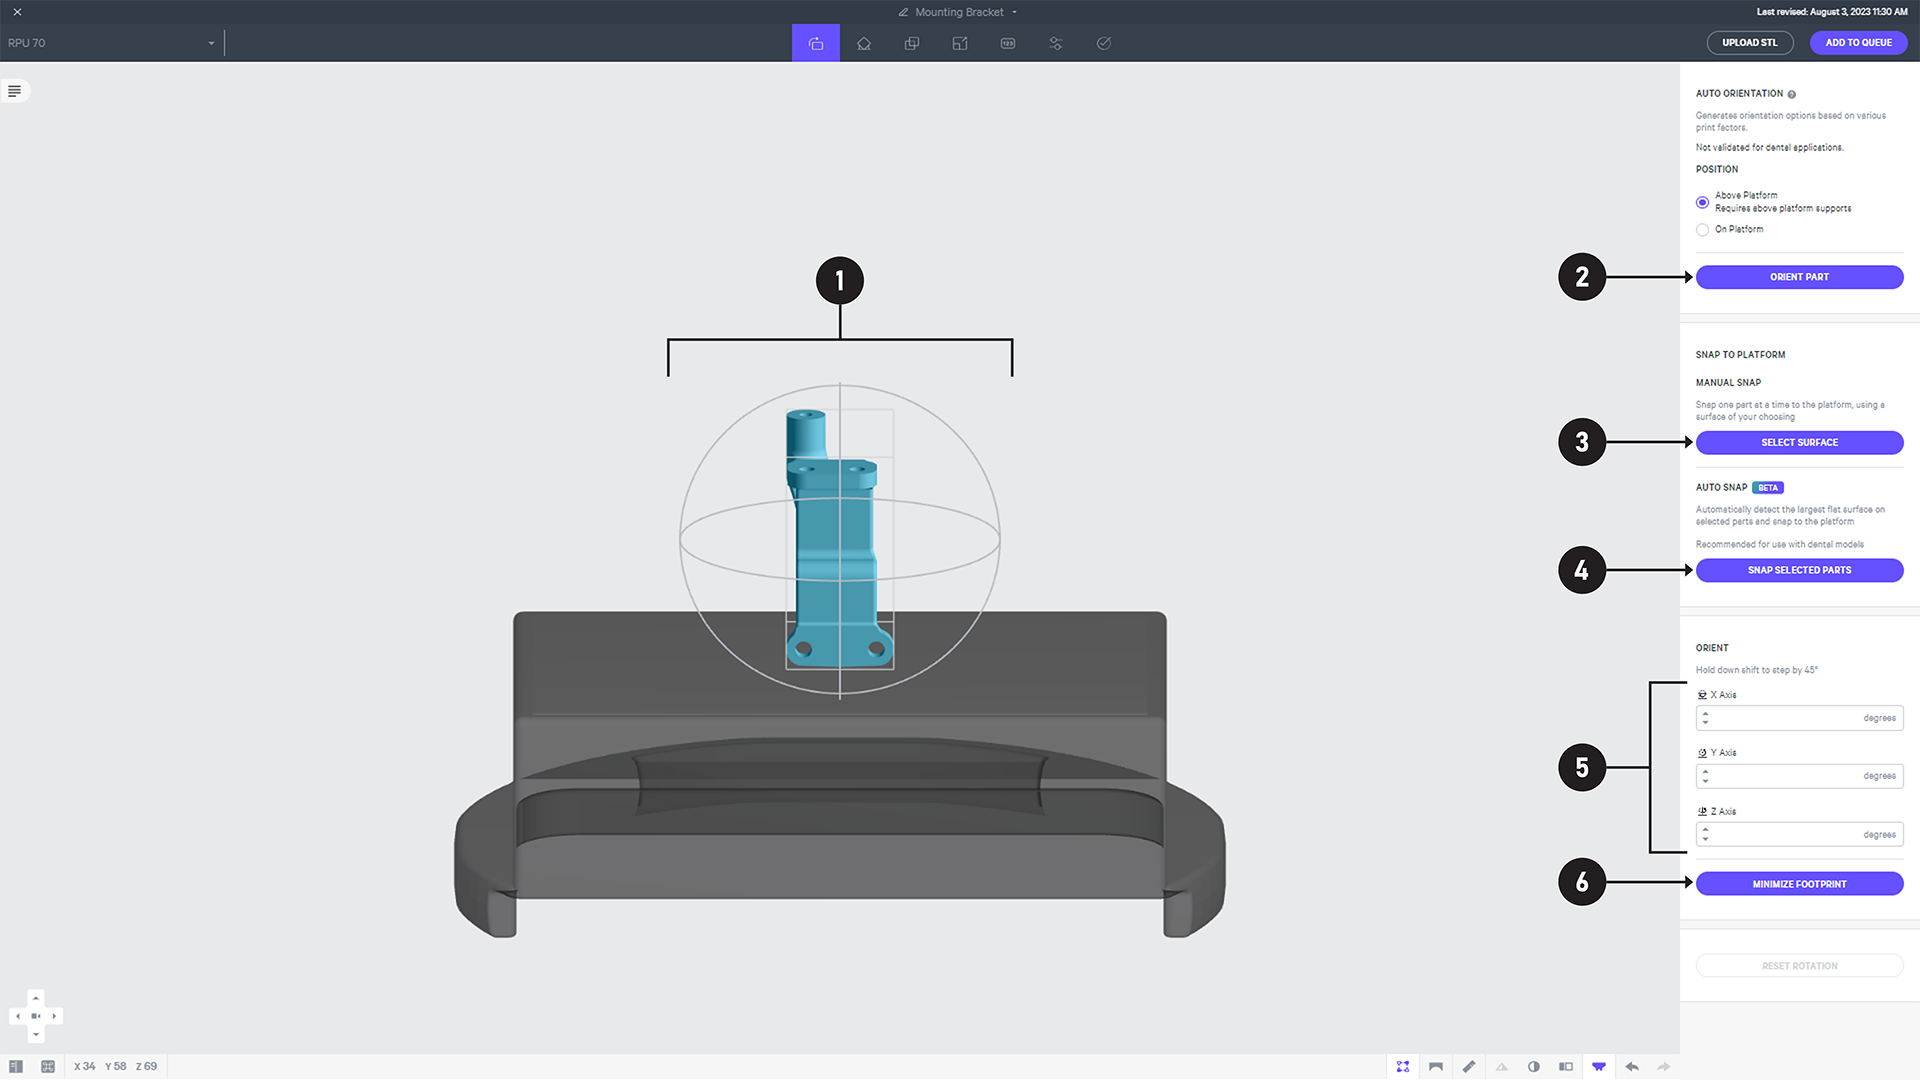
Click on the name of a feature below for more information.
::::::WorkflowBlock
::::WorkflowBlockItem
:::ExpandableHeading
### Manually Adjust Orientation
::embed[]{url="https://vimeo.com/1043994932?dnt=1"}
- Click and drag an axis loop
- Note the angle of rotation
:::
::::
:::::WorkflowBlockItem
::::ExpandableHeading
### Auto Orientation - Summary Demo
::embed[]{url="https://vimeo.com/1043994906?dnt=1"}
- Select Part Position
- Click Orient Part
- Review and select option
- Click Done
:::hint{type="info"}
See details about [Auto Orientation](docId\:rMnxtq1NIAHXZOc4bZXWu) below.
:::
::::
:::::
::::WorkflowBlockItem
:::ExpandableHeading
### Snap to Platform - Manual Snap
::embed[]{url="https://vimeo.com/1043994904?dnt=1"}
- Click Select Surface
- Click on a surface to snap to the platform
- Click DONE when complete
:::
::::
:::::WorkflowBlockItem
::::ExpandableHeading
### Snap to Platform - Auto Snap
::embed[]{url="https://vimeo.com/1043994910?dnt=1"}
- Select all (or intended) parts
- Click Snap Selected Parts
- All selected parts snap their largest flat surface to the platform
:::hint{type="warning"}
**Auto Snap **will provide an error message if the operation is not successful for all selected parts. Please ensure that you carefully review and remediate any failed parts before proceeding with your print.
:::
::::
:::::
::::WorkflowBlockItem
:::ExpandableHeading
### Orient by XYZ Axis
::embed[]{url="https://vimeo.com/1043994915?dnt=1"}
- Enter exact angles
- Use the arrows for fine tuning
- Hold shift to adjust by 45°
:::
::::
::::WorkflowBlockItem
:::ExpandableHeading
### Minimize Footprint
::embed[]{url="https://vimeo.com/1043994924?dnt=1"}
- Minimize Footprint provides the smallest footprint on the platform
- 💡 Effective strategy to maximize the build
:::
::::
::::::
# Auto Orientation Details
**What Auto Orientation Does**
While many orientations will print a successful part, there are also orientations that may lead to print defects, or even failures.
**Auto Orientation** considers **print success factors **for an optimal orientation.
- Unsupported Features
- Cross Section
- Resin Flow
- Unvented Volumes
- Stability
:::hint{type="info"}
It is recommended to also review the [Orientation and Supports](docId\:DoBa4qKKoXpi-52yw3nCr) guide to understand all factors affecting part orientation.
:::
:::hint{type="info"}
Auto Orientation has **not been validated for dental use.**
:::
::::VerticalSplit{layout="middle"}
:::VerticalSplitItem

Part printed with an **optimal orientation **for print success
:::
:::VerticalSplitItem

Part printed with a **sub-optimal orientation **resulting in **resin flow band defects** and **requiring supports** that were not needed in the optimal orientation
:::
::::
## Workflow
::embed[]{url="https://player.vimeo.com/video/731892077?dnt=1"}
:::ExpandableHeading
Video Text
1. Select the **Orient **tab
2. Choose **Position**
- Choose above or on platform
- If unsure, choose **above platform **which considers more options
3. Click **Orient Part**
4. Review options
- Recommended Orientation
- Easier to Support
- Reduce Z-height
5. Select option and click **Done**
:::
## Options
There is **not just one right orientation** for a part. Some factors may be more important to you than others for the design, function, and manufacturing efficiency of your part. Auto Orientation provides **a few options** to make the best choice for your application, while still providing a **successful print**.
- Recommended Orientation
- Easier to Support
- Reduce Z-height
:::hint{type="info"}
In some cases, you may find that suggestions are duplicated (for example, the second or third option may be the same as the first option). In this case, the algorithm was not able to find an outcome that out-performed the displayed option for the factors considered.
:::
Results will also vary depending on a couple of key conditions as selected by the user.
- **Elastomeric**
- **Above Platform **
:::hint{type="info"}
Performing an [Orientation Assessment](docId:2Yr4OFt_Lo0mOHUcloiQo) can help determine the best choice for your application.
:::
***
### Recommended Orientation
Carbon’s primary recommended orientation weighs all [print success factors](docId\:DoBa4qKKoXpi-52yw3nCr) in tandem to achieve a successful print. How the software analyzes your part for each factor is detailed below.
- Unsupported Features
- Cross Section
- Resin Flow
- Unvented Volumes
- Stability
**Unsupported Features**
Unsupported features consist of **overhangs and islands** that will not print properly if left unsupported.
::::VerticalSplit{layout="middle"}
:::VerticalSplitItem
Auto Orientation analyzes unsupported features to minimize the following:
1. Surface area of overhangs and islands
2. Volume of islands
3. Overhang surfaces exceeding a [self-supporting angle](docId\:t94PR-A-C0pIhY6LJsWk7)
:::
:::VerticalSplitItem

:::
::::
The goal is to reduce the quantity and/or complexity of supports for overhangs and islands and reduce [Under-Supported Overhang](docId\:NyU9Vh8WP7K9IGw0qOP8A) defects.
**Cross Section**
Cross section is the XY slice of the part being printed at a given point in time, which can be seen when you [View Slices](docId\:gfR-GoC-Irq_L9_KanC-X) for the project.
Auto Orientation minimizes the **average cross section **throughout the print.
The goal is to
- Reduce the quantity and/or complexity of supports for stability and adhesion due to suction forces and avoid the related defects: [Under-Adhesion](docId\:DAbqNXb4KnG1eeiClRzqF) and [Shift Lines](docId\:B4tdxu5JhjIzMKTloM5uh).
- Reduce heat related [Shrink Line](docId:76x3VgMKljC_sUzDVMXcY) defects and longer print times
- Avoid abrupt changes in cross section that cause the [Cross Section Line](docId:7TYKEfAqK6hnwMvjVW6Xj) defect
Example of **poor** and **good** average cross sections:

**Resin Flow**
Prints are most successful when the resin can flow freely and consistently.
Auto Orientation analyzes how far resin must flow between slices during printing and aims to minimize that distance.
The goal is to avoid **large cross sections **which can lead to the same risk of defects as cross sections described above:
- [Under-Adhesion](docId\:DAbqNXb4KnG1eeiClRzqF) from suction forces
- Suction forces detach part from platform mid-print as the cross section becomes large later in the print, compared to a small cross section on the platform
- [Cross Section Line](docId:7TYKEfAqK6hnwMvjVW6Xj) (aka resin flow band) from abrupt cross section change
- Small cross section
- Changes abruptly to a large cross section

**Unvented Volumes**
[Unvented volumes](docId\:U7XYytjyDp3BvsYy2qKcU) trap resin in a pressure vacuum during printing which can cause print defects.
Auto Orientation will orient a part to **vent trapped resin**.
The goal is to eliminate unvented volume print defects.
Note that Auto Orientation may still have an unvented volume if you selected an On Platform orientation. That unvented volume can be eliminated by lifting the part above platform.

**Stability**
Stability is needed to counter the [suction forces](docId\:U7XYytjyDp3BvsYy2qKcU) of printing.
Auto Orientation analyzes your part to reduce or eliminate **tall supports**.
The goal is to provide greater stability. When a part requires tall supports, it is generally less stable. An added benefit to reducing tall supports is that **shorter parts often print faster **than parts oriented taller.

***
### Easier to Support
The Easier to Support option prioritizes the analysis of **overhangs and islands **as described for **Unsupported Features **above.
This example bracket requires supports regardless of orientation, but Auto Orientation's Easier to Support option provides a solution that reduces overhangs and islands.
::::VerticalSplit{layout="middle"}
:::VerticalSplitItem

:::
:::VerticalSplitItem

:::
::::
**How Easier to Support is Determined**
The Easier to Support option analyzes overhangs and islands and seeks to reduce the overall impact of these unsupported features. In this example, overhangs and islands are represented in each orientation as follows. In aggregate, the Easier Support option contains fewer total overhangs and islands.
::::VerticalSplit{layout="middle"}
:::VerticalSplitItem
**Surface area of overhangs and islands**
*(View from below platform)*
**A.** Recommended Orientation = 480 mm2
(From Overhangs)
**B.** Easier to Support = 71 mm2
(From Islands)
:::
:::VerticalSplitItem

:::
::::
::::VerticalSplit{layout="middle"}
:::VerticalSplitItem
**Volume of islands**
**A. **Recommended Orientation = 0 mm3
**B.** Easier to Support = 73 mm3
:::
:::VerticalSplitItem

:::
::::
::::VerticalSplit{layout="middle"}
:::VerticalSplitItem
**Surfaces exceeding self-supporting angle**
*(> 30 degrees from platform for RPU 70)*
*(View from below platform)*
**A.** Recommended Orientation = 479 mm2
**B.** Easier to Support = 0 mm2
:::
:::VerticalSplitItem

:::
::::
**Is One Option Better?**
Both options offer a method for **print success**, and by that metric, neither option is better nor worse.
There are generally differences that may steer you to choosing one over the other. In this example, the following differences apply, but every geometry will need to be [assessed](docId:2Yr4OFt_Lo0mOHUcloiQo) to find the best value for design and production needs.
**Recommended Orientation**
- Part prints faster
- 1h 24m vs 2h 3m print time
- Part is more stable
- Supports are needed for overhangs and adhesion, not stability
::::VerticalSplit{layout="middle"}
:::VerticalSplitItem
**Easier to Support**
- Part requires fewer supports
- 1.0 mL vs 1.8 mL of resin per part
- Support locations may better suit the function of the part
- Orientation allows supports to remain on part edges, avoiding supports on surfaces that interface with assembly components
:::
:::VerticalSplitItem

:::
::::
:::hint{type="warning"}
**Note that the Easier to Support option does not always mean overhangs or islands are eliminated, nor does it always mean fewer supports.**
In this example, the Easier to Support option actually creates islands. Also, the part is less stable requiring supports to combat suction forces. It is always important to weigh options against your design goals and manufacturing efficiency. In this case the functional advantages and fewer supports may outweigh the stability and shorter print times of the Recommended Orientation.
:::
***
### Reduce Z-height
The Reduce Z-height option prioritizes shorter orientations for **stability **as described above, which will also yield **faster print times.**
The example eyeglass temple can print successfully with two very different Z-heights.
::::VerticalSplit{layout="middle"}
:::VerticalSplitItem

:::
:::VerticalSplitItem

:::
::::
**How Reduce Z-height is Determined**
The Reduce Z-height option analyzes the height of needed supports and seeks to reduce or eliminate the need for tall supports.
::::VerticalSplit{layout="middle"}
:::VerticalSplitItem

:::
:::VerticalSplitItem
**Tall Supports**
**A. **Recommended Orientation
- **134 mm**
**B.** Reduce Z-height
- **10 mm**
:::
::::
**Is One Option Better?**
Both options offer a method for **print success**, and by that metric, neither option is better nor worse.
There are generally differences that may steer you to choosing one over the other. In this example, the following differences apply, but every geometry will need to be assessed to find the best value for design and production needs. This example is also reviewed in detail in the [Orientation Assessment](docId:2Yr4OFt_Lo0mOHUcloiQo) guide.
**Recommended Orientation**
- Maximize parts per build
- 42 parts vs 10 parts
**Reduce Z-height**
- Part prints faster
- 1h 10m vs 5h 24m print time
- Part is more stable
- Part requires fewer supports
- 5.5 mL vs 6.6 mL of resin per part
- Support locations may better suit the function of the part
- Orientation allows supports to remain on features that don't interface with the wearer
:::hint{type="info"}
**Note that this option is not always the flattest possible orientation, but rather the flattest that still yields print success with other factors in mind.**
In this example, the Reduce Z-height option still raises the temple tip above the platform, even when a Y rotation could make the part even shorter. The given orientation takes this feature into account to reduce additional overhangs, leaving it at a self-supporting angle.
:::
## Result Variations
### Elastomeric vs Rigid Resin
Elastomeric and rigid resins are treated differently by Auto Orientation. Elastomers that are soft and flexible while printing (EPUs) are more susceptible to the suction forces of printing and therefore print more successfully when oriented closer to the platform.
The example below provides a different recommended orientation for an elastomeric resin (EPU 40) vs a rigid resin (RPU 70). The elastomeric recommendation is shorter in height to account for its flexible properties.
::::VerticalSplit{layout="middle"}
:::VerticalSplitItem

:::
:::VerticalSplitItem

:::
::::
:::hint{type="info"}
Note that SIL 30 is treated as a rigid resin during printing. Though elastomeric after thermal curing, SIL 30 prints stiff in its green state.
:::
::::VerticalSplit{layout="middle"}
:::VerticalSplitItem

:::
:::VerticalSplitItem
**Switch Resin Warning**
If you switch resins while in the Auto Orientation interface, you will be given a warning that results may change.
Should you choose to switch resin, **rerun Auto Orientation** to obtain the new results.
:::
::::
### Above Platform vs On Platform
Auto Orientation will provide different results for each platform position.
- **Above Platform **- **Default **position with the **most options**
- **On Platform - **Must be **specified by the user **and **limits options **to only those with flat surface for platform adhesion
:::hint{type="warning"}
Note that the **Above Platform **option actually **lifts the part **above the platform, so **supports will be needed **for a successful print.
Project Analysis will provide an error message if no parts are touching the platform. If at least one part touches the platform, the print will run but any parts without supports will fail.
:::
::::VerticalSplit{layout="middle"}
:::VerticalSplitItem
**Auto Orientation assesses the part to**
- Look for flat surfaces
- Determine if the flat surfaces provide enough platform contact for adhesion
This example does not have any flat surfaces that provide adequate platform contact.
:::
:::VerticalSplitItem

:::
::::
::::VerticalSplit{layout="middle"}
:::VerticalSplitItem

:::
:::VerticalSplitItem
**Platform Warning**
If no adequate surfaces are found for platform adhesion, users receive a warning that an on platform orientation is not possible.
:::
::::