---
title: Layout
slug: software/layout
description: The Layout tab in Carbon's Printer Software contains tools to duplicate your supported part and optimize the build layout for printing and post-processing.
docTags:
createdAt: 2024-07-01T22:46:21.544Z
---
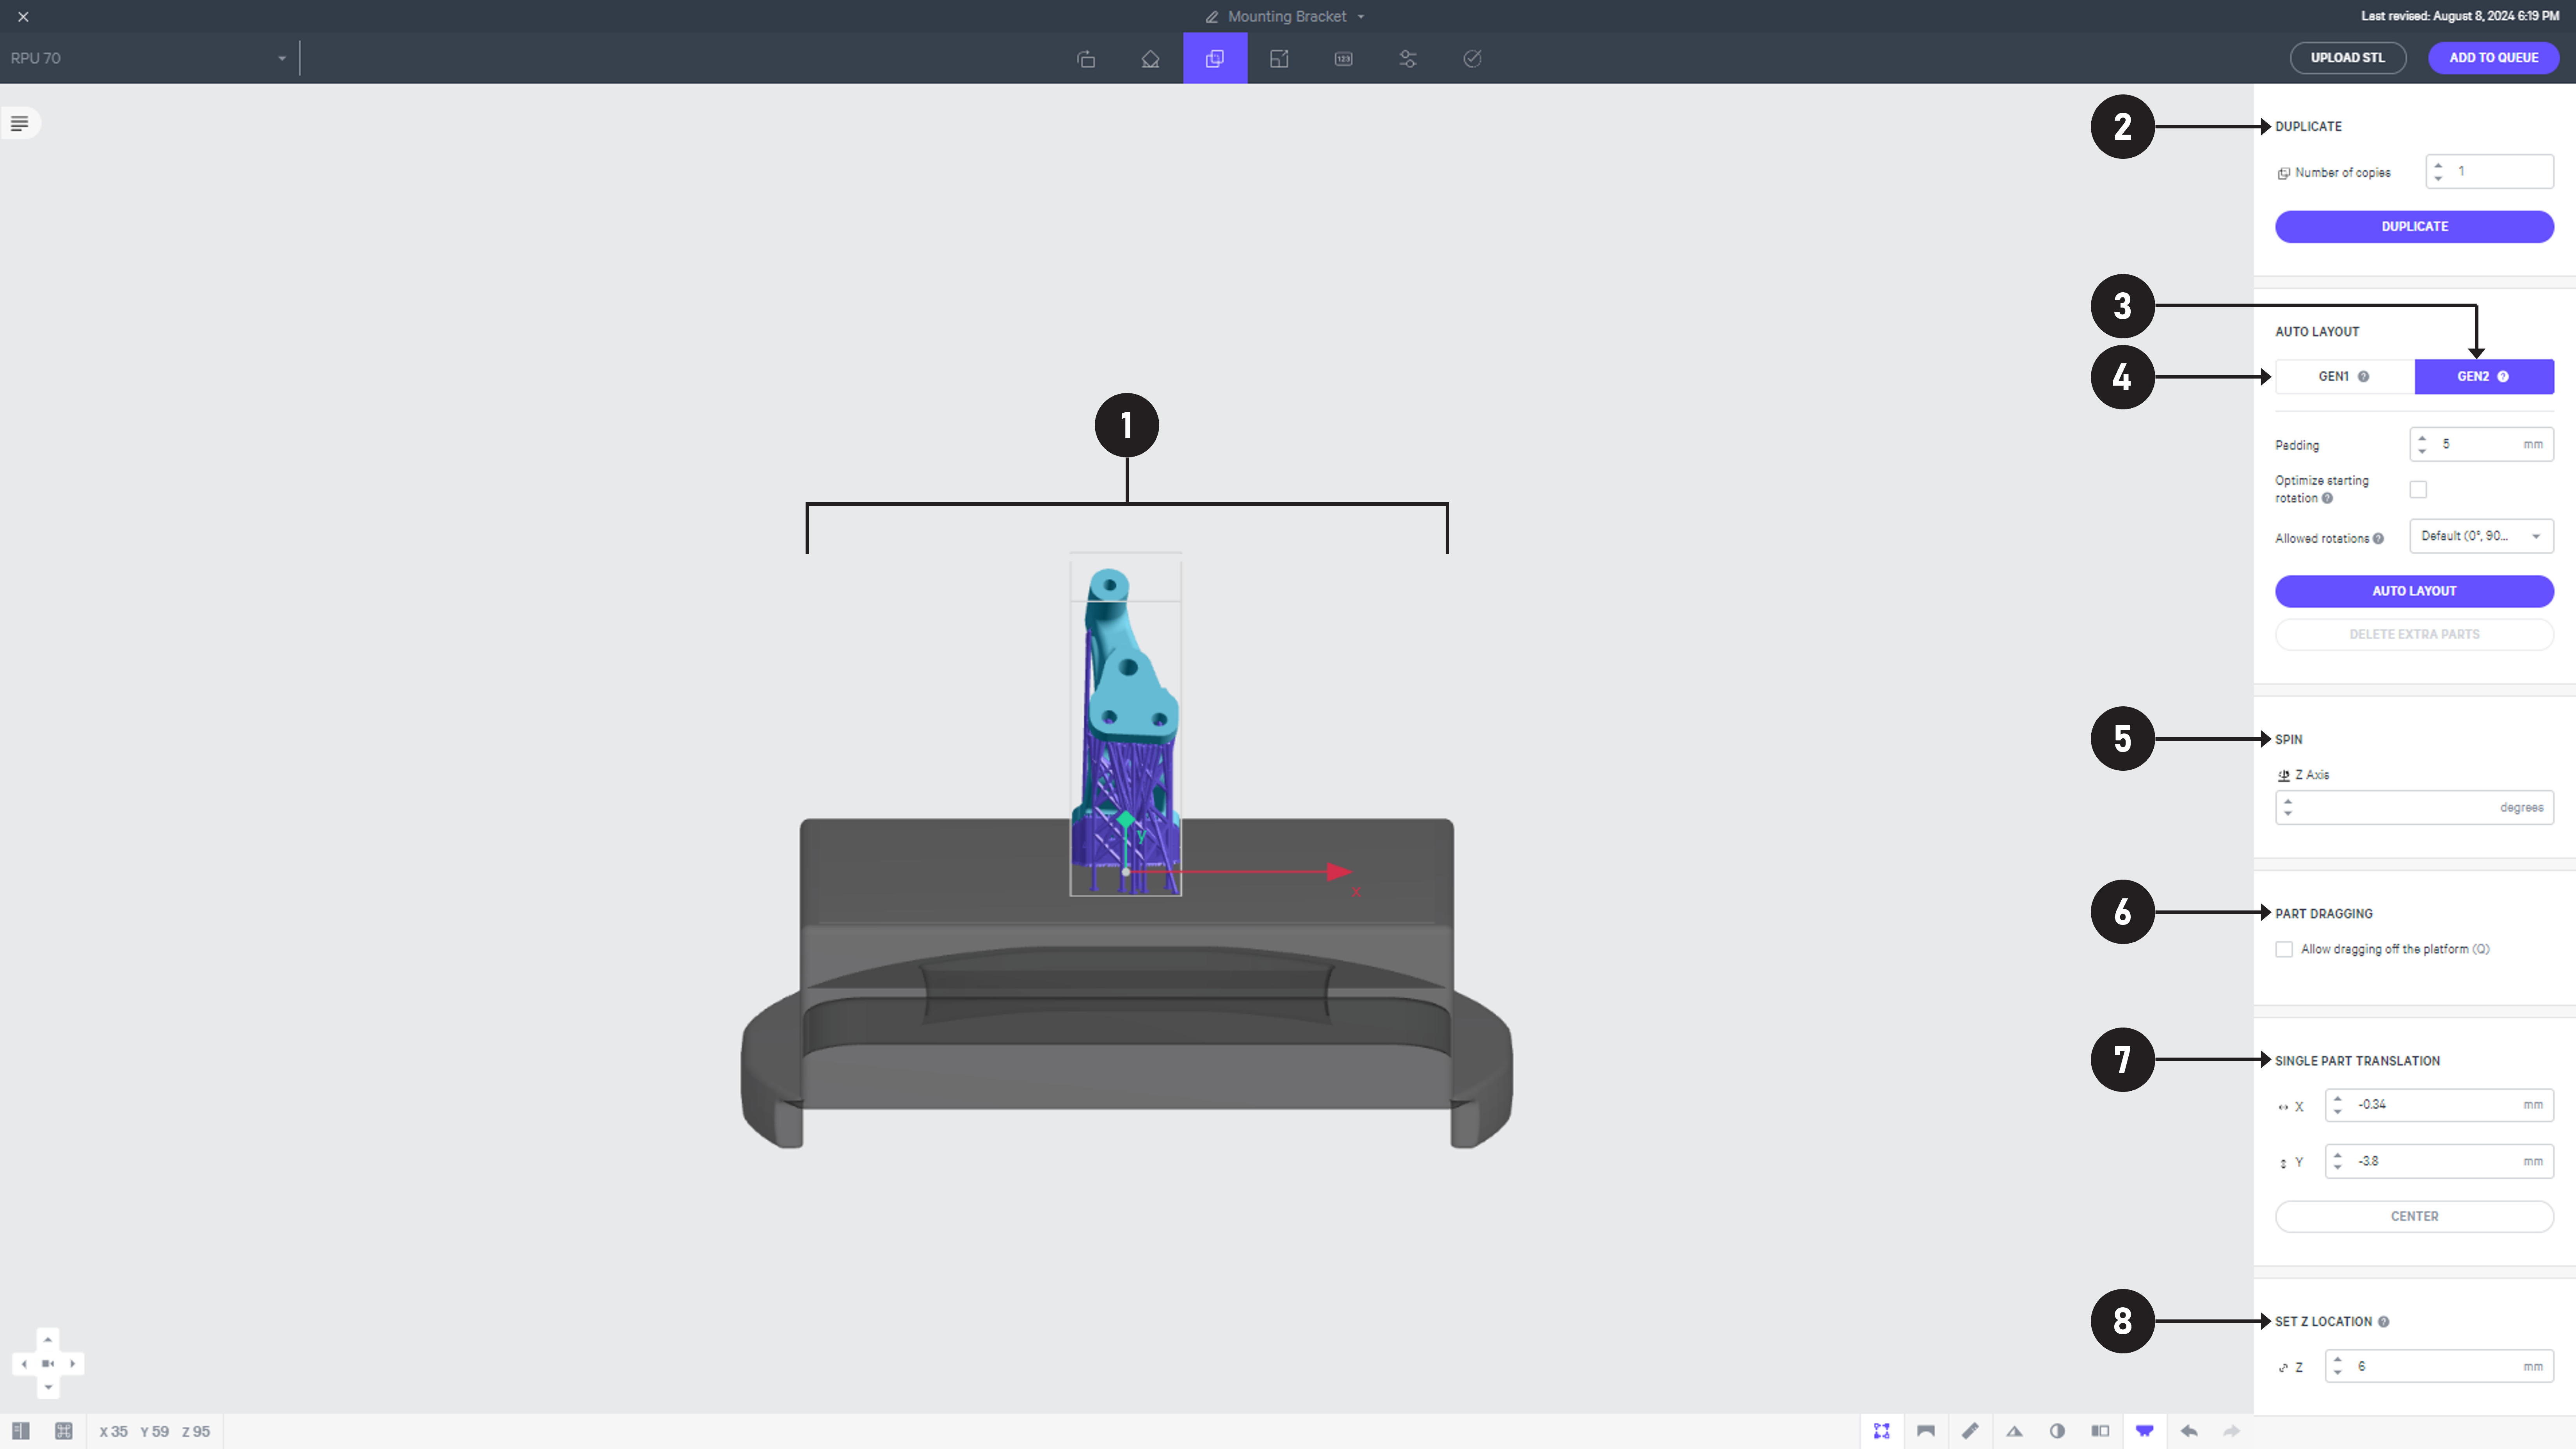
The Layout tab contains tools to duplicate your supported part and optimize the build layout for printing and post-processing.
# Layout Features
Click on the name of a feature below for more information.
::::::WorkflowBlock
::::WorkflowBlockItem
:::ExpandableHeading
### Manually Adjust Part Position
::embed[]{url="https://player.vimeo.com/video/996453182?dnt=1"}
- Manually adjust the part's position
- Click and drag an axis arrow
- Note the distance while dragging
:::
::::
::::WorkflowBlockItem
:::ExpandableHeading
### Duplicate
::embed[]{url="https://player.vimeo.com/video/996453124?dnt=1"}
- Duplicate parts to fill the build platform
- 💡 Enter more parts than you think will fit - It's easy to delete extras
- Click Duplicate
:::
::::
::::WorkflowBlockItem
:::ExpandableHeading
### Gen2 Auto Layout
::embed[]{url="https://player.vimeo.com/video/996453164?dnt=1"}
- Top down view is helpful when laying out the build
- Gen2 is the default auto layout tool
- After duplicating supported parts, click Auto Layout for default results
- Parts that do not fit will be placed off platform and highlighted **magenta**
- Delete extra parts
:::
::::
::::WorkflowBlockItem
:::ExpandableHeading
### Gen1 Auto Layout
::embed[]{url="https://player.vimeo.com/video/996453145?dnt=1"}
- After duplicating supported parts, click Auto Layout
- Parts that do not fit will be placed off platform and highlighted **magenta**
- Default padding between parts is 5mm
- ⚠ Tighter spacing can lead to print defects
- In this case, both the geometry and supports are such that the parts themselves are mostly greater than 5mm apart
- We can try a tighter 2 mm padding to fit an additional part
- One additional part fits
- Delete extra parts
:::
::::
::::WorkflowBlockItem
:::ExpandableHeading
### Spin
::embed[]{url="https://player.vimeo.com/video/996453209?dnt=1"}
- Select part to spin around the Z axis
- Enter the angle of rotation
- Adjust the layout if needed
- Spin can also apply to multiple parts
:::
::::
::::WorkflowBlockItem
:::ExpandableHeading
### Part Dragging
::embed[]{url="https://player.vimeo.com/video/996453109?dnt=1"}
- By default, parts will not drag off platform
- You can allow off platform dragging
:::
::::
::::WorkflowBlockItem
:::ExpandableHeading
### Single Part Translation and Center
::embed[]{url="https://player.vimeo.com/video/996453193?dnt=1"}
- Fine XY adjustments can be made to a single part position
- Re-center parts as needed
:::
::::
:::::WorkflowBlockItem
::::ExpandableHeading
### Set Z Location
::embed[]{url="https://player.vimeo.com/video/996453219?dnt=1"}
- Set Z location, measured from lowest point on part
- Optionally Regenerate supports at new height
- Software will autocorrect Z height to maximum allowed
- Maximum height
:::hint{type="warning"}
Individual parts’ set Z locations will be impacted by resin- and part-specific [correction scale](docId:4Z6MFha_0Lh3vOpPv9Jmn) factors. Select resin before setting a Z location for the most accurate placement.
:::
::::
:::::
::::::
# Gen1 vs Gen2 Auto Layout
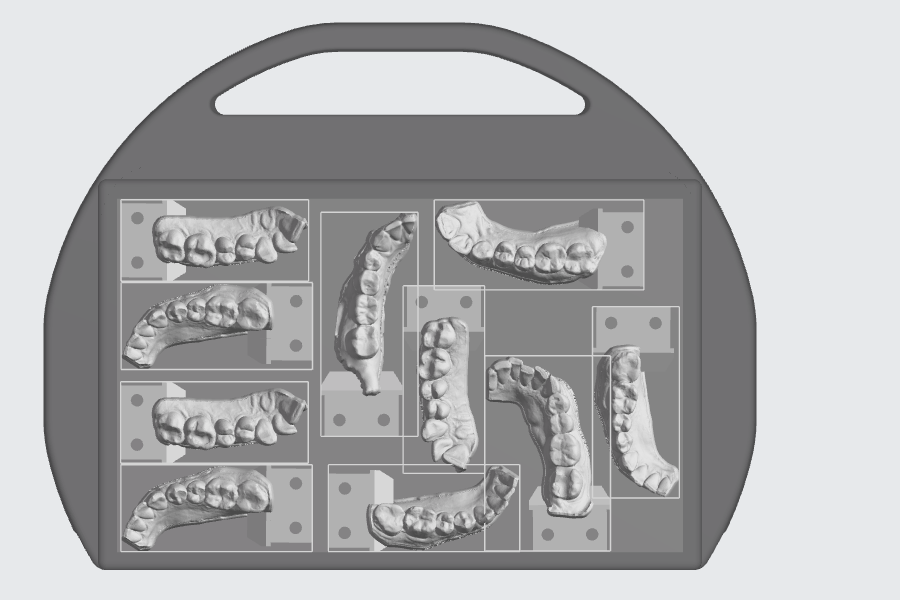
- **Gen2 **is the **default **auto layout tool. It analyzes many permutations, looking at all parts across the build. This approach takes a little more time, **up to 60 seconds**, to find a good layout.
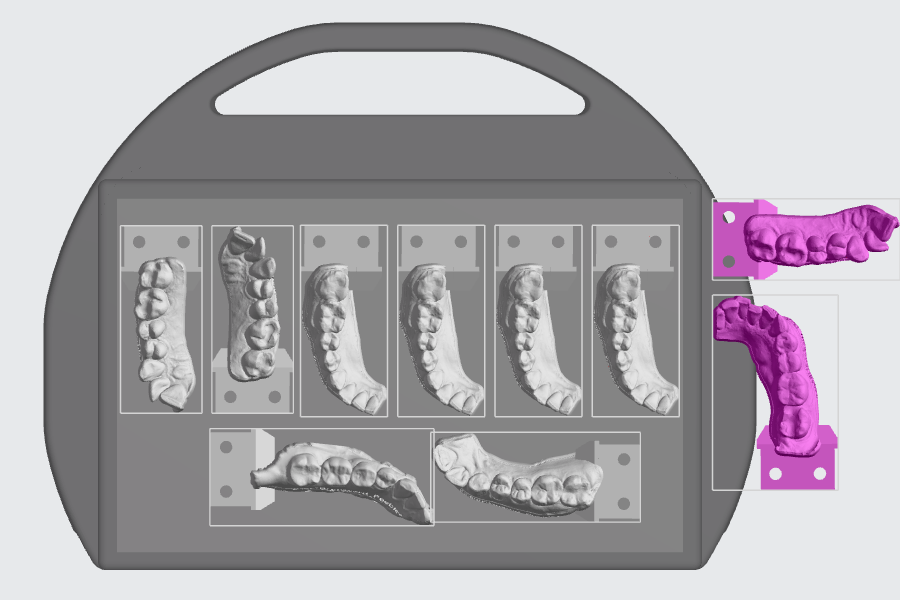
- **Gen1 **looks at grouping several parts together and then applies that strategy of groups across the build. This approach creates a **very quick **auto layout and works well when the **same part is repeated **across the build.
:::hint{type="info"}
For most applications, Gen2 layout is recommended and will provide the best overall packing density and speed.
Gen1 may be desired if you want to prohibit overlapping bounding boxes or provide a more regular layout.
:::
::::VerticalSplit{layout="middle"}
:::VerticalSplitItem
::Image[]{src="https://res.cloudinary.com/carbon3d/image/upload/v1723167548/Education/Software/Printer-UI/Layout/Optimize_Rotation.png" size="76" width="2916" height="3712" position="center" alt="Optimize Starting Rotation" showCaption="false"}
:::
:::VerticalSplitItem
### Optimize Starting Rotation
**Gen2 Auto Layout** offers an optimize starting rotation option. Enabling this function adjusts each part’s starting rotation to minimize its bounding box (XY) before running the layout operation.
This capability can enhance overall build density, especially for dental models. However, it may not be suitable when intentional initial rotations of parts are needed (e.g. for printability or post-processing concerns)
:::
::::
::::VerticalSplit{layout="middle"}
:::VerticalSplitItem
### Allowed Rotations
By default, **Gen2 Auto Layout** tries four rotations of all parts (based on each model’s starting orientation). If you do not want Gen2 Auto Layout to rotate parts, you can disallow rotation, or allow only a single 180° rotation. This behavior may be desired if you have oriented parts specifically for cleanability.
:::
:::VerticalSplitItem
::Image[]{src="https://res.cloudinary.com/carbon3d/image/upload/v1723488362/Education/Software/Printer-UI/Layout/gen2-part-rotations.png" size="70" width="400" height="500" position="center" alt="Gen2 Auto Layout limit part rotations" showCaption="false"}
:::
::::
:::hint{type="info"}
Note that in both cases, the original orientation of the part matters, as both approaches look at 90 degree rotations\* of each part (rather than a full 360 degree rotation).
*\*L1 Printers also looks at 45 degree rotations in Gen1 Auto Layout*
:::
::::VerticalSplit{layout="middle"}
:::VerticalSplitItem
**Gen1 Auto Layout**
:::
:::VerticalSplitItem
**Gen2 Auto Layout**
:::
::::
The Layout tab contains tools to duplicate your supported part and optimize the build layout for printing and post-processing.