---
title: Lattice Parameters
slug: software/lattice-parameters
description: This comprehensive guide provides details of the parameters that define a lattice in Carbon Design Engine. Learn about each parameter, mesh guidelines, and the manufacturability of a lattice in DLS production.
docTags:
createdAt: 2024-06-28T17:56:57.217Z
---
## Understanding Lattices in Design Engine
This guide will walk you through every aspect of defining a lattice. If you have not yet read the **Quick Start Guide**'s section on **Essential Lattice Information**, we recommend you do so before proceeding to have a foundational knowledge of Design Engine lattices.
::::LinkArray{contentSource="CUSTOM"}
:::LinkArrayItem{headerType="IMAGE" headerImage="https://api.archbee.com/api/optimize/3CesIL2dYMCHPZvRjp8S0/s0HNiC1_9ualJcsEvJ2U5_unit-cell-parameters.png"}
[Essential Lattice Information](docId\:JjWZIDzC2ZD7yo0ABsfGu)
:::
::::
This guide covers:
- [Mesh Guidelines](docId\:f-f8ROxDabcRrBEUDh6Q1)
- [Parameter Guidelines](docId\:f-f8ROxDabcRrBEUDh6Q1)
- [Material Guidelines](docId\:f-f8ROxDabcRrBEUDh6Q1)
- [Lattice Type Guidelines](docId\:f-f8ROxDabcRrBEUDh6Q1)
- [Cell Size Guidelines](docId\:f-f8ROxDabcRrBEUDh6Q1)
- [Strut Diameter Guidelines](docId\:f-f8ROxDabcRrBEUDh6Q1)
- [Unit Cell Manufacturability](docId\:f-f8ROxDabcRrBEUDh6Q1)
# Mesh Guidelines
The mesh is the underlying 3-dimensional scaffold upon which your lattice is built.
The mesh is comprised of **unit cells** upon which the strut lattice is applied.
Design Engine offers two mesh types:
::::VerticalSplit{layout="middle"}
:::VerticalSplitItem
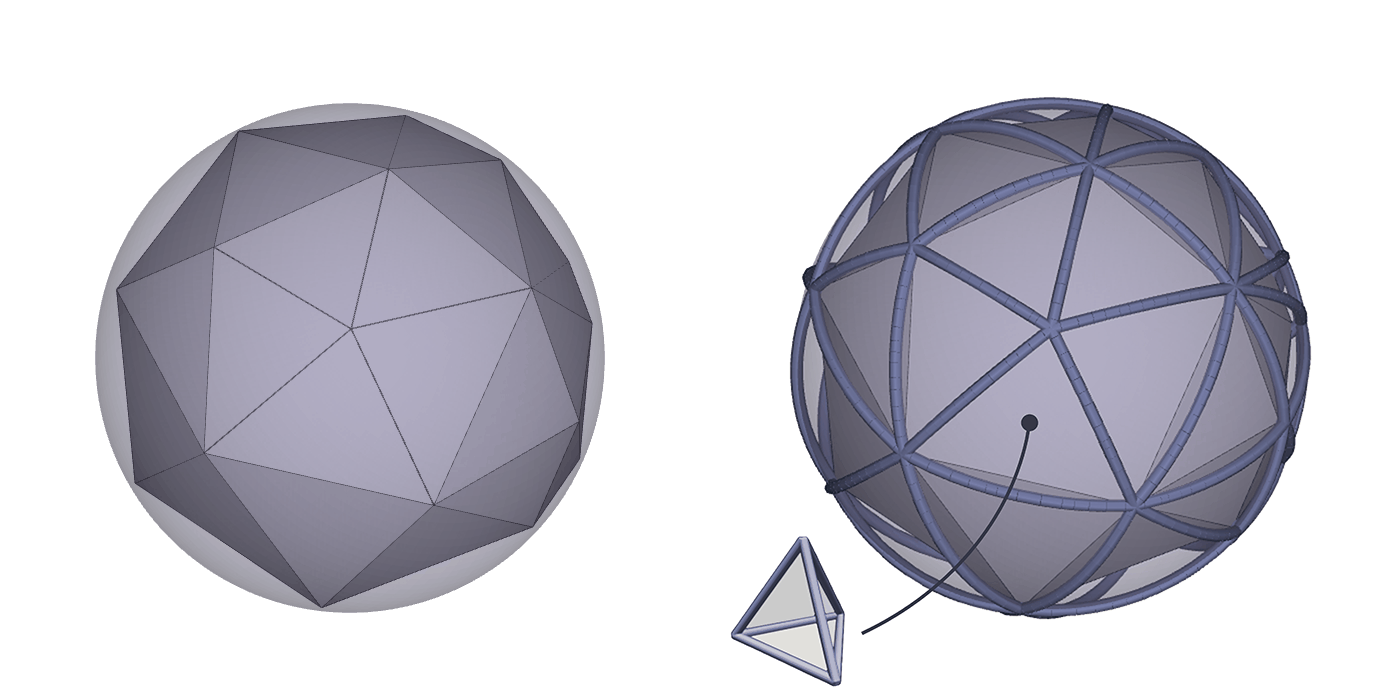
**Tetrahedron Mesh **(Tet)
Composed of polyhedrons with 4 faces
One unit cell = one tetrahedron
:::
:::VerticalSplitItem
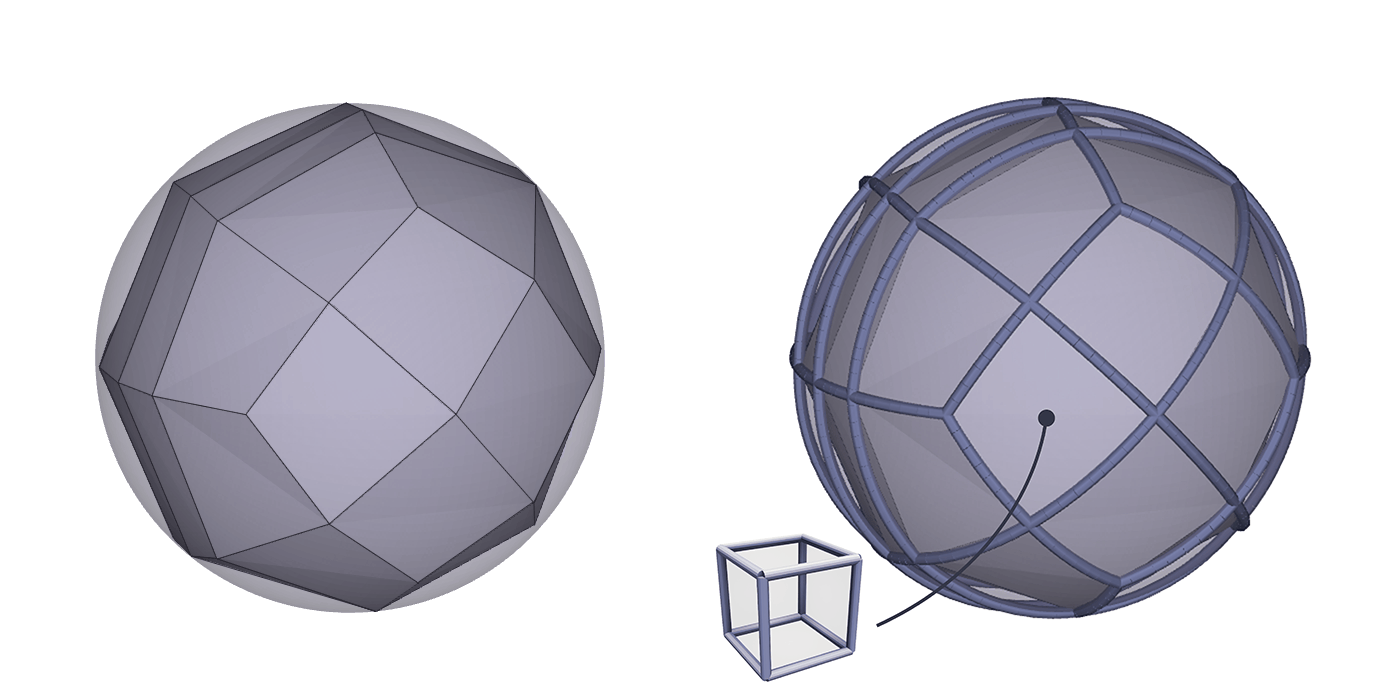
**Hexahedron Mesh **(Hex)
Composed of polyhedrons with 6 faces
One unit cell = one hexahedron
:::
::::
## How to Choose Between Tet and Hex Mesh
::::VerticalSplit{layout="middle"}
:::VerticalSplitItem
**Tetrahedron Mesh** (Tet)
Tet lattices are best used when
- A controlled **mechanical performance **is the highest priority.
- The conformal nature of the lattice must maintain mechanical performance as closely as possible at the boundaries of the design space.
- Multiple performance zones are required.
:::
:::VerticalSplitItem
**Hexahedron Mesh** (Hex)
Hex lattices are best used when
- A regular surface pattern and **aesthetics **are more important than mechanical performance.
- A low stiffness to mass ratio is desired.
- Design space is an annular shape. (ex: tube)
- A custom unit cell is desired.
:::
::::
### Aesthetics vs Performance
The primary difference between the two mesh types is aesthetics vs performance. This difference boils down to how the polyhedrons are created in each type of mesh.
- **Tetrahedron **scaffolds have **less variability **in the size of the individual tetrahedrons and therefore the mechanical response is much more consistent throughout the design.
- **Hexahedron **scaffolds have **more variability **in the size and shape of the individual hexahedrons and therefore the mechanical response can have more variation throughout the design.
Below are the three categorical examples of how the unit cell can vary in the design. There are two types of hexahedron meshes: gridded and loft, which work differently, and the third category is tetrahedron.
::::VerticalSplit{layout="middle"}
:::VerticalSplitItem
**Hexahedron - Gridded**
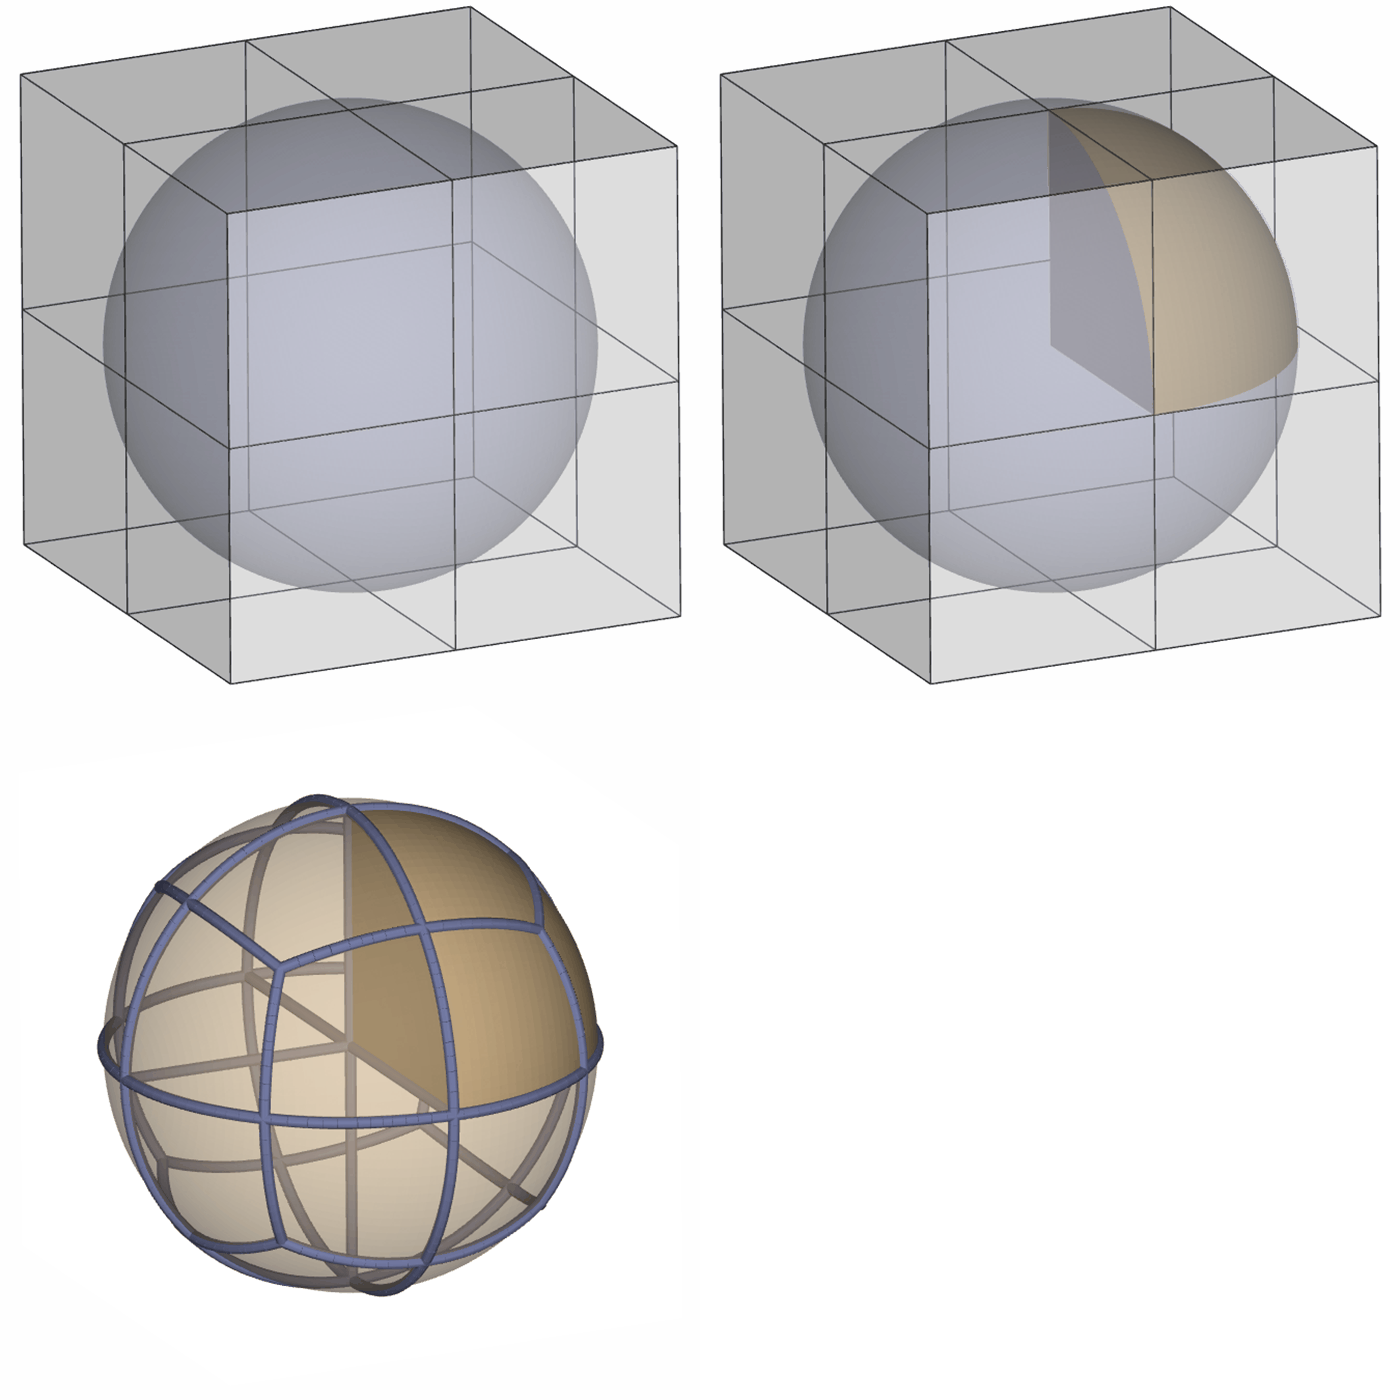
Hex gridded is the simplest mesh structure that uses a cube, or rectangular cuboid, tiled to fully overlap the design space.
All hexahedrons on the boundary of the design are cropped to the intersecting shape, meaning that all boundary unit cells are a different size and shape than any full unit cells in the interior.
In this example, the entire sphere is comprised of 8 partial unit cells.
:::
:::VerticalSplitItem
:::
::::
::::VerticalSplit{layout="middle"}
:::VerticalSplitItem
:::
:::VerticalSplitItem
**Hexahedron - Loft**
There are a few types of loft hexahedron meshes, but the core concept behind them is the same.
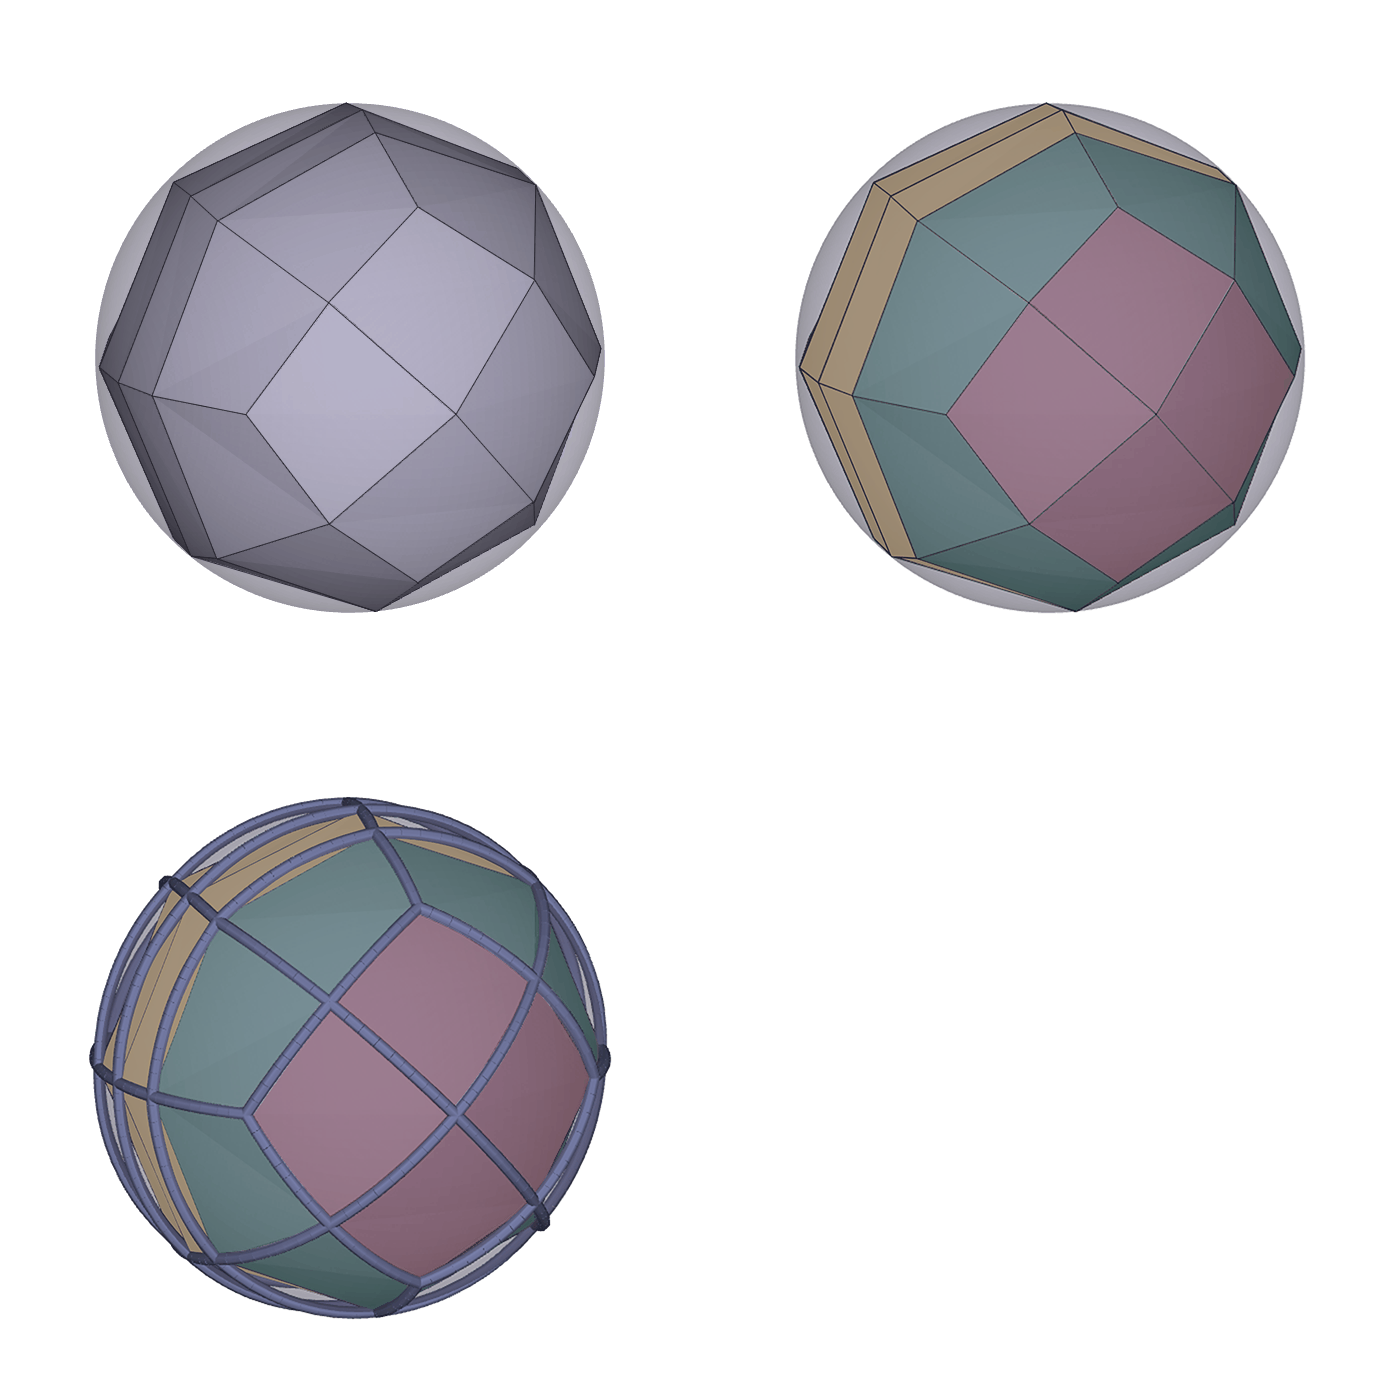
All hexahedrons throughout the mesh are morphed to fit into the design. This creates a very regular pattern but results in unit cells that vary in size and shape throughout the design space.
In this example, the sphere is using the sectioned type of loft hex mesh and results in 3 variations of unit cells that morph to the spherical design space.
:::
::::
::::VerticalSplit{layout="middle"}
:::VerticalSplitItem
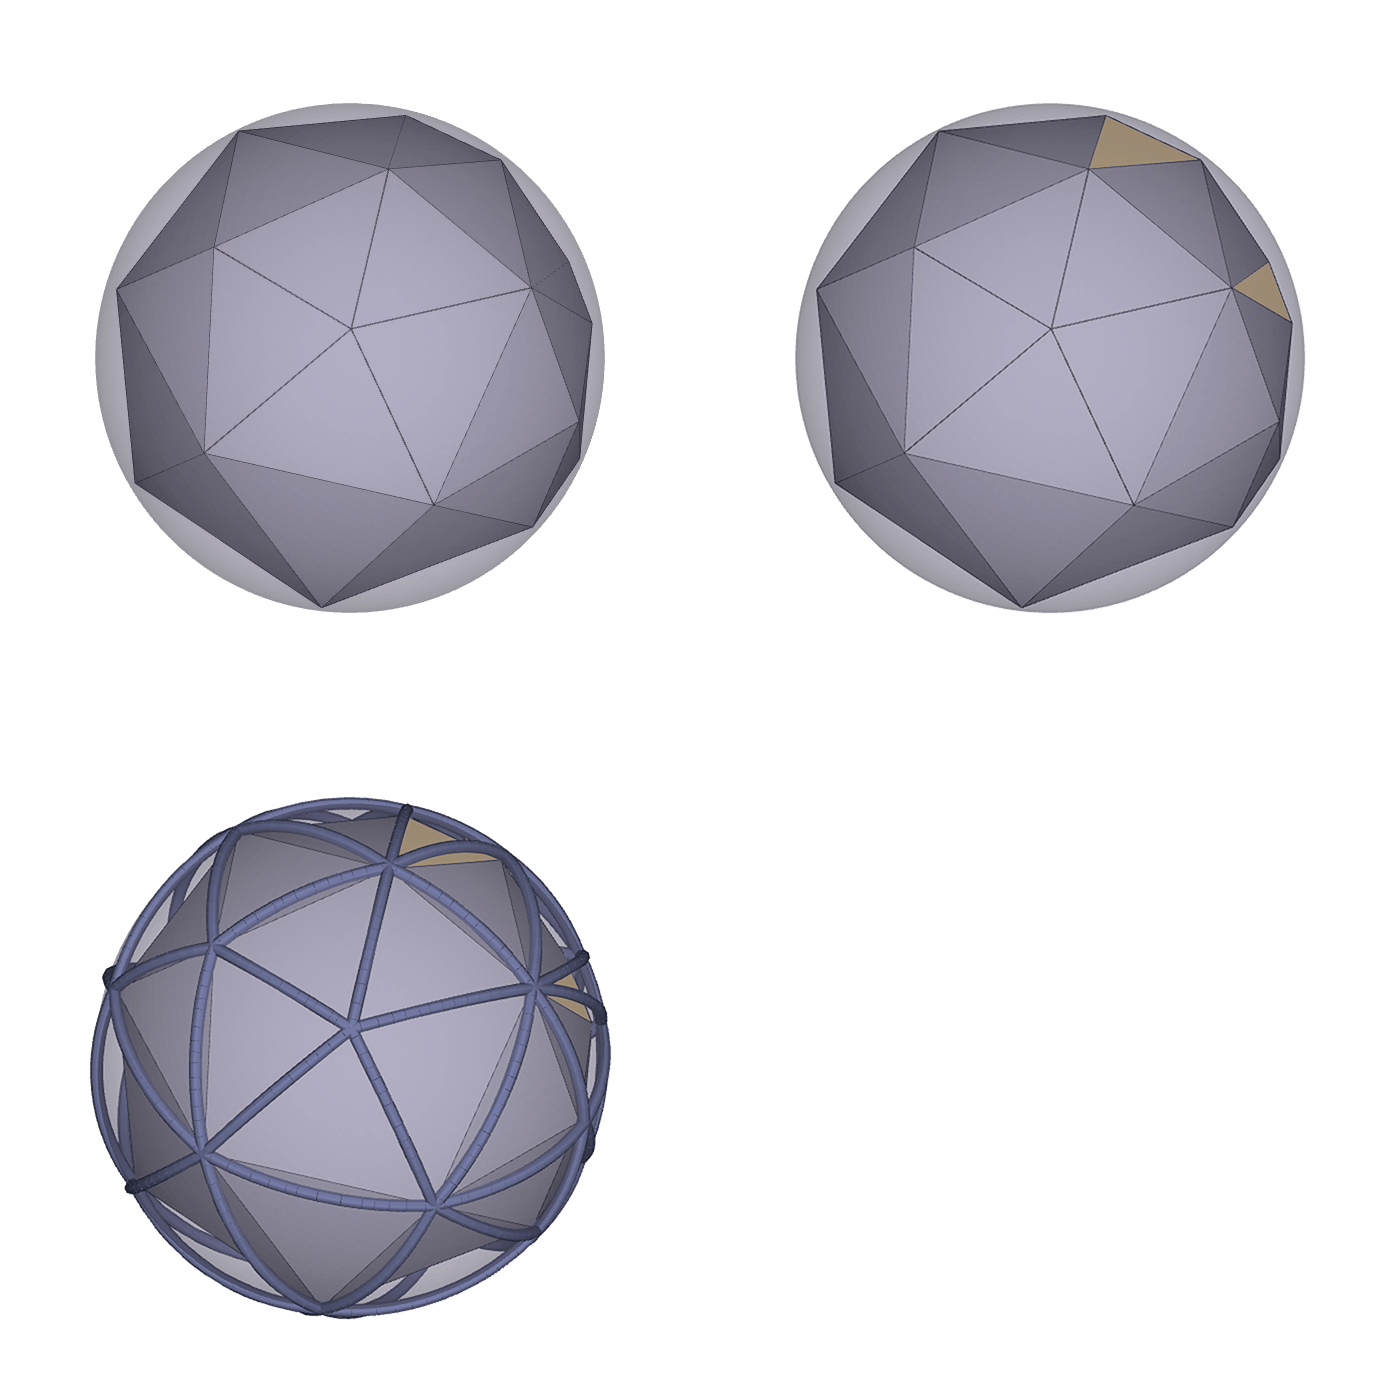
**Tetrahedron**
Tetrahedron meshes are the most consistent in maintaining full sized, regularly shaped, unit cells.
Only tetrahedrons on the boundary of the design are morphed to conform to the design space where needed. Unlike hex-gridded which can end up with non-hexahedron shapes on the boundary, tet meshes still use tetrahedrons throughout, but some are slightly smaller to conform to the design space.
In this example, the sphere only morphs a handful of unit cells to conform to the design space.
:::
:::VerticalSplitItem
:::
::::
### How the Hex Unit Cell Works
A hexahedron is any polyhedron with 6 faces. Design Engine uses a variety of cuboid shapes depending on the type of hex mesh created. Each cuboid is tiled together to fill the design space.
::::VerticalSplit{layout="middle"}
:::VerticalSplitItem
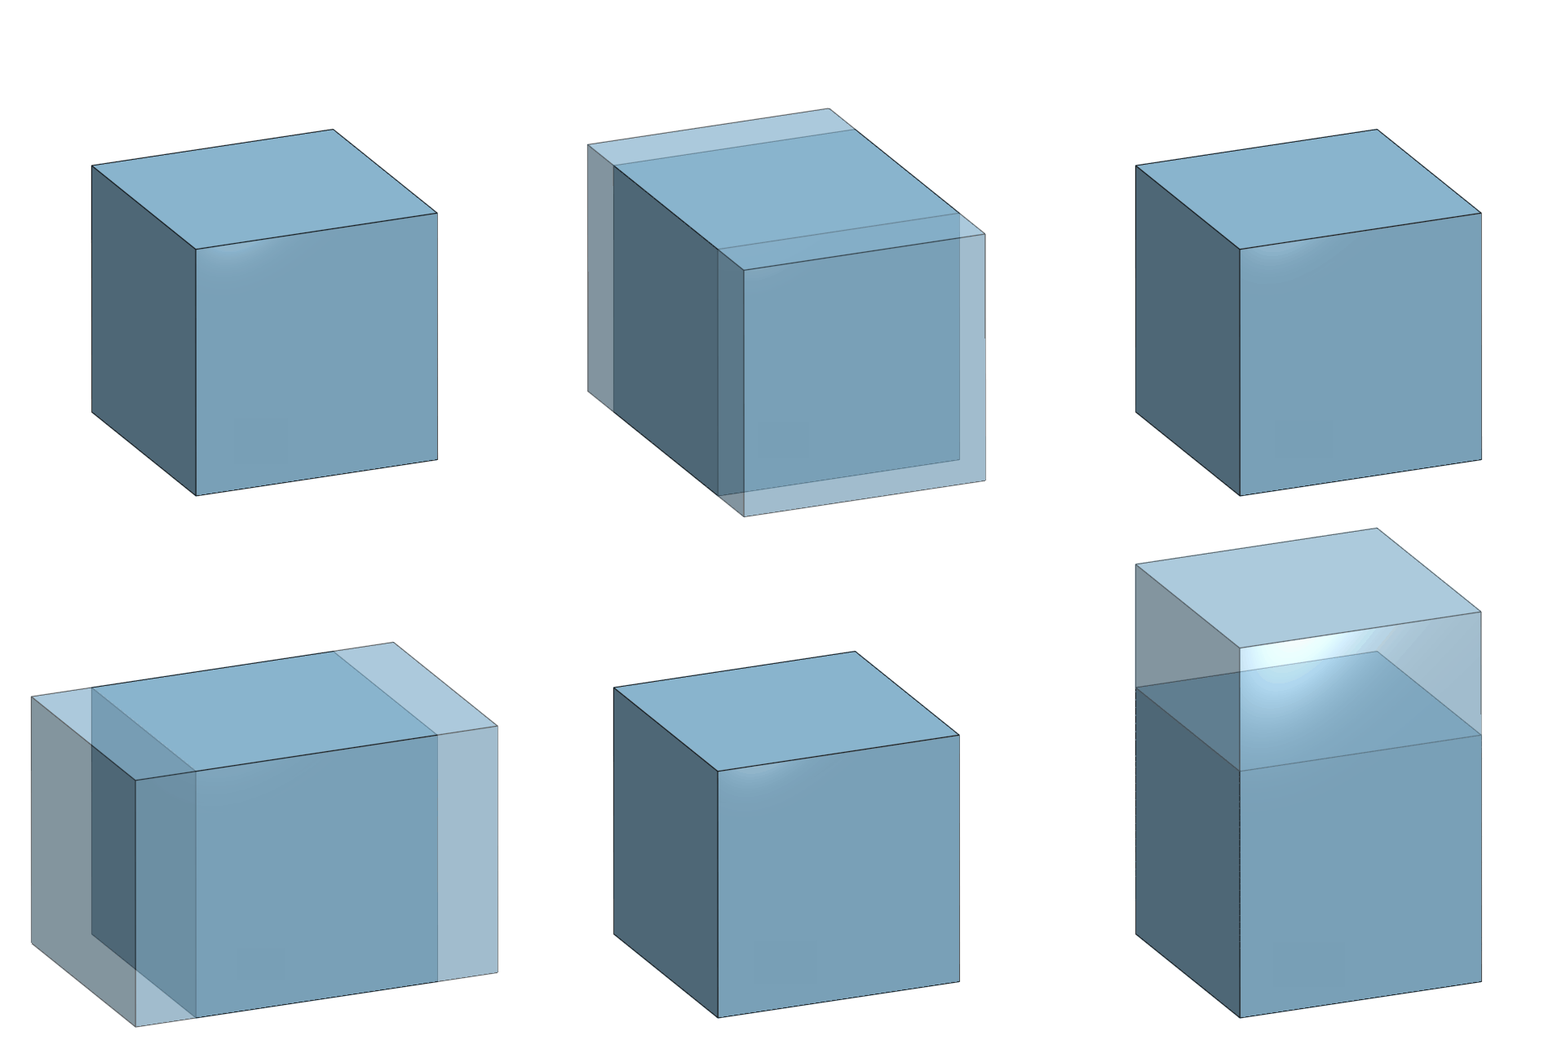
**Hexahedron - Gridded**
The simplest mesh structure uses a rectangular cuboid that can be adjusted dimensionally in the XYZ axes.
:::
:::VerticalSplitItem
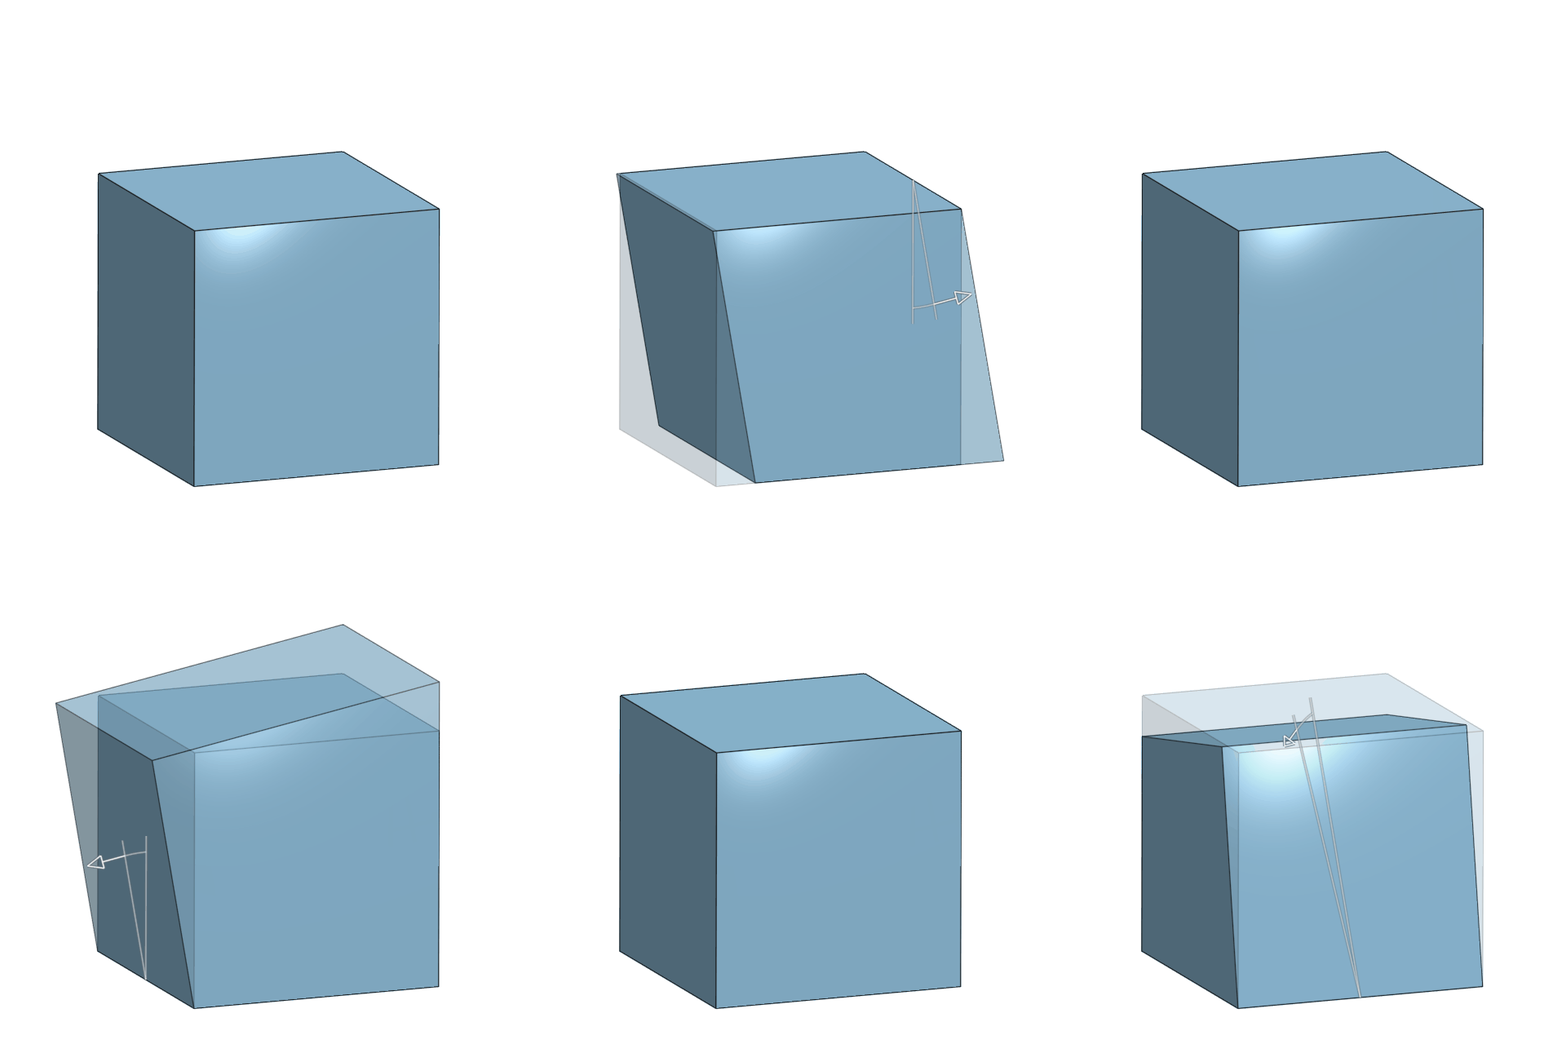
**Hexahedron - Loft**
All of the loft hexahedron meshes use a variety of cuboids. Each cuboid morphs to the design space based on the type of loft chosen.
:::
::::
::::VerticalSplit{layout="middle"}
:::VerticalSplitItem
:::
:::VerticalSplitItem
:::
::::
One hexahedron comprises one unit cell.
Each lattice type has its own strut pattern that fits in the unit cell.
From left to right -
Cross | Fluo | Grid | Kelvin (Hex) | Octahedral | Octet | Star (Hex) | Tesseract

### How the Tet Unit Cell Works
Design Engine uses regular tetrahedrons, or a triangular pyramid where all faces are equilateral\*.
*\* Tetrahedrons at the surface that morph to the boundary are often irregular tetrahedrons.*
One tetrahedron comprises one unit cell.
Each lattice type has its own strut pattern that fits in the unit cell.
From left to right -
Icosahedral | Kagome | Kelvin (Tet) | Rhombic | Star (Tet) | Tetrahedral | Voronoi

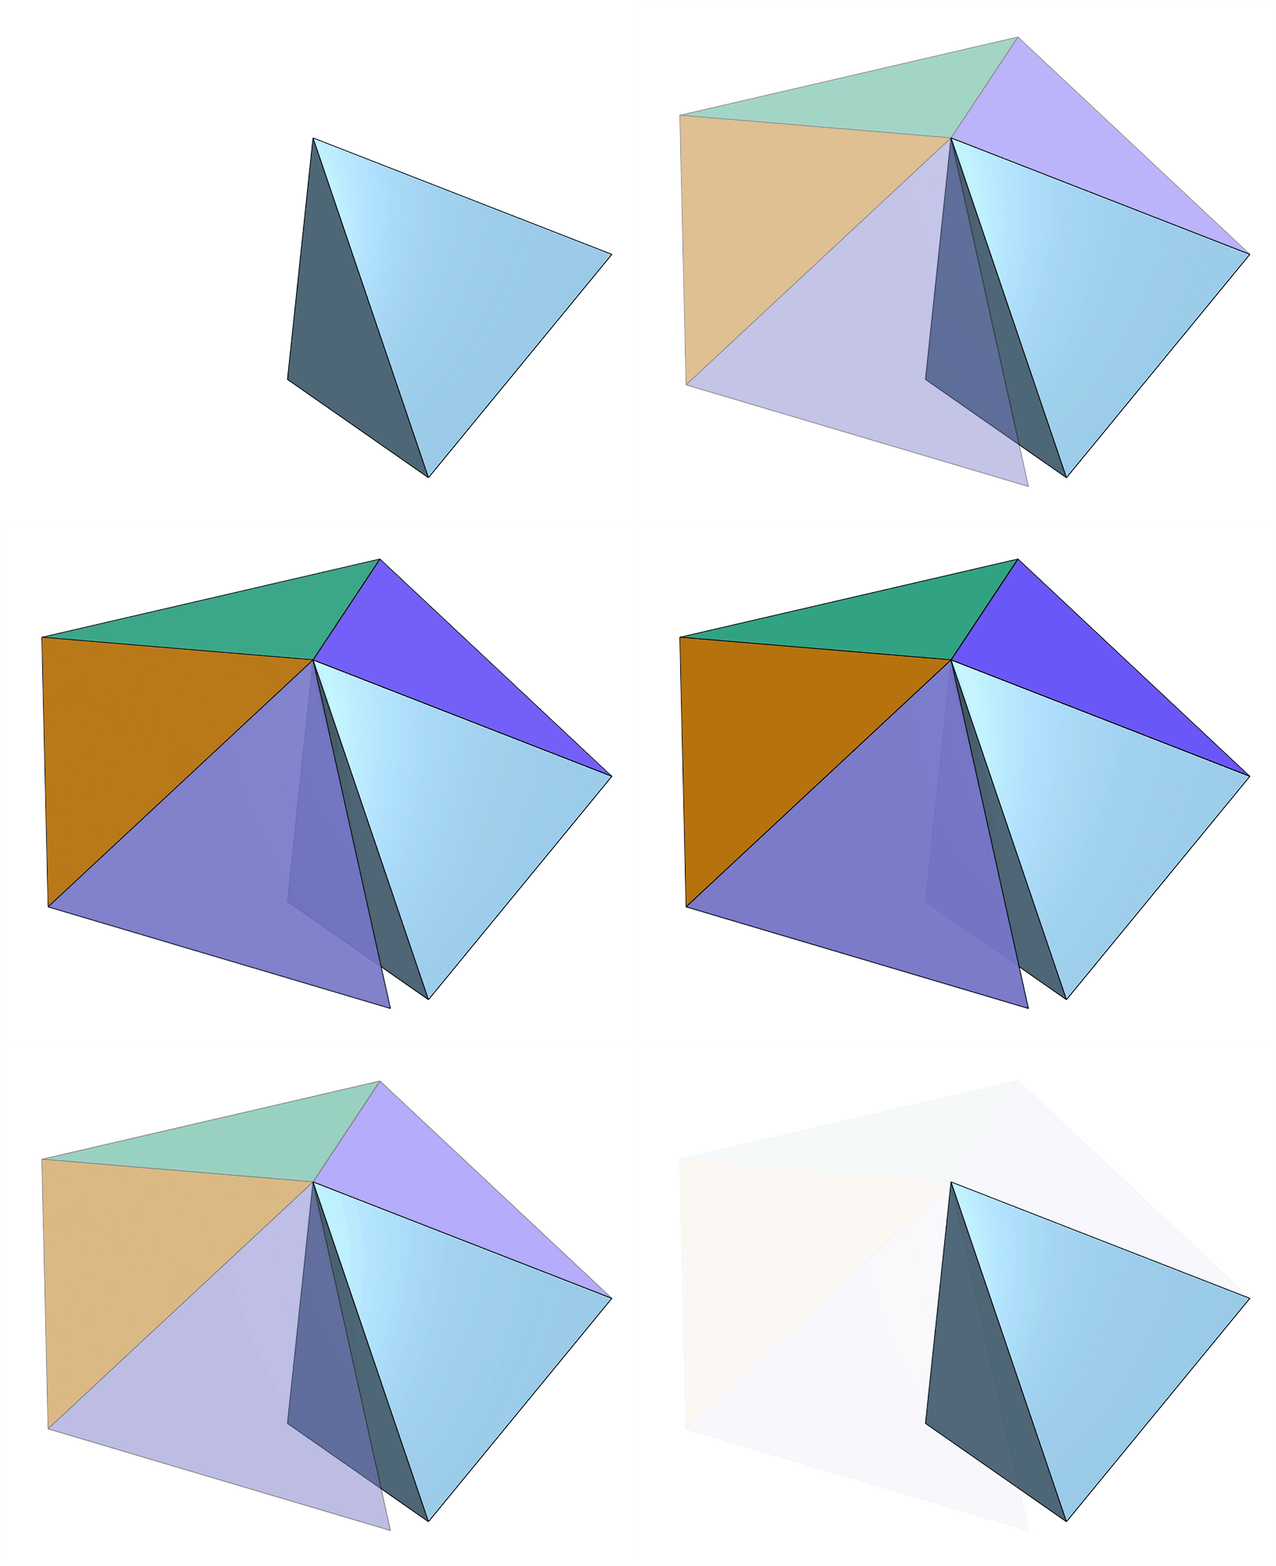
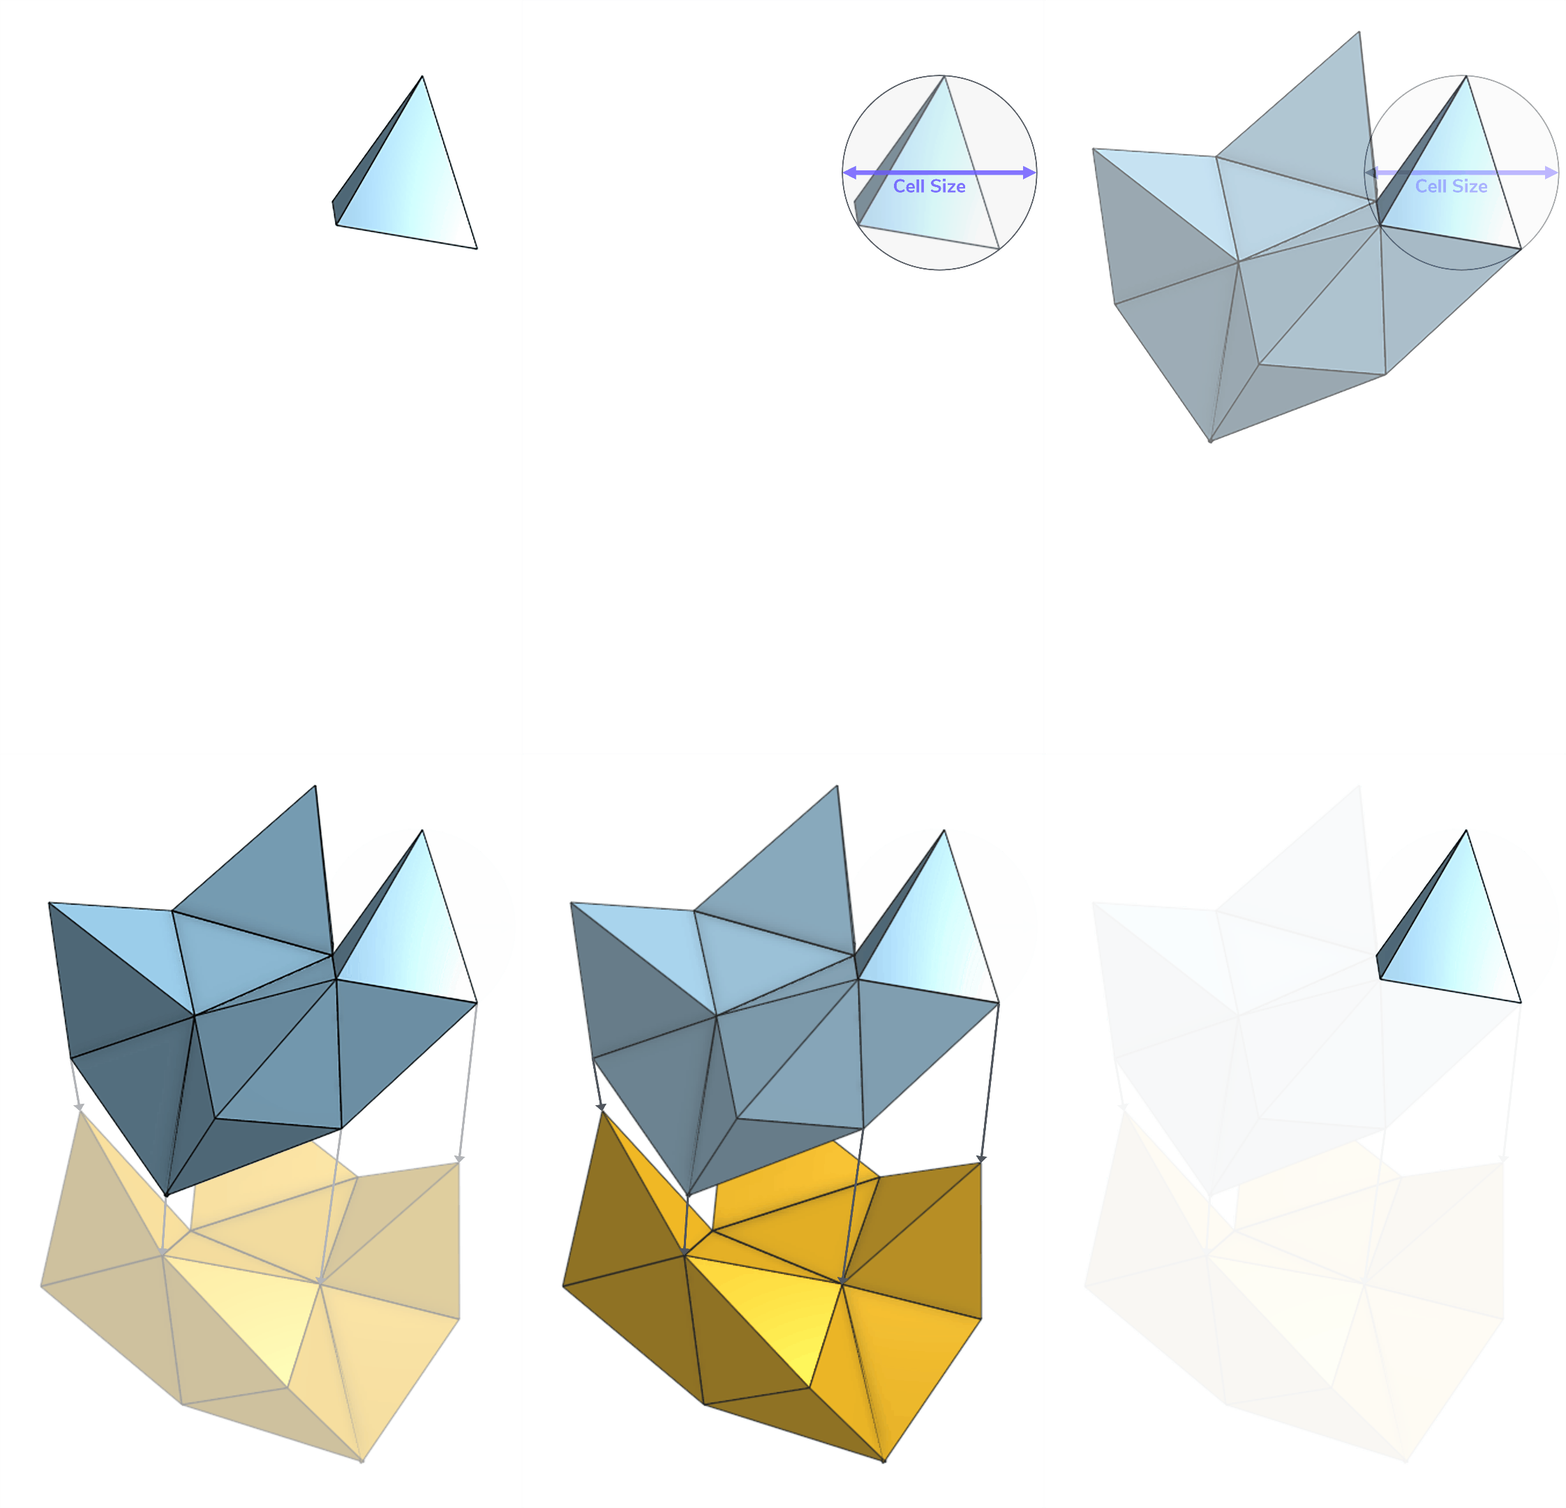
Compiling tetrahedrons to create the tet mesh is more complicated than the hex mesh. Unlike hexahedrons which can be tiled seamlessly 3-dimensionally, regular tetrahedrons are non-tessellating as single entities.
::::VerticalSplit{layout="middle"}
:::VerticalSplitItem
:::
:::VerticalSplitItem
**Single Tetrahedrons are Non-Tessellating**
Creating the tetrahedron mesh is not as simple as repeating the tetrahedron, surface to surface, as needed to fill the design space. A simple unit sphere of regular tetrahedrons is non-tessellating, meaning that repeating the tetrahedron, surface to surface, will not create a closed solid (or a fully connected lattice).
:::
::::
::::VerticalSplit{layout="middle"}
:::VerticalSplitItem
**Carbon's Patented Building Block**
The compilation of tetrahedrons needed to build the mesh is instead a mathematically generated compilation of tetrahedrons that not only creates a 3-dimensionally tessellating pattern, but also a building block that maximizes the mechanical performance of the lattice.
The result is Carbon's patented tetrahedron mesh building block.
:::
:::VerticalSplitItem
:::
::::
:::hint{type="info"}
Reference [Hex Mesh](docId:2s1MLNX3Yfvzt6F5Rge5h) for more information on how to create a hex mesh. Note that to use a hexahedron mesh, create the mesh in its own operation and then select it in the strut lattice operation.
The [Strut Lattice](docId\:IDhmaxmVU97UzzIHV0Pdk) operation implicitly creates a **tetrahedron mesh**, unless otherwise specified.
:::
# Parameter Guidelines
## Material Guidelines
Each material has its own characteristics that will influence the performance of a lattice. All materials compatible with a Carbon printer can be used to create a lattice with Carbon Design Engine, and many materials outside of Carbon's technology may be applicable as well.
Below is a summary of the **most common** **Carbon materials** to use as a reference for material selection.
Each **material has a unique stress-strain curve** that will influence the performance of a part. See [Stress-Strain Curves](docId\:f-f8ROxDabcRrBEUDh6Q1) below for more information on what the curves tell you.
**Common Elastomers**
Technical Data Sheets - [EPU 40](https://docs.carbon3d.com/files/technical-data-sheets/tds_carbon_epu-40.pdf) | [EPU 41](https://docs.carbon3d.com/files/technical-data-sheets/tds_carbon_epu-41.pdf) | [EPU 43](https://docs.carbon3d.com/files/technical-data-sheets/tds_carbon_epu-43.pdf?_ga=2.55048232.269097216.1682613817-1535819435.1646076665) | [EPU 45](https://docs.carbon3d.com/files/technical-data-sheets/tds_carbon_epu-45.pdf?_ga=2.55048232.269097216.1682613817-1535819435.1646076665) | [EPU 46](https://docs.carbon3d.com/files/technical-data-sheets/tds_carbon_epu-46.pdf) | [EPU Pro 50/90](https://docs.carbon3d.com/files/technical-data-sheets/tds_carbon_epu-pro-50-90-black.pdf) | [SIL 30](https://docs.carbon3d.com/files/technical-data-sheets/tds_carbon_sil-30.pdf?_gl=1*11ikj23*_gcl_au*MTgxOTU3MDQxNS4xNjg1NTUwMDQw&_ga=2.147821492.2036582103.1687373151-1535819435.1646076665)
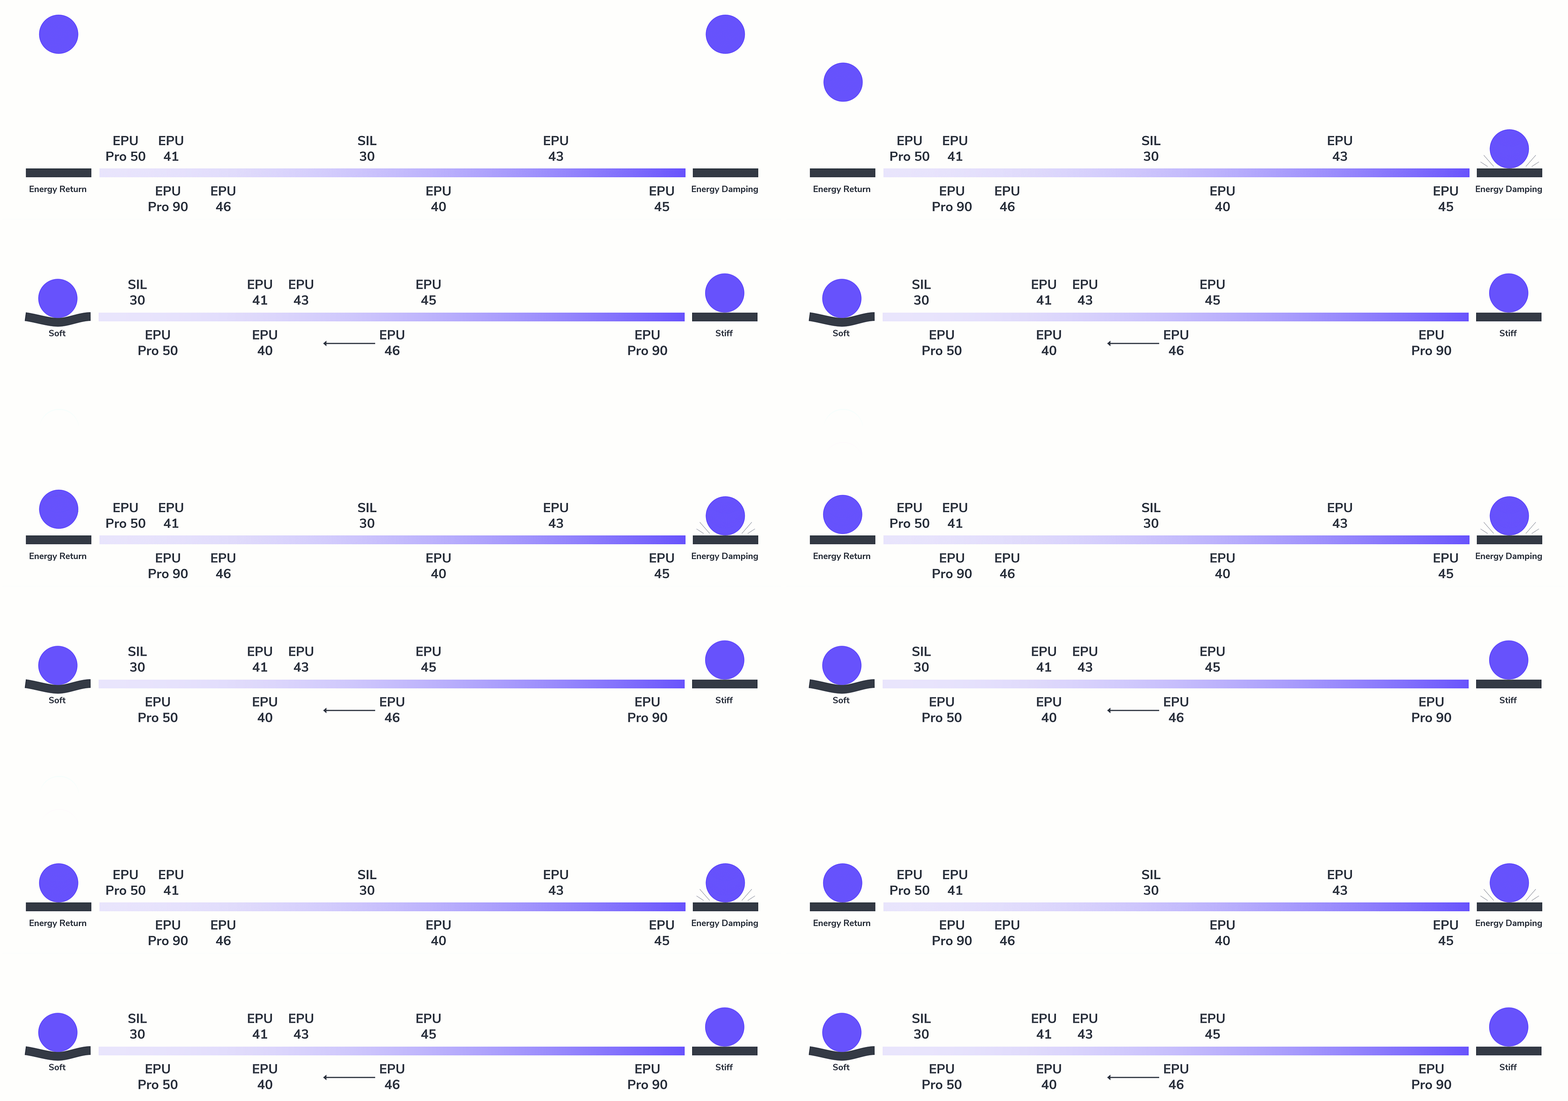
**Energy Return to Damping**
EPU Pro 50 | EPU Pro 90 | EPU 41 | EPU 46 | SIL 30 | EPU 40 | EPU 43 | EPU 45
**Soft to Stiff**
SIL 30 | EPU Pro 50 | EPU 41 | EPU 40 | EPU 43 | EPU 46 (tunable stiffness) | EPU 45 | EPU Pro 90
:::hint{type="info"}
For more information, reference [elastomeric materials](https://www.carbon3d.com/materials/elastomeric).
:::
**Common Rigids**
| **Carbon Material** | **EPX 82** | **RPU 70** | **RPU 130** |
| ------------------------------ | ----------------------------------------------------------------------------------- | ----------------------------------------------------------------------------------- | ------------------------------------------------------------------------------------ |
| **Polymer Type** | Epoxy | Rigid Polyurethane | Rigid Polyurethane |
| **Energy/**
**Impact** | Moderate Impact | Low Impact | High Impact |
| **Stiffness**
| High Stiffness | Moderate Stiffness | Low Stiffness |
| **Temperature** | Heat Resistance | | Heat Resistance |
| **Technical Data Sheet**
| [TDS](https://docs.carbon3d.com/files/technical-data-sheets/tds_carbon_epx-82.pdf) | [TDS](https://docs.carbon3d.com/files/technical-data-sheets/tds_carbon_rpu-70.pdf) | [TDS](https://docs.carbon3d.com/files/technical-data-sheets/tds_carbon_rpu-130.pdf) |
:::hint{type="info"}
For more information, reference [rigid materials](https://www.carbon3d.com/materials/rigid).
:::
## Lattice Type Guidelines
A lattice type is the 3-dimensional structure, or pattern, of the lattice.
Design Engine offers lattice types for both hexahedron meshes and tetrahedron meshes, each category offering different advantages. Reference [The Mesh](docId\:f-f8ROxDabcRrBEUDh6Q1) information above to learn more about choosing between mesh options.
### Hex Lattice Types
Choosing between the different hex lattice types is usually decided by the preferred:
- **Volume fraction **- % of volume the lattice uses out of the total volume of the design space. See also [Mass Comparison](docId\:f-f8ROxDabcRrBEUDh6Q1) below.
- **Aesthetics **of the lattice type - differentiated by the internal structure of the unit cell. See also [Surface Patterns](docId\:f-f8ROxDabcRrBEUDh6Q1) below.
::::LinkArray
:::LinkArrayItem{headerType="IMAGE" headerImage="https://api.archbee.com/api/optimize/dptYqcTHPbVZhe3zuNg4v-qcoSlF-YWn9mE4zPQaOBy-20240925-193949.png"}
**Cross**
Medium % Volume Fraction
:::
:::LinkArrayItem{headerType="IMAGE" headerImage="https://api.archbee.com/api/optimize/dptYqcTHPbVZhe3zuNg4v-PuJvTN57DnOCiLRz53KkI-20240925-203208.png"}
**Fluo**
High % Volume Fraction
:::
:::LinkArrayItem{headerType="IMAGE" headerImage="https://api.archbee.com/api/optimize/dptYqcTHPbVZhe3zuNg4v-Xj_i5lytlK1jq0tkG5AbW-20240925-203228.png"}
**Grid**
Low % Volume Fraction
:::
:::LinkArrayItem{headerType="IMAGE" headerImage="https://api.archbee.com/api/optimize/dptYqcTHPbVZhe3zuNg4v-BdHFpA6yF-J8C2vxwfUMY-20240925-203245.png"}
**Kelvin** (Hex)
Medium % Volume Fraction
:::
:::LinkArrayItem{headerType="IMAGE" headerImage="https://api.archbee.com/api/optimize/dptYqcTHPbVZhe3zuNg4v-5cM7F4sCwGtB1lWDj21VC-20240925-203309.png"}
**Octahedral**
Medium % Volume Fraction
:::
:::LinkArrayItem{headerType="IMAGE" headerImage="https://api.archbee.com/api/optimize/dptYqcTHPbVZhe3zuNg4v-Ce2wOWQc0VDMrfTmNd1-7-20240925-203324.png"}
**Octet**
High % Volume Fraction
:::
:::LinkArrayItem{headerType="IMAGE" headerImage="https://api.archbee.com/api/optimize/dptYqcTHPbVZhe3zuNg4v-fnFoqDXXW4WnzA1MVvxW3-20240925-203337.png"}
**Star **(Hex)
Medium % Volume Fraction
:::
:::LinkArrayItem{headerType="IMAGE" headerImage="https://api.archbee.com/api/optimize/dptYqcTHPbVZhe3zuNg4v-VWSSpBH0KuUBCxpq8HK_e-20240925-203350.png"}
**Tesseract**
High % Volume Fraction
:::
::::
### Tet Lattice Types
Choosing between the different tet lattice types is usually decided by the **application's performance** goals, influenced by the aesthetics of the surface pattern of the lattice type.
See also [Stress-Strain Curves](docId\:f-f8ROxDabcRrBEUDh6Q1) and [Surface Patterns](docId\:f-f8ROxDabcRrBEUDh6Q1) below respectively.
::::LinkArray{contentSource="CUSTOM"}
:::LinkArrayItem{headerType="IMAGE" headerImage="https://api.archbee.com/api/optimize/dptYqcTHPbVZhe3zuNg4v-2XFT5Wla6Dh4tGIIuCIf--20240926-012156.png"}
**Icosahedral**
Plateau Response
High stiffness to mass ratio
:::
:::LinkArrayItem{headerType="IMAGE" headerImage="https://api.archbee.com/api/optimize/dptYqcTHPbVZhe3zuNg4v-_eDf15-0K_kCwQ0Ri_TQc-20240926-012216.png"}
**Kagome**
Linear Response
High stiffness to mass ratio
:::
:::LinkArrayItem{headerType="IMAGE" headerImage="https://api.archbee.com/api/optimize/dptYqcTHPbVZhe3zuNg4v-72i_hf2biqiuh2FcDR8qm-20240926-012230.png"}
**Kelvin **(Tet)****
Linear Response
Available through [Lattice Search](docId\:LlWKO8SuVfs2j3cEjz6YR) only
:::
:::LinkArrayItem{headerType="IMAGE" headerImage="https://api.archbee.com/api/optimize/dptYqcTHPbVZhe3zuNg4v-eStBXIGnmlg3CwrA-Bhyn-20240926-012242.png"}
**Rhombic**
Linear Response
Energy absorption conditions
:::
:::LinkArrayItem{headerType="IMAGE" headerImage="https://api.archbee.com/api/optimize/dptYqcTHPbVZhe3zuNg4v-wLzb7GHUiFyHOlgUdg14P-20240926-012256.png"}
**Star **(Tet)****
Plateau Response
Available through [Lattice Search](docId\:LlWKO8SuVfs2j3cEjz6YR) only
:::
:::LinkArrayItem{headerType="IMAGE" headerImage="https://api.archbee.com/api/optimize/dptYqcTHPbVZhe3zuNg4v-dEqXjMDEoDdigA4XtHF1K-20240926-012307.png"}
**Tetrahedral**
Plateau Response
Static comfort conditions
:::
:::LinkArrayItem{headerType="IMAGE" headerImage="https://api.archbee.com/api/optimize/dptYqcTHPbVZhe3zuNg4v-bMqS5gPoumcrbDRWidcKq-20240926-012318.png"}
**Voronoi**
Linear Response
Springy with stress distribution
:::
::::
:::hint{type="info"}
**Kelvin** and **Star** lattice types are available for both hex and tet mesh lattices. They will be noted as (Hex) or (Tet) respectively to clarify which is in use for a given lattice.
:::
### Stress-Strain Curves
Each **lattice type has a unique stress-strain curve** that will influence the performance of a part.
**Stiffness **
The most basic piece of information gained from the stress-strain curve is **how stiff the lattice feels under compression**. The higher the stress numbers across the curve, the stiffer the lattice feels under compressive forces. In short, the higher the curve is on the graph, the stiffer the lattice.
:::hint{type="info"}
Reference these [Qualitative Comparisons](docId\:LlWKO8SuVfs2j3cEjz6YR) of common materials while using Design Engine's Lattice Search feature to get a sense of how stiff your lattice will feel.
:::
**Buckling & Densification**
Deeper inferences can be gained by assessing the **shape **of the stress-strain curve and where the three ranges of compression response fall on the curve. This is where the **lattice type can really distinguish itself** from others.
- **Linear Elastic** **Range**
- Defines how much strain the lattice handles before yielding and buckling. This looks like a linear slope on the graph at the start of the curve. This is the range where we get the [Modulus](docId\:LlWKO8SuVfs2j3cEjz6YR) metric in Lattice Search.
- **Plateau** **Range**
Defines how the lattice deforms under stress while buckling. Responses generally fall on spectrum between a linear or plateau response. [Stress at 25% Strain](docId\:LlWKO8SuVfs2j3cEjz6YR) is a good metric to reference in this range.
- A **linear response** looks like a steadily climbing curve on the graph. This means the lattice requires more force to continue to compress before densification.
- A **plateau response** looks like the curve is flattening in this range. This means the lattice is continuing to buckle with a relatively consistent force before densification.
- **Densification**
- Defines how much strain the lattice can handle before struts crush together. This looks like a sharp spike in stress on the graph at the end of the curve.
:::hint{type="info"}
Note that a lattice type will generally exhibit the same **shape** **of stress-strain curve** whether it is stiffer or softer. In the example below, the shape of an Octahedral lattice type curve is the same whether it has a 6 or 8 mm cell size. It's the cell size (or strut diameter) that primarily differentiates how stiff the lattice is, while the lattice type is characterizing the buckling behavior.
:::

:::hint{type="info"}
The material also influences the shape of the stress-strain curve. Reference [Carbon Material](https://www.carbon3d.com/materials) details to learn more about each material.
:::
### Mass Comparison
Each lattice type is unique in how it populates a design space and contributes to the weight of a part. In the charts below, each lattice type assumes the same cell size and strut diameter for a relative comparison. Actual values in the Y-axis will vary depending on those parameters.
**Volume Fraction **- % of volume the lattice uses out of the total volume of the design space.
Also reference [volume fraction](docId\:LlWKO8SuVfs2j3cEjz6YR) when using Design Engine's Lattice Search.
**Volume Fraction Low to High per Lattice Type**
Grid | Star (Hex) | Kelvin (Hex) | Cross | Octahedral | Tesseract | Fluo | Voronoi | Octet | Tetrahedral | Kagome | Star (Tet) | Rhombic | Icosahedral | Kelvin (Tet)

**Stiffness to Mass Ratio **- how stiff the lattice is compared to its mass.
**Stiffness to Mass Ratio Low to High per Lattice Type**
Tesseract | Kelvin (Hex) | Cross | Grid | Octahedral | Fluo | Octet | Star (Hex) | Tetrahedral | Voronoi | Rhombic | Star (Tet) | Kagome | Icosahedral | Kelvin (Tet)

### Surface Patterns
**Hex Patterns**
Most surface patterns amongst the hex lattice types fall into one of two categories: diamond or grid pattern.
::::VerticalSplit{layout="middle"}
:::VerticalSplitItem
**Diamond Pattern**

:::
:::VerticalSplitItem
**Grid Pattern**

:::
::::
::::VerticalSplit{layout="middle"}
:::VerticalSplitItem
**Disconnected Diamond Pattern**
The exception is the **Kelvin (Hex)** lattice type, which generates a unique surface pattern of disconnected diamonds.
:::
:::VerticalSplitItem

:::
::::
**Tet Patterns**
Surface pattern for tet lattice types varies and each lattice type has two patterns that may visually emerge on the surface:
- **Primary pattern**
- **Secondary pattern**
::::LinkArray{contentSource="CUSTOM"}
:::LinkArrayItem{headerType="IMAGE" headerImage="https://api.archbee.com/api/optimize/3CesIL2dYMCHPZvRjp8S0/e6AipLa8qazmty60XBVuE_icosahedral-1-2b.png"}
**Icosahedral**
:::
:::LinkArrayItem{headerType="IMAGE" headerImage="https://api.archbee.com/api/optimize/3CesIL2dYMCHPZvRjp8S0/SX2XDzLEPVkAnfpbg1EEB_kagome-1-2.png"}
**Kagome**
:::
:::LinkArrayItem{headerType="IMAGE" headerImage="https://api.archbee.com/api/optimize/3CesIL2dYMCHPZvRjp8S0/bvpLTiW8jcZaIlv9IGvFV_rhombic-1-2.png"}
**Rhombic**
:::
:::LinkArrayItem{headerType="IMAGE" headerImage="https://api.archbee.com/api/optimize/3CesIL2dYMCHPZvRjp8S0/7QQYND6HeDlfVKEDrZDt0_tetrahedral-1-2.png"}
**Tetrahedral**
:::
:::LinkArrayItem{headerType="IMAGE" headerImage="https://api.archbee.com/api/optimize/3CesIL2dYMCHPZvRjp8S0/-hHHR_8JvNyMkEPWMS78S_voronoi-1-2.png"}
**Voronoi**
:::
::::
The difference in the patterns is a result of where the lattice is in its 3-dimensional structure upon reaching the boundaries of the design space.
Any additional variation you see in the pattern is due to the conformal nature of the lattice.
:::hint{type="info"}
Kagome and Voronoi have the same surface patterns, but their internal structure is different.
:::
:::hint{type="info"}
Kelvin (Tet) and Star (Tet), available in [Lattice Search](docId\:LlWKO8SuVfs2j3cEjz6YR), are unique and may manifest more patterns than just a primary and secondary.
:::
::::VerticalSplit{layout="middle"}
:::VerticalSplitItem
**Example - Two Patterns Emerge**
On this Voronoi lattice, note how the **top** of the part manifests the **primary pattern** while the **sides** reveal the **secondary pattern**.
Reference [Surface Controls](docId\:IDhmaxmVU97UzzIHV0Pdk) features for tools to adjust the pattern.
:::
:::VerticalSplitItem
::Image[]{src="https://res.cloudinary.com/carbon3d/image/upload/v1722101376/Education/Software/Design-Engine/Lattice-parameters/Lattice-type-guidelines/Example-two-patterns_trans.png" size="90" width="792" height="599" position="center" alt="Example - Two Patterns Emerge" showCaption="false"}
:::
::::
### Hybrid Lattice Types
::::VerticalSplit{layout="middle"}
:::VerticalSplitItem
:::
:::VerticalSplitItem
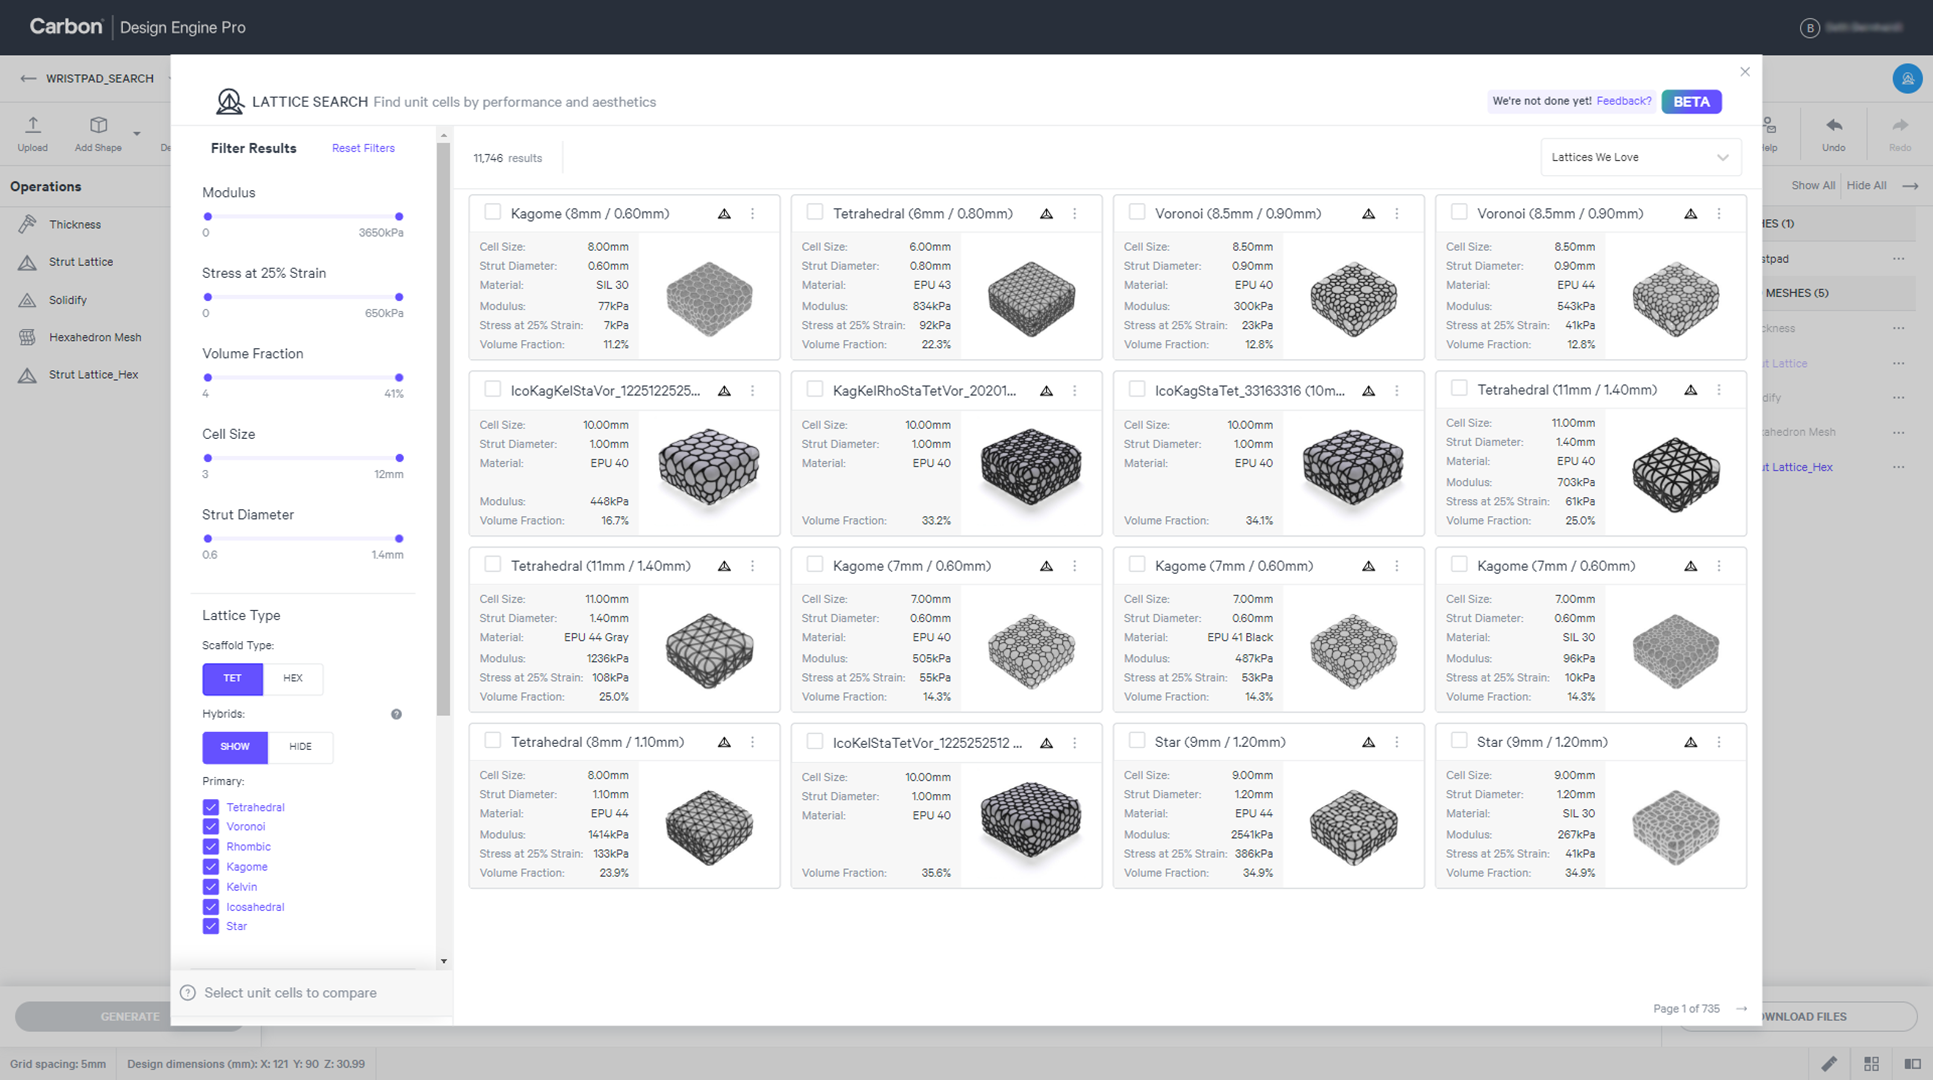
Design Engine also offers a vast library of hybrid lattices in the [Lattice Search](docId\:LlWKO8SuVfs2j3cEjz6YR) feature.
The five primary tet lattice types, along with two additional types, can be hybridized in many combinations to provide more performance options.
:::
::::
:::hint{type="info"}
Hybrid types apply to tet lattice types only.
:::
## Cell Size Guidelines
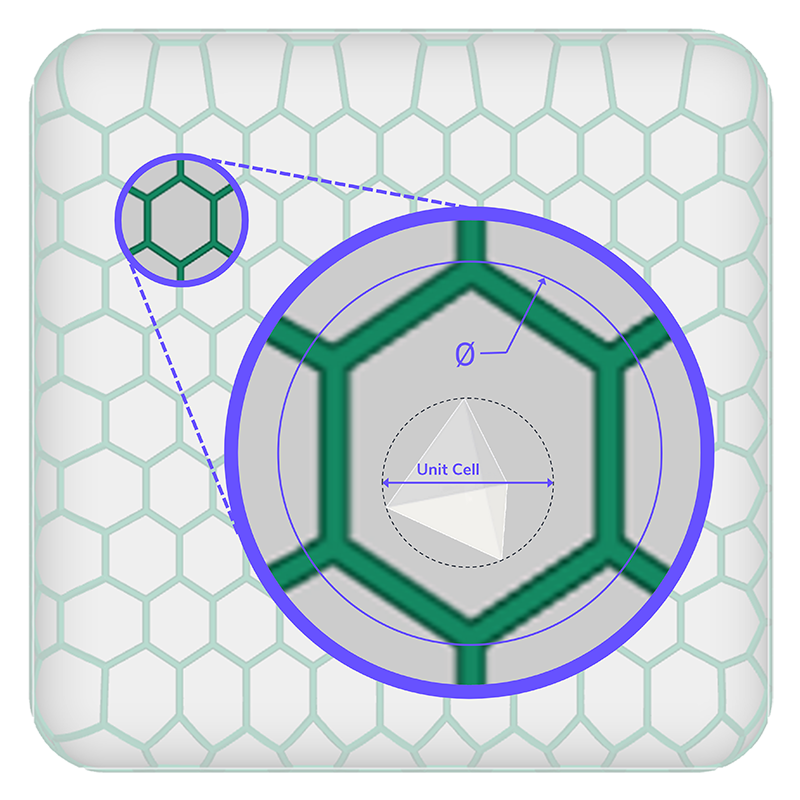
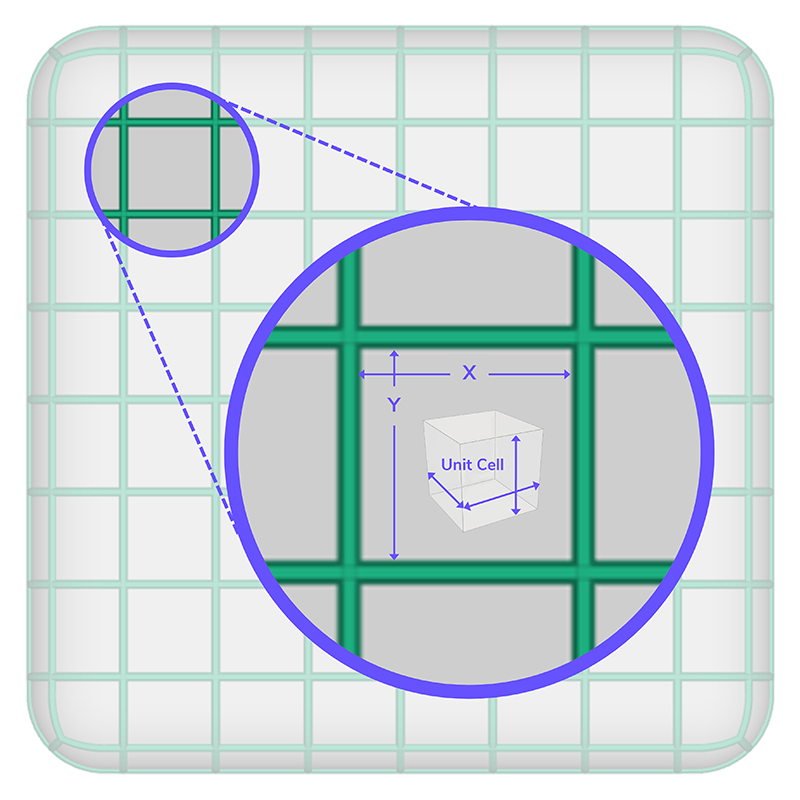
Cell size is the dimensions of the unit cell, which defines the scale of the lattice.
::::VerticalSplit{layout="middle"}
:::VerticalSplitItem
**Tetrahedron Cell Size**
:::
:::VerticalSplitItem
**Hexahedron Cell Size**
:::
::::
### Cell Size in the Surface Pattern
::::VerticalSplit{layout="middle"}
:::VerticalSplitItem
**Hexahedron Cell Size**
Hex lattice types can be measured easily in the surface pattern to reference the cell size. One of two patterns will be on the surface based on the lattice type and can be measured as follows:
- **Diamond Pattern** - measure across the diagonal: Cross, Fluo, Octahedral, Octet
- **Grid Pattern** - measure across the length/width: Grid, Star (Hex), Tesseract
- **Disconnected Diamond Pattern** - measure between the disconnected diamonds: Kelvin (Hex)
:::
:::VerticalSplitItem

:::
::::
::::VerticalSplit{layout="middle"}
:::VerticalSplitItem

:::
:::VerticalSplitItem
**Tetrahedron Cell Size**
Tet lattice types are not so easy to measure with how the pattern manifests on the lattice surface. The best way to visualize the cell size is with a simplified relative comparison of the circular cell size with the pattern of the generated lattice. Then you can approximately measure the selected cell size.
:::
::::
Below are each of the tet lattice types with a circular overlay matching the **cell size diameter **at key intersections of the pattern.
::::LinkArray{contentSource="CUSTOM"}
:::LinkArrayItem{headerType="IMAGE" headerImage="https://api.archbee.com/api/optimize/3CesIL2dYMCHPZvRjp8S0/wIIepzfP6Ym6iOC3hGaGM_icosahedral-cell-size.png"}
**Icosahedral**
:::
:::LinkArrayItem{headerType="IMAGE" headerImage="https://api.archbee.com/api/optimize/3CesIL2dYMCHPZvRjp8S0/K1gJ74YTUiWqkllQOgGBZ_kagome-cell-size.png"}
**Kagome**
:::
:::LinkArrayItem{headerType="IMAGE" headerImage="https://api.archbee.com/api/optimize/3CesIL2dYMCHPZvRjp8S0/Yn-JKEL9py6eJRL_Xs3EW_rhombic-cell-size.png"}
**Rhombic**
:::
:::LinkArrayItem{headerType="IMAGE" headerImage="https://api.archbee.com/api/optimize/3CesIL2dYMCHPZvRjp8S0/0z1KDRhMbhqpCXPW3DkKp_tetrahedral-cell-size.png"}
**Tetrahedral**
:::
:::LinkArrayItem{headerType="IMAGE" headerImage="https://api.archbee.com/api/optimize/3CesIL2dYMCHPZvRjp8S0/jGWAF3ooS41pbr7ck_hXm_voronoi-cell-size.png"}
**Voronoi**
:::
::::
### Cell Size per Part Geometry
Assessing the overall geometry of your part and using these rules of thumb is the best starting place.
Iterate from here with the remaining considerations for best results.
1. **Measure **your part
2. Select a **main cell size**
3. Optionally apply **cell size adaptivity**
:::hint{type="info"}
Cell size adaptivity allows for greater control in conforming the lattice to smaller features in the design space. The guidelines below provide basic recommendations for cell size adaptivity. Also reference [Cell Size Adaptivity](docId\:UpBQxWWLjaafbScteZwEd) for more advanced recommendations.
:::
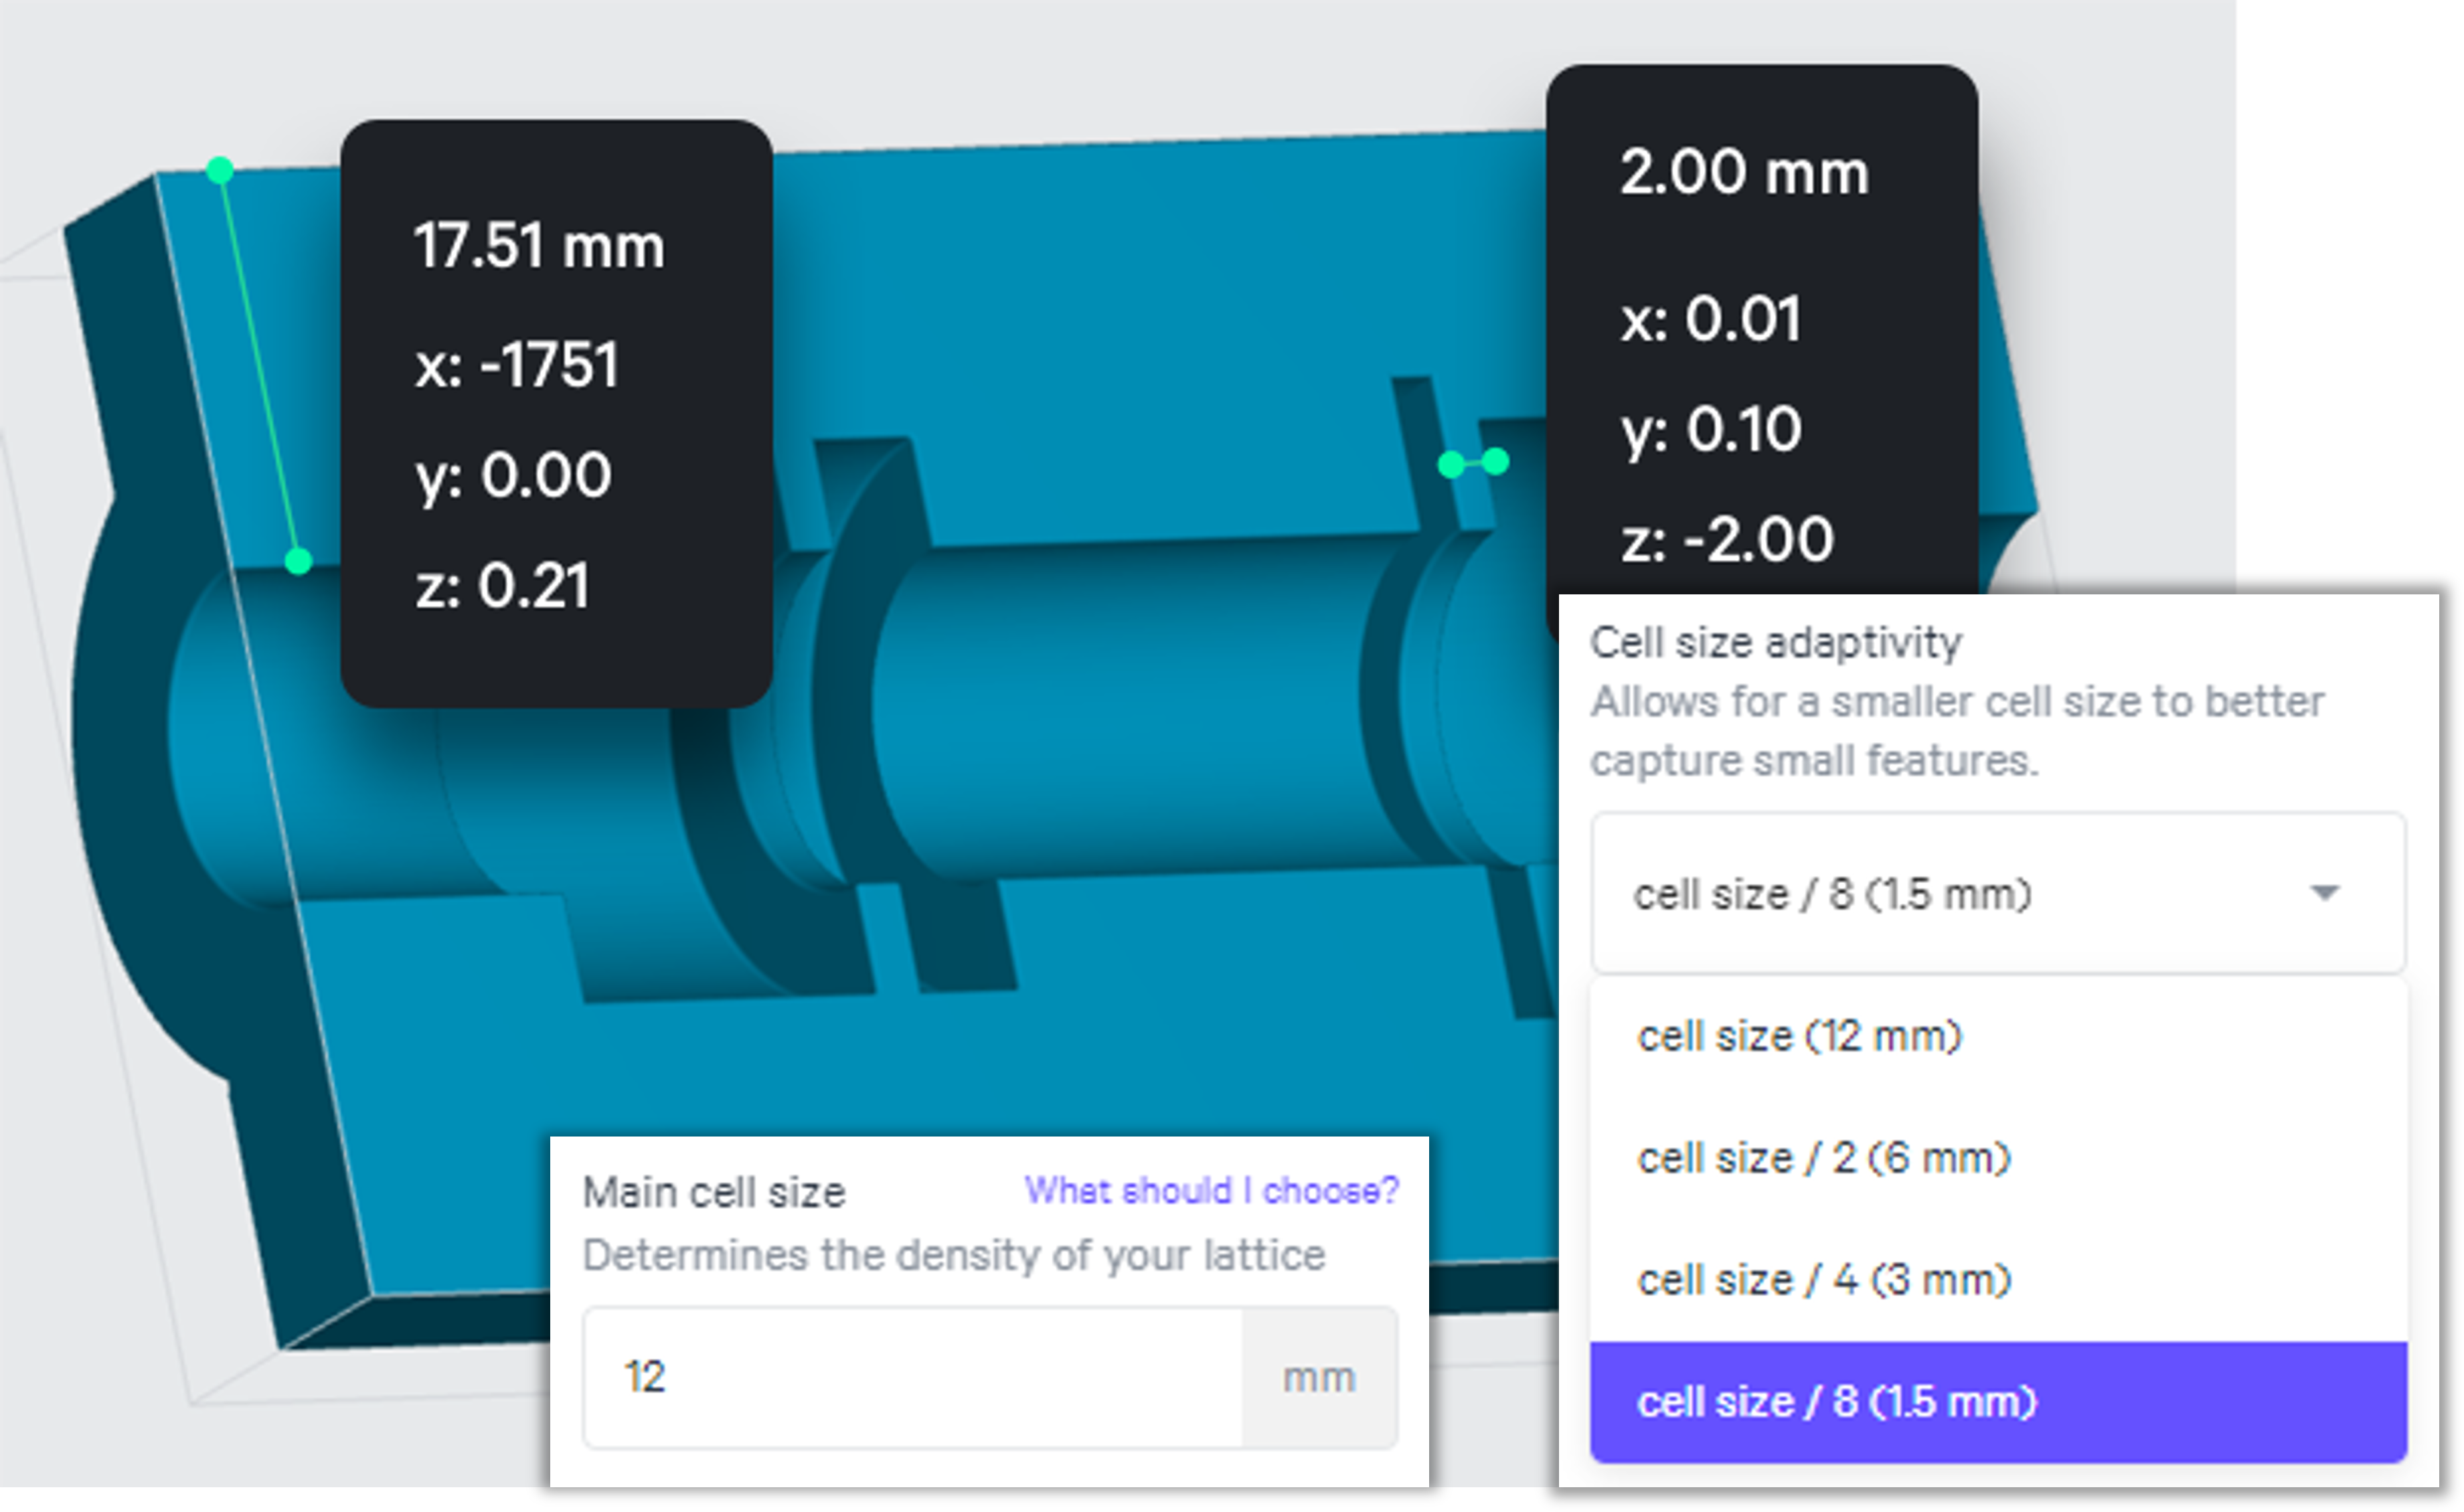
**Measure your Part**
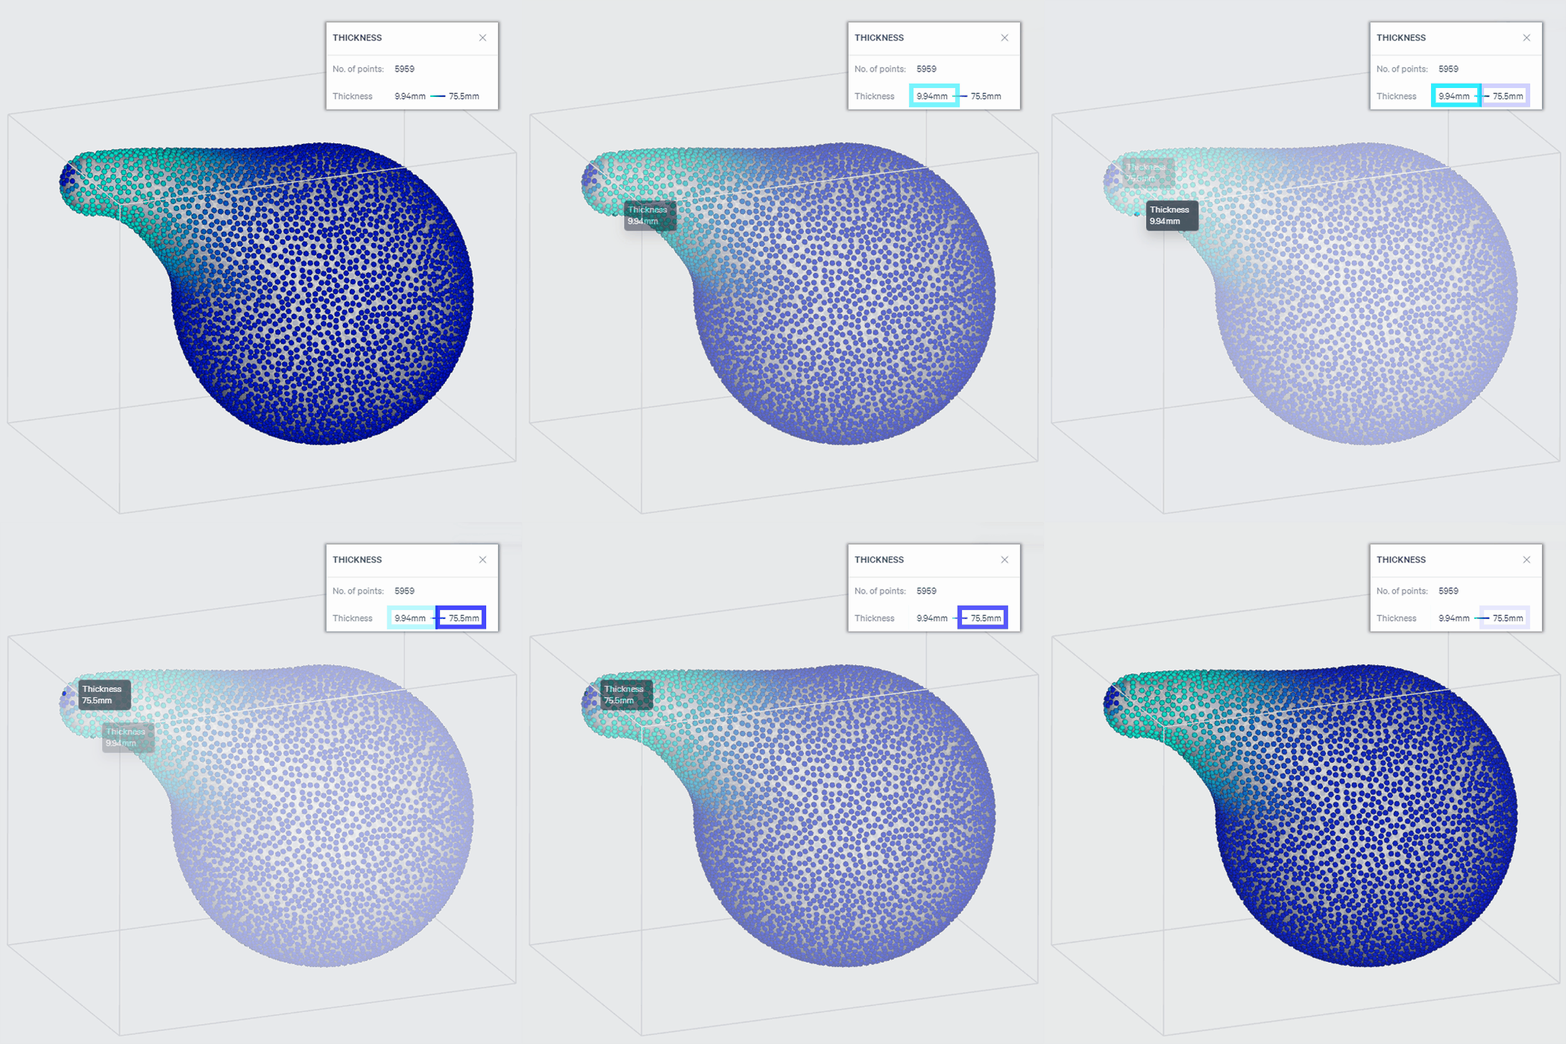
There are two methods for measuring your part.
::::VerticalSplit{layout="middle"}
:::VerticalSplitItem
**Measure**

:::
:::VerticalSplitItem
**Thickness**
:::
::::
**Main Cell Size**
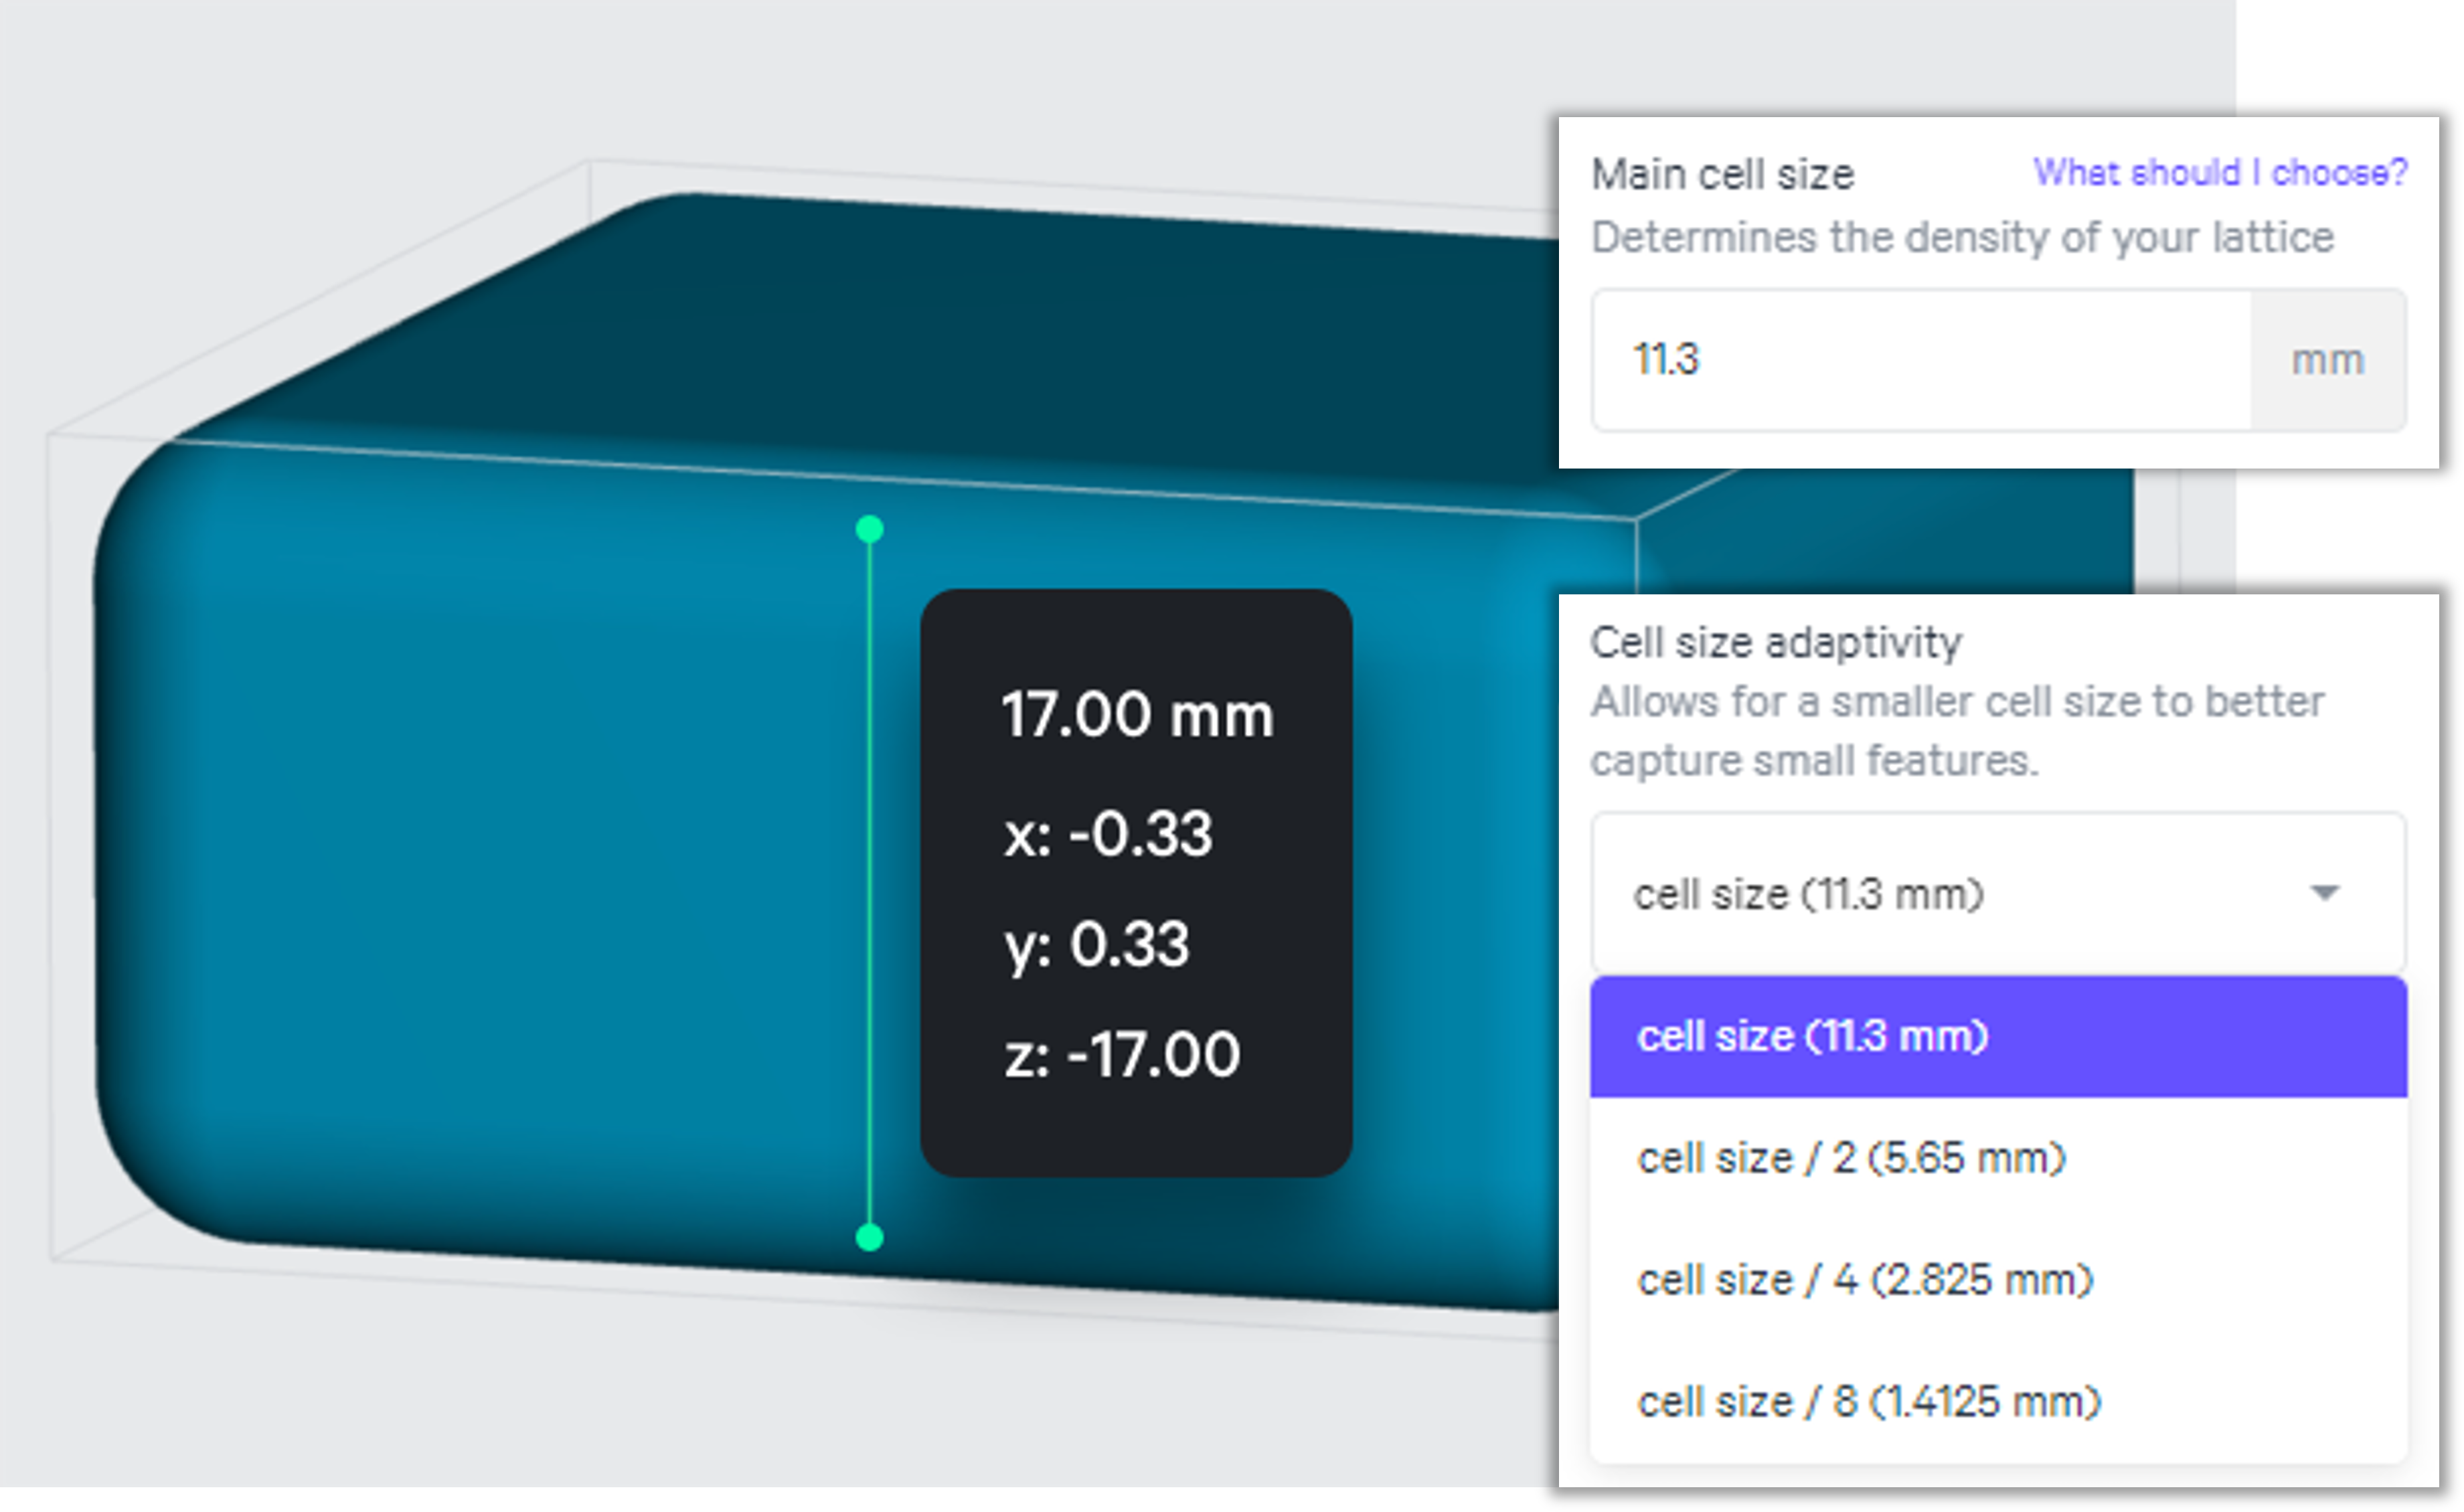
and optional **Cell Size Adaptivity**
::::VerticalSplit{layout="middle"}
:::VerticalSplitItem
:::
:::VerticalSplitItem
**If your part does not have any distinct features**
- **Main** cell size → \~¾ of smallest XYZ dimensions
- Cell size **adaptivity** → 1/1 of main cell size
:::
::::
::::VerticalSplit{layout="middle"}
:::VerticalSplitItem
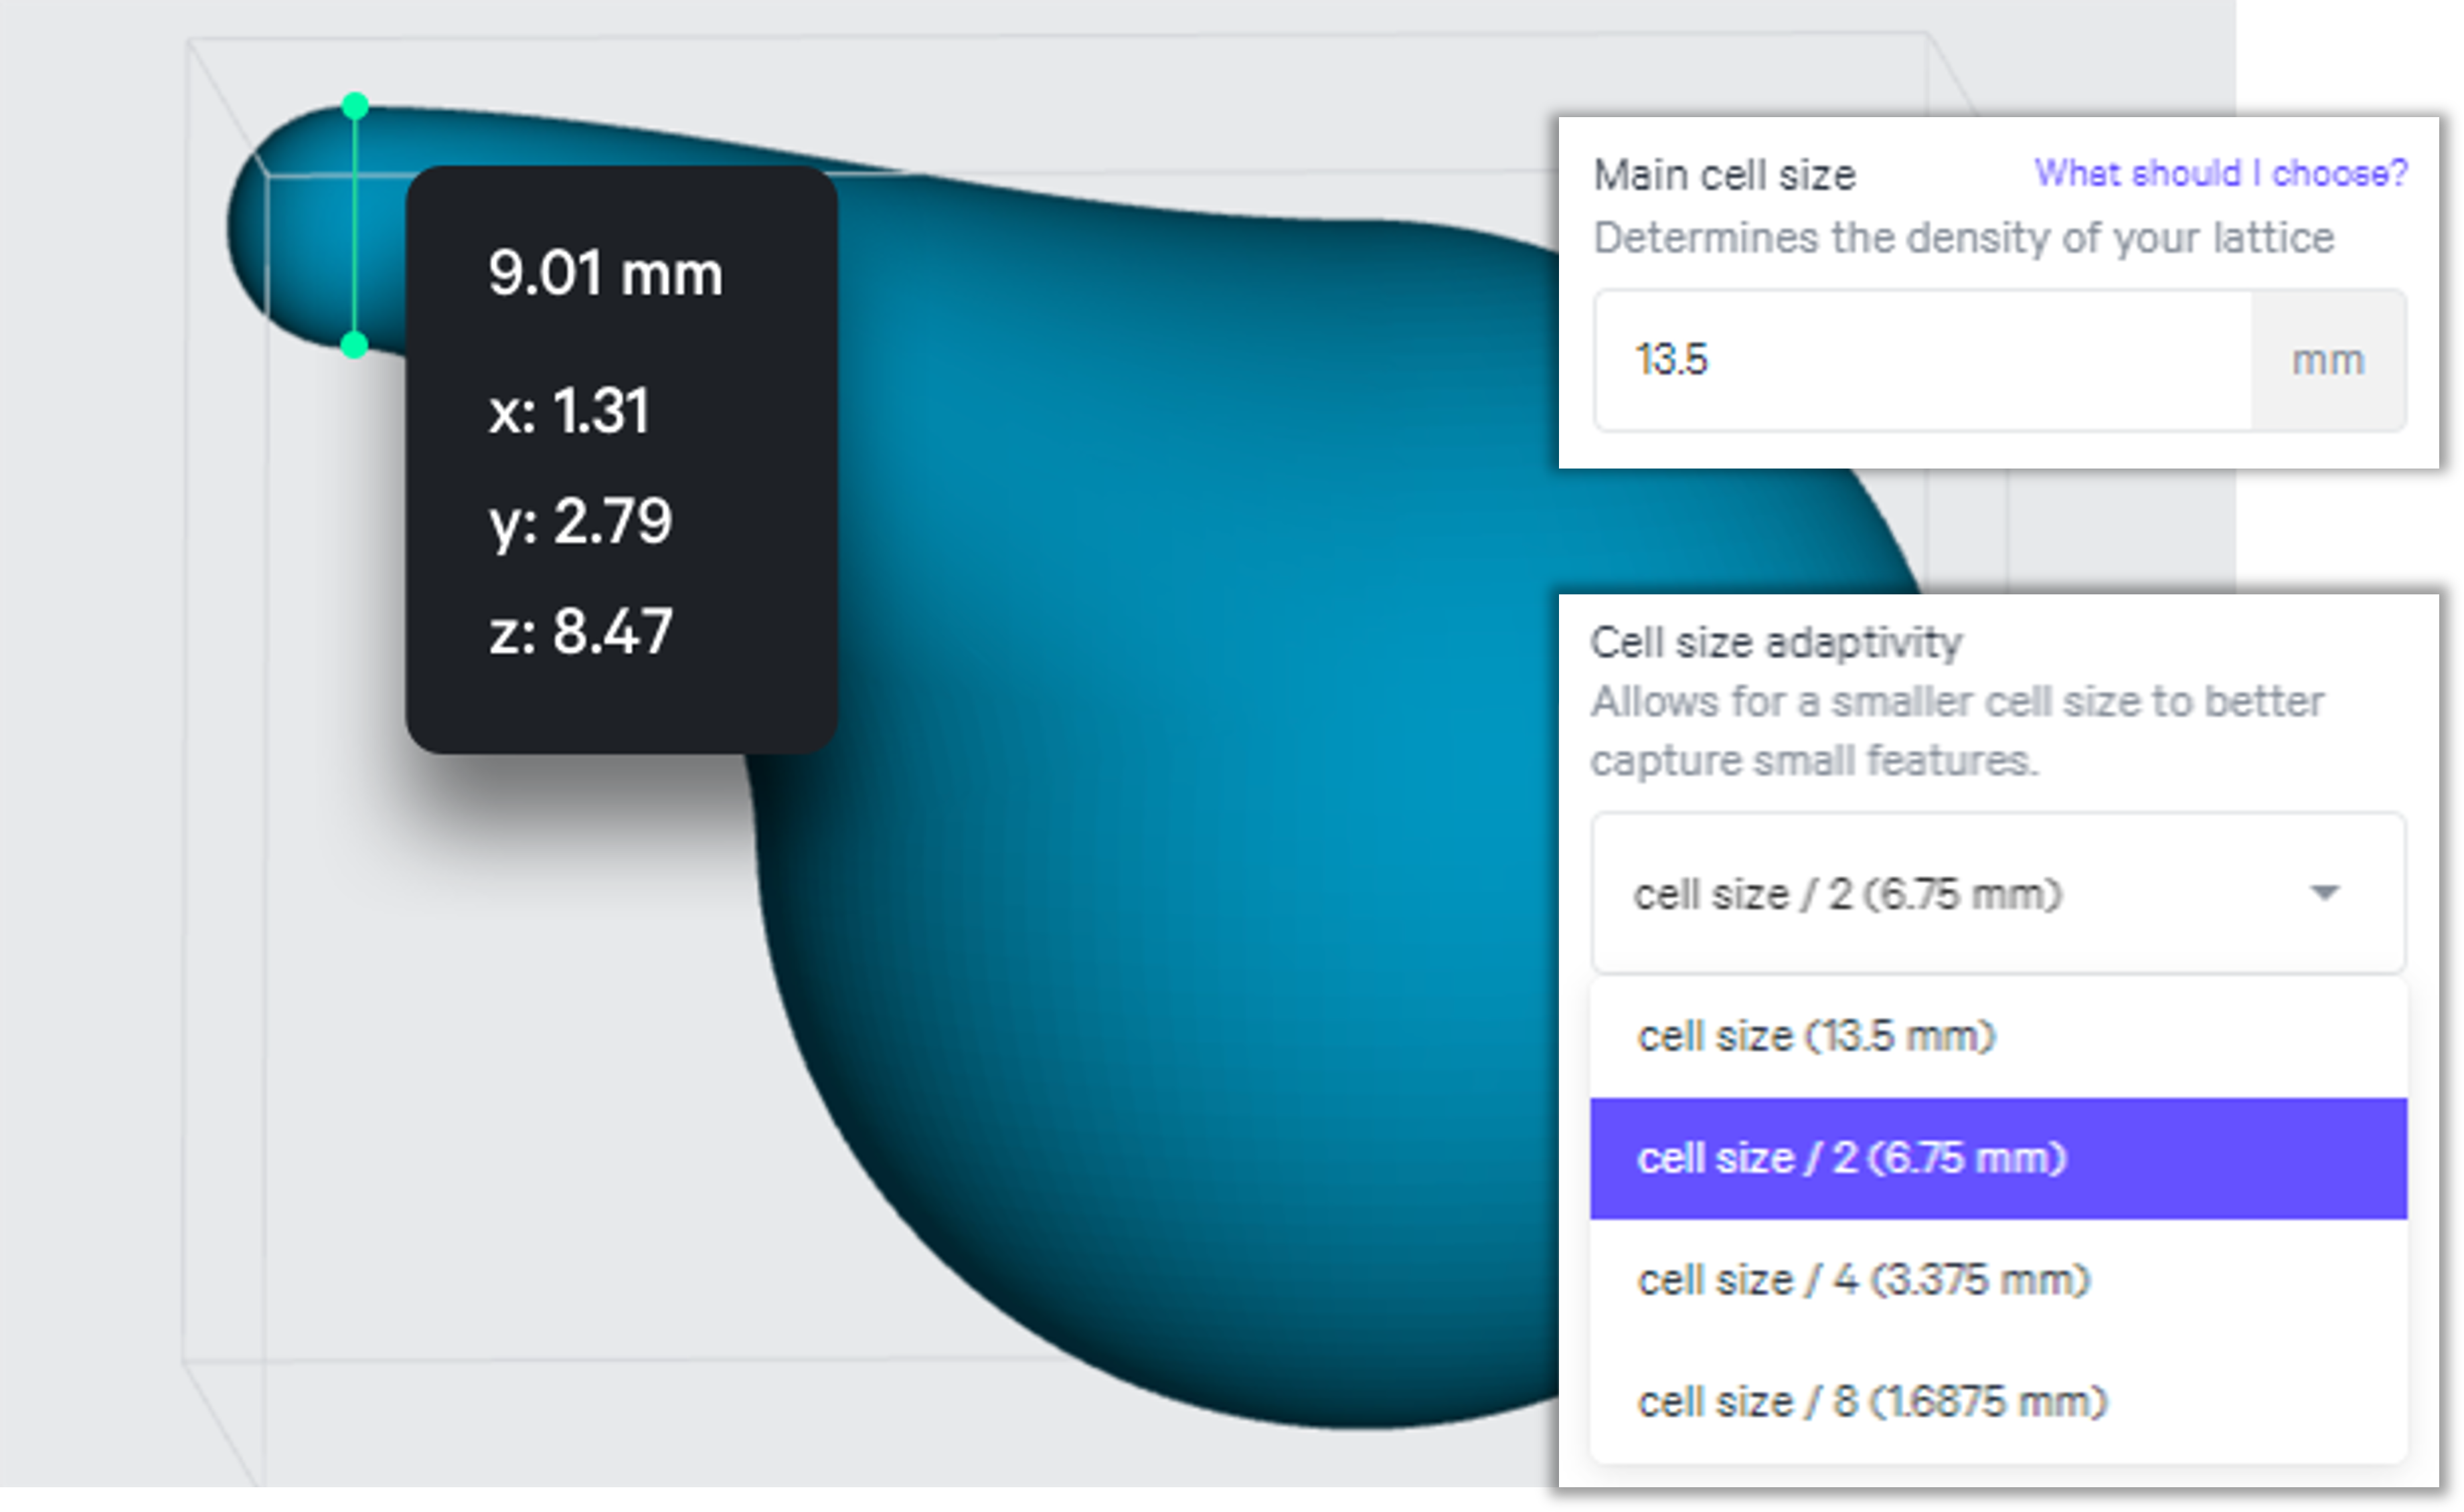
**If your part has one dominating feature**
- Cell size** adaptivity** → \~¾ of smallest feature
- **Main **cell size → up to 4x adaptive cell size
:::
:::VerticalSplitItem
:::
::::
::::VerticalSplit{layout="middle"}
:::VerticalSplitItem
:::
:::VerticalSplitItem
**If your part has multiple or variable feature sizes / wall thicknesses**
- Cell size **adaptivity** → \~¾ of smallest feature
- **Main **cell size → 1x, 2x, 4x, or 8x adaptive cell size, whichever is closest to and below the max feature size
:::
::::
### Performance per Cell Size
Cell size has an inverse relationship with compressive strain.
- **Large **cell size = **softer**
- **Small **cell size = **stiffer**
:::hint{type="info"}
If you have a performance specification, utilize the [Lattice Search](docId\:LlWKO8SuVfs2j3cEjz6YR) feature.
:::
## Strut Diameter Guidelines
::::VerticalSplit{layout="right"}
:::VerticalSplitItem
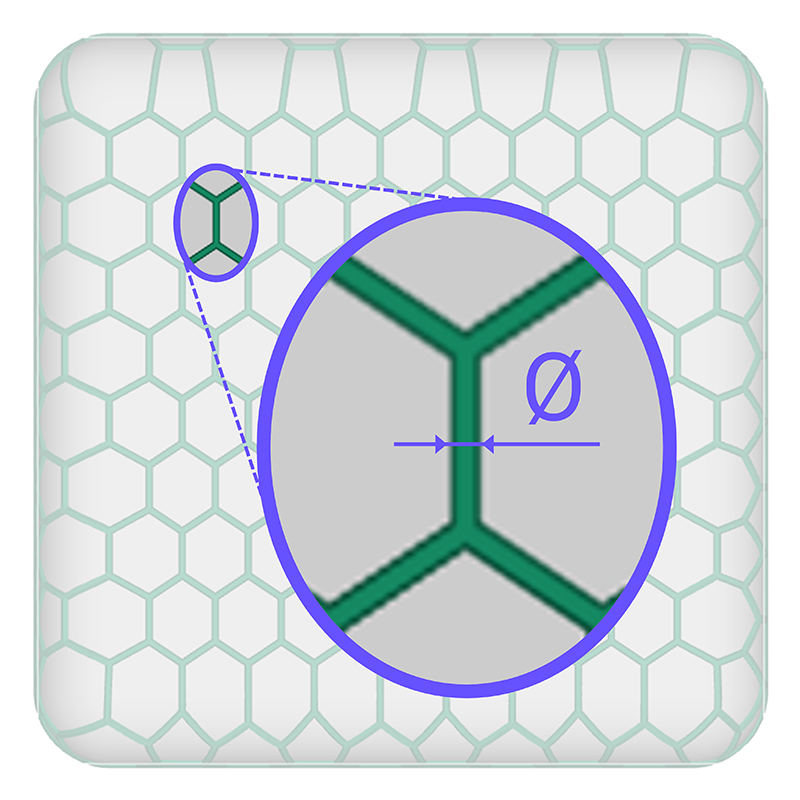
**Strut Diameter**
The diameter of the printed material that builds the structure of the lattice.
:::
:::VerticalSplitItem
:::
::::
For printability, durability, and post-processing, the following strut diameters are **recommended per Carbon resin**.
- If the resin is not known upfront, start with a 1.0 mm strut diameter or 10%-30% of cell size.
- Allowable strut sizes fall between 0.1 and 7.5 mm inclusively, but warning advice will be provided under some conditions.
| **Resin** | **Minimum (mm)** | **Default (mm)**
| **Maximum (mm)** |
| ---------------------- | ---------------- | ---------------------- | ---------------- |
| **Rigid Resins** | | | |
| **EPX 82** | 0.4 | 0.8 | 3.0 |
| **EPX 150** | 0.4 | 0.8 | 3.0 |
| **FPU 50** | 0.4 | 0.8 | 3.0 |
| **MPU 100** | 0.4 | 0.8 | 3.0 |
| **RPU 70** | 0.4 | 0.8 | 3.0 |
| **RPU 130** | 0.4 | 0.8 | 3.0 |
| **UMA 90** | 0.4 | 0.8 | 3.0 |
| **Elastomeric Resins** | | | |
| **EPU 40** | 0.65 | 1.0 | 3.0 |
| **EPU 41** | 0.65 | 1.0 | 3.0 |
| **EPU 43** | 0.65 | 1.0 | 3.0 |
| **EPU 45** | 0.5 | 1.0 | 3.0 |
| **EPU 46** | 0.5 | 1.0 | 3.0 |
| **EPU Pro 50** | 0.8 | 1.0 | 3.0 |
| **EPU Pro 90** | 0.6 | 0.8 | 3.0 |
| **SIL 30** | 0.8 | 1.0 | 3.0 |
:::hint{type="info"}
For materials outside of Carbon's portfolio, follow the manufacturer's feature size recommendations.
:::
### Performance per Strut Diameter
Strut diameter has a direct relationship with compressive strain.
- **Small **strut diameter = **softer**
- **Large **strut diameter = **stiffer**
:::hint{type="info"}
If you have a performance specification, utilize the [Lattice Search](docId\:LlWKO8SuVfs2j3cEjz6YR) feature.
:::
# Unit Cell Manufacturability
The parameters that comprise the **unit cell**: lattice type, cell size, and strut diameter, all contribute to how successful a lattice will be in the production environment.
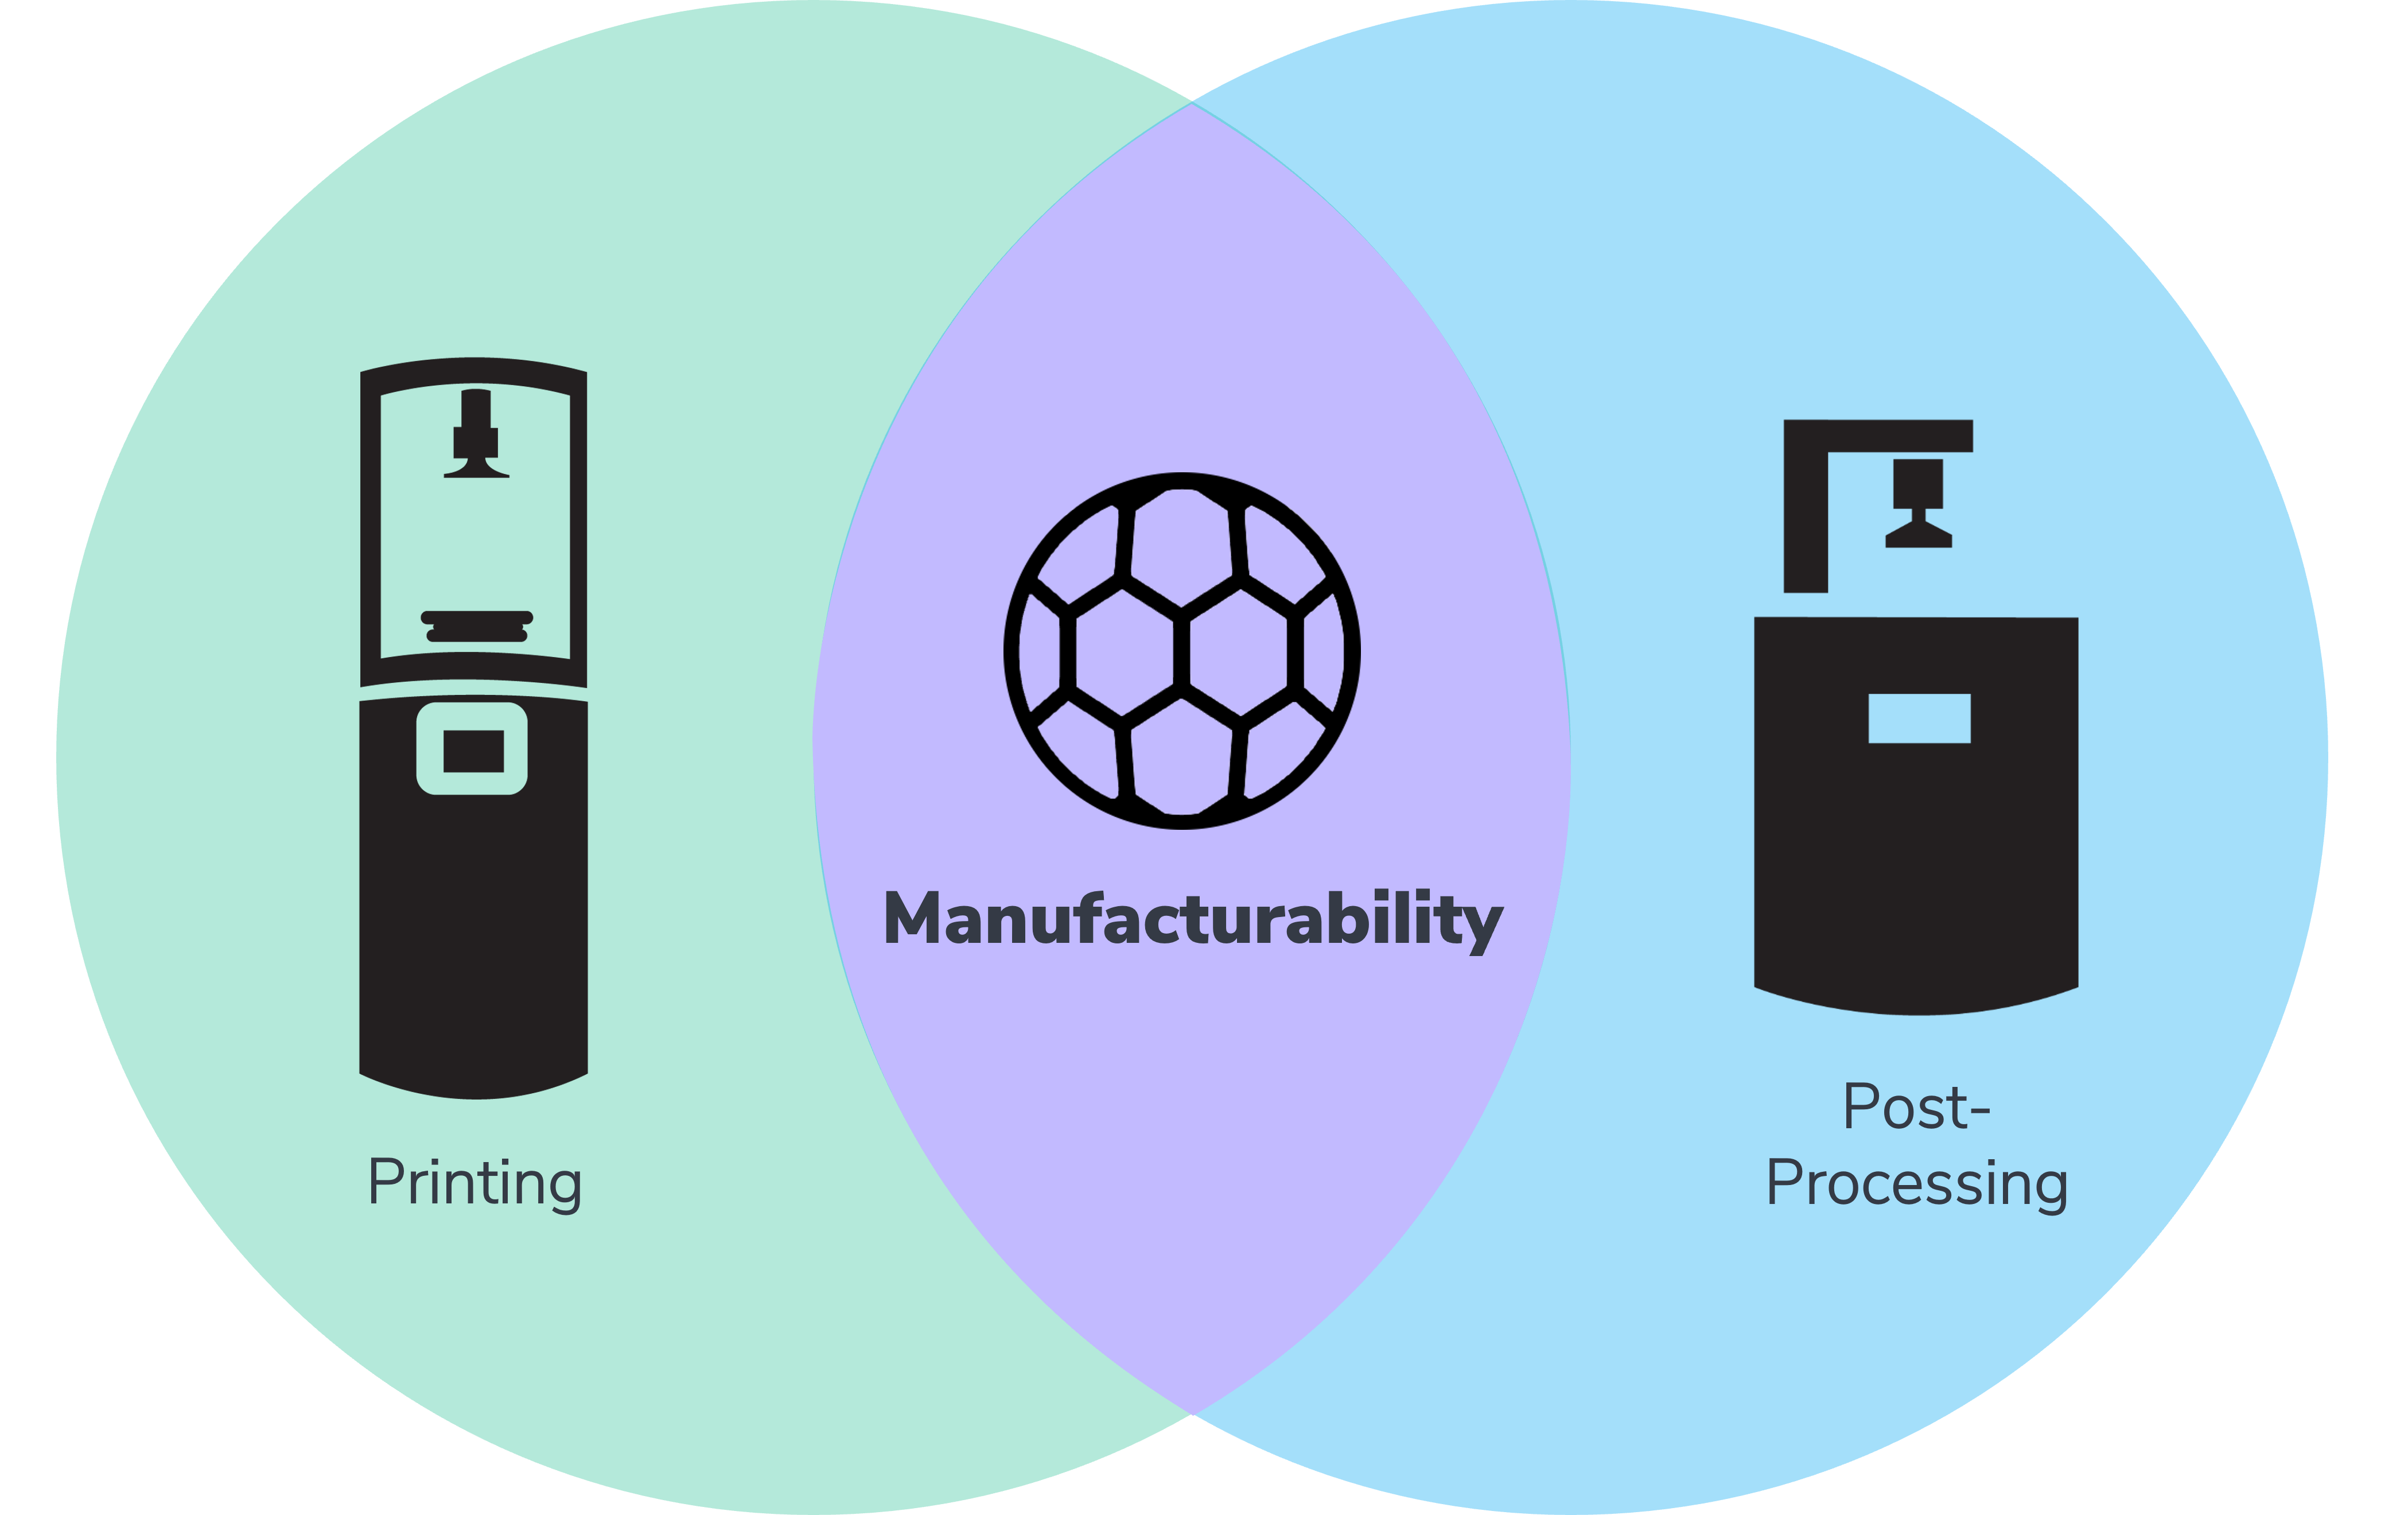
The success of a lattice in additive manufacturing is driven by two key factors:
- **Printing**
- The printing process requires guidelines in all additive technologies: wall thickness, orientation, overhangs & supports, and more. A lattice must meet these guidelines to successfully print.
- **Post-processing**
- Additional processes after printing, such as washing, support removal, and supplemental curing must be feasible for the lattice to perform properly in its application.
::::VerticalSplit{layout="right"}
:::VerticalSplitItem
:::
:::VerticalSplitItem
Where a lattice performs well in both aspects of the production process, you have a **manufacturable** lattice.
:::
::::
:::hint{type="info"}
**Variation in Additive Technologies**
Design Engine lattices can be produced on many types of 3D printers. Always follow the guidelines for the printer you are using for best results.
The following guidelines apply to Carbon DLS printers. Other resin-based technologies may be similar. Powder-based or other technologies may vary more widely.
:::
### Tet Lattice Manufacturability
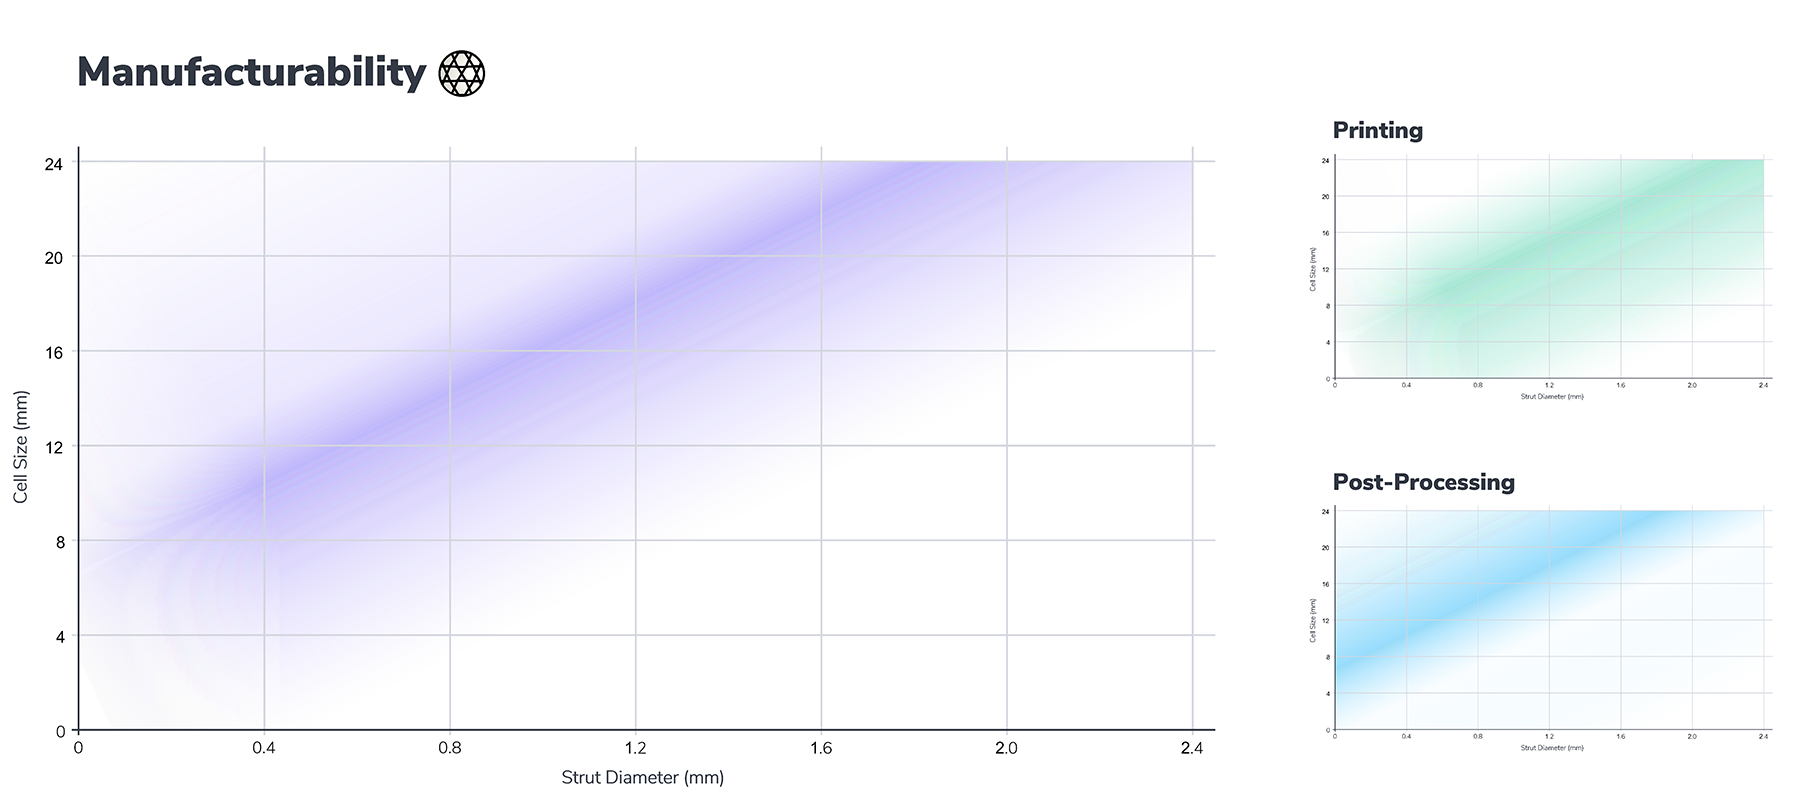
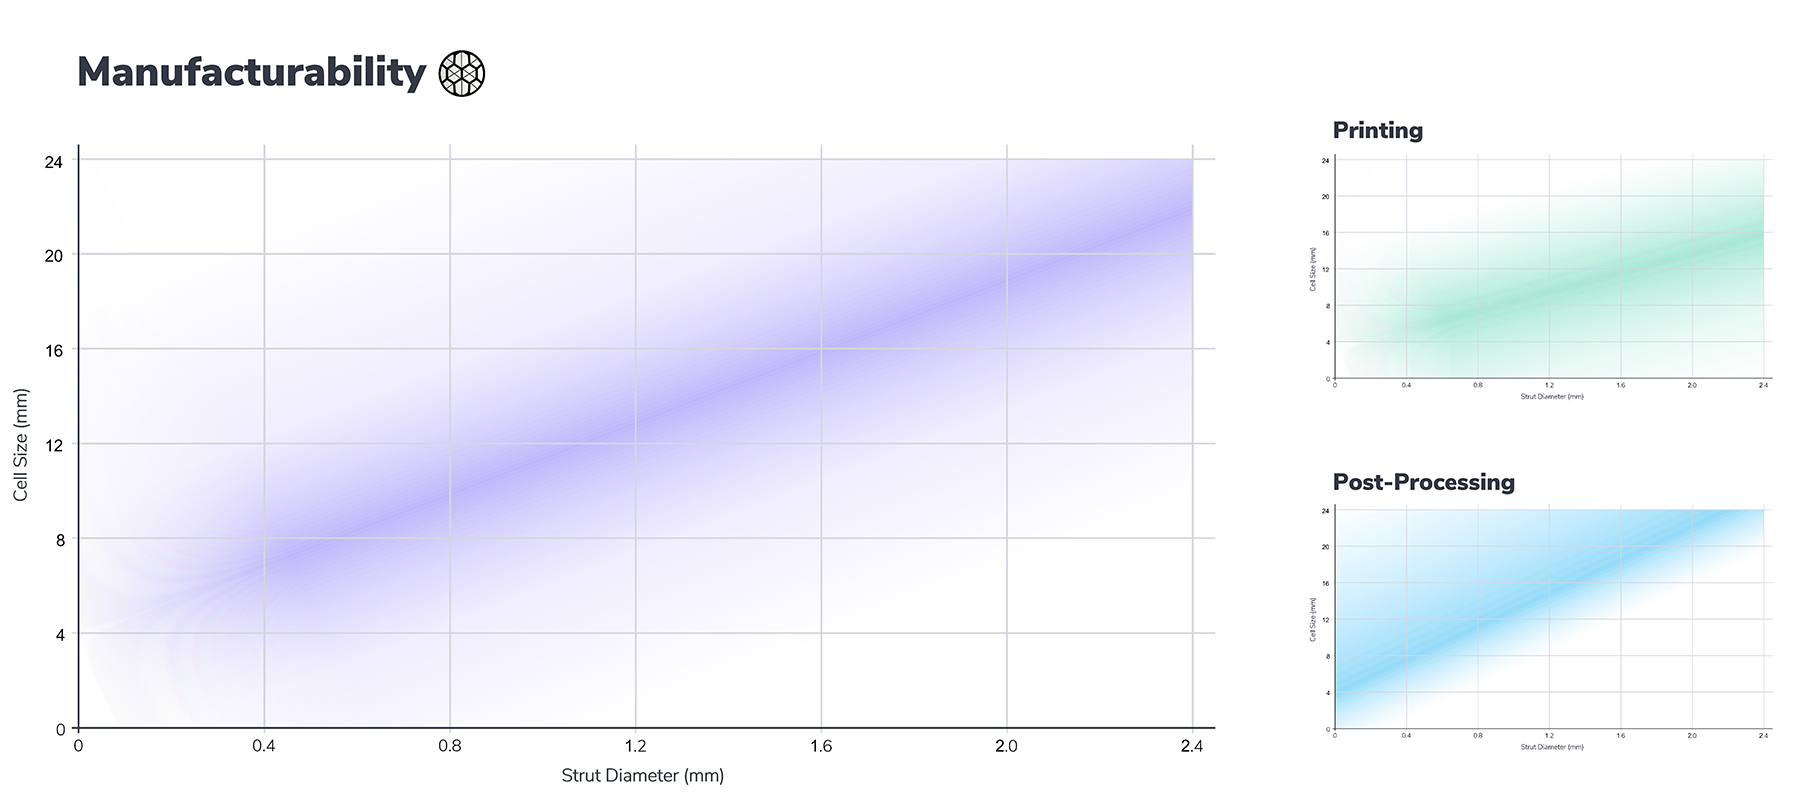
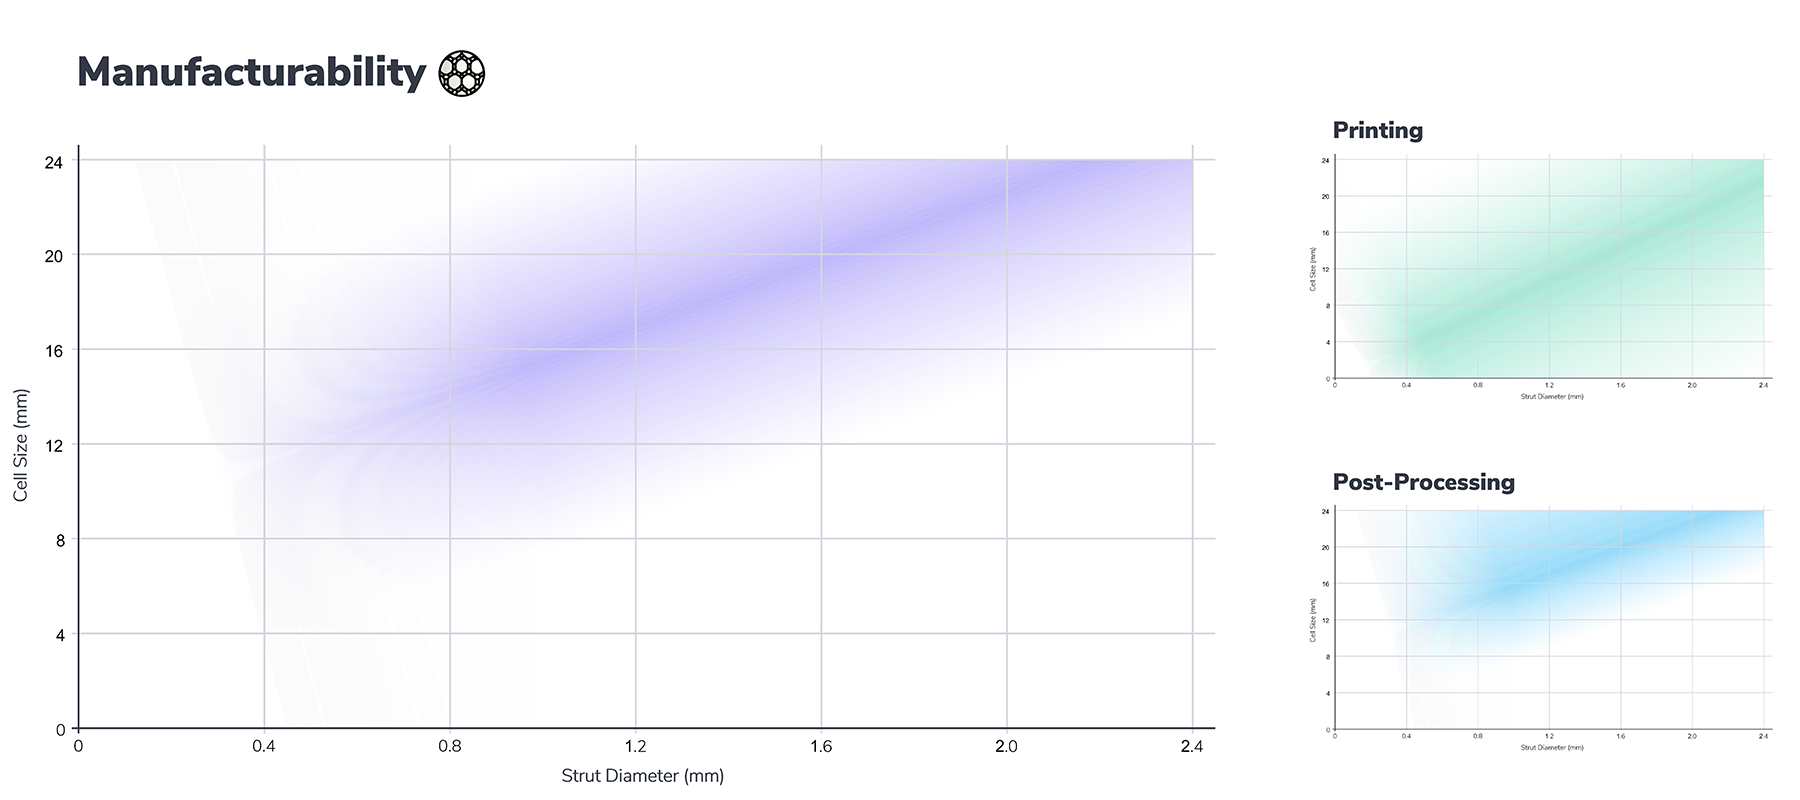
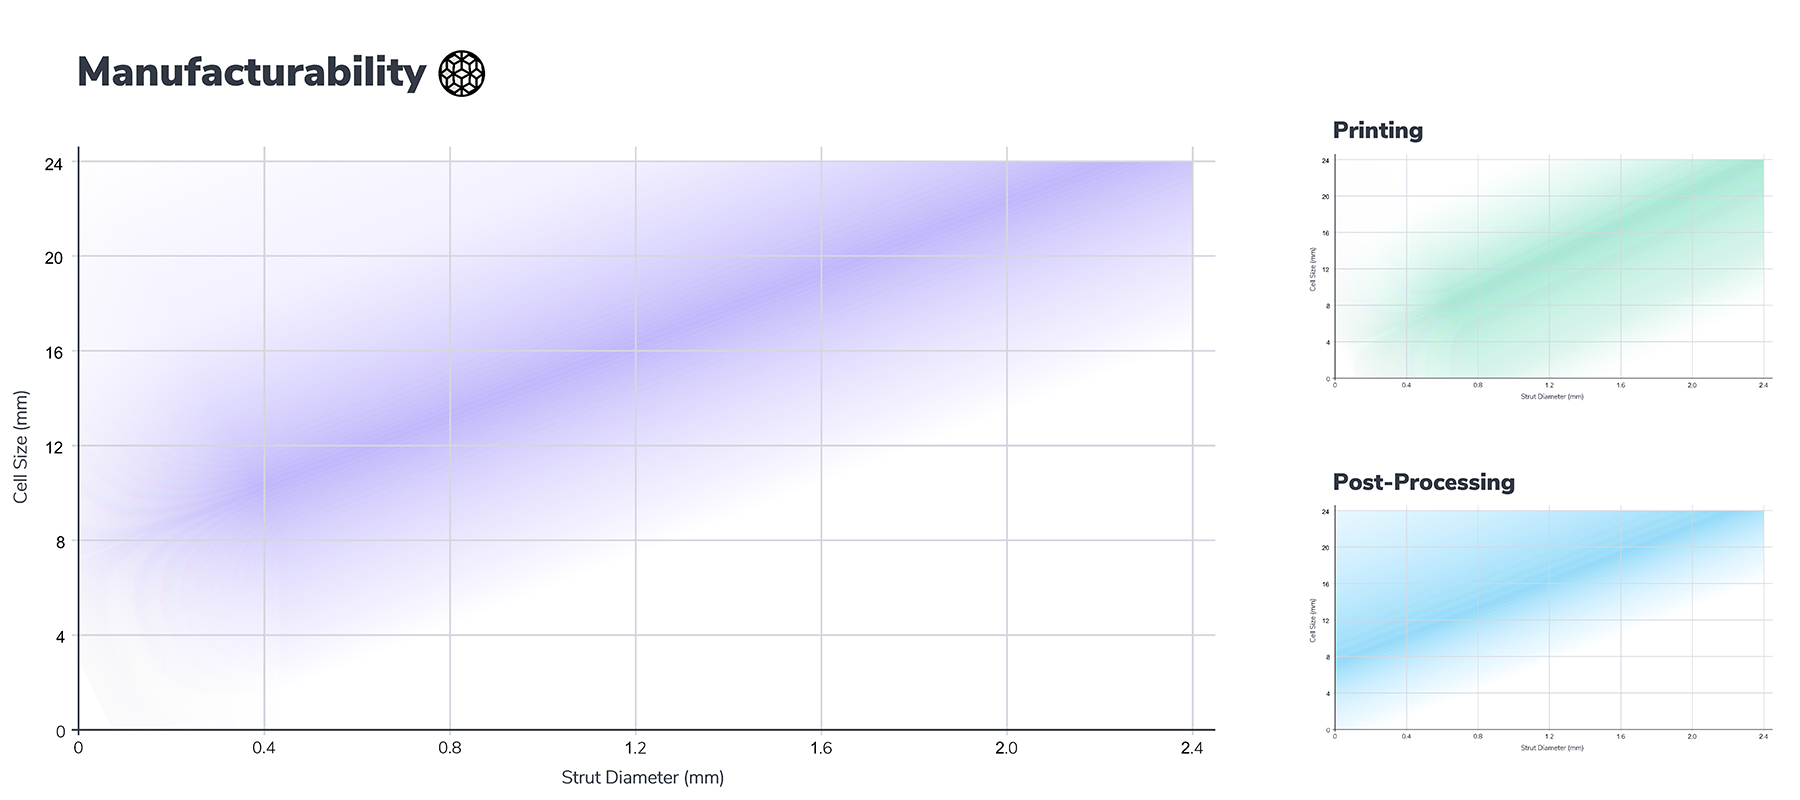
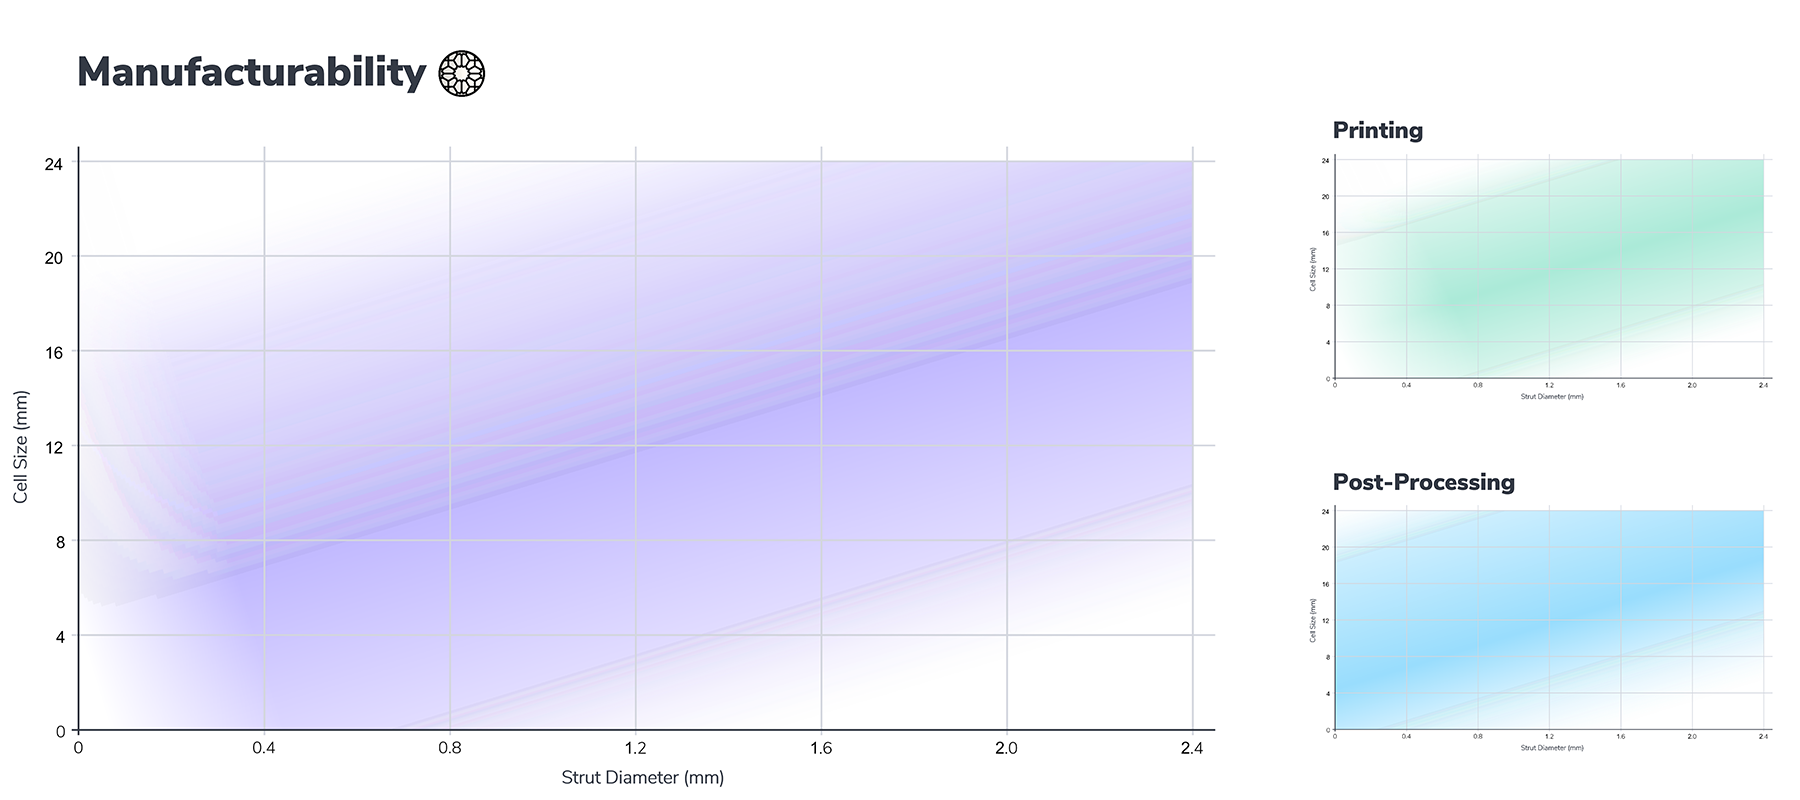
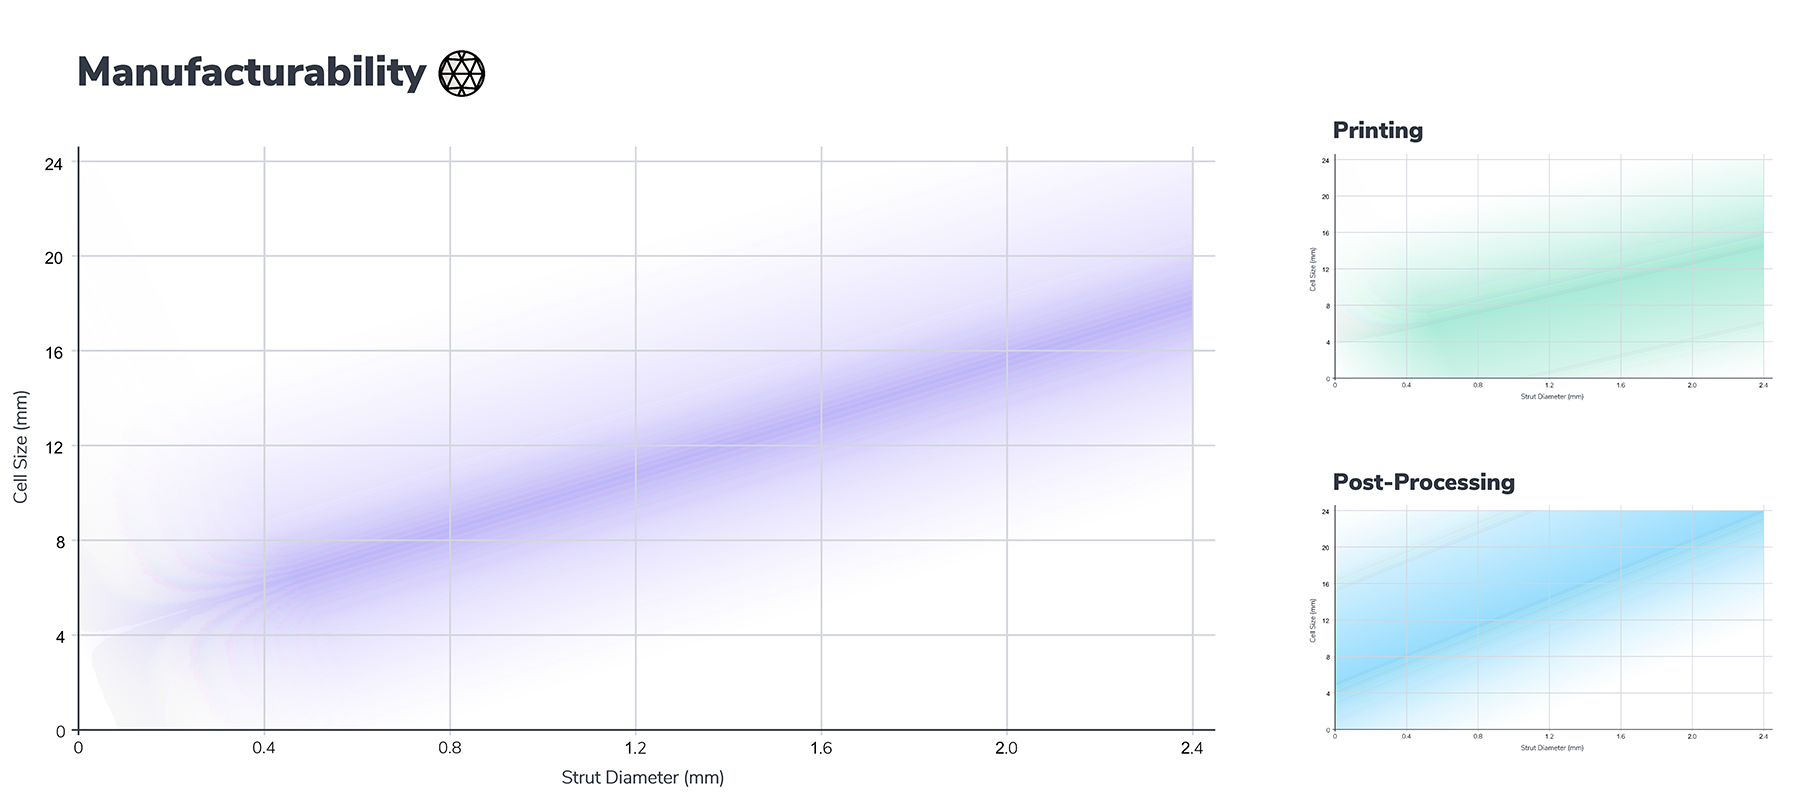
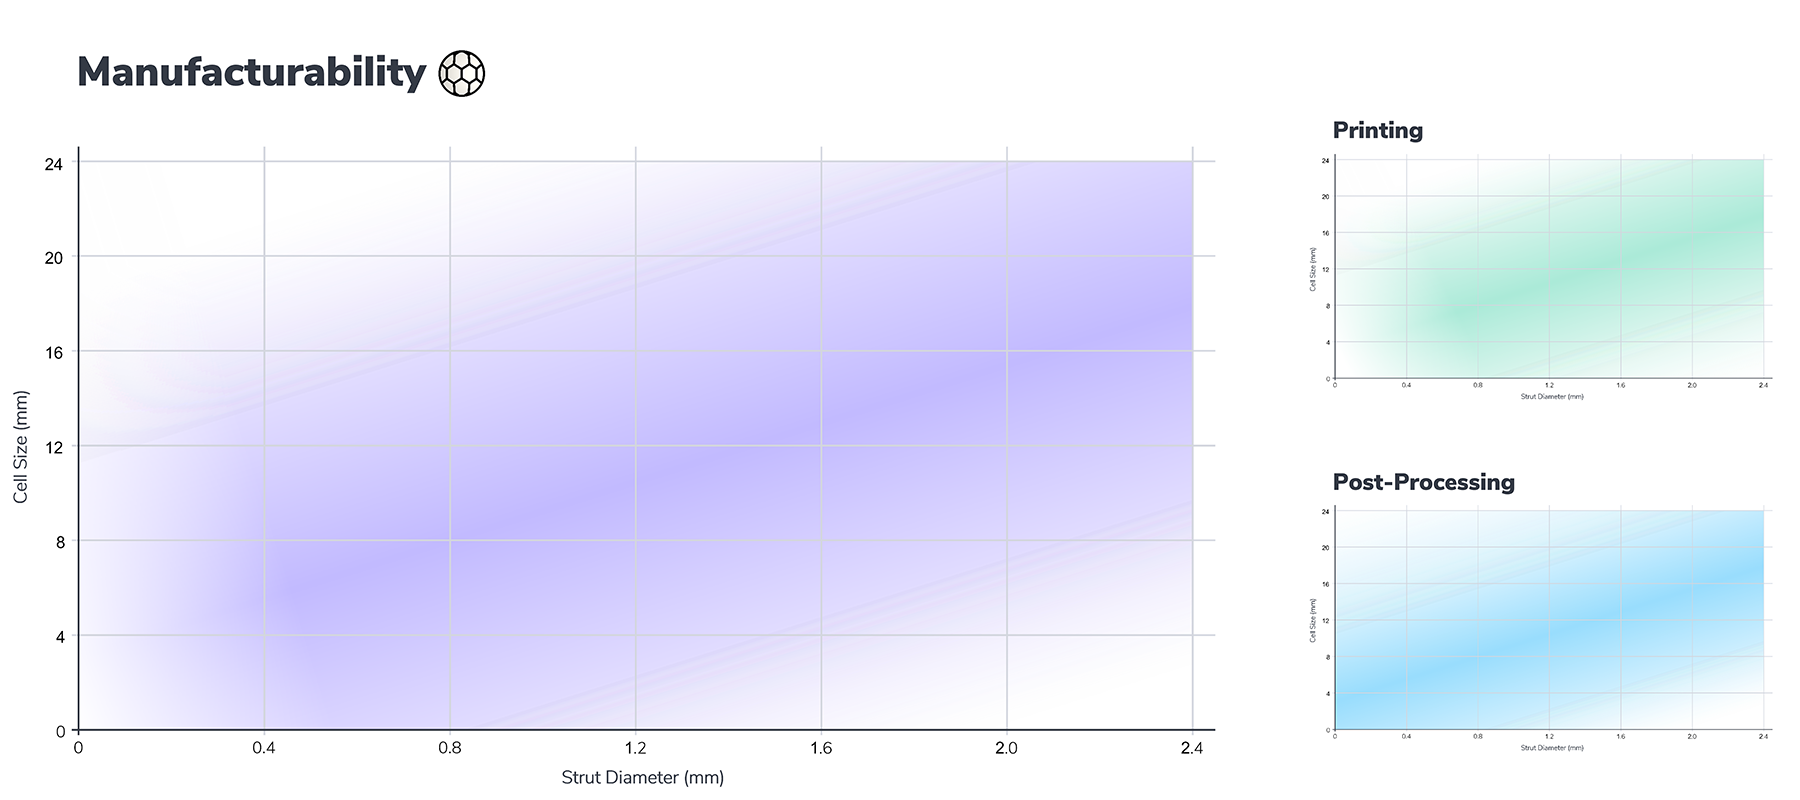
For the tet lattice types below, find your cell size and strut diameter on the chart. The **printability** range is shown in green and **washability** in blue. Where the green and blue areas overlap, we arrive at the **optimal manufacturing range** for the lattice type, shown in purple. The tabs below include:
Icoahedral | Kagome | Kelvin (Tet) | Rhombic | Star (Tet) | Tetrahedral | Voronoi
::::Tabs
:::Tab{title="Icosahedral"}
:::
:::Tab{title="Kagome"}
:::
:::Tab{title="Kelvin (Tet)"}
:::
:::Tab{title="Rhombic"}
:::
:::Tab{title="Star (Tet)"}
:::
:::Tab{title="Tetrahedral"}
:::
:::Tab{title="Voronoi"}
:::
::::
:::hint{type="info"}
Note that Kelvin (Tet) and Star (Tet) are only available through [Lattice Search](docId\:LlWKO8SuVfs2j3cEjz6YR).
:::
:::hint{type="info"}
**All Applications are Unique**
Part geometry and material will also influence the success of a lattice. The purple manufacturable zone is shown darkest where you have the greatest chance of success, but the edges are intentionally blurry to allow for inherent variation between geometries and resins. Also reference cell size and strut diameter guidelines respectively for additional guidance and/or plan for more iteration prints on the fringes of the manufacturable zone.
:::
### What Drives Printability and Washability
::::VerticalSplit{layout="middle"}
:::VerticalSplitItem
**Printing**
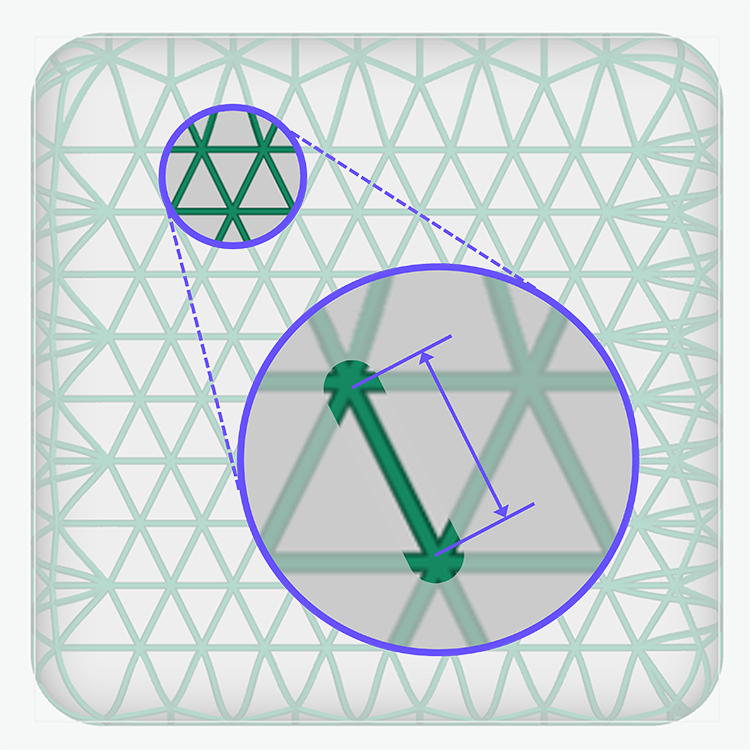
Printability in DLS lattices is governed most by how far a strut spans between connection nodes, ie how long of an unsupported overhang it has (or a bridge because two overhangs connect together in the middle).
:::
:::VerticalSplitItem
**P****ost-Processing**
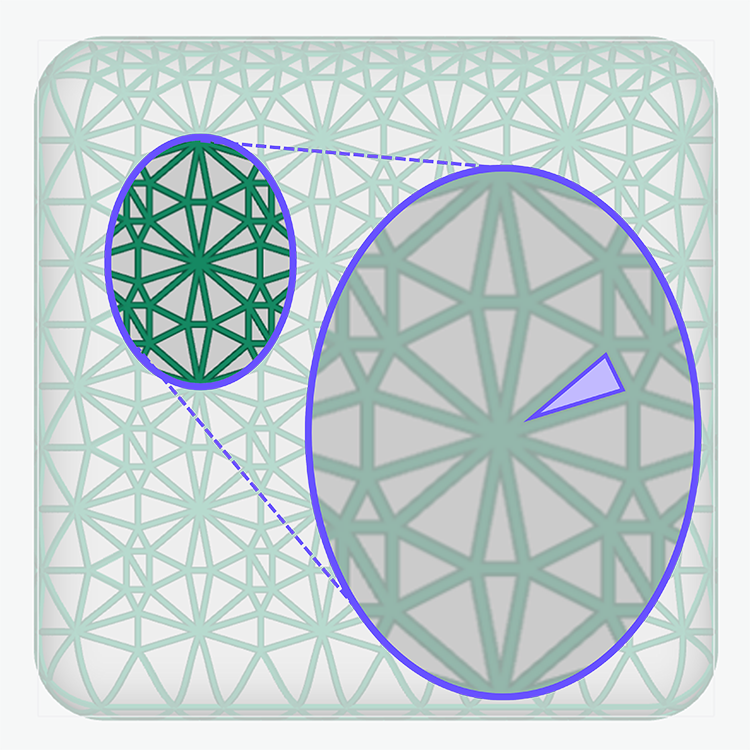
Post-processing success in DLS lattices is governed most by how washable it is. The volume fraction and size of openings between struts dictate how washable the lattice will be.
:::
::::
**How These Factors are Quantified**
:::ExpandableHeading
**Printi****ng**
The success of a printed overhang comes down to the **length of the span** and the **thickness of the strut**. Because of the structural nature of lattices, standard [feature size recommendations](docId\:t94PR-A-C0pIhY6LJsWk7) are more conservative than what lattices can handle. Just like geodesic domes can withstand heavy loads for their size, so too can a lattice because the elements work together as a whole.
While we can achieve **longer spans and thinner struts than standard geometries**, there are still limits. To quantify those limits, we measured the longest spans in the primary pattern\* of each lattice type and found the typical failure point across a sample set. Longer spans need thicker struts and thinner struts needs short spans. Additionally, the denser lattice types have more connection nodes and perform better overall for printability. To capture all characteristics of the unit cell: the volume fraction of the lattice type, along with cells size and strut diameter, we calculate the ratio of volume fraction to cell size and compare those values to the inflection point of print success in our sample set. This provides a **range of printability** across various cell sizes and strut diameters for each lattice type.
*\* The primary pattern was used for measuring spans because this pattern typically has longer overhangs than the secondary pattern.*
:::
:::ExpandableHeading
**P****ost-Processing**
Washability comes down to **how freely solvent and liquid resin can flow through the negative space** in the lattice. Dense lattices with small openings are more difficult to clean and may trap liquid resin, disrupting the performance of the intended lattice.
To quantify those limits, we measured the median opening area in the secondary pattern\* of each lattice type and found the typical failure point across a sample set. Then we compare volume fraction to the inflection point of print success in our sample set. This provides a **range of washability** across various cell sizes and strut diameters for each lattice type.
*\* The secondary pattern was used to measure median size openings because the smallest openings are typically found in that pattern.*
:::