---
title: Utilities
slug: site-prep/utilities
description: Explore essential utility guidelines for Carbon printer installation, covering ventilation, air quality, electrical needs, and safety measures for optimal operation and compliance.
docTags:
createdAt: 2024-06-11T17:18:59.285Z
---
# Ventilation and Air Quality
::::VerticalSplit{layout="left"}
:::VerticalSplitItem
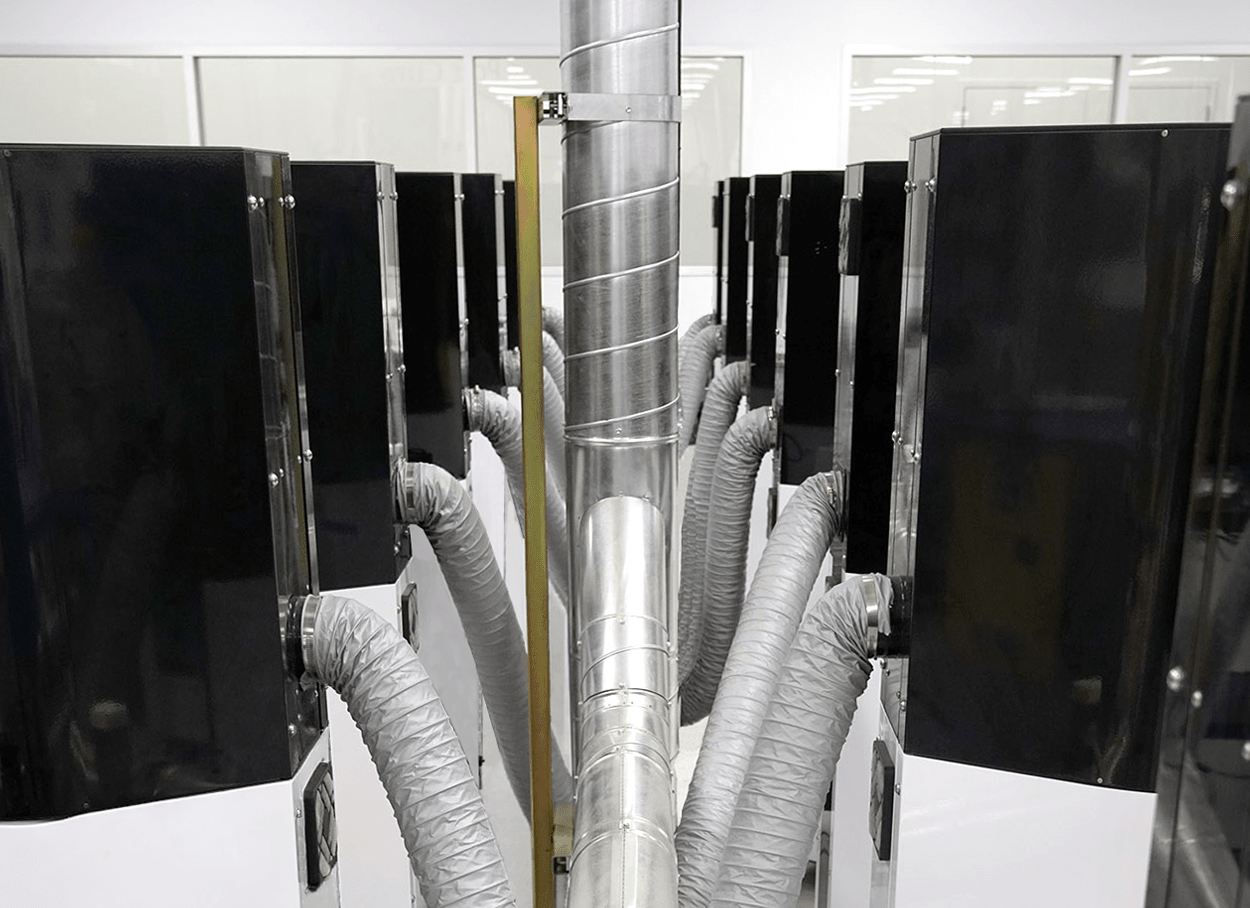
Ventilation equipment is **not provided by Carbon** and can be a long lead item.
Planning and installation should be started early in the site preparation process.
:::
:::VerticalSplitItem
:::
::::
## Requirements
:::hint{type="warning"}
You must have** built-in mechanical ventilation** that **meets the requirements below before scheduling your printer installation**. This must include a blast gate/damper for each drop to control the amount of airflow.
:::
### Printers
| **Item** | **Flow Rate Requirement** | **Additional Requirements** |
| ----------------------- | ----------------------------------------------------- | ---------------------------------------------------------------------- |
| **M1/M2 Printer** | Minimum Flow Rate 34-51 m³/hr (20-30 cfm) per printer | Printer exhaust outlet: 4” diameter exhaust on the back of the printer |
| **M3 / M3 Max Printer** | Minimum Flow Rate 34-51 m³/hr (20-30 cfm) per printer | Printer exhaust outlet: 4” diameter exhaust on the back of the printer |
| **L1 Printer** | Minimum Flow Rate 85 m³/hr (50 cfm) per printer | Printer exhaust outlet: 4” diameter exhaust above the printer |
### Washing
**Manual Washing**
| **Item** | **Flow Rate Requirement** | **Additional Requirements** |
| -------------------------------------------------- | ------------------------------- | --------------------------------- |
| **Part Washing Workstation **(orbital shaker) | 85 m³/hr (50 cfm) per wash area | - Adjustable snorkel or fume hood |
**Machine Washing**
| **Item** | **Flow Rate Requirement** | **Additional Requirements** |
| ------------------------------------ | --------------------------------- | ------------------------------------------------------------------------------------------------------------------------------------------- |
| **Smart Part Washer** | 85 m³/hr (50 cfm) per part washer | SPW exhaust outlet: 4” diameter exhaust on the back of the SPW |
| **Custom Distiller (if applicable)** | 170 m³/hr (100 cfm) per distiller | - Fixed snorkel
- **Only for use with VF 1 solvent** (formerly Vertrel solvent blend MS-767-3D-13). Not compatible with DPM or DAA solvents |
### Curing
**Small Scale Production**
| **Item** | **Flow Rate Requirement** | **Additional Requirements** |
| ----------------------------------------------------------------- | --------------------------------------------------------------------------------------- | --------------------------------------------------------------------------------------------------------------------------------------------------------------------------------------- |
| **Small Convection Oven**
\~150L oven such as Yamato DKN602 | 34 m³/hr (20 cfm) per oven
*3.8 L/min (0.13 cfm) per liter of oven capacity* | - Convection Oven exhaust outlet: 4” diameter exhaust on the top of the oven
- Ovens that require a [condenser](docId\:kCxHDDR-fsKYsI32W63xN) will need additional ventilation capacity |
**Large Scale Production**
| **Item** | **Flow Rate Requirement** | **Additional Requirements** |
| ---------------------------------------------------------------- | --------------------------------------------------------------------------------------------- | --------------------------------------------------------------------------------------------------------------------------------------------------------------------------------------- |
| **Large Convection Oven**
\~540L oven such as Yamato DNF911 | 90 m³/hr (53 cfm) per oven
2*.7 L/min (0.095 cfm) per liter of oven capacity* | - Convection Oven exhaust outlet: 4” diameter exhaust on the top of the oven
- Ovens that require a [condenser](docId\:kCxHDDR-fsKYsI32W63xN) will need additional ventilation capacity |
:::hint{type="info"}
For equipment not listed above, **reference the manufacturer's product manual** for requirements.
:::
### Air Quality
- Printer must be installed **away from sources of particulate matter:** smoke, dust from grinding, milling, sanding, or polishing, or any other known sources of dust or air contaminants (internal optical equipment is highly sensitive and will degrade when exposed to significant pollutants).
- Room where printer is installed should have **air filters** to maintain air cleanliness.
- Above requirements do not apply to post-processing areas.
## Ventilation Locations
- Ventilation is required in **3 places** in a **single printer lab** with thermal curing:
1. Printer
2. Part Washing Workstation
3. Oven
- Each additional product will require **1 additional ventilation drop** per the [Ventilation Requirements Table](docId\:kCxHDDR-fsKYsI32W63xN).
- Each of these locations must be vented to the **outside of the building.**
## Ventilation Capacity
:::hint{type="info"}
To** test the air flow** in your ventilation system, use an [anemometer](docId:95TwE3ttL-5ihI6dNl4XI).
Be sure it is properly calibrated. You will need to estimate your ventilation tubing diameter, length, and bends to understand measurements for your lab.
:::
### Example Calculation
- The **minimum ventilation requirement** for a lab with a **single M3 printer**:
- One M3 printer - 20 cfm
- One Part Washing Workstation (orbital shaker) - 50 cfm
- One Small Convection Oven - 20 cfm
- is **90 cfm**
**
**
:::hint{type="info"}
Building capacity for **excess ventilation is recommended** to accommodate more printers and adopt future products or accessories without the need to re-engineer your lab.
:::
Ventilation Examples
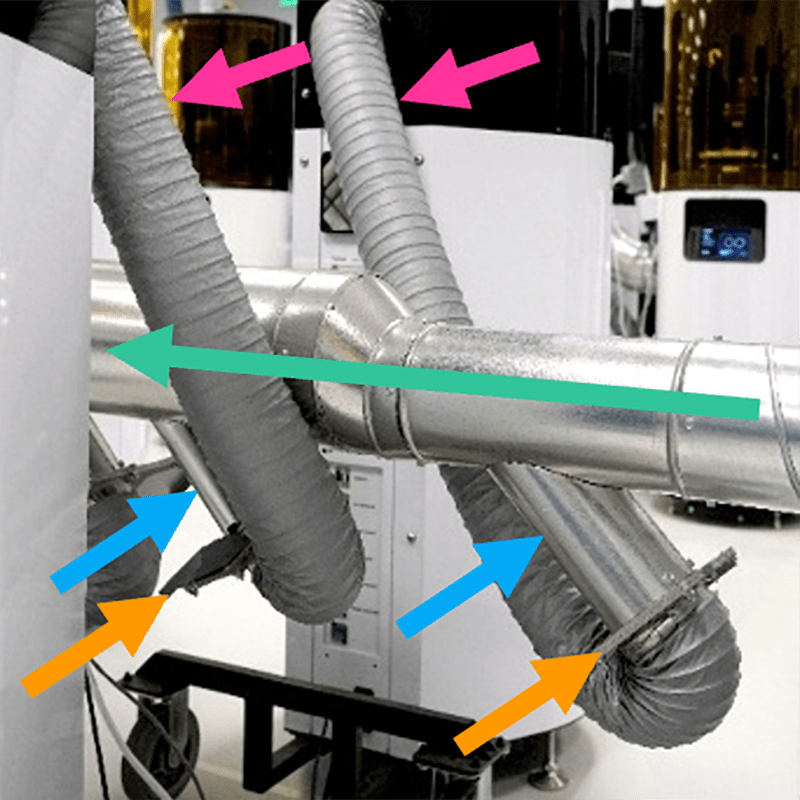
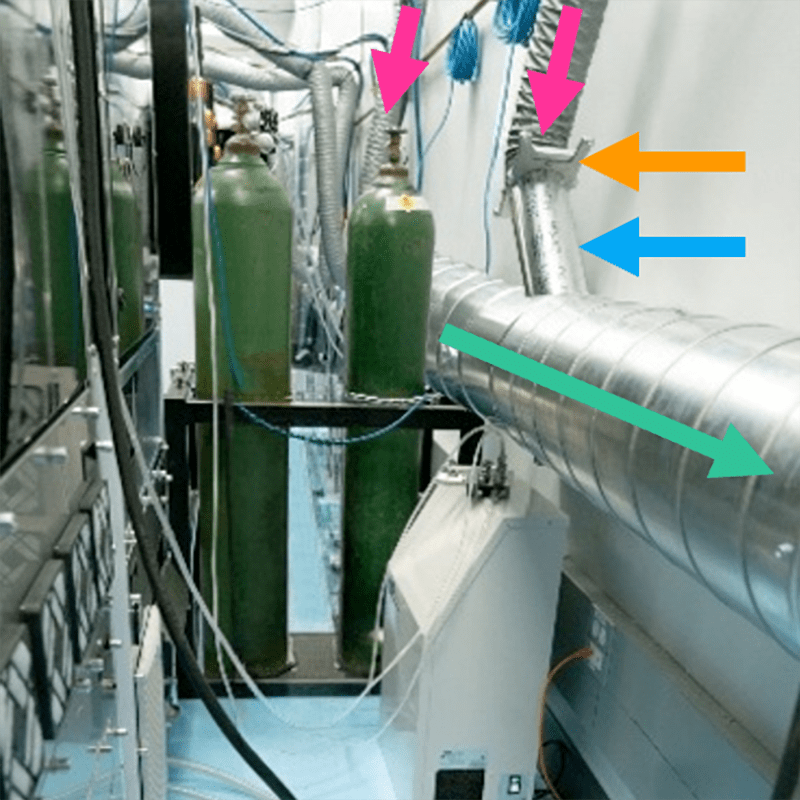
Your Onboarding Consultant will ask for a picture of each ventilation connection before scheduling the installation.
Carbon recommends a **central line** of ventilation with **multiple drops**, each with an installed **blast gate** and a **4" ventilation duct**. This will connect to the Carbon product’s exhaust port using a hose clamp.
*Click on a title to expand*
:::::VerticalSplit{layout="middle"}
::::VerticalSplitItem
:::ExpandableHeading
**M Series Printers**

:::
::::
::::VerticalSplitItem
:::ExpandableHeading
**L1 Printers**

:::
::::
:::::
:::::VerticalSplit{layout="middle"}
::::VerticalSplitItem
:::ExpandableHeading
**Part Washer**

:::
::::
::::VerticalSplitItem
:::ExpandableHeading
**Distiller**

:::
::::
:::::
:::::VerticalSplit{layout="middle"}
::::VerticalSplitItem
:::ExpandableHeading
**Part Washing Workstation**

:::
::::
::::VerticalSplitItem
:::ExpandableHeading
**Ovens ***(more information below)*

:::
::::
:::::
## Oven Ventilation
**4" Ventilation Duct**
As oven exhaust temperatures can exceed **220 °C**, use a flexible hose (and hose clamp) with a high-temperature rating for at least **10 feet**, such as this [silicone hose example](docId:95TwE3ttL-5ihI6dNl4XI).
:::::VerticalSplit{layout="middle"}
::::VerticalSplitItem
**Blast Gate**
The blast gate regulates air flow in the ventilation system.
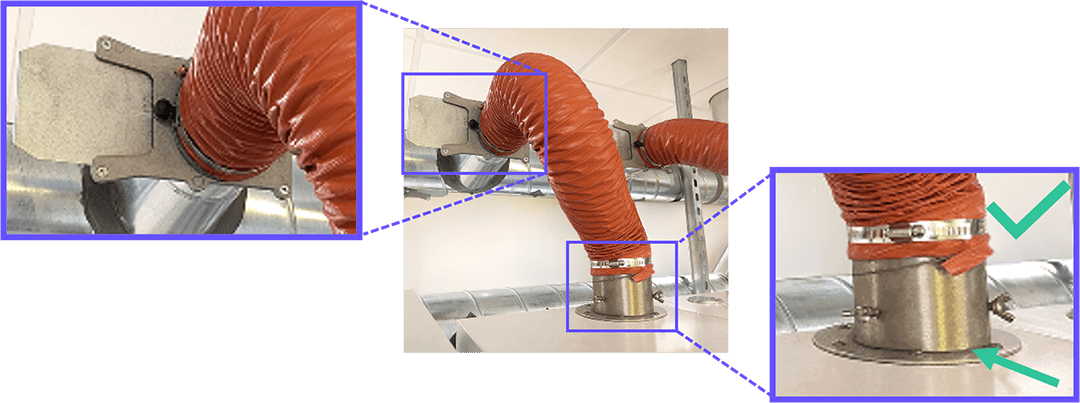
- Begin **setup** with the blast gate **fully open** (as shown in the image).
- Check the **oven's temperature against** your resin's baking schedule. If the oven does not reach required temperatures within specified ramp times:
- Incrementally, **reduce the opening** in the exhaust duct by pushing in the blast gate until the oven can follow the schedule accurately.
- **DO NOT** **fully close** the blast gate. Air flow must be maintained.
:::BlockQuote
For example, if a step in the schedule requires the oven to ramp up from 200°C to 220°C in 1 hour, verify that it does.
:::
::::
:::VerticalSplitItem
**Exhaust Adapter**
Your oven is equipped with an adapter to **connect the oven exhaust** opening to the **4" ventilation duct**.
- Attach the oven to the ventilation system using the provided adapter, which is shipped inside the oven.
- The adapter is a flanged ventilation duct with an outer ring held with three wing nuts that should be installed on top of the oven. You should connect it to the oven first so you can easily connect it to your 4" ventilation duct.
- Ensure the **adapter sits tight to the top** of the oven, *without* an air gap.
:::
:::::
:::hint{type="danger"}
The oven exhaust connection should **not have a gap** at the adapter. This gap prevents accurate measurements of oven air turnover.
::Image[]{src="https://res.cloudinary.com/carbon3d/image/upload/t_auto_quality_format/Education/Site_Prep/General_Site_Prep/Utilities/Oven-exhaust-connection_WRONG.png" size="50" isUploading="false" position="center" width="497" height="373" darkWidth="497" darkHeight="373" alt="Incorrect Exhaust Connection" showCaption="false"}
This gap was formerly recommended by Carbon. If your adapter is connected in this manner, please adjust it to a tight connection.
:::
**Checking Temperature**
Once the oven has been installed and ventilated, please conduct temperature checks, using any precision [oven thermometer](docId:95TwE3ttL-5ihI6dNl4XI), at **60, 120, and 220°C **to ensure your oven is maintaining the proper temperature.
### Condenser for High-Volume EPU Production
If you will be using approximately **100 liters** or more **annually**, you will need to install a **condenser **to prevent buildup in the ventilation ducting.
Download the handout below for more information.
::File{src="https://api.archbee.com/api/presign/3CesIL2dYMCHPZvRjp8S0/Z8rcZYK-OMyeg8UwHt50X-20260203-024611.pdf" label="Condenser System Guide v0203.pdf"}
### Lauryl Methyacrylate (LMA) in EPU
:::hint{type="warning"}
A potential fire risk exists if you operate your oven at temperatures in excess of the Carbon recommended bake profiles. This concern is specific to **ovens used to cure EPU parts**. Lauryl Methyacrylate (LMA), which is released during the baking of EPU parts, can condense inside oven insulation and/or ducting. The amount of LMA released will be dependent on the volume of EPU parts in a particular bake and how often you are baking with those parts. This condensed LMA can ignite if exposed to temperatures above what is needed to cure the parts. Please refer to the [SDS for LMA](https://www.sigmaaldrich.com/MSDS/MSDS/DisplayMSDSPage.do?country=US\&language=en\&productNumber=291811\&brand=ALDRICH\&PageToGoToURL=https%3A%2F%2Fwww.sigmaaldrich.com%2Fcatalog%2Fproduct%2Faldrich%2F291811%3Flang%3Den) for more specific information about this chemical.
- Don’t perform bakes at higher temperatures than the bake profile specified by Carbon.
- Inspect oven and exhaust ducts for presence of condensate. If you find condensate, clean it or replace ductwork. Refer to the SDS for LMA prior to cleaning to ensure proper precautions are in place.
- If condensate is noticed after cleaning or replacement, a heat exchanger may need to be installed to cool the ventilation duct to remove the condensate. Refer to the **Condenser System Guide** above.
*Additional Recommendations:*
- Consider baking EPX and EPU parts in separate ovens. EPX requires a higher temperature to bake.
- Clearly label ovens with maximum allowable temperatures for bakes as specified for products by Carbon. Do not exceed the Carbon recommended bake temperatures. Yamato Ovens are equipped with Independent Overheat Protection.
- Consult your Facilities and EHS staff on proper handling of LMA condensate in the exhaust system and proper personal protective equipment for handling of LMA contaminated exhaust components and associated ductwork.
:::
## Reminders
- Ventilation must **vent to the outside** of the building.
- **M1/M2 & L1 Printers only** - Before scheduling the installation, you must provide **photos of each of the following ventilation connections:** printer; part washing workstation (orbital shaker); convection oven; as well as Smart Part Washer and custom distiller, if applicable.
- Ensure the oven ventilation is installed using the **provided adapter **(shipped inside the oven).
- **Check the flow rate** of each connection prior to equipment installation.
- **Check the oven temperature** after ventilation installation.
- Each ventilation drop must include an installed **blast gate** to tune airflow.
Have extra hose clamps on hand for exhaust hose connections.
- Selecting the proper type of **ventilation hoses** at installation may save you headaches later.
- Building capacity for plenty of ventilation is a good idea for your Carbon lab because excess ventilation will make it easy to accommodate more printers and adopt future products or accessories without the need to re-engineer your lab.
## FAQs and Additional Information
**How do we know if our installation site has adequate air quality?**
For most installation sites, air that is filtered and clean enough for workers not to wear dust masks will likely be adequate. In addition, the printer must be separated from any machines that emit smoke, dust, mist, or particles.
**Can I use a stand-alone ventilation system (fume extractor) instead of mechanical ventilation?**
No, the fume extractor is not compatible with the following:
- Non-Dental resins or Carbon 2-part engineering resins
- If using multiple M1/M2 or M3 / M3 Max printers with 1-part resins, you will need more than one fume extractor
For more information on fume extraction, contact the Carbon Onboarding Team.
**Do I need a contractor for traditional/mechanical ventilation?**
In most cases, you may want to use a contractor to install mechanical ventilation. A contractor can help ensure that your ventilation system meets all local and regulatory codes, as well as Carbon-recommended specifications.
**In a single printer lab with a Smart Part Washer, how many ventilation drops are required?**
Ventilation is required in **four places:** Printer, Smart Part Washer, part washing workstation (orbital shaker), and convection oven. See the table above for the specific flow requirements per product.
:::hint{type="info"}
If using a custom distiller (only for VF 1 formerly custom Vertrel™ solvent - MS-767-3D-13), this will also require ventilation.
:::
**Where is the exhaust port located on L1 Printers?**
On the top of the printer.
**Where is the Smart Part Washer exhaust port located?**
On the back, in the upper right corner.
**Why does Carbon have a ventilation requirement?**
Carbon printers require ventilation because liquid resins and solvents are classified as hazardous materials. Without ventilation, your facility could be exposed to fumes that could pose a health risk for your employees. For more information regarding health and safety, contact your local regulatory agency.
Oven Ventilation LMA FAQs
**What are the elements of a ventilation system set up to capture condensate?**
LMA fumes tend to condense in cold spots. In general, this seems to be in areas of the ventilation system where the hot air coming out of the ovens cools - elbows, connectors, etc. further away from the oven. Carbon has installed cold traps at the point where oven ventilation connects to the main facility exhaust line. These cold traps condense LMA and the liquid can be collected and disposed of as hazardous waste. Work with a qualified HVAC contractor to determine the size of the intercooler/condenser unit to best suit your needs.
**How do I safely clean out existing ductwork if condensate is present?**
If you notice condensate in the duct connecting to your oven exhaust - we recommend you replace any flexible ducts with new ones. For condensate that might have accumulated in metal pipes, use a rag to wipe down the inside of the ductwork as far back as possible. Any cleaning gloves, wipes, rags. etc the come in contact with LMA should be handled as hazardous material and disposed of accordingly.
**What PPE is needed during this cleaning?**
Standard PPE used for work with resins and solvents should be used for this cleaning task.
**How do I handle multiple resin bakes in ovens?**
Per the memo and user guide, avoid baking parts printed with EPX in the same ovens as EPU parts. EPX resins require a higher bake temperature.
# Electricity

## Requirements
You will be required to supply power to the following equipment and accessories:
- All printers
- Smart Part Washer
- Custom Distiller (if applicable)
- Resin Prep Workstation
- Part Washing Workstation
- Curing Workstation
| **Item** | **M1/M2 Printer** | **M3 Printer** | **M3 Max Printer** | **L1 Printer** |
| ------------------------------------- | ------------------------------------------------------------- | ------------------------------------------------------------------------------------------------------------------------- | ------------------------------------------------------------------------------------------------------------------------- | --------------------------------------------------------------------------------------------------------------------------------------------------------- |
| **Voltage** | 100-240 V
50/60 Hz
single phase | 120-240 V
50/60 Hz
single phase | 120-240 V
50/60 Hz
single phase | 200-240 V
50/60 Hz
single phase |
| **Mains supply voltage fluctuations** | ±10% | ±10% | ±10% | ±10% |
| **Overvoltage category** | II | II | II | II |
| **Circuit Breaker** | 15 A dedicated circuit | 15 A breaker on a dedicated circuit separate from ovens (Japan: 16 A breaker on 200 V dedicated industrial power circuit) | 20 A breaker on a dedicated circuit separate from ovens (Japan: 16 A breaker on 200 V dedicated industrial power circuit) | 30 A dedicated circuit |
| **Power Supply Cable**
| A regionally appropriate power supply cable will be supplied. | A regionally appropriate power supply cable will be supplied. | A regionally appropriate power supply cable will be supplied. | For North American customers, a regionally appropriate power supply cable will be supplied. All International customers will need to purchase the .
|
| **Socket type** | Standard | Standard | NEMA 5-20 | NEMA L6-30 |
| **Item** | **All printers** |
| ------------------------------- | ---------------------------------------------------------------------------------------------------------------------------- |
| **Socket location** | If using a Carbon-provided cable, the socket must be within 1.8 m (6’) of the power entry point on the printer. |
| **Non-Carbon power cords
** | **Note:** Using an inadequately rated power cable can result in electric shock, arc flash, fire, or damage to the equipment. |
Sockets & Amp Draw
You may need to supply power using at least **5** electrical sockets for an **M1/M2 or M3 / M3 Max Printer lab** and **7** electrical sockets for an **L1 Printer lab.** For each additional Carbon product installed, you will require another electrical socket.
:::hint{type="info"}
**Note:** International customers should contact Carbon for region-specific information.
:::
| **Workstation/Product** | **# Sockets Required **
***Place sockets near equipment to avoid trailing power cords.*** | **Dedicated Circuit Breaker Required** | **Power Requirements *****(100-240 VAC and ***
***50/60 Hz)*** |
| --------------------------------------------------------- | --------------------------------------------------------------------------------------------------- | -------------------------------------- | --------------------------------------------------------------------------------------- |
| **Printer** | 1 | Yes | 7.5 A for M1;
9 A for M2;
12 A for M3;
16 A for M3 Max;
18 A for L1 |
| **Chiller **
**(L1 Printers only)** | 1 (NEMA 6-15 socket) | Yes | 15 A |
| **Oxygen Concentrator**
**(L1 Printers only)** | 1 (NEMA 5-15 socket) | | 3-5.5 A |
| **Smart Part Washer**
| 1 (US NEMA 5-15R socket) | | 8 A |
| **Custom Distiller **
**(if applicable)**
| 1 (US NEMA 5-20R socket)\* | Yes | 20 A |
| **Resin Prep Workstation**
| 1 for resin dispenser battery charger | | 2.1 A |
| **Part Washing Workstation** | 1 for orbital shaker | | 1 A |
| **Curing Workstation** | 1 for convection oven | Yes | 14 A |
| | 1 for APM LED UV-Cube III | | 2.5 A |
**\*Make sure custom distiller outlet has a single socket.** A dual-socket outlet is not recommended since a second device could be plugged into the circuit and cause an overload.
## Notes
- The **oven and printer** should be on **separate breakers. **Additionally, the **part washer and custom distiller** should be on **separate breakers.**
- Please **consult with your electrician** on how to best power the printer and accessories.
- See the operator’s manuals for the [Yamato convection oven](docId:7NE6rGdaSzpAPOHH5QOzm) and [APM LED UV-Cube III](docId\:FrUV7Y7efpnNQlOkhl8X5) requirements.
::Image[]{src="https://api.archbee.com/api/optimize/3CesIL2dYMCHPZvRjp8S0/SRR1LEPhjJ3tcI33ofyBn_oven-and-uv-cure-unit-side-by-side.png" size="70" width="2077" height="1128" position="flex-start" caption="Yamato convection oven and APM LED UV-Cure III" darkWidth="2077" darkHeight="1128" showCaption="true" indent="3"}
::::VerticalSplit{layout="right"}
:::VerticalSplitItem
- **UPS battery back up** units protect printers against power outages and surges.
- For the **M1/M2 Printers,** we recommend a [1500 VA uninterruptible power supply with an additional battery pack](docId:95TwE3ttL-5ihI6dNl4XI) to prevent the printer from power cycling during power outages. At a minimum, you must have the printer and part washer plugged into separate power strips with adequate surge protection.
- **M3 Printers** draw 850 VA during unheated and 1200 VA during heated prints. You may use [online tools](https://www.apc.com/shop/us/en/tools/ups_selector/server/load) to calculate the appropriately sized UPS and battery pack(s) for your needs.
- **M3 Max Printers** draw 1150 VA during unheated and 1500 VA during heated prints. You may use [online tools](https://www.apc.com/shop/us/en/tools/ups_selector/server/load) to calculate the appropriately sized UPS and battery pack(s) for your needs.
- **L1 Printers** draw 1300 VA with an unheated and 2300 VA with a heated cassette. You may use [online tools](https://www.apc.com/shop/us/en/tools/ups_selector/server/load) to calculate the appropriately sized UPS and battery pack(s) for your needs.
:::
:::VerticalSplitItem
::Image[]{src="https://api.archbee.com/api/optimize/3CesIL2dYMCHPZvRjp8S0/W5g63e-nVAgRkX9EmV3em_ups-battery-tall-234x800.png" size="50" width="800" height="2735" position="center" alt="Uninterruptible power supply" darkWidth="800" darkHeight="2735" showCaption="false"}
:::
::::
# Compressed Air

## Requirements
You will be required to supply compressed air to the following equipment and accessories:
- M3 / M3 Max & L1 Printers
- Smart Part Washer
| **Workstation/Product** | **Requirement** |
| ----------------------- | ---------------------------------------------------------------------------------------------------------------------------------------------------------------------------------------------------- |
| **M3 / M3 Max Printer** | * Pressure: 620-800 kPa (90-115 psi) at inlet
* Peak Consumption: 30 L/min ANR (1 cfm) for 10 seconds every 10 minutes
* Purity: ISO 8573-1:2010 Class 2.4.3 Standard |
| **L1 Printer** | - Pressure: 650-800 kPa (95-115 psi) at inlet
- Average Consumption: 1.5 L/min ANR (0.05 cfm)
- Peak Consumption: 30 L/min ANR (1 cfm) for 10 seconds
- Purity: ISO 8573-1:2010 Class 2.4.3 Standard |
| **Smart Part Washer** | * Pressure: 620-900 kPa (90-130 psi) at inlet
* Average Consumption: 100 L/min ANR (3.5 cfm)
* Purity: ISO 8573-1:2010 Class 2.4.3 Standard |
## Conditional Use
### Resin Storage After Opening
Select Carbon resins require special handling after opening if they will be stored or not used up for ***over one month***** from the date of first opening.**
Once opened, air conditions inside the container can negatively impact the resin over time. This empty space must be replaced with properly conditioned air to maintain printing viability: either **dry air **(via a *compressed air* line) or** nitrogen** depending on the formulation.
:::hint{type="info"}
Reference [protocol sheets](docId\:qsOQBEdCnaBfdx656tlY6) to view whether this procedure applies to a **resin**.
:::
:::hint{type="info"}
Reference [compressed dry air and nitrogen](docId:1Eza6pyDO_uCTnosWpgIE) guidelines if this applies to your resin storage conditions.
:::
### Washing
::::VerticalSplit{layout="middle"}
:::VerticalSplitItem
If a **Compressed Air Cleaning Cabinet **is recommended in your washing protocol, then you will need to [procure a cabinet](docId:95TwE3ttL-5ihI6dNl4XI) and **supply compressed air** to your washing workstation(s).
:::
:::VerticalSplitItem
::Image[]{src="https://res.cloudinary.com/carbon3d/image/upload/t_auto_quality_format/Education/Site_Prep/General_Site_Prep/Utilities/compressed-air-cleaning-ductless-fume-hood.png" size="40" width="343" height="393" position="center" alt="Compressed Air Cleaning Cabinet" darkWidth="343" darkHeight="393" showCaption="false"}
:::
::::
:::hint{type="info"}
If you are sourcing a self-contained air compressor, the **size will be based on your expected use and throughput**.
:::