---
title: Site Selection and Layout
slug: site-prep/site-selection
description: Discover essential guidelines for setting up a Carbon DLS printing lab, focusing on site selection, equipment placement, safety protocols, and optimal workflow configurations.
docTags:
createdAt: 2024-06-11T21:52:42.935Z
---

# Site Selection
Please consider your final equipment site(s) carefully.
:::hint{type="warning"}
**Once Carbon installs your M1, M2 or L1 Printer, you cannot independently move it to a new location.**
:::
A Carbon Field Service Engineer must reinstall your Carbon printer after any move from its initial installation site.
:::hint{type="warning"}
**Reinstallation is an add-on service and is not covered by your subscription agreement.**
:::
Your M3 / M3 Max printer may be moved to a new location and reinstalled (including re-leveling) by your facilities team without requiring a Carbon Field Service Engineer to come onsite.
# Space Requirements
User preferences, building codes, and equipment configuration will help you determine the total floor area that your printer will need.
:::hint{type="info"}
**NOTE:** Carbon suggests that you locate your post-processing equipment in the same room as your printer for optimal workflow efficiency.
:::
**Allocate space for the following equipment and required accessories:**
| | **M1/M2 Printer** | **M3/M3 Max Printer** | **L1 Printer** |
| ----------------------- | ------------------------------------------------------------------------- | -------------------------------------------------------------------------------------------------------------------------------------------------------------------------------------------------------- | ------------------------------------------------------------------------------------------------------------ |
| **Dimensions** | W: 543 mm (21.4")
D: 655 mm (25.8")
H: 1733 mm (68.2") | W: 760 mm (30")
D: 696 mm (27.5")
H: 1762 mm (69.5")
| W: 930 mm (37")
D: 1140 mm (45")
H (door closed): 1920 mm (76")
H (door open): 2730 mm (107") |
| **Minimum Spacing** | Side: 480 mm (18.9")
Front: 480 mm (18.9")
Back: 380 mm (15.0") | Side: 240 mm (9.4")\*
Front: 561 mm (22.1")\*
Back: 380 mm (15")\*
\* All facilities connections must have at least 3' of slack
[M3/M3 Max clearances](docId\:QVbccAUESZSZaTj588zQ1) | Side: 150 mm (6")
Front: 1500 mm (59")
Back: 1000 mm (40") |
| **Recommended Spacing** | - | S: 240 mm (9.4")
F: 561 mm (22.1")
B: 610 mm (24") | S: 300 mm (12")
F: 2000 mm (79")
B: 1200 mm (47") |
| **Area** | **Accessories & Considerations** |
| ------------------------------------------ | --------------------------------------------------------------------------------------------------------------------------------------------------------------------------------------------------------------------------------------------------------------------------------------------------------------------------------------------------------------------------------------------------------------------------------------------------------------------------------------------------------------------------------------------------------------- |
| **Printer(s)** | **Site Selection: **
* The printer requires a hard, non-porous surface, away from vibrating equipment and excessive dust.
* Each printer requires 1 electrical socket and a dedicated circuit. |
| **Post-processing Area** | **Accessories & Peripheral Equipment**
* Solvents
* Orbital shaker (requires one electrical socket)
* Compressed Air Cleaning Cabinet (requires two electrical sockets)
* Cleaning accessories & tools
* Aluminum foil
* Nitrile gloves
* Trays (to transport parts) |
| **Convection Oven(s) & UV Curing Unit(s)** | - Depending on the application and resins used, your lab may require more than one convection oven and/or UV curing unit. If you need assistance, please contact your Carbon Sales Director for more information.
- Each convection oven requires one electrical socket on a dedicated circuit.
- Each UV curing unit requires one electrical socket (can be a shared circuit). |
| **Resin Dispensing Area** | * [M Series pour stand](docId\:f1aYnlyVOGRuEAF5oZQG4)\* (418 x 610 x 570 mm or 16.6 x 24.0 x 22.4 in)
* Legacy pour stand\* (270 x 360 x 100 mm or 10.8 x 13.6 x 3.93 in)
* Resin dispenser (requires one electrical socket per charger)
* Spatula
* Paper towels
* Nitrile gloves
* Resin storage cabinet
**\* Note: **The M Series pour stand (released 2023) is compatible with all M series printer cassettes. It is also larger than the legacy pour stand. Please click the link above for more information about the M Series pour stand. |
| **Solvents** | - Isopropanol & acetone (for cleaning parts and equipment)
- Cabinet for solvent storage |
| **Hazardous Waste Containers** | * Trash can with foot pedal
* Liquid hazardous waste drum/container
Consult with local waste management service for more information. |
| **Required PPE** | - Gloves
- Lab coats
- Safety glasses
- Close-toed shoes
- Long pants |
| **Suggested Additional Safety Equipment** | * Fire extinguisher
* Spill kit
* Eyewash station |
# Example Site Layouts
See below for layout examples. If you have questions or need assistance in arranging your lab layout, please contact [Carbon’s Onboarding Team](mailto\:onboarding@carbon3d.com).
[Download Carbon's site layout tool to help you design your facility.](docId\:hws1UJVXQpVoKV9YMdsu4)
## M1/M2 Printers
::::Tabs
:::Tab{title="1 printer"}

:::
:::Tab{title="3 printers"}

:::
:::Tab{title="5 printers"}

:::
:::Tab{title="10 printers"}

:::
::::
## M3/M3 Max Printers
::::Tabs
:::Tab{title="1 printer"}

:::
:::Tab{title="3 printers"}

:::
:::Tab{title="5 printers"}

:::
:::Tab{title="10 printers"}

:::
::::
## L1 Printers
::::Tabs
:::Tab{title="1 printer"}

:::
:::Tab{title="3 printers"}

:::
:::Tab{title="5 printers"}

:::
:::Tab{title="10 printers"}

:::
::::
# Lab Setup Video
::embed[]{url="https://player.vimeo.com/video/527518239"}
:::ExpandableHeading
**Video Text**
**Workstations & Equipment**
- **PPE/Gowning** - Clean zone outside the lab to put on lab coats, gloves and glasses.
- Lab coats
- **Printing** - Carbon printer(s) with plenty of space for easy movement.
- **Resin dispensing** - Workstation to dispense resin for printing.
- Resin cartridge, resin dispenser, mixing tips, cassette
- Dispensing gun uses batteries that require power to charge.
- Dispenser batter
- **Washing Station **- Area to remove liquid resin from parts. Requires power.
- Orbital shaker, washing container, timer, foam swabs to remove resin from parts, tray with shop towel, IPA squirt bottle
- Washing station requires ventilation
- **Compressed Air Cabinet** - Cabinet with air gun for cleaning parts.
- Requires power, ventilation and compressed air.
- Requires clearance on right side for access to interior.
- **Part removal** - Area to remove parts from the platform. Parts can be removed before or after washing.
- Scraper blade. Plastic tray with aluminum foil covering. Dead blow hammer.
- Consumables and tools are within reach.
- **Drying rack** - After washing, parts need to air dry before curing.
- **UV Curing** - Area to UV cure parts. Requires power.
- **Thermal Curing **- Cures two-part resins. Requires power and ventilation.
- Ensure small vents on right side and top are closed.
- Check blast gate on main vent.
- Gate must be about 50% closed for proper oven operation.
- Completely closed gate prevents proper ventilation.
- Completely open gate prevents proper heating of oven.
- Remove cured part from lab to avoid contamination with uncured resin.
- **Salt packing **- Packing parts in salt during thermal curing can help prevent part deformation.
- Set up container of salt near oven if training with EPX 82, FPU 50 or RPU 70.
- CE 221, EPU 40, EPU 41 and SIL 30 are **not** compatible with salt packing.
- **Resin reclamation and disposal** - Area to clean cassette, reclaim unused one-part resins or dispose of unused two-part resins.
- Pour stand. Strainers. Funnels. Soft silicone spatula.
- **Hazardous waste container** - For safe disposal of liquid waste. Subject to local regulations.
- Waste container. Funnel with lid. Secondary container to prevent spills.
**Recommendations**
- Keep consumables and tools within arm's reach.
- Swabs. Tools. Wipes. Aluminum foil. Gloves. Shop towels. Isopropyl alcohol and acetone squirt bottles.
- Make use of space under workbenches.
- Flammable cabinet for solvent storage
- Resin storage
- Designate clean standing desk for laptop or notebook.
- Desk should be clearly labelled to prevent contamination.
- NO TOUCH WITH GLOVES. CLEAN SURFACE.
- To keep track of parts, use metal tags to label trays during baking.
- A sink and eyewash kit in the lab will help keep you clean and safe.
You lab is now ready for familiarization training.
:::
# FAQ
Equipment
---------
:::ExpandableHeading
**What is the required clearance for service access for the M1/M2, M3 / M3 Max, or L1 Printers and the Smart Part Washer?**
- **M1/M2 Printer** clearances:
- 480 mm (19”) on the sides and front;
- 380 mm (15”) behind.
- **M3 / M3 Max Printer** clearances (required/recommended):
- 240 mm (9.4")/305 mm (12") on the sides;
- 561 mm (22")/561 mm (22") on the front;
- 380 mm (15”)/610 mm (24") behind.
- **L1 Printer **clearances (required/recommended):
- 150 mm (6")/300 mm (12") on the sides;
- 1500 mm (59")/2000 mm (79") on the front;
- 1000 mm (40”)/1200 mm (47") behind.
- **Smart Part Washer** requires 380 mm (15”) of clearance on all sides.
:::
:::::ExpandableHeading
**What is the recommended Smart Part Washer & custom distiller (if applicable) setup?**
If your production resins are compatible with the Smart Part Washer in their protocol:
::::VerticalSplit{layout="middle"}
:::VerticalSplitItem
The network-connected Smart Part Washer and custom distiller require additional floor space, compressed air, two ventilation drops, and two power sockets. Due to the location of the fill and drain hoses, we strongly recommend positioning the part washer to the right of the custom distiller.
:::
:::VerticalSplitItem
::Image[]{src="https://api.archbee.com/api/optimize/3CesIL2dYMCHPZvRjp8S0/u-BlkA2wFJnr8uVn6qb1I_image.png" size="60" width="1112" height="1116" position="center" darkWidth="1112" darkHeight="1116" showCaption="false"}
:::
::::
| **Specification** | **Measurements** |
| --------------------------------------------- | ----------------------------------------------------------------------------------------------------------------------------------------------------------------------------------------------------------------------- |
| **Smart Part Washer Dimensions (W × D × H)** | 35 × 26 × 46 in
89 × 66 × 117 cm
|
| **Custom Distiller Dimensions (W × D × H)\*** | 23 × 36 × 44 in
58 × 91 × 112 cm
|
| **Ventilation hose diameter** | 4 in (2 places)
10.2 cm |
| **Power outlet\*\*** | (2) US standard 120V outlets:
* Smart Part Washer requires **(1) NEMA 5-15R** on a **10 A circuit breaker.**
* CBG custom distiller requires **(1) NEMA 5-20R **on a dedicated **20 A circuit breaker.** |
| **Solvent capacity** | \~7.5 gallons (28.4 L) |
\*If applicable.
\*\*International customers should contact Carbon for region-specific information.
:::::
## Workstations
:::ExpandableHeading
**How many workstations does Carbon recommend?**
**5** workstations:
- PPE
- Resin prep
- Part washing
- Compressed air cleaning cabinet
- Curing
:::
:::::ExpandableHeading
**Does Carbon have a recommendation for a PPE workstation?**
There are many ways to organize PPE for your lab. Some labs create a PPE workstation in the printer area with all needed supplies (lab coats, gloves, and safety glasses). One possible solution is shown below.
::::VerticalSplit{layout="middle"}
:::VerticalSplitItem
- The **PPE workstation** should include lab coats, gloves, and safety glasses. Additional baskets can be used at the bottom of the rack to store shoe protectors or provide more storage. Locate it near the door for easy access to proper PPE.
- If space is limited, you can use a simple hook on a wall/door for each lab coat.
- Nitrile gloves should remain in their box until use. It is recommended to have boxes of nitrile gloves at the resin prep and part cleaning workstations.
:::
:::VerticalSplitItem

:::
::::
:::::
:::::ExpandableHeading
**Does Carbon have a recommendation for the layout of the resin prep workstation?**
The diagram below shows the items required at the resin prep workstation. They should be arranged in whatever way best suits your workflow. One example of a resin prep workstation is shown below.
::::VerticalSplit{layout="middle"}
:::VerticalSplitItem
The **resin prep workstation** holds equipment for resin dispensing, window cleaning, and waste disposal (liquid resin, solvent, and solid hazmat).
Approximately **5 linear feet** of bench space and **2 standard 120V AC sockets** for the two resin dispenser battery chargers are required when applicable.
:::
:::VerticalSplitItem

:::
::::
:::::
:::::ExpandableHeading
**Does Carbon have any recommendations for setting up the part washing workstation?**
Carbon recommends having the post-processing/part cleaning workstation in the same room as the printer. This will increase productivity and efficiency. Setting up post-processing/part cleaning in a different room will require your lab techs to transport parts with uncured resin which is hazardous. Dust and dirt can stick to the parts.
The diagram below shows the items required at the part washing workstation. They should be arranged in whatever way best suits your workflow. One example of a part washing workstation is shown below.
::::VerticalSplit{layout="middle"}
:::VerticalSplitItem
The **part washing workstation** requires **5 linear feet** of bench space to accommodate the cleaning accessories.
A standard 120V AC socket for the orbital shaker and an optional standard 120V AC socket for the lamp is also needed.
:::
:::VerticalSplitItem

:::
::::
:::::
:::::ExpandableHeading
**What are the dimensions of the orbital shaker?**
::::VerticalSplit{layout="middle"}
:::VerticalSplitItem
**Dimensions (W x D x H)**
10.8 x 13.6 x 3.93 inches
(274 x 345 x 100 cm)
:::
:::VerticalSplitItem

:::
::::
:::::
:::ExpandableHeading
**What types of accessories do I need to plan space for?**
You will need to store your safety and cleaning accessories. Consider utilizing the space above and below your lab benches, keeping in mind that you will need ready access to some items, whereas others can be tucked away in deeper storage until you need to replenish a consumable item.
Some of the accessories that you will need to plan space for in your post-processing area are shown below:

:::
:::::ExpandableHeading
**Does Carbon have any recommendations for the compressed air cleaning cabinet (if applicable)?**
If your production resins are compatible with compressed air cleaning in their protocol:
::::VerticalSplit{layout="middle"}
:::VerticalSplitItem
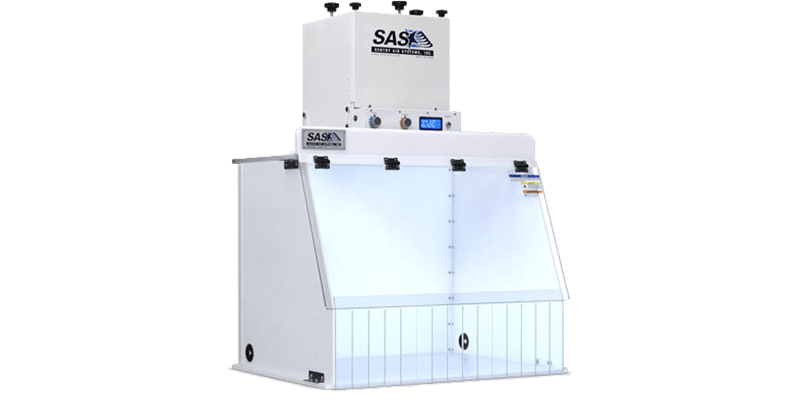
A bench is recommended near the part washing workstation for a benchtop compressed air cleaning cabinet.
- Carbon recommends a [ductless fume hood model](docId:95TwE3ttL-5ihI6dNl4XI) to be supplied by the customer.
- It is helpful but not required to have a bench that is height-adjustable to accommodate different technician’s reach requirements.
:::
:::VerticalSplitItem
:::
::::
| **Specification** | **Measurements** |
| ------------------------------------------------------------ | ----------------------------------------- |
| **Minimum Bench Dimensions **
**(W × D)\*** | 32 × 24 in
82 × 61 cm
|
| **Compressed Air Cleaning Cabinet Dimensions (W × D × H)\*** | 32 × 24 × 25 in
82 × 66 × 64 cm
|
\*For the suggested 30" wide model.
:::::
::::ExpandableHeading
**Does Carbon have any recommendations for curing workstation(s)?**
There are many options for curing workstations. The number of ovens and UV curing units will depend on the resins you are using and the volume of production your facility will be doing.
Below is one type of resin storage cabinet with dimensions:
This **curing workstation **includes a programmable convection oven (for thermal curing) and a UV curing unit. In place of benches, you could use height-adjustable stands with shelves and three-sided stainless steel tops, which are available from restaurant supply companies. You’ll need about **36 square feet** of equipment surface.
::Image[]{src="https://api.archbee.com/api/optimize/3CesIL2dYMCHPZvRjp8S0/2Fpm5WzOUzxOW-O9M_UVF_image.png" size="80" width="1680" height="1661" position="center" caption="Example of a curing workstation" darkWidth="1680" darkHeight="1661" showCaption="true"}
:::hint{type="info"}
An adjustable height desk is strongly recommended.
:::
If you cure parts in salt, we suggest containing the salt in a small downdraft table placed on a stand with three upturned sides. Spilled salt is slippery, so sweep the floor often and use a rubber mat to lower the slip hazard.
For better ergonomics, you may want to place the oven stand below the standard counter height. And if you’re using a tabletop downdraft box, you may want the top of the box to be level with the counter.
It’s convenient to place the UV curing unit on a shelf mounted like a kitchen microwave oven. Just make sure the shelf is low is enough for easy access while still allowing room to work underneath.
| **Specification** | **Measurements** |
| -------------------------------------------------------------------------- | -------------------------------------------------------------------------------------------------------------- |
| **Bench Dimensions **
**(W × D x H)**
| 72 × 36 x 34 in
183 × 91 x 86 cm |
| **Convection Oven Dimensions **
**(W × D × H)**
| 25.7 × 27.9 × 34.2 in
65 × 71 × 87 cm
|
| **APM LED UV-Cube II and III Dimensions **
**(W × D × H)**
| 14.3 × 13.6 × 17.8 in
36 × 35 × 45 cm
|
| **Ventilation hose diameter** | 4 in (2 places)
10.2 cm |
| **Power outlet** | **US customers only: **2 standard 120V AC sockets (for the convection oven and the UV curing system) |
::::
## Storage
:::ExpandableHeading
**How many cabinets are recommended and what are the cabinets for?**
Cabinets are recommended as follows:
- Flammable cabinet for solvent
- Optionally a dark (enclosed) cabinet for small container resin storage
:::
::::ExpandableHeading
**Does Carbon have any recommendations for solvent storage?**
:::hint{type="warning"}
Always follow **local regulations** for solvent storage requirements and reference **Safety Data Sheets** (SDS) provided by the manufacturer.
:::
:::hint{type="warning"}
See also [Safety - Hazardous Waste ](docId\:EpLNOlhPOETRa_WXRrpjd)for information on proper disposal.
:::
- A **Flammables Storage Cabinet** is required for flammable solvents in accordance with local regulations.
- All solvents must be stored in **secondary containment**.
- Reference [Resin and Solvent Storage](docId:1Eza6pyDO_uCTnosWpgIE) for details
:::hint{type="info"}
Choose a cabinet size to fit your production capacity. Reference [Accessories & Supplies](docId:95TwE3ttL-5ihI6dNl4XI) for purchasing links.
:::
::::
::::ExpandableHeading
**Does Carbon have any recommendations for resin storage?**
There are many options for resin storage, and your facility needs to store resin based on the volume of production your facility will be doing and types of containers you will be using.
Carbon offers **general guidelines** for resin storage per
- [Temperature](docId:1Eza6pyDO_uCTnosWpgIE)
- [Isolation from UV Light](docId:1Eza6pyDO_uCTnosWpgIE)
- [Secondary Containment](docId:1Eza6pyDO_uCTnosWpgIE)
- [Storage Conditions After Opening](docId:1Eza6pyDO_uCTnosWpgIE)
- [Dimensional Specifications of Containers](docId:1Eza6pyDO_uCTnosWpgIE)
:::hint{type="warning"}
Always reference [protocol sheets](docId\:qsOQBEdCnaBfdx656tlY6) to view how guidelines apply to a specific **resin**.
:::
You should assess your own resin consumption rate and adjust your storage capacity accordingly.
::::