---
title: Thermal Curing
slug: process/thermal-curing
description: Enhance your understanding with our comprehensive guide on thermal curing for Carbon's resins. Learn essential safety precautions, baking equipment and workflow steps.
docTags:
createdAt: 2024-06-28T18:34:38.020Z
---
# Overview
All of Carbon’s two-part resins require **thermal curing (also called baking)** in a convection oven to achieve their ultimate mechanical properties.
- Parts are initially solidified with UV light during printing.
- The thermal cure activates another chemical process that makes parts much tougher.

# Safety
::::VerticalSplit{layout="left"}
:::VerticalSplitItem
::Image[]{src="https://res.cloudinary.com/carbon3d/image/upload/v1738344637/Education/Process/Thermal-Curing/safety_symbols_03_burn_150px.png" size="60" width="150" height="133" position="center" alt="Burn hazard symbol" showCaption="false"}
:::
:::VerticalSplitItem
The oven, parts and accessories may be hot and can cause burns.
Use caution when operating the oven or handling items that have been in the oven.
:::
::::
::::VerticalSplit{layout="right"}
:::VerticalSplitItem
- Always use heat resistant gloves when removing parts from the oven.
- Allow parts to fully cool to room temperature before handling
- For safety.
- For the accuracy of your parts.
- Cooling typically takes about 30 - 60 minutes.
:::
:::VerticalSplitItem

:::
::::
## LMA Notes
[https://pim-resources.coleparmer.com/instruction-manual/33959-06.pdf](https://pim-resources.coleparmer.com/instruction-manual/33959-06.pdf)
A potential fire risk exists if you operate your oven at temperatures in excess of the Carbon recommended bake profiles. This concern is specific to ovens used to cure **EPU parts.** **Lauryl Methyacrylate (LMA), **which is released during the baking of EPU parts, can condense inside oven insulation and/or ducting. The amount of LMA released will be dependent on the volume of EPU parts in a particular bake and how often you are baking with those parts. This condensed LMA can ignite if exposed to temperatures above what is needed to cure the parts. Please refer to the [SDS for LMA](https://www.sigmaaldrich.com/MSDS/MSDS/DisplayMSDSPage.do?country=US\&language=en\&productNumber=291811\&brand=ALDRICH\&PageToGoToURL=https%3A%2F%2Fwww.sigmaaldrich.com%2Fcatalog%2Fproduct%2Faldrich%2F291811%3Flang%3Den) for more specific information about this chemical.
Given our findings, we are updating our user documentation to include these additional recommendations for customers who print with EPU resins.
- Do not perform bakes at higher temperatures than the bake profile specified by Carbon.
- Inspect oven and exhaust ducts for presence of condensate. If you find condensate, clean it, or replace ductwork. Refer to the SDS for LMA prior to cleaning to ensure proper precautions are in place.
- If condensate is noticed after cleaning or replacement, a heat exchanger may need to be installed to cool the ventilation duct to remove the condensate.
Additional Recommendations:
- Bake CE/EPX and EPU parts in separate ovens. CE and EPX require a higher temperature to bake.
- Clearly label ovens with maximum allowable temperatures for bakes as specified for products by Carbon. Do not exceed the Carbon recommended bake temperatures. Yamato Ovens are equipped with Independent Overheat Protection. Refer to the [Overheating Prevention Section](docId:7NE6rGdaSzpAPOHH5QOzm) in the instruction manual to understand how to set Overheating Protection for your specific oven.
- Consult your Facilities and EHS staff on proper handling of LMA condensate in the exhaust system and proper personal protective equipment for handling of LMA contaminated exhaust components and associated duct work.
# Baking Equipment
:::hint{type="info"}
Go to [Accessories & Supplies](docId:95TwE3ttL-5ihI6dNl4XI) for purchase links to many of the products listed below.
:::
## Yamato Convection Oven
::::VerticalSplit{layout="left"}
:::VerticalSplitItem

:::
:::VerticalSplitItem
This programmable, convection oven is the central component of thermal curing. It is able to store up to 6 different programs at once.
Larger facilities should consider purchasing multiple ovens to minimize downtime.
See [Oven Programming](docId\:fZE0_QDaHOVHnVVM6l6kk) for instructions on creating baking programs for the resins that you use.
:::
::::
### Installation Instructions
:::hint{type="warning"}
Install the Yamato oven according to local safety regulations.
:::
::::VerticalSplit{layout="left"}
:::VerticalSplitItem
**English**
:::
:::VerticalSplitItem
::File{src="https://api.archbee.com/api/presign/uXbZOKjJTGpPhjapQ8fvM-Fz7Mxyy-k9_EkoGUrOgFj-20250522-000913.pdf" label="Yamato Oven Installation Instructions v0200.pdf"}
:::
::::
### Instruction Manual
:::hint{type="info"}
Consult the instruction manual below for safety and operating information.
:::
::::VerticalSplit{layout="left"}
:::VerticalSplitItem
**English**
:::
:::VerticalSplitItem
::File{src="https://api.archbee.com/api/presign/uXbZOKjJTGpPhjapQ8fvM-TpgdPlOiZ7Z9sLxsuRqFX-20250131-225002.pdf" label="Yamato Convection Oven DKN 602 Instruction Manual.pdf"}
:::
::::
### CE Certificate
::::VerticalSplit{layout="left"}
:::VerticalSplitItem
**English**
:::
:::VerticalSplitItem
::File{src="https://api.archbee.com/api/presign/uXbZOKjJTGpPhjapQ8fvM-Z2vLnitdTlHQJZbYzY0Ij-20250131-225512.pdf" label="CE Certificate - Yamato Oven.pdf"}
:::
::::
## Ceramic Baking Sheets
::::VerticalSplit{layout="right"}
:::VerticalSplitItem
Ceramic baking sheets work well for curing most Carbon resins due to their durability and non-stick properties.
- Placing parts directly on the tray works well for the following resin families:
- RPU, FPU
- Placing parts directly on the tray is **not recommended** for EPX or SIL resins.
:::
:::VerticalSplitItem

:::
::::
::::VerticalSplit{layout="left"}
:::VerticalSplitItem

:::
:::VerticalSplitItem
**Writing notes on the tray** with a felt tip pen can help identify parts after baking. Notes are easily removed with IPA after baking.
:::
::::
::::VerticalSplit{layout="right"}
:::VerticalSplitItem
Exercise caution with previously used trays with baked on resin.
- Parts tend to stick to resin residue on dirty trays.
- Thoroughly cleaned parts will not leave behind baked resin on your tray.
:::
:::VerticalSplitItem

:::
::::
::::VerticalSplit{layout="left"}
:::VerticalSplitItem

:::
:::VerticalSplitItem
Parts may have a **non-uniform texture** where they directly contact the tray.
:::
::::
## Nonstick Aluminum Foil
:::::VerticalSplit{layout="right"}
::::VerticalSplitItem
Nonstick aluminum foil works well for parts that are more prone to sticking to the baking tray.
- For optimal surface finish, ensure that the foil is completely flattened.
- All resins are compatible with nonstick foil.
- Most useful for EPU, SIL and EPX.
- Nonstick foil also works well to keep trays clean.
:::hint{type="warning"}
Do not use standard aluminum foil, which will stick to parts.
:::
::::
:::VerticalSplitItem

:::
:::::
## Silicone Sheets
:::::VerticalSplit{layout="right"}
::::VerticalSplitItem
Silicone sheets can be used to line baking trays.
- Silicone helps preserve your trays.
- When silicone degrades or becomes coated in residual resin, discard and replace.
- Any residual resin left on silicone from previous bakes can stick to parts.
:::hint{type="info"}
Parts may have a non-uniform texture where they directly contact the silicone.
:::
::::
:::VerticalSplitItem

:::
:::::
## Pan Mesh
:::::VerticalSplit{layout="right"}
::::VerticalSplitItem
The pan mesh is a flexible, heat resistant grid.
- Best used for parts with thin walls or flat parts that are prone to warping.
- Allows all surfaces to be equally exposed to air for uniform evaporation of solvent and uncured monomers.
When baking parts on a mesh, use the following 3 items in order:
- Ceramic baking tray on the bottom
- Drying rack on the tray
- Pan mesh on the rack
This is the ideal setup to promote airflow around parts.
:::hint{type="info"}
The pan mesh may leave marks on parts.
:::
::::
:::VerticalSplitItem

:::
:::::

# Basic Workflow
::::::WorkflowBlock
:::WorkflowBlockItem
### Prepare the parts
Ensure that part(s) are thoroughly washed and dried per standard washing protocol.
:::
:::::WorkflowBlockItem
### Prepare baking implements
::::VerticalSplit{layout="right"}
:::VerticalSplitItem
- Clean the non-stick baking tray with IPA to remove any residue.
- Make sure all surfaces are dry before placing parts or putting the tray in the oven.
:::
:::VerticalSplitItem

:::
::::
**Options**
::::VerticalSplit{layout="right"}
:::VerticalSplitItem
- Line the tray with **non-stick aluminum foil**
- Lining your tray with non-stick aluminum foil will preserve your baking sheet and keep parts clean.
- Some resins/ parts may stick to the bare ceramic tray.
- Especially if the tray has baked on resin from a previous bake (which cannot be cleaned off).
:::
:::VerticalSplitItem

:::
::::
:::::
:::::WorkflowBlockItem
### Put tray with parts in oven
::::VerticalSplit{layout="right"}
:::VerticalSplitItem
1. Place the parts on the clean tray.
2. Carefully put the tray in the oven.
3. Close the oven door.
:::
:::VerticalSplitItem

:::
::::
:::::
:::WorkflowBlockItem
### Start the oven
1. On the oven controls, press the **Program button** to select the appropriate program for the resin.
- Programs will show in the SET TEMP window: **PrG1, PrG2, and PrG3.**
- Consult the [Lab Reference Grids](docId\:UJF4K0NY4lYE74ZoHX1R-) or the resin protocol sheet for the appropriate baking schedule.
2. Press the **Enter button** to confirm the program and enter Pattern mode. **PAt** will be displayed in the °C window.
3. Press **up or down arrows** to select the appropriate pattern.
- Pattern numbers will display in the SET TEMP window.
4. Press and hold **Run/Stop button** until you hear a click, indicating that the curing cycle has begun. The Heater LED light will also begin blinking.

**Example Video**
The following video demonstrates choosing Program 3, Pattern 1 which in this example is programmed for RPU 70.
*This video does not have audio.*
::embed[]{url="https://vimeo.com/527522543/79e3009358?dnt=1"}
:::
:::WorkflowBlockItem
### Remove parts from the oven
1. Wearing heat-resistant gloves, remove the pan from the oven and allow it to cool (\~27° C).
- Alternately, parts may be allowed to cool inside the oven as well when the production workflow allows.
:::
::::::
## Workflow Video
::embed[]{url="https://player.vimeo.com/video/527522760?dnt=1"}
:::ExpandableHeading{isOpen="true"}
**Video text**
1. Place uncured part on metal tray with grid.
- Grid promotes even curing and helps prevent warping.
2. Carefully place tray in oven and close door.
- Use caution. Oven may be hot.
3. Press **Program button** to select correct program.
- **Note: The video mistakenly says "Pattern button."**
4. Press **Enter button** to confirm and enter Pattern mode.
5. Press **up or down arrows** to select pattern.
6. Press **Run/Stop button 2 times** to begin curing cycle.
7. When cycle is complete, put on heat resistant glvoe and remove part from oven.
- Use caution. Oven, parts and tray may be hot.
8. Set part aside to cool before handling.
Your part is now cured.
:::
# Salt Baking
See [Salt Baking](docId\:wHftudZDY0cS0A0-dljcm) for instructions for curing your parts while nested in salt.
# Hanging
::::VerticalSplit{layout="right"}
:::VerticalSplitItem
The majority of parts are baked on a tray. However, some parts are best baked by hanging them.
- Ideal for thin, light, oddly shaped parts with a feature (hole or hook) suitable for hanging.
- Allows for uniform heat distribution, which decreases the chance of deformation and surface imperfections.
The material coupons shown in the image are designed to be threaded onto a keychain. The hole for mounting the coupons works perfectly as a feature to hang the parts from during baking.
:::
:::VerticalSplitItem

:::
::::
## Tips
::::VerticalSplit{layout="right"}
:::VerticalSplitItem
- Load parts onto a wire or rod.
- **Hold parts by edges** or other non-cosmetic surfaces to prevent scratches or other surface defects to cosmetically important surfaces.
- Ensure that **parts do not touch each other** or **they will fuse and bake together.**
:::
:::VerticalSplitItem

:::
::::
::::VerticalSplit{layout="right"}
:::VerticalSplitItem
- Allow parts to cool to room temperature in hanging position.
- Cooling can occur in oven or outside of oven.
- If cooling outside of oven, be sure to support parts so they may hang while they cool.
- Exercise caution when loosening parts from wire to avoid **chipping.**
- Most resins will slide off easily, but CE may stick to the wire.
:::
:::VerticalSplitItem

:::
::::
## Hanging with Wire Loops
::::VerticalSplit{layout="right"}
:::VerticalSplitItem
**Requirements**
- Perforated rack
- Steel wire or paper clips
- Lengths of stiff wire or thin rods
- Oven safe weights
**Instructions**
- Bend **2 wires into upside-down U shapes with a loop on each end.** These loops will hold the rod loaded with parts.
- Lower **bent clips through holes of rack** so the U shapes hang down. Space the clips so they hold rod.
- Place **weight on top of each wire** U to hold it steady while loading the rod of parts.
- Carefully hang rod of parts from wires.
- Remove weights after loading or keep them in place throughout the bake.
:::
:::VerticalSplitItem

:::
::::
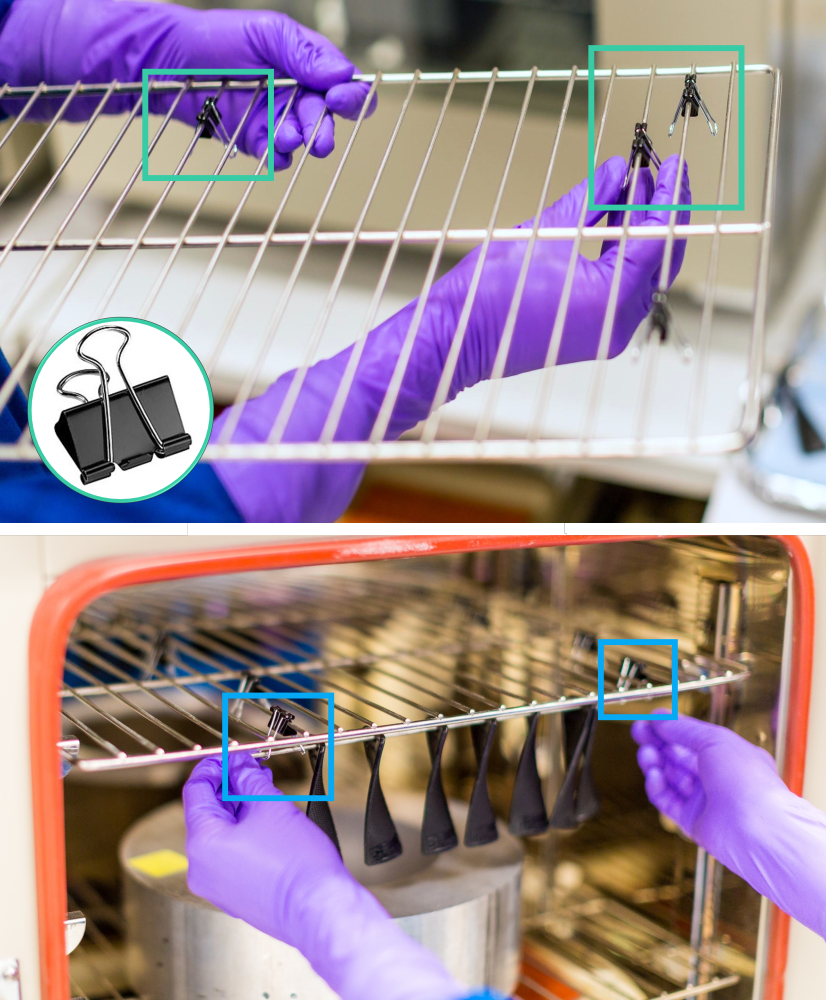
## Hanging with Binder Clips
::::VerticalSplit{layout="right"}
:::VerticalSplitItem
**Requirements**
- Grill racks
- Binder clips
- Thin rods or stiff wires
**Instructions**
- Clip **2 binder clips** to the oven rack from below.
- Space clips so that they can safely hold a rod of parts.
- **Hang rod of parts** from binder clip loops hanging below rack.
:::
:::VerticalSplitItem
:::
::::
# Baking Fixtures
Baking fixtures are used to support parts during the thermal curing process. They are especially useful for parts with delicate features, long protrusions or any features that require a high degree of accuracy.
## Disposable baking fixtures
- Salt baking
- Nonstick foil
- Shaping foil to support overhangs can be used as a quick, low cost and disposable baking fixture.
## Reusable baking fixtures
Production runs are well-suited to fixtures for repeated baking cycles. Designing fixtures to specifically support a part during the bake can maintain part accuracy and prevent deformations.
- [Loctite IND147](docId\:e2xwJDkBpKRmFPACChEU0) fixtures
- This temperature-resistant one-part resin is well suited to creating custom baking fixtures.
- Machined aluminum
- If parts are sticking to the fixture:
- Ensure that the part is fully clean.
- Apply a noise texture to the fixture and/or part to minimize direct contact.
- Use non-stick foil between the part and the fixture as a mold release.
- Use a Teflon mold release spray.
- Other materials compatible with baking temperatures.
:::hint{type="warning"}
It is not recommended to weigh down parts during baking. Weighing down parts can contribute to warpage due to uneven heat distribution and mass loss.
:::