---
title: Overhead Mixers
slug: process/overhead-mixers
description: Explore the efficiency of overhead mixers in our comprehensive document detailing their customizable features and optimal usage for mixing bulk Carbon resins. Learn how adjustable shafts and tailored mixing blades handle varying material viscosities.
docTags:
createdAt: 2024-07-04T01:05:29.606Z
---
# Overview
An **overhead mixer or stirrer **blends components by spinning a long shaft with blades or other mixing elements. The shaft can be raised or lowered for larger or smaller containers. The mixer's speed, direction, and duration of mixing can be adjusted based on the specific requirements of the materials being processed.
::::VerticalSplit{layout="middle"}
:::VerticalSplitItem
Some important points to consider when using overhead mixers:
- Wide range of brands and price points available.
- Process variability based on resin viscosity, diameter of container, diameter of mixing blades and amount of resin being mixed.
- Compatible with a wide range of mixing containers.
- Requires purchasing several accessories for optimal operation.
- Open mixing container.
- Mixing capacity up to 15,000 g
:::
:::VerticalSplitItem

:::
::::
| **Max Capacity** | **Hands-On Time** | **Machine Time** | **Total Process Time** | **Equipment Cost** |
| ---------------- | ----------------- | ----------------- | ---------------------- | ------------------ |
| 15,000 g | 4 minutes | 10 - 26 minutes\* | 14 - 30 minutes\* | $$ |
\* Total processing time varies according to the amount of resin being mixed. 3000 g would mix in about 10 minutes while mixing the maximum amount of 15,000 g would take approximately 25 minutes.
# Equipment & Accessories
::::VerticalSplit{layout="middle"}
:::VerticalSplitItem

:::
:::VerticalSplitItem
## Overhead mixer
An overhead mixer is a device that spins a blade to mix. It operates much like a drill press. An adjustable chuck secures the shaft of the mixing blade
- A built-in timer is recommended.
- Models with more power/torque may be needed for larger volumes and higher viscosity resins like RPU 130.
- The following models are provided as reference.
:::
::::
| **Model** | **Capacity** |
| --------------------------------------------------------------------------------------------------------------------------------------- | -------------------------------------------------- |
| **1.** [IKA Eurostar 60 - 115 V](https://www.ika.com/en/Products-LabEq/Overhead-Stirrers-pg187/EUROSTAR-60-digital-4446000/) | All resins up to 3 L. Lower viscosity up to 10 L. |
| **2.** [IKA Eurostar 60 with timer - 115 V](https://www.ika.com/en/Products-LabEq/Overhead-Stirrers-pg187/EUROSTAR-60-control-4440000/) | All resins up to 3 L. Lower viscosity up to 10 L. |
| **3.** [IKA Eurostar 100 - 115 V](https://www.ika.com/en/Products-LabEq/Overhead-Stirrers-pg187/EUROSTAR-100-digital-4238100/) | All resins up to 10 L. Lower viscosity up to 15 L. |

Contact your Carbon representative if you have questions.
## Mixing blades
Mixing blades can be used for both pigment dispersions and component mixing.
- Size is important: Larger mixing blades are required for larger volumes.
- One piece blades (shaft + blade) are more durable and easier to clean than two part blades. But they can be significantly more expensive.
- Two part blades (blade + shaft) are less expensive but less durable.
- [Two part mixing blade examples](https://www.mixerdirect.com/collections/lab-impellers)
Carbon recommends two mixing blade types:
::::VerticalSplit{layout="middle"}
:::VerticalSplitItem
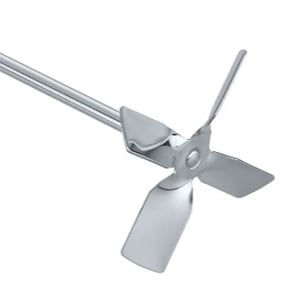
**Propeller blade**
- 4 armed configuration
- Recommended for mixing Part A and Part B components
:::
:::VerticalSplitItem
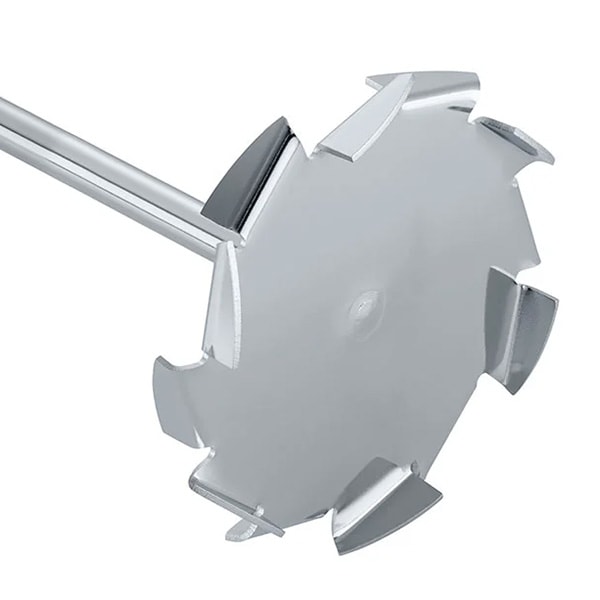
**Dissolver blade**
- Saw-like configuration
- Recommended for making color formulations with [EPU 46 Color Base](docId:74h6IE6GvINCNbSCZ0r9l)
:::
::::
::::VerticalSplit{layout="middle"}
:::VerticalSplitItem
:::
:::VerticalSplitItem
:::
::::
See the table below for recommended mixing blades.
| **Model** | **Notes** | **Price** |
| ------------------------------------------------------------------------------------------------------------------------------------------------------------------------------------------------------------------------------------------------------------------------------------------------------------------------------------------------------------------------------------------------------------ | ----------------------------------------------------- | --------- |
| [50 mm Propeller stirrer, 4 blade, 8 mm shaft](https://www.ika.com/en/Products-LabEq/Overhead-Stirrers-pg187/R-1342-Propeller-stirrer,-4-bladed-0741000/Technical-Data-cptd.html) | Ideal for volumes below 600 mL | $$ |
| [100 mm Propeller blade, 4 blade, 8 mm shaft](https://www.ika.com/en/Products-LabEq/Overhead-Stirrers-pg187/R-1345-Propeller-stirrer,-4-bladed-0741300/) | For larger volumes - 1 L to 15 L | $$ |
| [100 mm Low cost dissolver blade only](https://www.amazon.com/dp/B09YVQFJSL/ref=sspa_dk_detail_0?pd_rd_i=B09YVPRJFG\&pd_rd_w=r9rVS\&content-id=amzn1.sym.f2f1cf8f-cab4-44dc-82ba-0ca811fb90cc\&pf_rd_p=f2f1cf8f-cab4-44dc-82ba-0ca811fb90cc\&pf_rd_r=EXZJRPNG2ZEY5Z8A7RVH\&pd_rd_wg=F6D0s\&pd_rd_r=113eebb6-7aff-4574-900d-1dcad8e5c38c\&s=industrial\&sp_csd=d2lkZ2V0TmFtZT1zcF9kZXRhaWxfdGhlbWF0aWM\&th=1) | Requires separate purchase of rod and attachment bolt | $ |
| [100 mm Dissolver blade, 10 mm shaft](https://www.ika.com/en/Products-LabEq/Measuring-stirrers-pg162/R-1302-Dissolver-stirrer-2387900/) | | $$$ |
:::hint{type="warning"}
See [Mixing Considerations](docId:5x1KZyqEj3Jza7hQ3H4Hf) below for important information about choosing the critical relationship between blade diameter, mixing container diameter, blade height and resin level.
:::
::::VerticalSplit{layout="middle"}
:::VerticalSplitItem

:::
:::VerticalSplitItem
## Stand
The stand securely holds the overhead mixer above the mixing container.
- **Telescoping stands** are highly recommended. They are slightly more expensive but are much easier to use than static stands. The mixers are heavy and the easy adjusting stand is very helpful and worth a small premium.
- Example: [IKA Telescoping stand](https://www.ika.com/en/Products-LabEq/Overhead-Stirrers-pg187/R-2723-Telescopic-stand-1412100/)
:::
::::
::::VerticalSplit{layout="middle"}
:::VerticalSplitItem
## Strap clamp
This device is an adjustable belt that securely holds the mixing container in place during mixing.
[Example](https://www.ika.com/en/Products-LabEq/Overhead-Stirrers-pg187/RH-5-Strap-clamp-3159000/): RH 5 Strap clamp
:::
:::VerticalSplitItem

:::
::::
::::VerticalSplit{layout="middle"}
:::VerticalSplitItem
## Mixing container
- PPE or HDPE containers are recommended.
- Transparent or natural containers are recommended so that it is easier to inspect resin during mixing.
- The container must be large enough to hold the resin components to be mixed.
- Carbon recommends using a 1 gallon size container for mixing resin volumes from 1 - 3 L.
:::
:::VerticalSplitItem

:::
::::
:::hint{type="warning"}
See [Blade and Mixing Container Sizing](docId:5x1KZyqEj3Jza7hQ3H4Hf) below for important information about choosing the correct container size. A mismatch between the blade diameter and the mixing conatiner diameter will result in poorly mixed resin and affect part quality.
:::
::::VerticalSplit{layout="middle"}
:::VerticalSplitItem

:::
:::VerticalSplitItem
## Rubber pad
In combination with the strap clamp, the pad holds the mixing container in place during mixing.
- [Example ](https://www.amazon.com/Resistant-Thickness-Cushioning-Anti-Vibration-Anti-Slip/dp/B08LN95K82/ref=sr_1_4_sspa?keywords=rubber%2Bworkbench%2Bmat\&qid=1696436701\&sr=8-4-spons\&sp_csd=d2lkZ2V0TmFtZT1zcF9hdGY\&th=1)
:::
::::
# Mixing Considerations
## Blade and Mixing Container Sizing
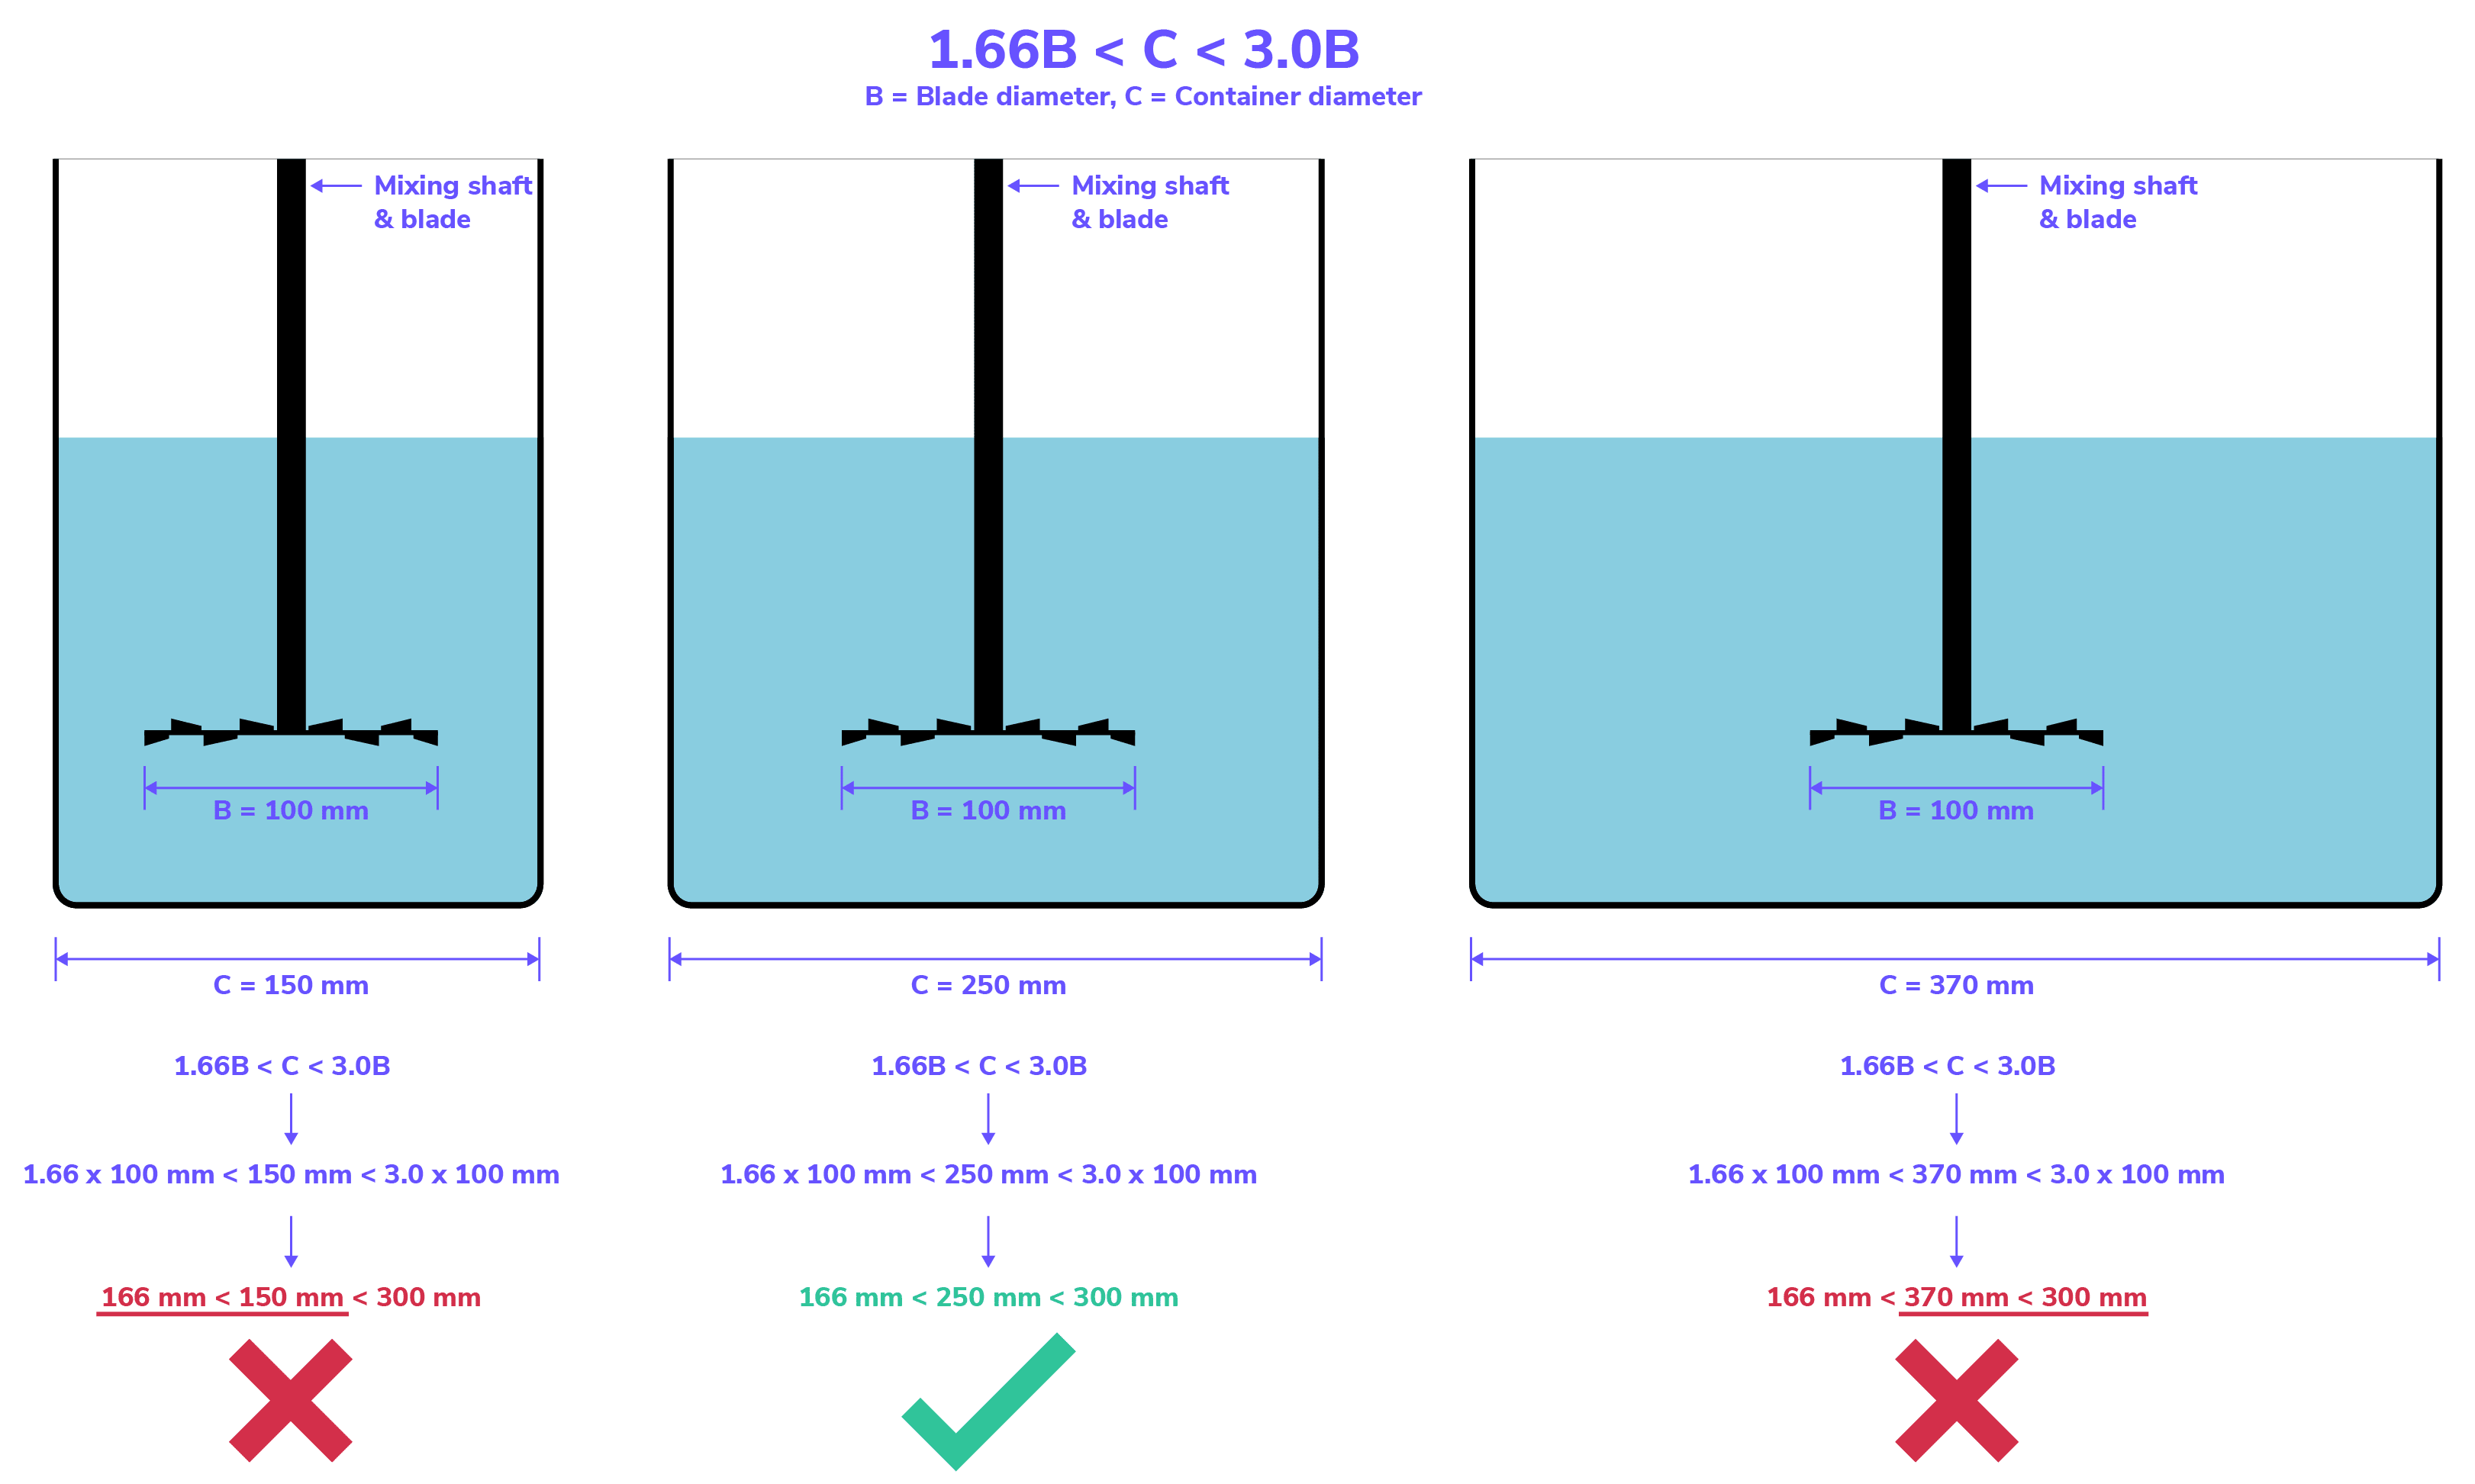
**The blade and mixing container sizes must align for proper mixing. **This is necessary to ensure sufficient flow of material components/additives for good blending.
If the blade is too small compared to the container, there will not be enough flow to properly blend the resin ingredients. If the blade is too large, dead zones will be created in the container, which will also result in improperly mixed resin.
The mixing container diameter should be at least 1.66 times wider than the blade but no more than 3 times wider than the blade. Mathematically, this can be expressed as:
- Blade diameter = B
- Container diameter = C
- **1.66B \< C \< 3.0B**
See the image below for some examples.
:::hint{type="success"}
For optimal mixing, the container diameter should be between** 1.66 and 3 times the diameter of the mixing blade.**
:::
## Blade Height and Resin Fill Level
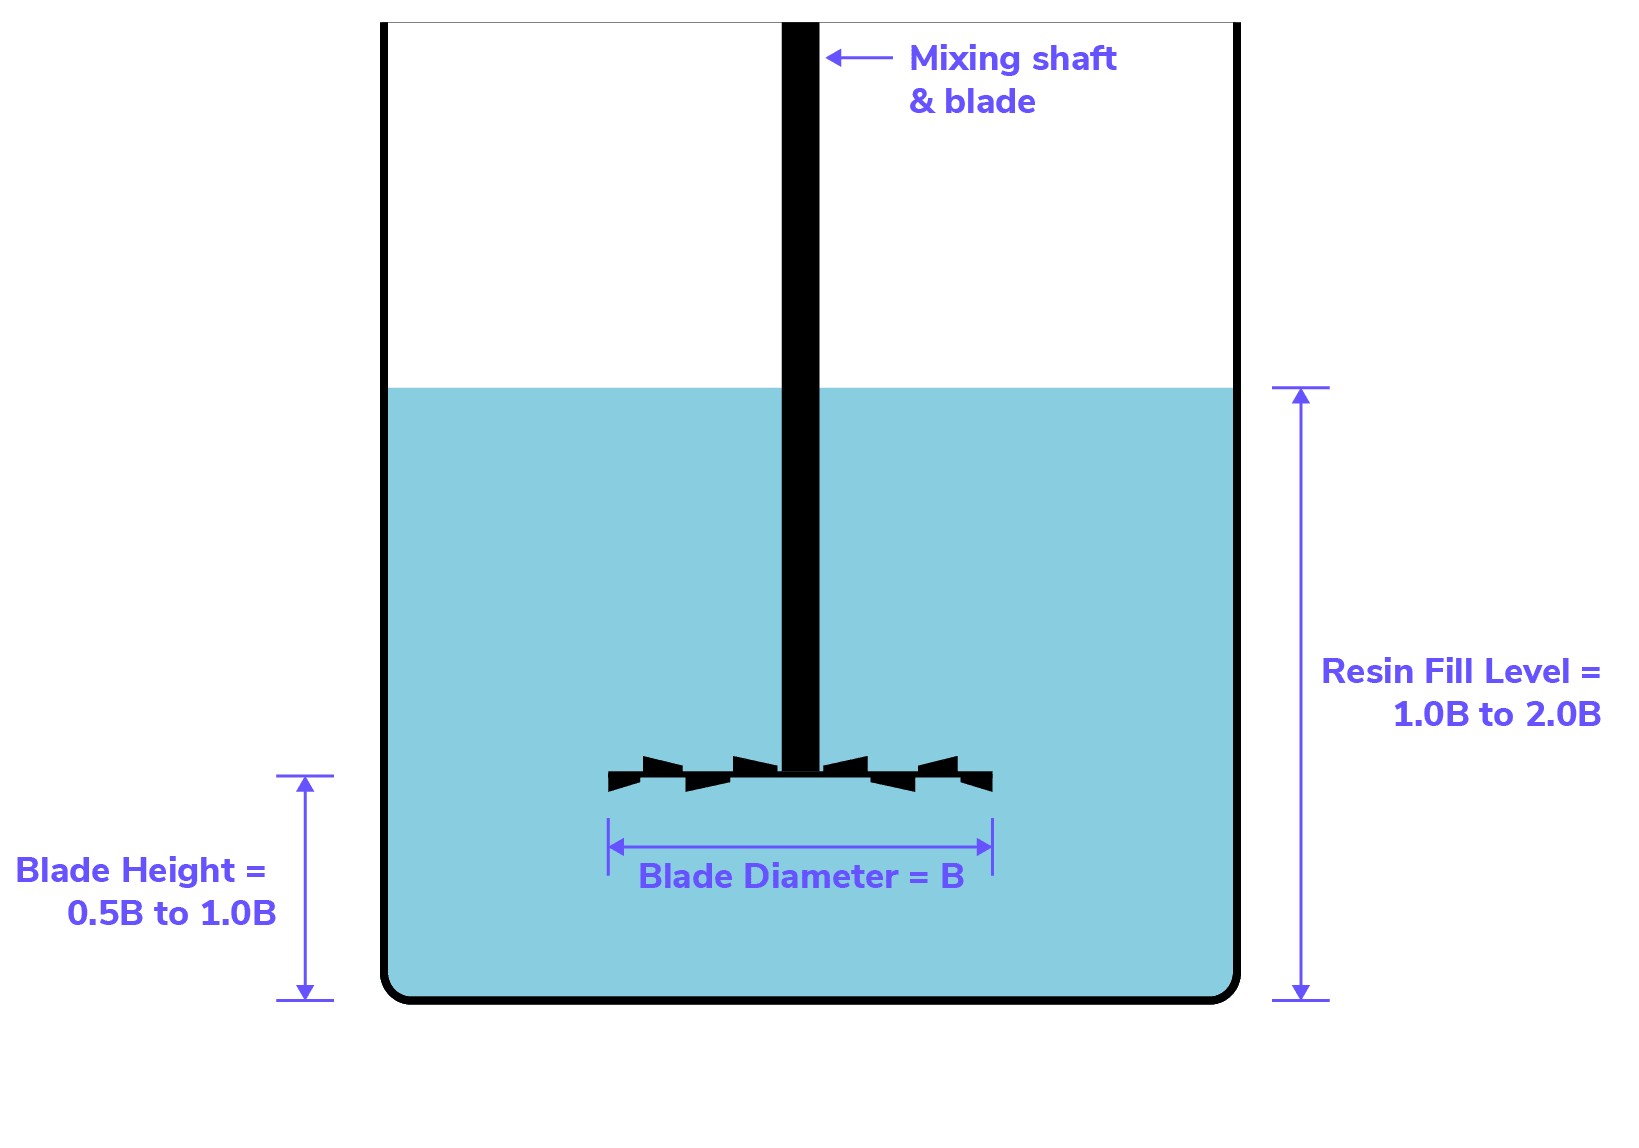
The height of the blade and the height of the resin in the mixing container are also important factors. If the blade is too close to the top level of the resin or too close to the bottom of the mixing container, mixing will be negatively affected.
Similarly, having too much or too little resin in the container will also negatively affect mixing quality.
The blade should be positioned** between one half and 1 blade diameter from the bottom of the mixing container.** Mathematically, this can be expressed as:
- Blade diameter = B
- **0.5B \< Blade height \< 1.0B**
Additionally, the resin fill level should be **between 1 and 2 blade diameters high. **Mathematically, this can be expressed as:
- Blade diameter = B
- **1.0B \< Resin fill level \< 2.0B**
See the image below for a visualization of this information.
## Adding Pigment to EPU 46 Color Base
- Do not mix pigment by hand, this will not provide sufficient mixing to disperse the pigment and will lead to print defects.
- Do not mix pigment into Part B directly, it must be dispersed into Part A first.
- When mixing pigment into Part A, it is normal for Part A to become quite warm. The temperature can reach **40° C** with good mixing (2-3 L of resin with a 4” (100 mm) dissolver blade at 500 rpm).
- The dissolver blade can generate **air bubbles.** Carbon recommends letting the material sit overnight to allow bubbles to settle out.
- To accelerate removal of bubbles, the use of a [vortex mixer](docId\:mtnuEeUkMHMahdpAzGz_i) to mix Part A and B will help remove bubbles.
## Mixing Part A and Part B
:::hint{type="warning"}
**Do not use the dissolver blade to mix Part A/Part B components.** This blade results in high shear and generates heat. Heat generation will accelerate the chemical reaction and shorten the pot life of the material.
:::
## Mixing Container
:::hint{type="warning"}
**Use caution when mixing. **The spinning blade can damage the side of mixing container. Damage can cause a leak or create plastic debris in the mixed resin.
:::
## Filtering Mixed Resin
When dispensing from the mixing container, it is advisable to filter the resin using a 100 um filter to ensure that no dust particles or other debris are present.
# Recommended Mixing Configurations
Please consult the table below for some recommended mixing configurations for various mixing volumes.
| **Mixing Volume** | **Recommended Container** | **Container DIameter (C)** | **Blade Diameter (B)** | **1.66B \< C \< 3B** | **Mixer** |
| ----------------- | -------------------------------------------------------------------------------------------------------------------------------- | -------------------------- | --------------------------------- | ------------------------------------------------------------------------------------------------------------------------------------------------- | ---------------- |
| \< 1 L | [2.5 Quart Container](https://www.uline.com/Product/Detail/S-22983/Pails/Mixing-Container-2-1-2-Quart) | 5.25"
133 mm | 3"
75 mm | 4.98 < 5.25 < 9 **✓**
| IKA Eurostar 60 |
| 1 - 3 L | [1 gallon can](https://www.uline.com/Product/Detail/S-25173/Pails/Plastic-Paint-Can-with-Handle-1-Gallon) | 6.6"
168 mm | 3"
75 mm
4"
100 mm | 4.98 < 6.6 < 9 **✓** | IKA Eurostar 60 |
| 5 - 15 L | [5 gallon bucket](https://www.uline.com/Product/Detail/S-7914W/Pails/Plastic-Pail-5-Gallon-White?model=S-7914W\&RootChecked=yes) | 10.3"
262 mm | 4"
100 mm | 6.64 < 10.3 < 12 **✓** | IKA Eurostar 100 |
# Operation
:::hint{type="info"}
**The following information is a general guide for usage. Consult your overhead mixer product manual for specific instructions about operation.**
:::
:::::::WorkflowBlock
:::::WorkflowBlockItem
## Prep the mixer
::::VerticalSplit{layout="middle"}
:::VerticalSplitItem
1. Check that the blade is securely installed. If necessary, use the chuck key to tighten the chuck.
2. Raise the mixer on the stand so that the mixing container can fit under the blade.
:::
:::VerticalSplitItem

:::
::::
:::::
:::::WorkflowBlockItem
## Position the container
::::VerticalSplit{layout="middle"}
:::VerticalSplitItem
1. Center the container under the blade.
2. Place a **rubber pad** or other non-slip item under the container.
3. Secure the mixing container with the **strap clamp** to ensure that the container doesn’t spill or move during mixing.
:::
:::VerticalSplitItem

:::
::::
:::::
::::::WorkflowBlockItem
## Lower the blade into the container
:::::VerticalSplit{layout="middle"}
::::VerticalSplitItem
1. Lower the mixer until the mixing blade is approximately **0.5 to 1 blade diameter** from the bottom of the container. For example, if the blade diameter is 100 mm, the blade should be positioned between 50 and 100 mm from the bottom of the container.
:::hint{type="info"}
The total fill level should be no more than **2 times the diameter of the mixing blade. **See [Blade Height and Resin Fill Level](docId:5x1KZyqEj3Jza7hQ3H4Hf) above for more information.
:::
::::
:::VerticalSplitItem

:::
:::::
::::::
:::WorkflowBlockItem
## Start the mixer
1. Start the mixer at a **low speed (\~200 RPM)** and increase until a healthy vortex is created.
1. For smaller quantities, a vortex may not be created.
2. If the container is wobbling, adjust the position so that it is centered under the mixing blade.
3. For lower torque mixers, it may be necessary to run at a low speed until Parts A & B have incorporated. This will lower the overall viscocity and allow for higher speeds.
2. Set the mixing time.
1. Mixing time for up to **3000 g** would be approximately **10 minutes.**
2. Mixing time for the maximum capacity of **15,000 g** would be approximately **25 minutes.**
:::
:::::WorkflowBlockItem
## Check and dispense
::::VerticalSplit{layout="middle"}
:::VerticalSplitItem
1. Once mixing has finished, check to ensure that the components have thoroughly mixed.
2. Dispense the mixed resin into the cassette and begin printing promptly in order to maximize pot life.
- It is advisable to filter the resin using a 100 um filter to remove any dust or other debris that may be present.
:::
:::VerticalSplitItem

:::
::::
:::::
:::::::