---
title: Dreve PCU LED
slug: process/dreve-pcu-led
docTags:
createdAt: 2025-01-09T17:56:12.393Z
---
# Overview
::::VerticalSplit{layout="middle"}
:::VerticalSplitItem
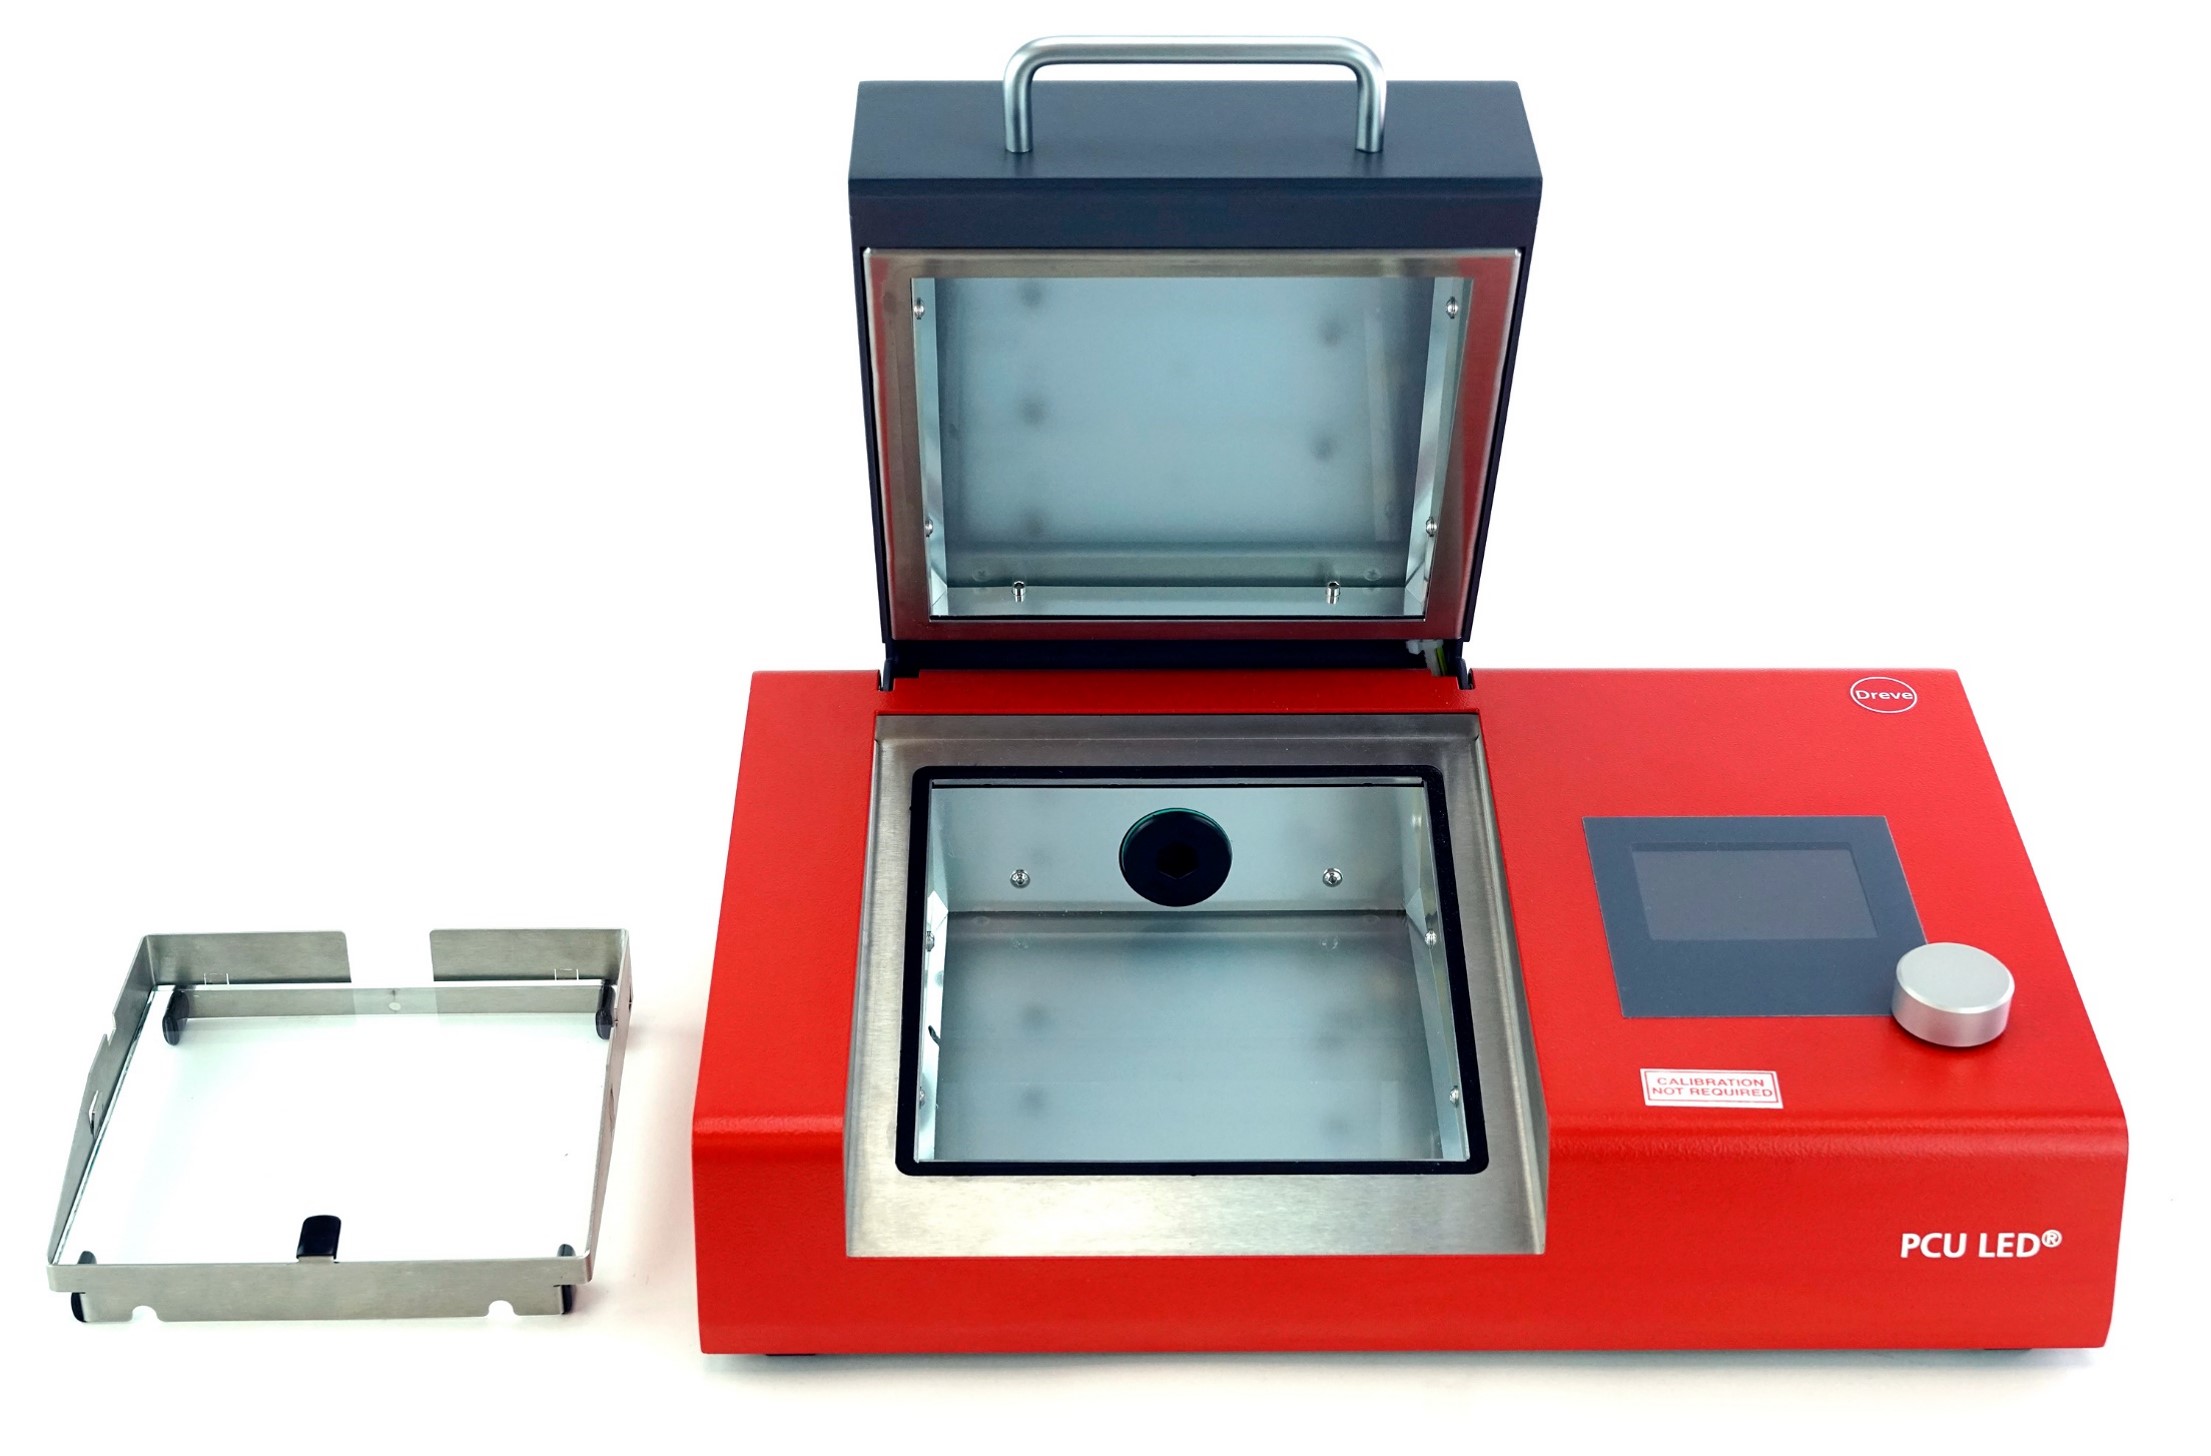
The **Dreve PCU LED** uses UV light to cure parts, completing the process started during printing, giving parts their final mechanical properties and making parts safe to handle.
It can create a vacuum in the exposure chamber or fill the exposure chamber with nitrogen to aid curing.
:::
:::VerticalSplitItem
:::
::::
# Curing Basics
- LED lamps are located above and below the curing chamber.
- Parts rest on transparent glass platform.
- UV light comes from **above and below** and cures most parts without rotating them.
::::VerticalSplit{layout="middle"}
:::VerticalSplitItem
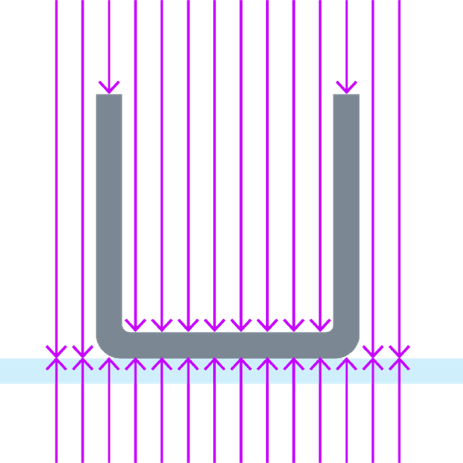
**Orientation 1**
:::
:::VerticalSplitItem
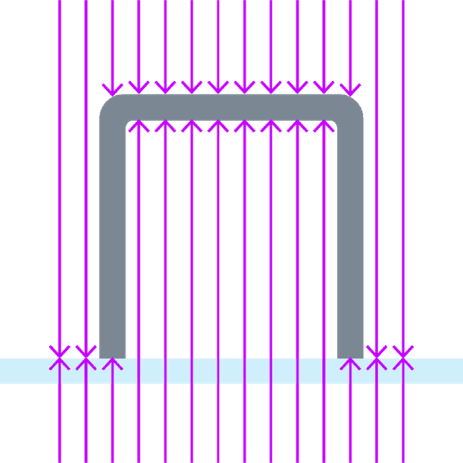
All surfaces exposed to UV light. 1 pass cure.
:::
::::
::::VerticalSplit{layout="middle"}
:::VerticalSplitItem
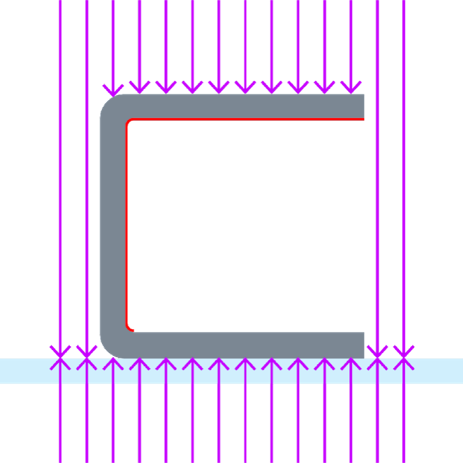
**Orientation 3**
Significant percentage of surface area not exposed to light. Part will need to be rotated and cured again to achieve full cure.
:::
:::VerticalSplitItem
:::
::::
###
# Features
::::VerticalSplit{layout="middle"}
:::VerticalSplitItem
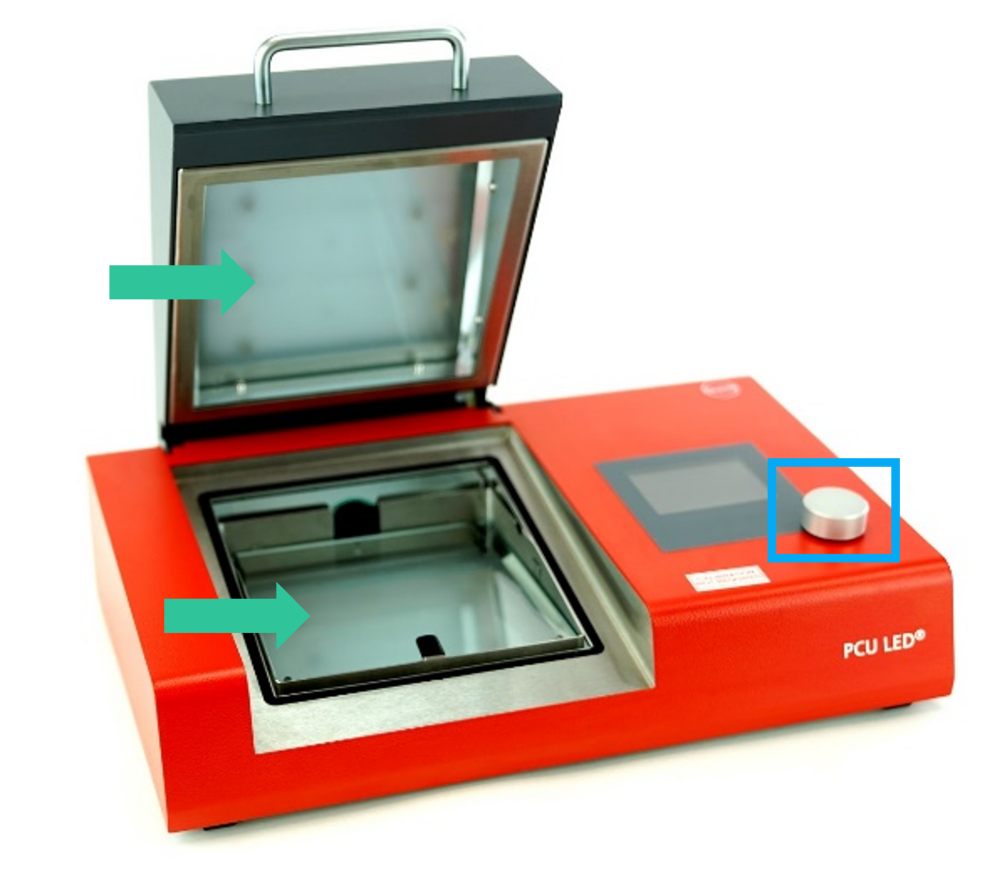
**Light sources** on both the top and bottom of chamber allow for consistent curing without the need to flip parts.
The **rotary button** is used to select resin programs, start the curing process and perform administrative tasks.
:::
:::VerticalSplitItem
:::
::::
::::VerticalSplit{layout="middle"}
:::VerticalSplitItem
:::
:::VerticalSplitItem
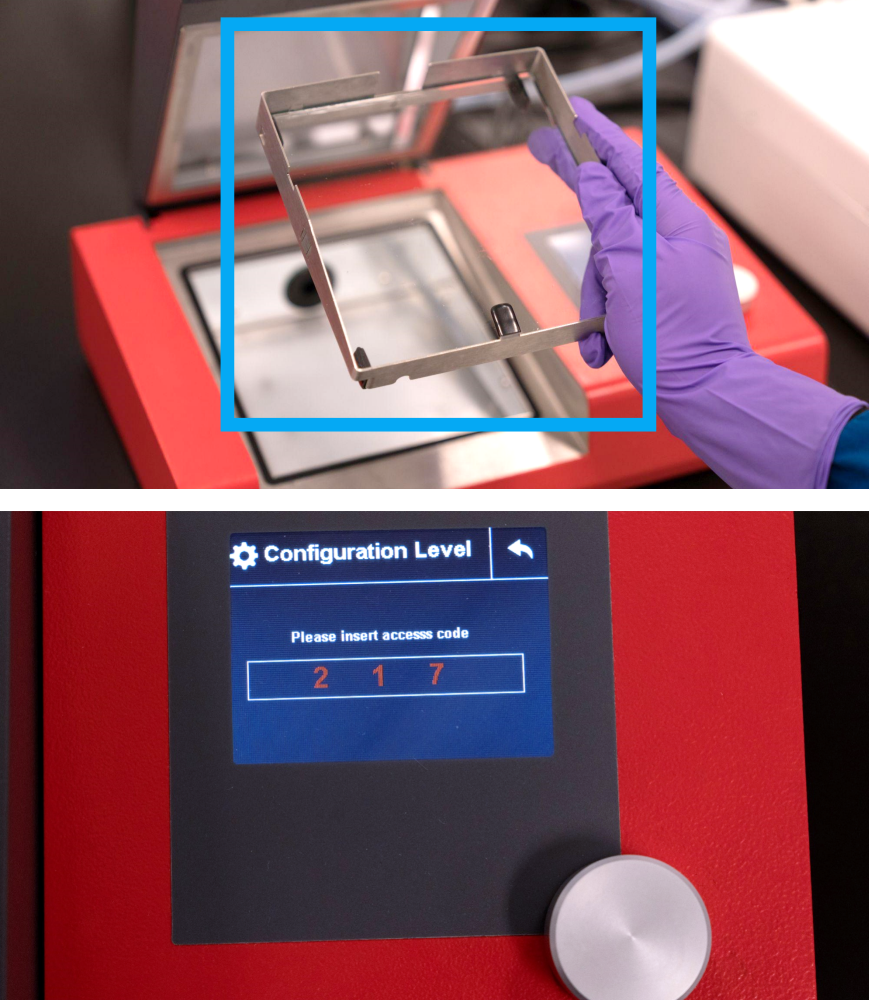
- Carbon recommends always using the **removable glass platform** to cure parts.
- This ensures a more uniform cure since parts will be centered between light sources.
- Keeps glass right above lower light source free of resin buildup.
- **1.5” part height maximum** when using platform.
- There are 3 different curing environments available: Vacuum, nitrogen and air.
- See Exposure Atmospheres below for details.
- LED lamps do not generate heat. So parts may go through multiple cure cycles without pausing for cooling.
- The unit needs to be configured before use to create the options for proper curing.
- Go to [Configuring the Dreve PCU LED](docId\:JLgbnwUiOTYwrCRMNPTbk) below.
:::
::::
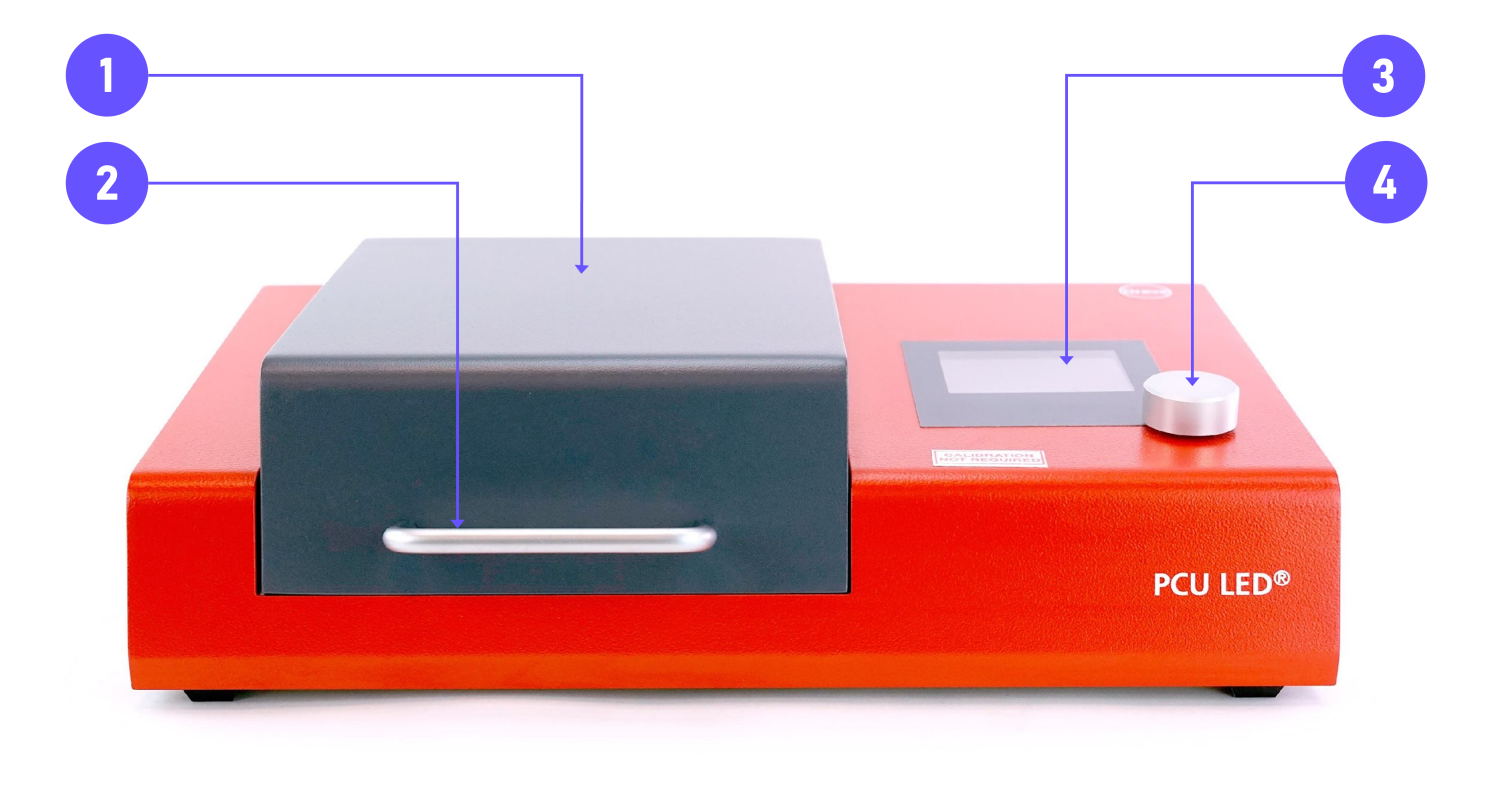
## Front
::::WorkflowBlock
:::WorkflowBlockItem
Lid
:::
:::WorkflowBlockItem
Handle
:::
:::WorkflowBlockItem
Display
:::
:::WorkflowBlockItem
Rotary Button
:::
::::
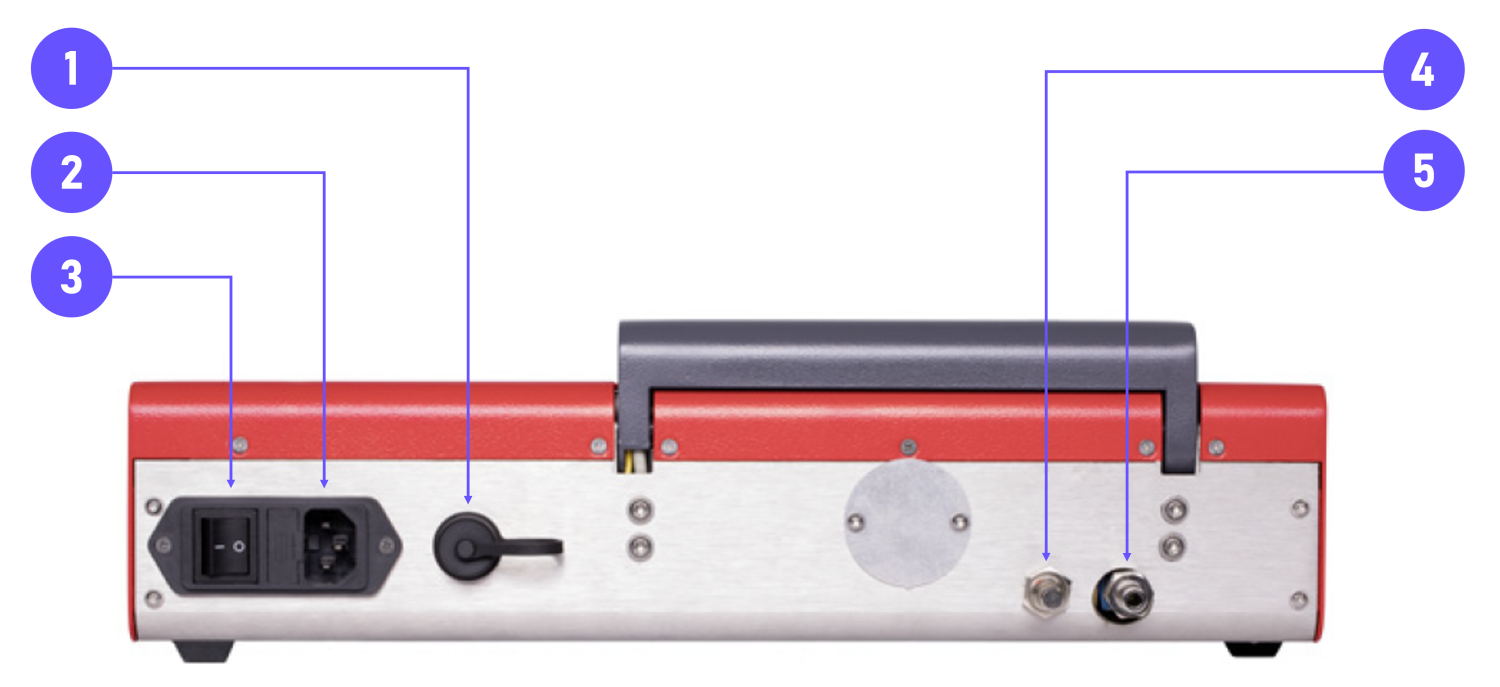
## Rear
::::WorkflowBlock
:::WorkflowBlockItem
USB port
:::
:::WorkflowBlockItem
Power connector
:::
:::WorkflowBlockItem
Power switch
:::
:::WorkflowBlockItem
Nitrogen purge valve
:::
:::WorkflowBlockItem
Nitrogen connector
:::
::::
## Display
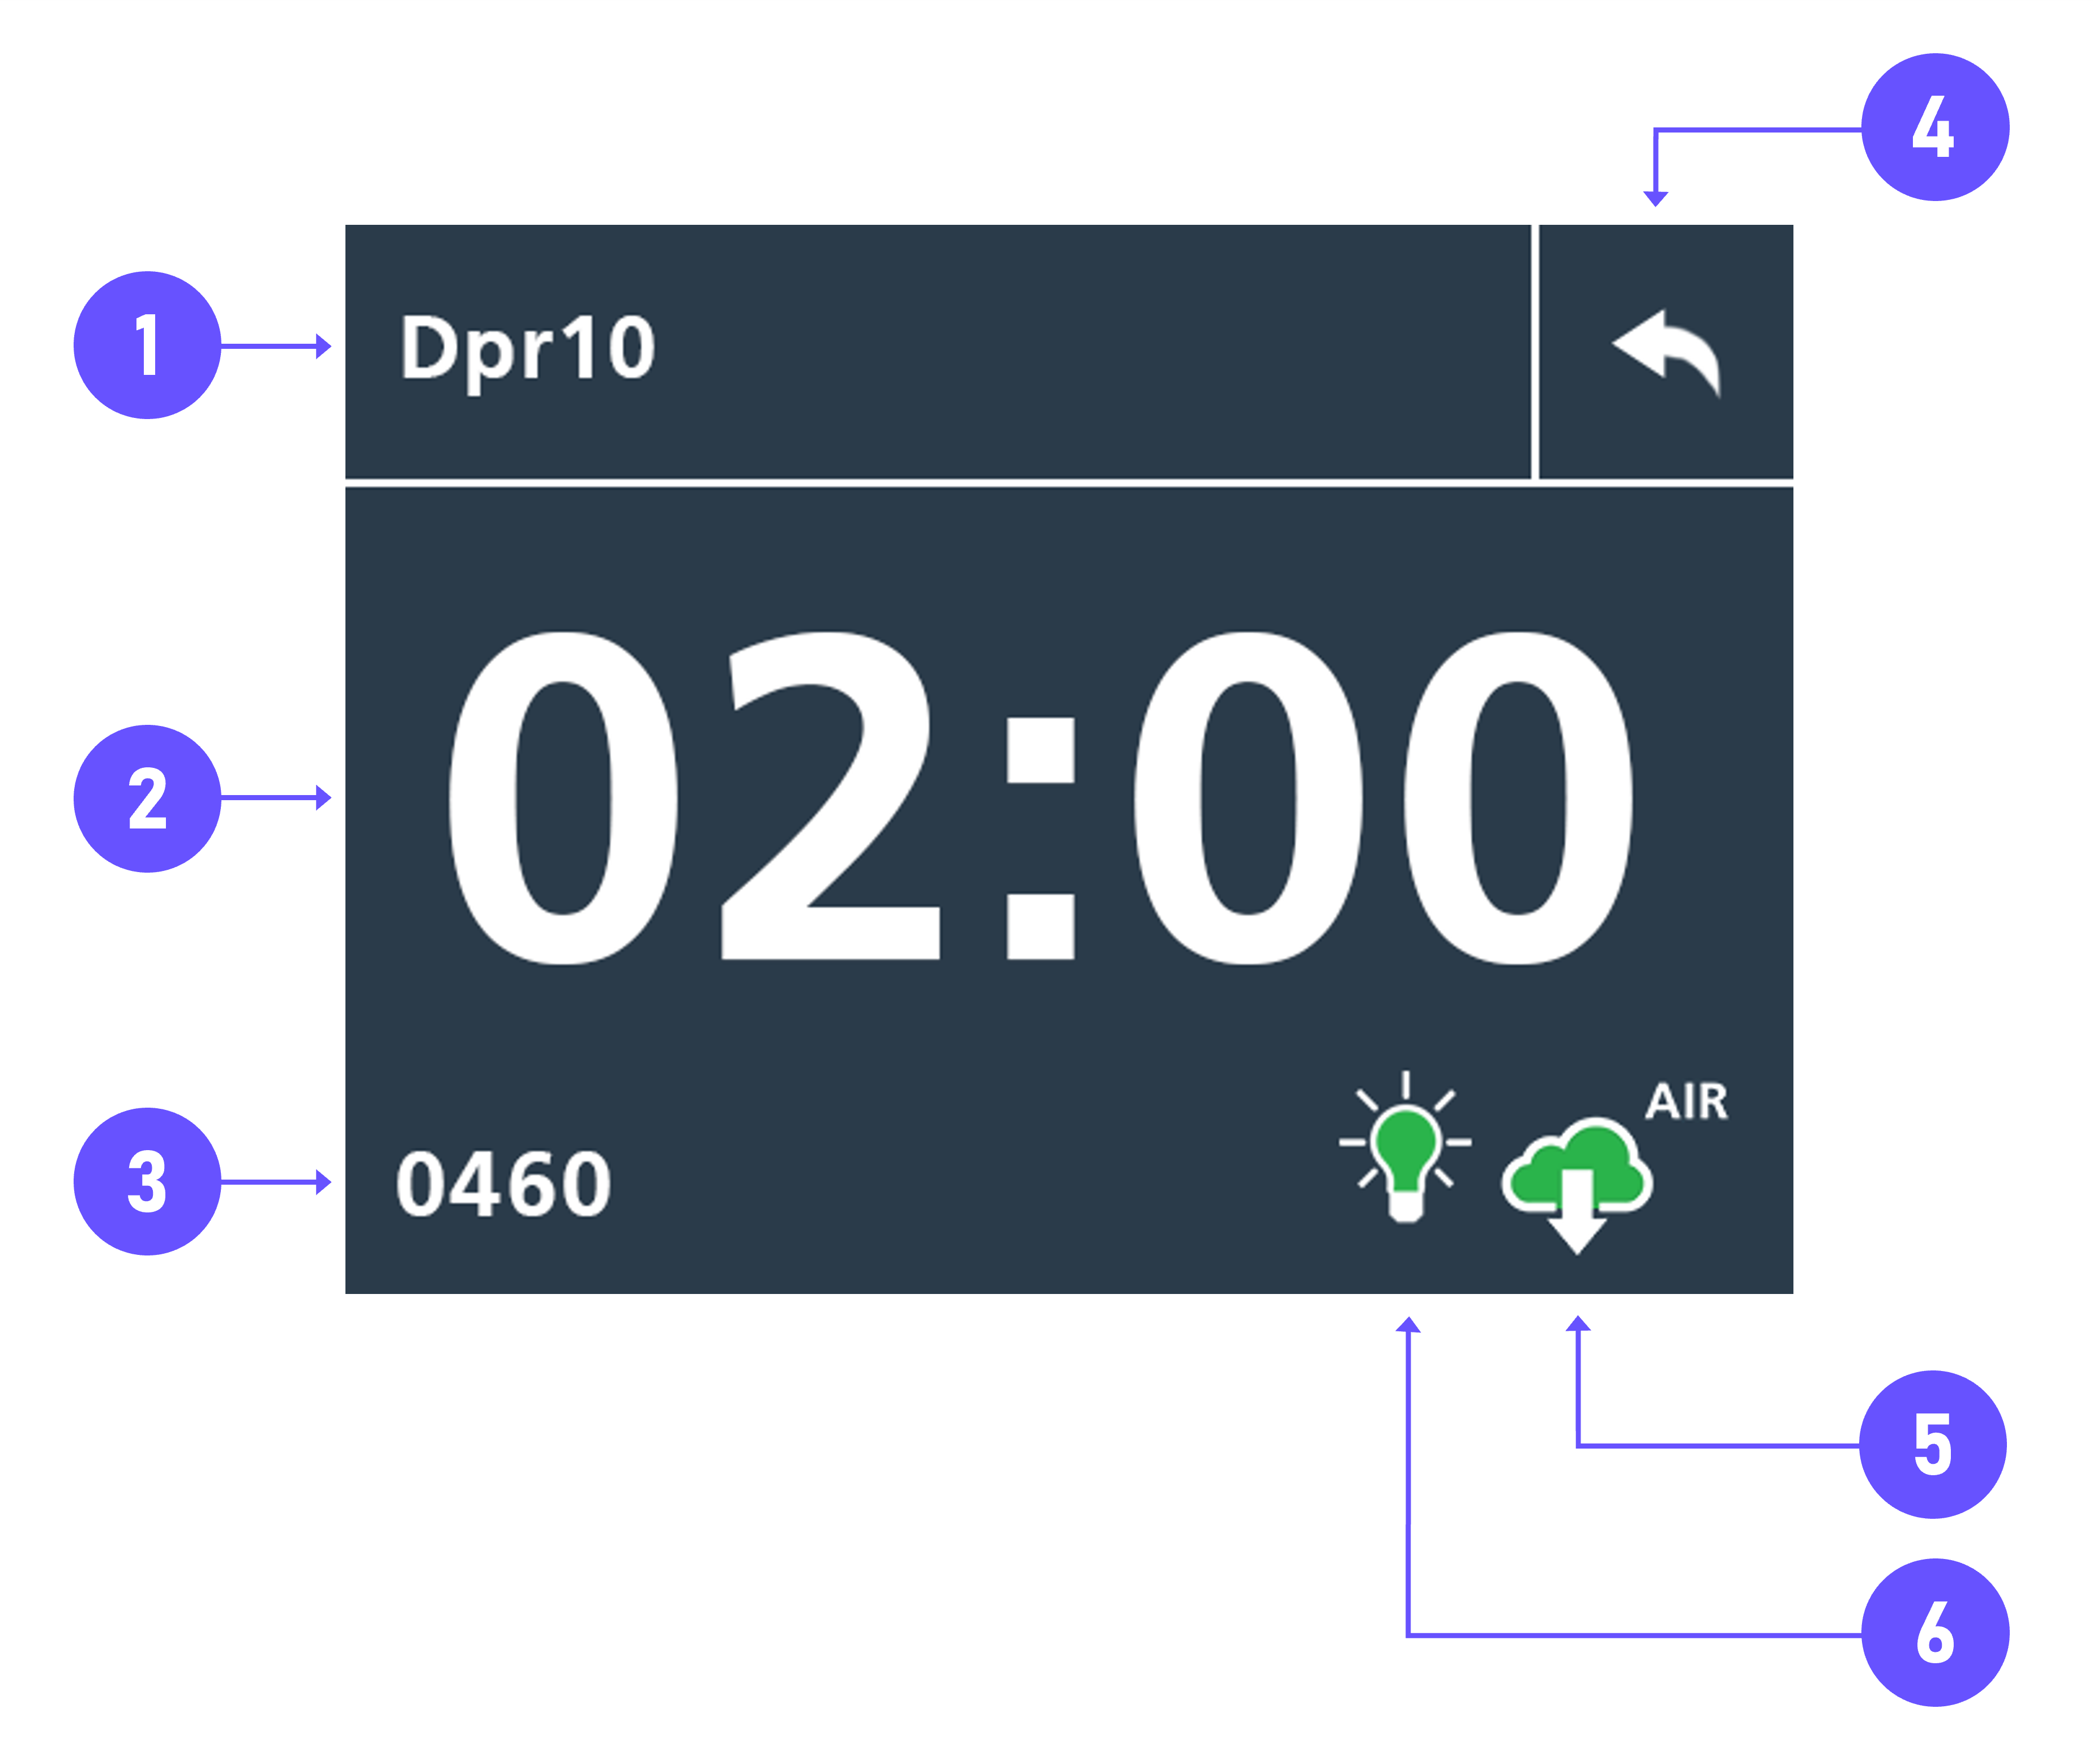
::::WorkflowBlock
:::WorkflowBlockItem
Resin program
:::
:::WorkflowBlockItem
Curing time remaining
:::
:::WorkflowBlockItem
Pressure (mbar)
:::
:::WorkflowBlockItem
Rotary button
:::
:::WorkflowBlockItem
Exposure atmosphere Air/Vacuum/Nitrogen
:::
:::WorkflowBlockItem
Exposure icon ON/OFF
:::
::::
::::VerticalSplit{layout="middle"}
:::VerticalSplitItem
**Vacuum warning**
Indicates vacuum in exposure chamber. Do not open the door when this is displayed. Doing so will destroy the sealing in the chamber.
:::
:::VerticalSplitItem

:::
::::
::::VerticalSplit{layout="middle"}
:::VerticalSplitItem
**Final process screen**
Indicates exposure process is complete.
:::
:::VerticalSplitItem

:::
::::
## Exposure Atmosphere
:::::VerticalSplit{layout="middle"}
:::VerticalSplitItem

:::
::::VerticalSplitItem
**Vacuum **
This option creates a vacuum in the exposure chamber and is used for curing many resins including DPR 10.
:::hint{type="warning"}
**Vacuum release must complete before opening the door. Otherwise, the unit may be damaged.**
:::
::::
:::::
::::VerticalSplit{layout="middle"}
:::VerticalSplitItem

:::
:::VerticalSplitItem
**Nitrogen**
This option fills the exposure chamber with Nitrogen (N2) and is used for curing resins including Pac-Dent Rodin Sculpture.
:::
::::
::::VerticalSplit{layout="middle"}
:::VerticalSplitItem

:::
:::VerticalSplitItem
**Air **
This option leaves the exposure chamber filled with the ambient air in the room and is not currently used for curing.
:::
::::
**Note:** These options cannot be run at the same time.
# Operation
::::VerticalSplit{layout="middle"}
:::VerticalSplitItem
**Note:** Be sure your part is completely dry before curing.
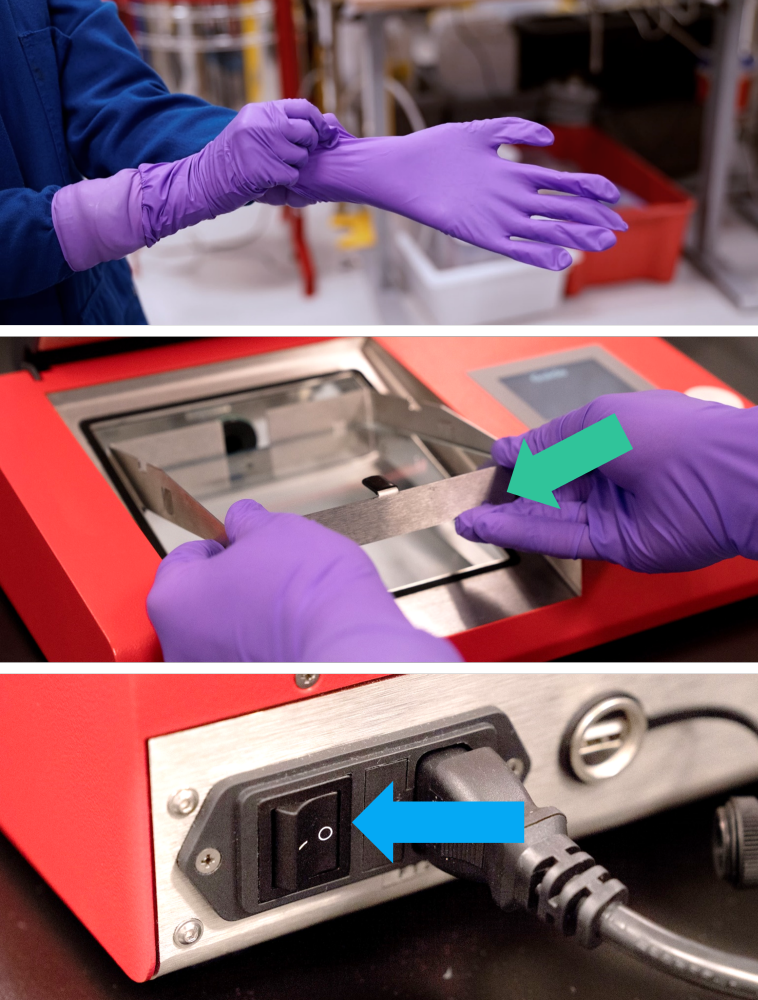
1\. Put on new pair of gloves.
- Your gloves will be soiled from washing your part. Changing your gloves minimizes resin contamination of the PCU LED and the workspace.
2\. Insert removable **glass platform** inside chamber.
- The glass platform allows for more consistency since parts will be more centered between light sources.
- If your Dreve PCU LED box did not include a removable glass platform, please contact [Carbon Support](#).
3\. Turn on the **power switch** on the back of the unit
:::
:::VerticalSplitItem
:::
::::
::::VerticalSplit{layout="middle"}
:::VerticalSplitItem
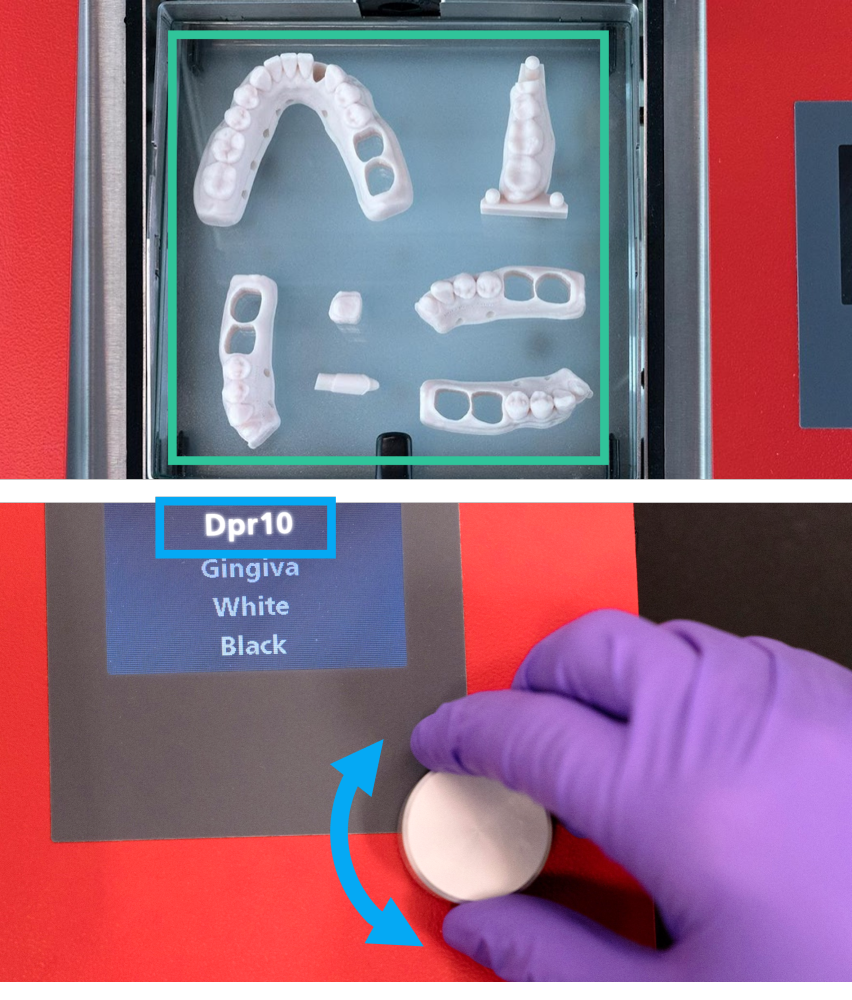
**4. ****Center parts** on removable glass platform.
- Parts should not touch the sides of the chamber or plastic handle to prevent any uncured surfaces.
- Parts can be placed close together, but should not overlap or touch other parts.
5\. Use handle to close the lid.
**6. ****Rotate the rotary button** until the proper material program is displayed in white.
:::
:::VerticalSplitItem
:::
::::
::::VerticalSplit{layout="middle"}
:::VerticalSplitItem
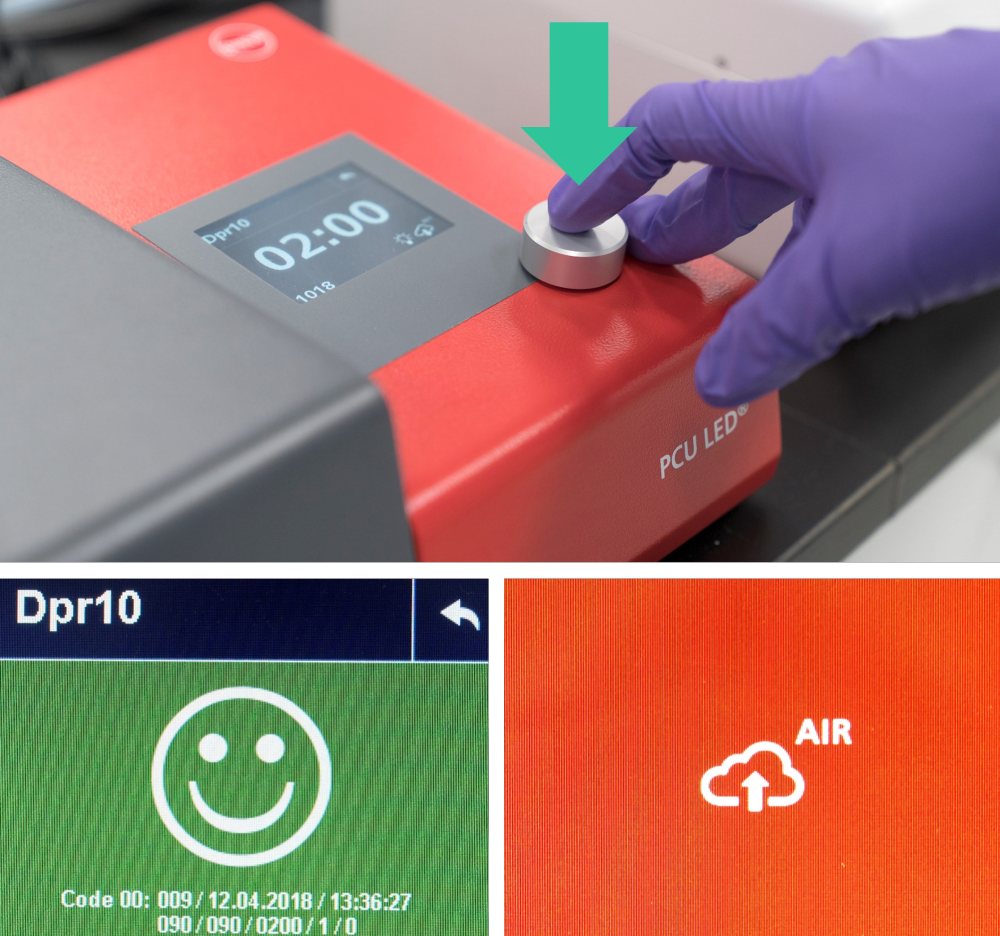
7\. Push the **rotary button twice** to select and start the selected resin program.
8\. If a vacuum program has been selected, the pressure indicator will begin decreasing. Once vacuum is achieved (\~150 mbars), the exposure icon and the exposure atmosphere indicator will turn green. At the same time, the clock will begin counting down as the parts in the exposure chamber are cured with light.
9\. A green screen with a smiley face will display once the exposure cycle is complete.
- If the screen is red, you will need to wait for the vacuum to be released so that you can open the lid without damaging the PCU LED.
:::
:::VerticalSplitItem
:::
::::
## Part Placement
Proper part placement requires that light has a clear path to all part surfaces.
- Leave at least 3 mm (0.125 in) around each part to ensure proper curing.
- Failure to properly arrange parts will result in partially cured parts that are not fit for use.
::::VerticalSplit{layout="middle"}
:::VerticalSplitItem
::Image[]{src="https://api.archbee.com/api/optimize/3CesIL2dYMCHPZvRjp8S0/-o7e3hS7y1-DK1KXOmWkD_image.png" size="66" width="1531" height="1529" position="center" darkWidth="1531" darkHeight="1529" showCaption="false"}
**Parts touching each other** **- NO**
Light cannot get between touching parts leaving uncured areas.
:::
:::VerticalSplitItem
::Image[]{src="https://api.archbee.com/api/optimize/3CesIL2dYMCHPZvRjp8S0/0lwRmE5SrjekGw7ynUc4c_image.png" size="66" width="1531" height="1530" position="center" darkWidth="1531" darkHeight="1530" showCaption="false"}
**Parts touching sides - NO**
Light cannot get to surfaces where parts touch sides of chamber leaving uncured areas.
:::
::::
::::VerticalSplit{layout="middle"}
:::VerticalSplitItem
::Image[]{src="https://api.archbee.com/api/optimize/3CesIL2dYMCHPZvRjp8S0/zvciWl3t_Jm2nPPmBBaPE_image.png" size="66" width="1524" height="1529" position="center" darkWidth="1524" darkHeight="1529" showCaption="false"}
**Parts stacked - NO**
Light cannot get between touching parts leaving uncured areas.
:::
:::VerticalSplitItem
::Image[]{src="https://api.archbee.com/api/optimize/3CesIL2dYMCHPZvRjp8S0/OKqdBpGcFaZUEjAVgYmJm_image.png" size="66" width="334" height="334" position="center" darkWidth="334" darkHeight="334" showCaption="false"}
**Parts separated from each other and sides - YES**
Light can easily get to all part surfaces.
:::
::::
# Maintenance
## Daily
::::VerticalSplit{layout="middle"}
:::VerticalSplitItem
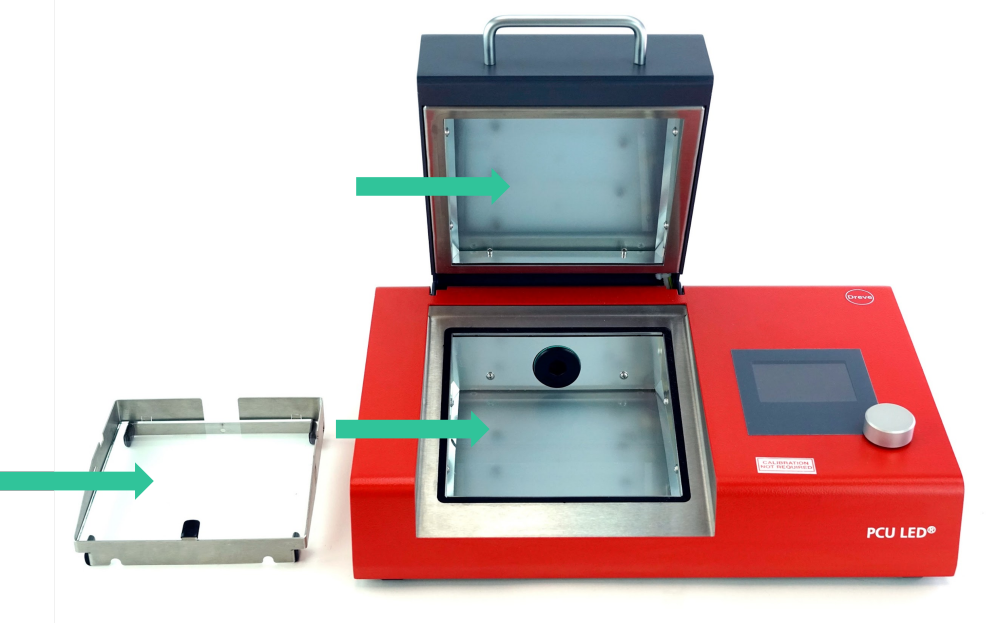
Wipe glass surfaces **(platform, lid, and chamber floor)** with IPA and lint-free Kimwipe.
- It is very important to avoid residue build-up on these surfaces. Otherwise, the light intensity will be diminished and your parts may not be fully cured.
**Note:** Cleaning of glass surfaces should also be performed when switching from one resin to another.
:::
:::VerticalSplitItem
:::
::::
Configuring the Dreve PCU LED
=============================
Configuration is necessary before initial install or when new resins or protocols are introduced.
:::hint{type="info"}
**This process requires a USB flash drive.**
:::
## Download the Configuration File
:::::VerticalSplit{layout="middle"}
::::VerticalSplitItem
1. Delete old versions of the **PCU\_NAME.txt **file on your USB flash drive.
2. **Download the appropriate file **[below](docId\:JLgbnwUiOTYwrCRMNPTbk)**.**
3. **Unzip the file named PCU\_NAME.txt.zip. **
4. Copy PCU\_NAME.txt file onto USB thumb drive.
5. Remove USB thumb drive from your computer.
:::hint{type="danger"}
**Do not open the file. Doing so will corrupt the file and make it unusable. **
:::
::::
:::VerticalSplitItem

:::
:::::
### Dreve PCU LED Configuration Files
The attached files contain configuration data for the Dreve PCU LED UV curing unit. When uploaded via USB flash drive, they will create profiles to cure dental materials. A video on how to upload these configuration files is linked to this course.
Please note that the Dreve PCU LED cure units can only store **10 cure profiles.** Therefore we offer different configuration files, consisting of different combinations of 10 resins. If you need a custom configuration file, please contact Carbon Support.
::::VerticalSplit{layout="middle"}
:::VerticalSplitItem
**Configuration File 1**
::File{src="https://api.archbee.com/api/presign/uXbZOKjJTGpPhjapQ8fvM-nGDniYWel1C9hIUwureCT-20250109-223843.zip" label="Configuration_File_1.zip"}
This file contains the following resin cure programs:
1. DPR 10
2. KeySplint Soft Clear
3. KeySplint Hard Clear and KeyGuide
4. Flexcera Smile Ultra+, Flexcera Base, Flexcera Base Ultra+ and SmileGuard
5. FotoDent Gingiva
6. KeyDenture Try-In
7. FotoDent Tray 2.0
8. Pac-Dent Rodin Sculpture
9. KeyPrint KeyGuard
10. KeySplint Hard Tinted
:::
:::VerticalSplitItem
**Configuration File 2**
::File{src="https://api.archbee.com/api/presign/uXbZOKjJTGpPhjapQ8fvM-IaZt-mmcR8baxpnIU3Ffb-20250109-223902.zip" label="Configuration_File_2.zip"}
This file contains the following resin cure programs:
1. DPR 10
2. KeySplint Soft Clear
3. KeySplint Hard Clear and KeyGuide
4. Pac-Dent Tray
5. FotoDent Gingiva
6. KeyDenture Try-In
7. FotoDent Cast
8. Dentca Flash
9. Dentca
:::
::::
## Access the Configuration Menu
::::VerticalSplit{layout="middle"}
:::VerticalSplitItem
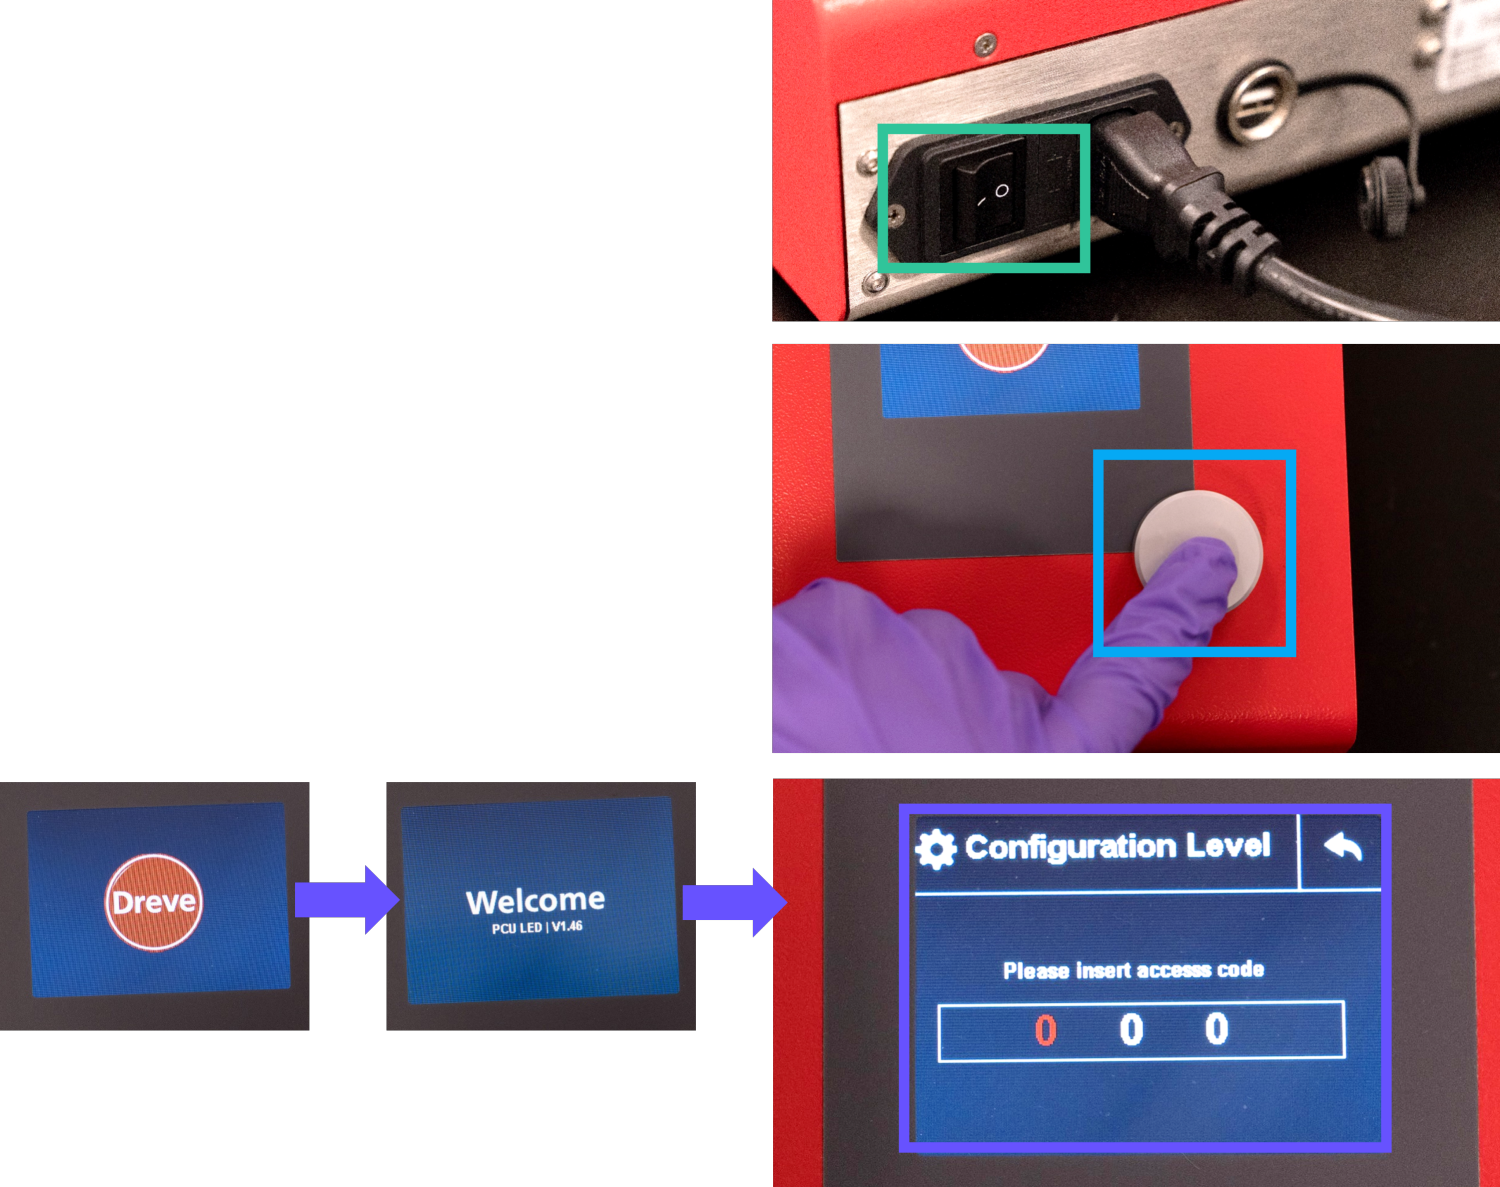
1. On the back of the unit, turn the **power switch** on.
2. Quickly push down and **hold rotary button** while PCU powers on.
3. Hold until display shows **Configuration Level** menu.
:::
:::VerticalSplitItem
:::
::::
## Enter Admin Mode with Access Code 217
::::VerticalSplit{layout="middle"}
:::VerticalSplitItem
:::
:::VerticalSplitItem
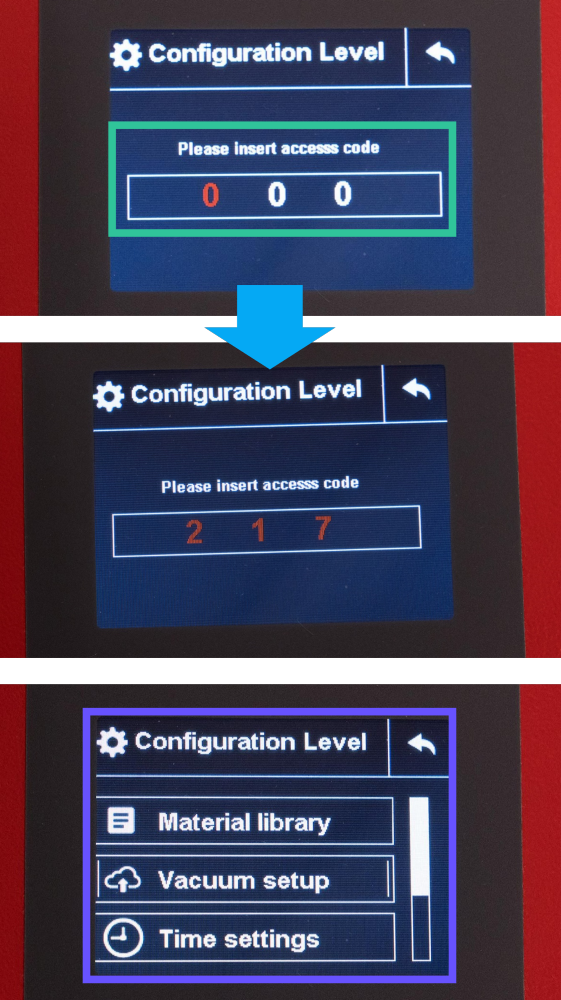
1. Display shows **Please insert access code****.** The first digit is red.
2. Turn rotary button to change first digit to **2.**
- Press rotary button to accept.
- The second number will turn red.
3. Turn rotary button to change next digit to **1.**
- Press rotary button to accept.
- The second number will turn red.
4. Turn rotary button to change last digit to **7.**
- Press rotary button to accept.
- The second number will turn red.
5. You are now in **Admin mode**.
- The screen will change and show the Material library, Vacuum setup and Time settings
:::
::::
## Upload New Program Data
::::VerticalSplit{layout="middle"}
:::VerticalSplitItem
This will install all current Carbon resin curing programs onto the Dreve PCU LED.
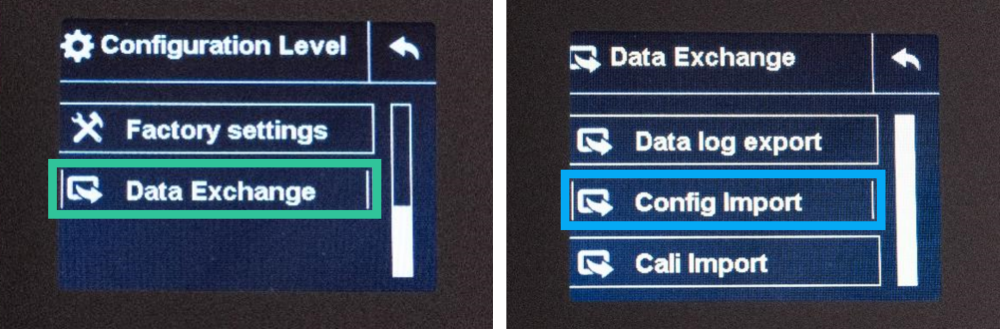
1\. Turn rotary button to select **Data Exchange** and push button.
2\. Select **Config Import** and push button.
:::
:::VerticalSplitItem
:::
::::
::::VerticalSplit{layout="middle"}
:::VerticalSplitItem
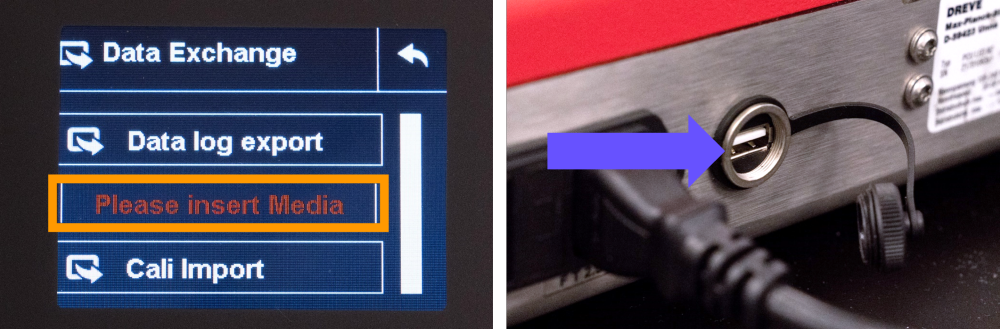
3.** Config Import** will change to **Please insert media** in red.
4\. Insert USB drive into **port on back of PCU**.
:::
:::VerticalSplitItem
:::
::::
::::VerticalSplit{layout="middle"}
:::VerticalSplitItem
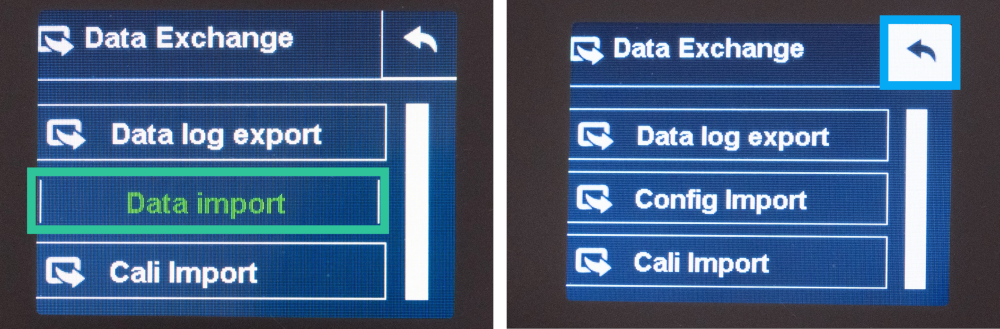
5\. After a few moments, text will briefly change to **Data import** in green then return to **Config Import**.
6\. Scroll up to the **Back arrow** and push rotary button to return to the **Configuration Level menu**.
7\. Remove the USB drive from the back of the unit.
:::
:::VerticalSplitItem
:::
::::
The Dreve PCU LED is now updated with the latest Carbon curing programs.
## Choose Resins to Display
You can select which resin programs to display as options for use. For example, if you only print with DPR 10, you can hide all other resins.
::::VerticalSplit{layout="middle"}
:::VerticalSplitItem
:::
:::VerticalSplitItem
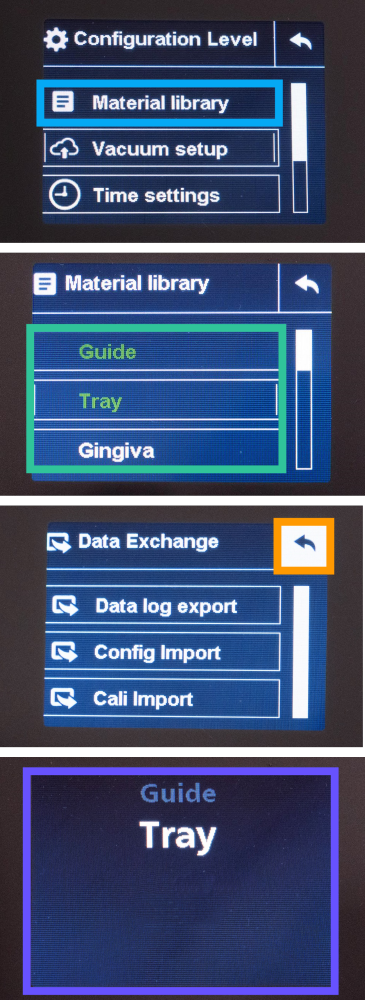
1. Select **Material Library** and push rotary button.
2. The display will show **all resin programs**.
1. Resins in green text are available for use.
2. Resins in white text are unavailable for use.
3. Toggle availability by selecting a resin and pushing the rotary button.
4. When you are finished, scroll up to the **Back arrow** and push rotary button to go to the **Configuration Level** menu.
5. Scroll up to** Back arrow** again and push rotary button to go to the **Program menu**.
6. The display will show a list of available resin programs.
The Dreve PCU LED unit is now ready for use.
:::
::::
# Nitrogen Setup
::::VerticalSplit{layout="right"}
:::VerticalSplitItem
The Dreve PCU LED requires nitrogen to cure certain resins. Nitrogen must be purchased separately. The document below describes options for installing large and small nitrogen cylinders.
::File{src="https://api.archbee.com/api/presign/uXbZOKjJTGpPhjapQ8fvM-ZRK6oEkIjzsKdBL1vJAW5-20250519-232729.pdf" label="Nitrogen Setup for Dreve PCU LED v0102.pdf"}
:::
:::VerticalSplitItem
::Image[]{src="https://api.archbee.com/api/optimize/uXbZOKjJTGpPhjapQ8fvM-abKrxgYVa66q7d-M2nJiB-20250110-000504.png" size="60" width="300" height="386" position="center" darkWidth="300" darkHeight="386" showCaption="false"}
:::
::::
# Product Manual
::::VerticalSplit{layout="middle"}
:::VerticalSplitItem
**English & German/Deutsch**
:::
:::VerticalSplitItem
::File{src="https://api.archbee.com/api/presign/uXbZOKjJTGpPhjapQ8fvM-m0tHJAjO6byEH2INrZ3rv-20250110-012510.pdf" label="Dreve_PCU_LED manual 1854.pdf"}
:::
::::