---
title: SprintRay Apex Base
slug: materials/sprintray-apex-base
description: Sprintray Apex Denture base material combines exceptional strength with Carbon’s trusted accuracy and reliability. Bringing clinician trusted materials to the Carbon M series platform.
docTags:
createdAt: 2025-01-28T17:47:33.901Z
---
# Overview
::::VerticalSplit{layout="right"}
:::VerticalSplitItem
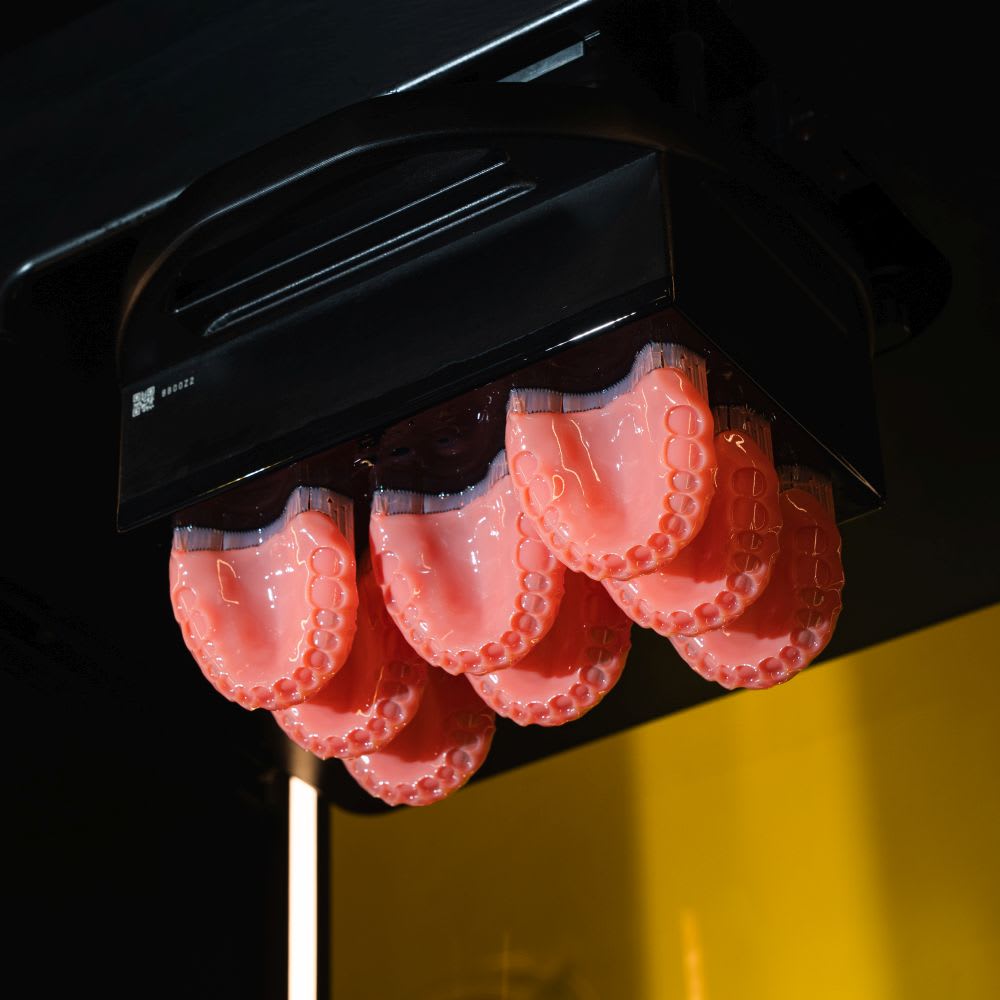
**SprintRay Apex Base,** now validated for Carbon M-series printers, sets a new standard in digital denture base materials by combining superior mechanical strength, lifelike aesthetics, and streamlined processing.
**Powered by NanoFusion™ Technology**
- Exceeds ISO high-impact standards for fracture and wear resistance
- Delivers exceptional polishability and translucency
- Requires less mixing and prep than comparable materials
- Optimized for smooth integration into labs
:::
:::VerticalSplitItem
:::
::::
Carbon has validated the following shades:
::::VerticalSplit{layout="middle"}
:::VerticalSplitItem
- Light Pink
- Original Pink
:::
:::VerticalSplitItem
- Dark Reddish Pink
- Opaque Original Pink
:::
::::
:::hint{type="info"}
This resin is not currently compatible with the [AO Polishing Cassette](docId\:iFFh3q8-WLk-LIqr87bd5).
:::
## Resource Links
::::LinkArray{contentSource="CUSTOM"}
:::LinkArrayItem{headerType="IMAGE" headerImage="https://api.archbee.com/api/optimize/uXbZOKjJTGpPhjapQ8fvM-IOQIJkNnkbUAw9Q-ap1FV-20241115-235121.jpg"}
[About the Material](https://www.carbon3d.com/materials/apex-base)
:::
:::LinkArrayItem{headerType="IMAGE" headerImage="https://api.archbee.com/api/optimize/3CesIL2dYMCHPZvRjp8S0/cJAKqDDnRUAeJAXNRThMm-20251016-221334.png"}
[Instructions for Use](https://support.sprintray.com/s/materials/material-usage-documentation)
*Select region and click on 'Apex Base.'*
:::
:::LinkArrayItem{headerType="IMAGE" headerImage="https://api.archbee.com/api/optimize/3CesIL2dYMCHPZvRjp8S0/1r3fpdvMUMFVZGfey2Tjn-20251016-221405.jpg"}
[Safety Data Sheet](https://support.sprintray.com/s/materials/material-usage-documentation)
*Select region, click the Safety Data Sheet tab and click 'Apex Base.'*
:::
::::
### Protocol
This downloadable handout provides important usage information, including instructions about storage and post-processing. Print it out and bring it into the lab!
::File{src="https://api.archbee.com/api/presign/uXbZOKjJTGpPhjapQ8fvM-hj1rQu5F0-WQe36f0ZGRD-20250414-173007.pdf" label="SprintRay Apex Base Protocol v0100.pdf"}
# Design
See IFU above for manufacturer design recommendations.
# Digital Preparation
***
### Connect to Printer
::::VerticalSplit{layout="left"}
:::VerticalSplitItem
Connect to the printer software using your web browser.
:::
:::VerticalSplitItem
::Image[]{src="https://res.cloudinary.com/carbon3d/image/upload/t_auto_quality_format/Education/Materials/dental/__General_Use/Connect-printer_thumbnail.png" size="70" width="774" height="319" darkWidth="774" darkHeight="319" position="flex-start" alt="Connect to Printer" showCaption="false"}
:::
::::
::::::::ExpandableHeading
*Expand for steps*
:::::::WorkflowBlock
:::::WorkflowBlockItem
::::VerticalSplit{layout="middle"}
:::VerticalSplitItem
**Open browser**
Enter [https://print.carbon3d.com](https://print.carbon3d.com/) in the URL field.
:::
:::VerticalSplitItem
:::
::::
:::hint{type="info"}
Latest version of Chrome recommended.
:::
:::::
:::::WorkflowBlockItem
::::VerticalSplit{layout="middle"}
:::VerticalSplitItem
If you are not automatically logged in, enter your email and password and **click Log In****.**
:::
:::VerticalSplitItem
::Image[]{src="https://res.cloudinary.com/carbon3d/image/upload/t_auto_quality_format/Education/Materials/dental/__General_Use/Connect-login.png" size="60" width="561" height="677" darkWidth="561" darkHeight="677" position="center" alt="Carbon Log In" showCaption="false"}
:::
::::
:::::
::::::WorkflowBlockItem
:::::VerticalSplit{layout="middle"}
::::VerticalSplitItem
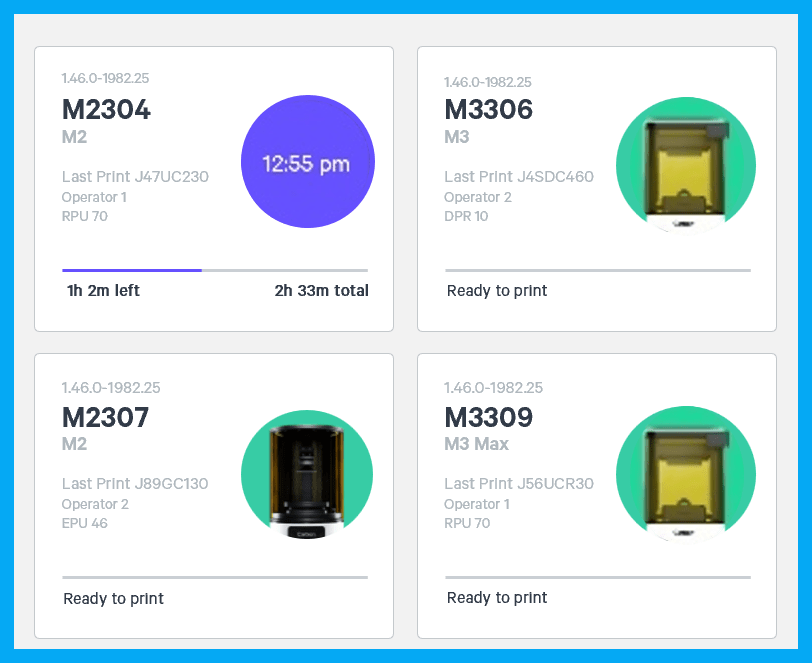
If you have multiple printers, **select the printer** that you wish to use to create the project.
:::hint{type="info"}
You may queue the build to other printers.
:::
::::
:::VerticalSplitItem
:::
:::::
::::::
:::::::
::::::::
***
### Create Project
::::VerticalSplit{layout="left"}
:::VerticalSplitItem
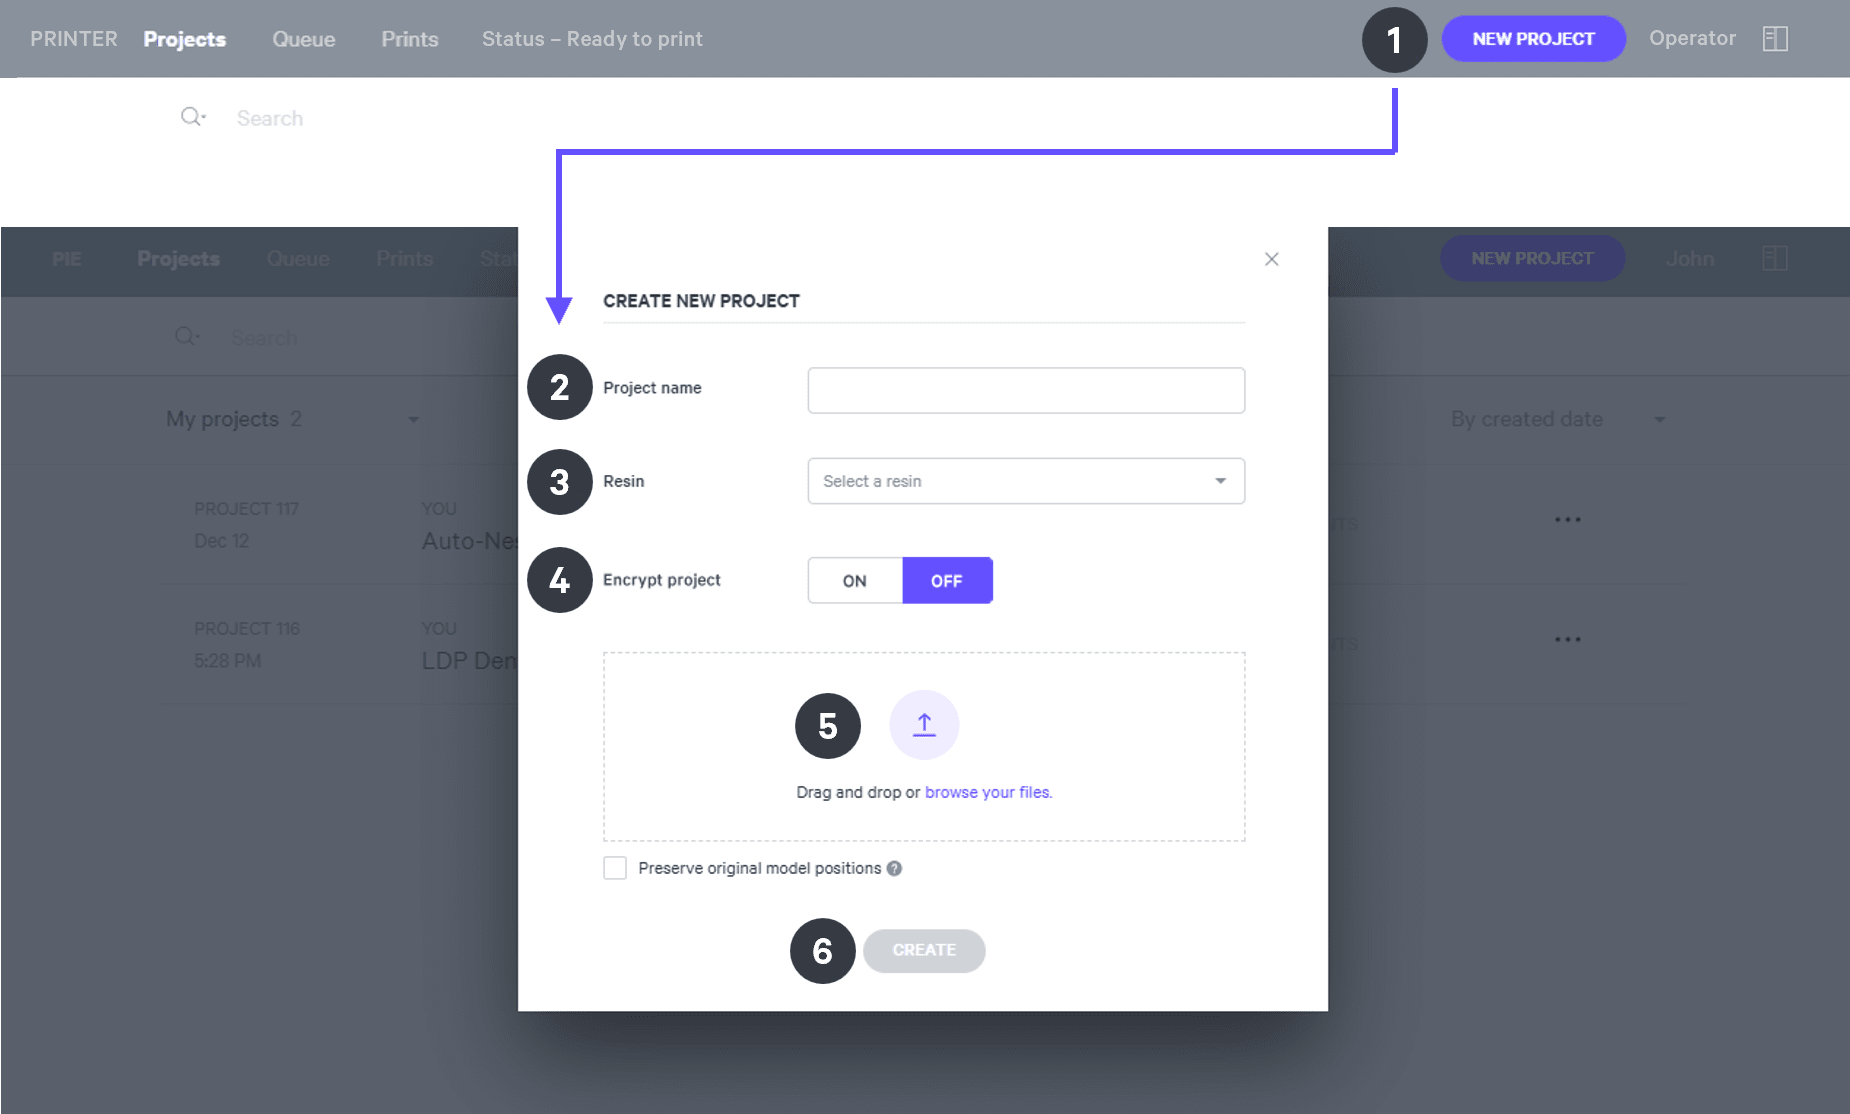
After you have chosen the printer, you must create a new project.
:::
:::VerticalSplitItem
::Image[]{src="https://res.cloudinary.com/carbon3d/image/upload/t_auto_quality_format/Education/Materials/dental/__General_Use/Create-project_thumbnail.png" size="70" width="673" height="247" darkWidth="673" darkHeight="247" position="flex-start" alt="Create Project" showCaption="false"}
:::
::::
::::::ExpandableHeading
*Expand for steps*
:::::WorkflowBlock
:::WorkflowBlockItem
Click **New Project.**
You can also drag your files from a file browser window and drop it on top of the **New Project** icon.
:::
:::WorkflowBlockItem
Enter a new **Project name.**
:::
:::WorkflowBlockItem
In the Resin dropdown, select **your resin.**
:::
::::WorkflowBlockItem
Only use [Encrypt project](docId:1bT3mas8msvxq9CDza67C) if you want to require a password to access the project.
:::hint{type="warning"}
**Carbon cannot provide support** for encrypted projects.
:::
::::
:::WorkflowBlockItem
**Drag and drop** your part files into the dotted box or click **browse your files **and select them in a file browser window.
:::
:::WorkflowBlockItem
Click **Create**
After a few moments you will see the project printer interface with your parts on the platform.
:::
:::::
::::::
***
## Orientation
:::hint{type="info"}
For detailed information about orienting parts, read [Orient](docId\:rMnxtq1NIAHXZOc4bZXWu).
:::
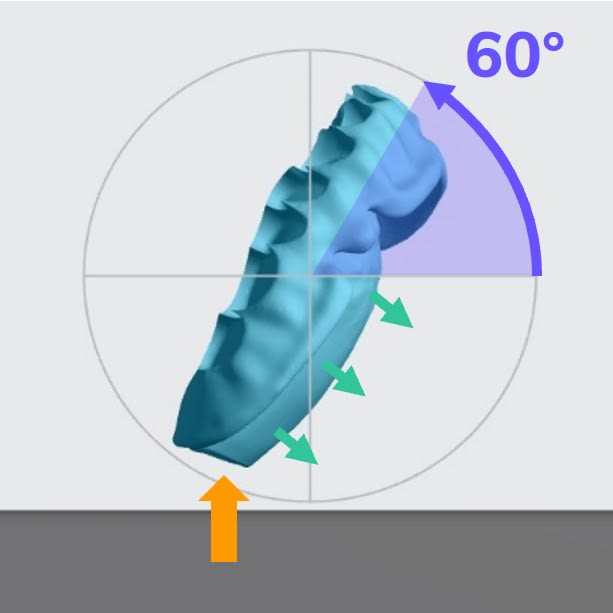
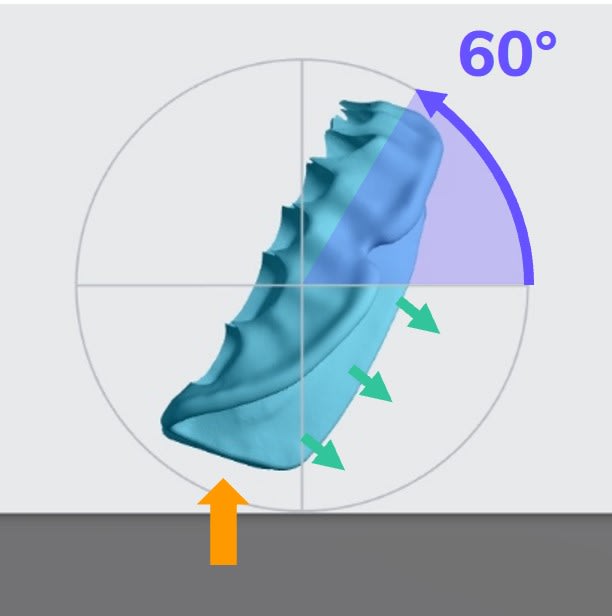
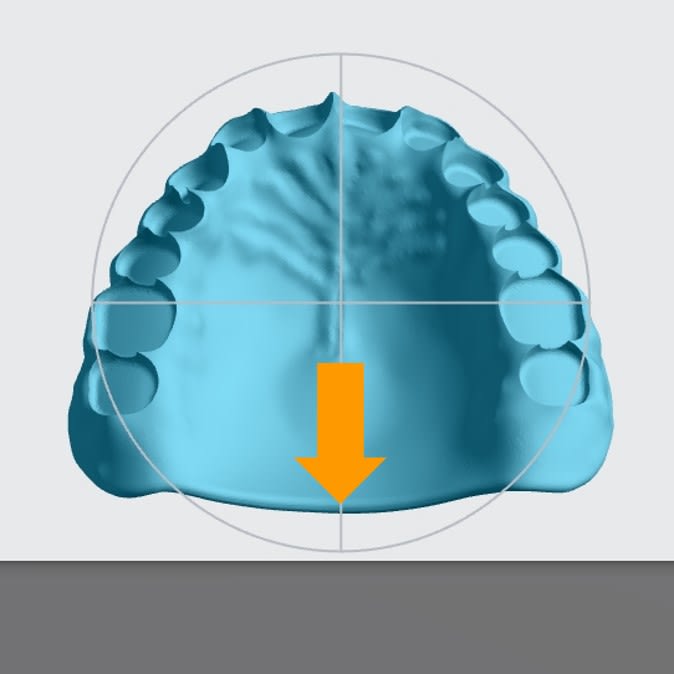
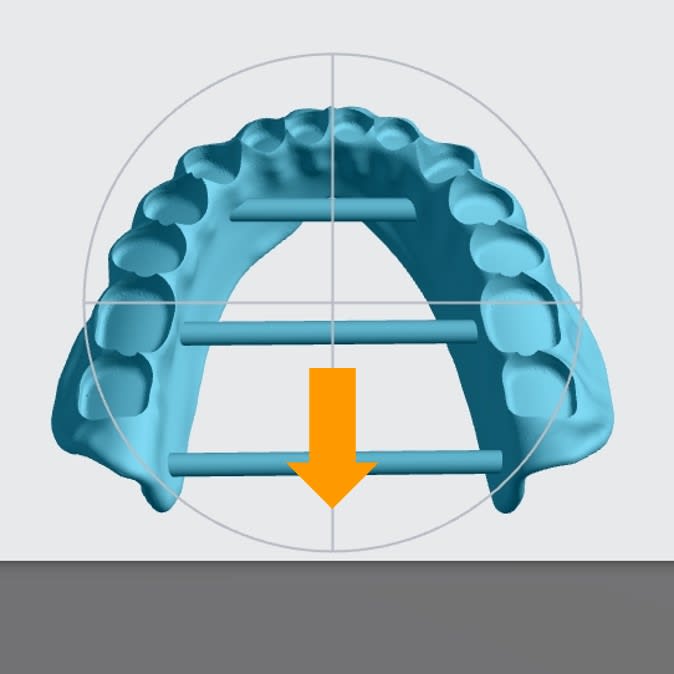
- Rotate denture bases to **60 degrees from the platform** with the **posterior at the platform.**
- **Intaglio surfaces should face the platform.**
::::VerticalSplit{layout="middle"}
:::VerticalSplitItem
**Upper Base**
:::
:::VerticalSplitItem
**Lower Base**
:::
::::
::::VerticalSplit{layout="middle"}
:::VerticalSplitItem
:::
:::VerticalSplitItem
:::
::::
## Supporting
:::hint{type="info"}
See [Supports](docId\:VUbpoAitbLM11aM9-qJ1p) for detailed information.
:::
::::WorkflowBlock
:::WorkflowBlockItem
Select the [Supports](docId\:VUbpoAitbLM11aM9-qJ1p) tab in the top bar or press **Shift + S.**

:::
:::WorkflowBlockItem
In the bottom bar, toggle [Overhang Detection](docId:1bT3mas8msvxq9CDza67C) **on** and set the angle to **40 degrees.**
::Image[]{src="https://res.cloudinary.com/carbon3d/image/upload/t_auto_quality_format/v1741914659/Education/Materials/dental/__General_Use/overhang-detection02.gif" size="70" width="712" height="278" position="flex-start" showCaption="false"}
:::
:::WorkflowBlockItem
Also in the bottom bar, set [Toggle Platform](docId:1bT3mas8msvxq9CDza67C) to **off.**
::Image[]{src="https://res.cloudinary.com/carbon3d/image/upload/v1741970064/Education/Materials/dental/__General_Use/toggle-platform02.gif" size="70" width="722" height="347" position="flex-start" showCaption="false"}
:::
:::WorkflowBlockItem
Set **Part Postion** to **Above.**
::Image[]{src="https://res.cloudinary.com/carbon3d/image/upload/t_auto_quality_format/v1743201611/Education/Materials/dental/__General_Use/part-position-above.jpg" size="70" width="733" height="146" position="flex-start" showCaption="false"}
:::
:::WorkflowBlockItem
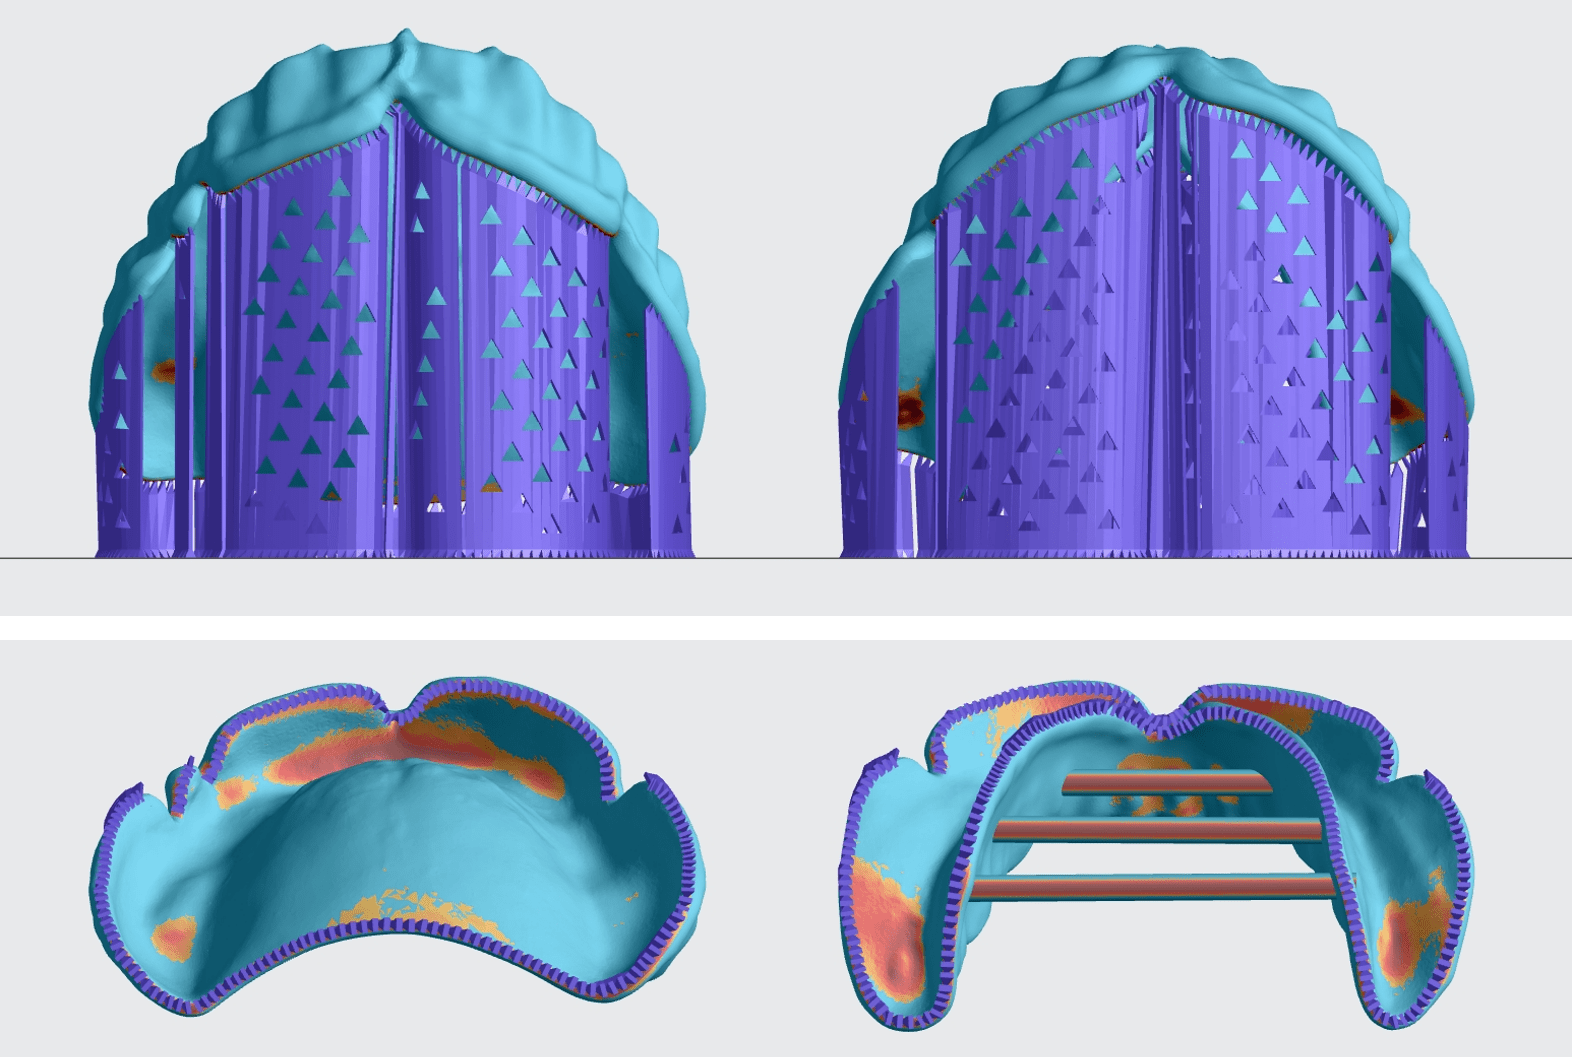
Support **edges **with [fences.](docId\:VUbpoAitbLM11aM9-qJ1p)
- Avoid adding supports to **intaglio surfaces.**
:::
:::WorkflowBlockItem
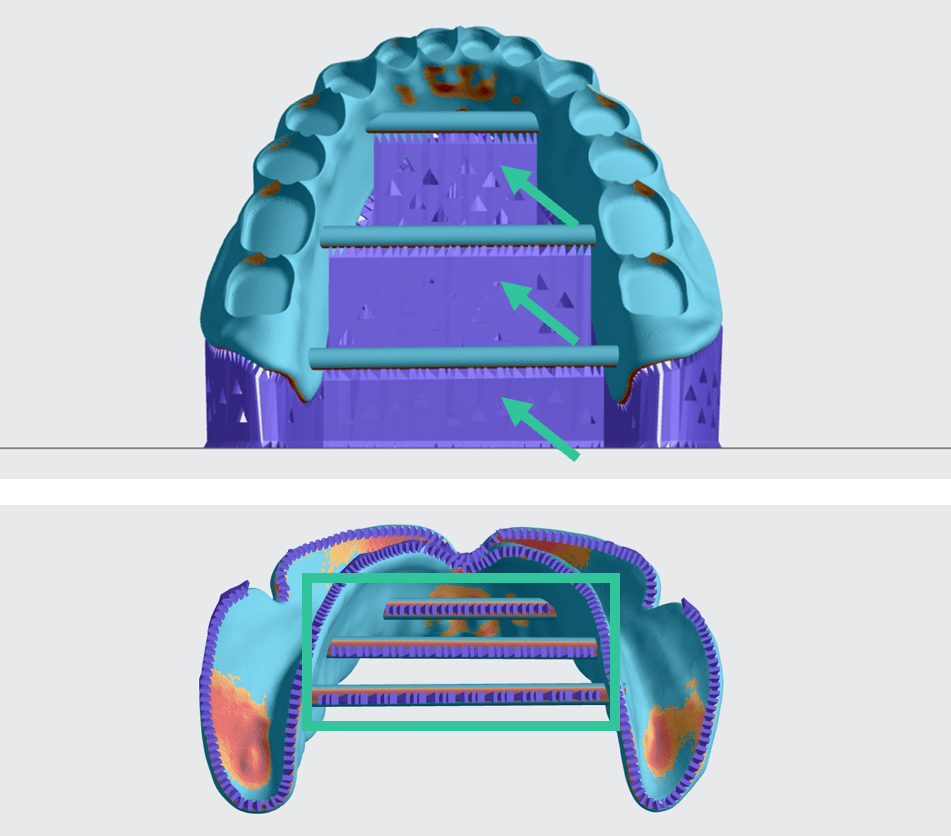
Support **horizontal T-bars** with [fences.](docId\:VUbpoAitbLM11aM9-qJ1p)
:::
::::
## Nesting
::::WorkflowBlock
:::WorkflowBlockItem
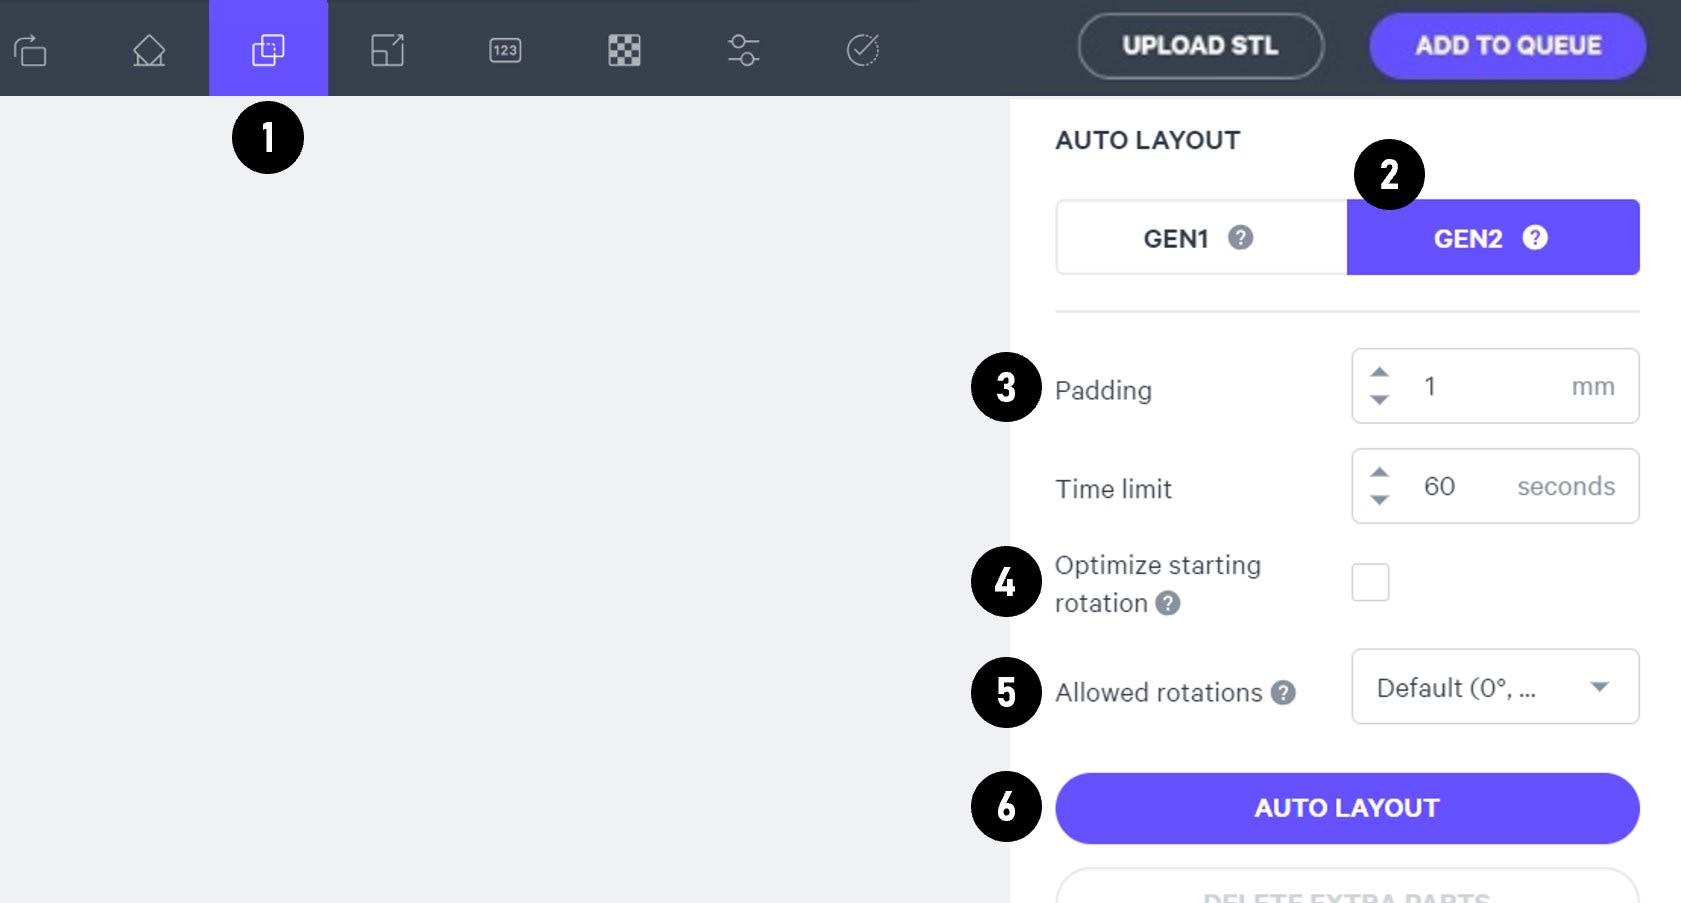
Select the **Layout tab (Shift + L)** in the top menu bar.
:::
:::WorkflowBlockItem
Under **Auto Layout,** select **Gen2.**
Gen2 usually gives the most efficient packing for dental devices.
:::
:::WorkflowBlockItem
Enter at least **1 mm** in **Padding.**
Models require a minimum of 1 mm of space between them.
:::
:::WorkflowBlockItem
Leave **Optimize starting rotation** unchecked.
This leaves your parts in their previous orientations.
:::
:::WorkflowBlockItem
Leave **Allowed rotations** at the default setting.
This gives the software maximum flexibility to fit the most possible parts on the build platform.
:::
:::WorkflowBlockItem
Press the **Auto Layout** button to arrange your parts.
:::
::::
If necessary, nesting can be changed manually:
- Click and drag parts to adjust their position.
- Modify Z rotation by using the **Spin **tool or manual rotations under the **Orient tab** **(Shift + O).**
- Use the [Part List tab](docId:1bT3mas8msvxq9CDza67C)** **as needed to more easily select models and focus on them.
## Print Controls
Click **Print Controls** or **Shift + P** in the top menu bar.

### Slicing
::::VerticalSplit{layout="middle"}
:::VerticalSplitItem
Set Slice Thickness to **Standard (100 µm).**
:::
:::VerticalSplitItem

:::
::::
:::hint{type="warning"}
Reducing the slice thickness by choosing the Fine (50 µm) or Super-fine (25 µm) settings will increase print time and may reduce part quality and accuracy.
:::
## Project Analysis
::::WorkflowBlock
:::WorkflowBlockItem
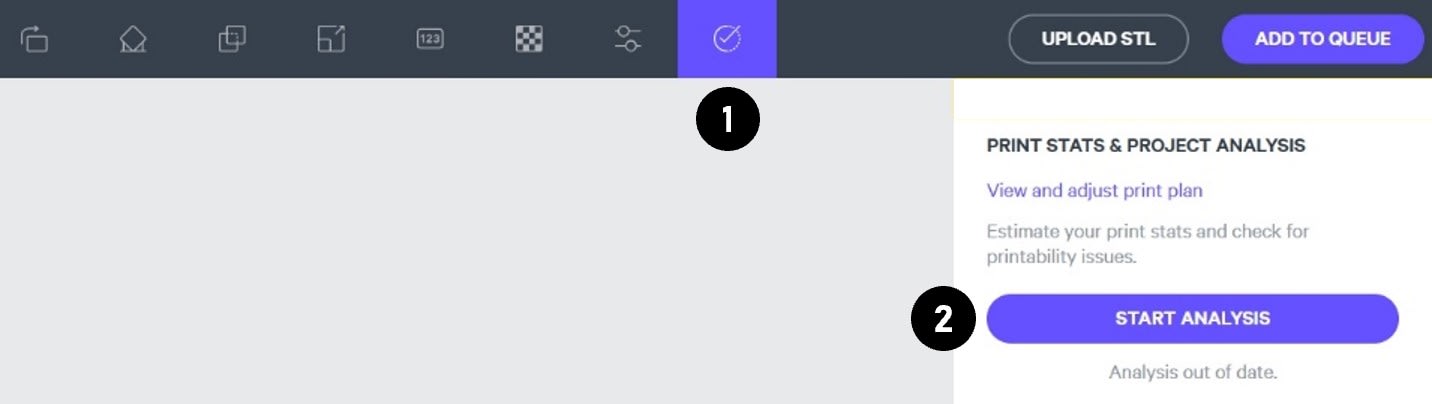
On the top menu bar, select the **Project Analysis tab** (Shift + A).
:::
:::WorkflowBlockItem
Press **Start Analysis.**
:::
:::WorkflowBlockItem
After a short time, the result of the project analysis will be displayed. Note the **print time** and the **required resin volume.**
::Image[]{src="https://res.cloudinary.com/carbon3d/image/upload/t_auto_quality_format/v1742344445/Education/Materials/dental/__General_Use/Analysis-print-time-reqd-resin01.png" size="50" width="842" height="594" position="flex-start" alt="Print Time and Required Resin Volume" showCaption="false"}
:::
:::WorkflowBlockItem
Click **Add to Queue.**

:::
::::
# Printing & Post-Processing
Consult the manufacturer IFU for dispensing, printing, washing, curing, bonding and finishing information.
::::LinkArray{contentSource="CUSTOM"}
:::LinkArrayItem{headerType="IMAGE" headerImage="https://api.archbee.com/api/optimize/3CesIL2dYMCHPZvRjp8S0/cJAKqDDnRUAeJAXNRThMm-20251016-221334.png"}
[Instructions for Use](https://support.sprintray.com/s/materials/material-usage-documentation)
:::
::::
# Questions & Support
**For questions about the resin properties, printing, washing or curing your parts, please contact the SprintRay support team:**
- Phone: (800) 914-8004
- Email: support\@sprintray.com
For questions about your **Carbon printer** or **Carbon software settings** used for this resin, please [contact Carbon](https://learn.carbon3d.com/carbon-support):
- Email: [support@carbon3d.com](mailto\:support@carbon3d.com)
- Phone:
- **U.S. and Canada** 1-650-285-6307 option 2
- **Germany** +49 6102 5790849
- **UK **+44 (0) 2082 647484
- Printer UI: On the dashboard, select the **Prints** tab. **Select one of the printed projects.** Click **Request Help** in the lower right corner.
::Image[]{src="https://api.archbee.com/api/optimize/3CesIL2dYMCHPZvRjp8S0/YY6yCChSIB8SevmBwY76W_request-help-01.png" size="70" width="6541" height="3371" position="flex-start" alt="Location of button in the printer software" showCaption="false"}