---
title: Carbon DPR 10
slug: materials/dpr-10
description: Discover the comprehensive guide to DPR 10, an advanced material for precise dental model production in both dental and orthodontic applications.
docTags:
createdAt: 2024-07-08T19:49:34.596Z
---
# Overview
::::VerticalSplit{layout="middle"}
:::VerticalSplitItem
**DPR 10** is a fast, accurate material ideally suited for dental models. Its stone color is appropriate for dental and orthodontic applications.
:::
:::VerticalSplitItem
::Image[]{src="https://api.archbee.com/api/optimize/3CesIL2dYMCHPZvRjp8S0/J9HYAdwX96tHTiXUnFGWe_image.png" size="80" width="800" height="627" position="center" alt="Mandibular dental model made of DPR 10" darkWidth="800" darkHeight="627" showCaption="false"}
:::
::::
::::VerticalSplit{layout="middle"}
:::VerticalSplitItem

:::
:::VerticalSplitItem
Carbon’s **AO Stack** workflow is designed to enable labs to produce additional DPR 10 models overnight, without the need for additional operators to handle print turnover.
[Learn how to use AO Stack now.](docId\:ZGrnrM59LhIu0Y6LoUKNt)
:::
::::
:::hint{type="info"}
This resin is not currently compatible with the [AO Polishing Cassette](docId\:iFFh3q8-WLk-LIqr87bd5).
:::
## Resource Links
::::LinkArray{contentSource="CUSTOM"}
:::LinkArrayItem{headerType="IMAGE" headerImage="https://api.archbee.com/api/optimize/uXbZOKjJTGpPhjapQ8fvM-IOQIJkNnkbUAw9Q-ap1FV-20241115-235121.jpg"}
[About the Material](https://www.carbon3d.com/materials/dpr-10)
Material overview and use cases
:::
:::LinkArrayItem{headerType="IMAGE" headerImage="https://api.archbee.com/api/optimize/3CesIL2dYMCHPZvRjp8S0/meEa1m4VN4HOvIJpjIIld-20251016-220433.jpg"}
[Technical Data Sheet](https://docs.carbon3d.com/files/technical-data-sheets/tds_carbon_dpr-10.pdf)
Mechanical properties and data
:::
:::LinkArrayItem{headerType="IMAGE" headerImage="https://api.archbee.com/api/optimize/3CesIL2dYMCHPZvRjp8S0/1r3fpdvMUMFVZGfey2Tjn-20251016-221405.jpg"}
[Safety Data Sheet
](https://www.carbon3d.com/stewardship)*Login required*
:::
::::
## Protocol Sheet
This downloadable handout provides important usage information, including instructions about storage and post-processing. Print it out and bring it into the lab!
::::VerticalSplit{layout="middle"}
:::VerticalSplitItem
**English**
:::
:::VerticalSplitItem
::File{src="https://api.archbee.com/api/presign/3CesIL2dYMCHPZvRjp8S0/JmvnSnjvVUPGsL5KSfUMT_dpr-10-protocol-v201.pdf" label="DPR 10 Protocol v201.pdf"}
:::
::::
::::VerticalSplit{layout="middle"}
:::VerticalSplitItem
**German/Deutsch**
:::
:::VerticalSplitItem
::File{src="https://api.archbee.com/api/presign/uXbZOKjJTGpPhjapQ8fvM-GqsvR8w-eZfTc08XHbmht-20241213-185942.pdf" label="DPR 10 Protokoll v01.04 DE.pdf"}
:::
::::
::::VerticalSplit{layout="middle"}
:::VerticalSplitItem
**Spanish/Español**
:::
:::VerticalSplitItem
::File{src="https://api.archbee.com/api/presign/uXbZOKjJTGpPhjapQ8fvM-Nuy_d6bgIKnR2fNBnigHC-20241213-185848.pdf" label="DPR 10 Protocolo v01.04 ES.pdf"}
:::
::::
## Dental Post-Processing Grids
::::VerticalSplit{layout="right"}
:::VerticalSplitItem
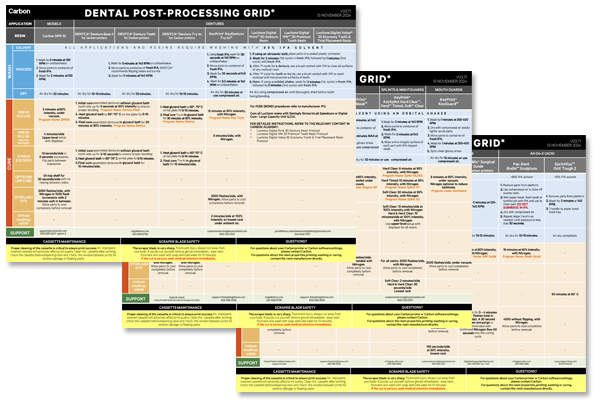
One of our most popular downloads! This table provides washing and curing instructions for all supported dental resins.
Print it and use it in the lab as a quick reference.
:::
:::VerticalSplitItem
:::
::::
::::VerticalSplit{layout="left"}
:::VerticalSplitItem
**English**
:::
:::VerticalSplitItem
::File{src="https://api.archbee.com/api/presign/3CesIL2dYMCHPZvRjp8S0/vQ2WsRger2d-CoLrn-m5f_dental-post-processing-grids-v0501.pdf" label="Dental-Post-Processing-Grids_v0501.pdf"}
:::
::::
::::VerticalSplit{layout="left"}
:::VerticalSplitItem
**German/Deutsch**
:::
:::VerticalSplitItem
::File{src="https://api.archbee.com/api/presign/uXbZOKjJTGpPhjapQ8fvM-seBSLAiWUzNDRI1GCLlop-20241125-214312.pdf" label="ZAHNÄRZTLICHES NACHBEARBEITUNGSGITTER v03.71 DE Deutsch.pdf"}
:::
::::
::::VerticalSplit{layout="left"}
:::VerticalSplitItem
**Spanish/Español**
:::
:::VerticalSplitItem
::File{src="https://api.archbee.com/api/presign/uXbZOKjJTGpPhjapQ8fvM-2i0UhzOfuA4aYJFusL1v2-20241203-180542.pdf" label="Rejilla de Posprocesamiento Dental v03.71 ES Espanol Spanish.pdf"}
:::
::::
## Workflow
::embed[]{url="https://player.vimeo.com/video/527517106?dnt=1"}
# Design
## Dental CAD Software
Dental CAD software must be used to modify dental scans and design the production files. Settings to use when printing on a Carbon DLS printer in DPR 10 resin are available for [3Shape](docId\:BsUOXSYRMKluviqWQk69u) (including a DME file) and [exocad](docId\:BsUOXSYRMKluviqWQk69u).
:::hint{type="info"}
These **recommended settings** are the best **starting point** for your models and dies. **Adjustment** for fit and design preference **may be required**.
:::
Carbon has partnered with [3Shape](https://www.3shape.com/) and [exocad](https://exocad.com/) to provide design training videos for Carbon customers.
Click the link below to see videos for the CAD software that you use.
::::LinkArray{contentSource="CUSTOM"}
:::LinkArrayItem{headerType="IMAGE" headerImage="https://api.archbee.com/api/optimize/uXbZOKjJTGpPhjapQ8fvM-wyTpsIJL53MD82Vf_OmoG-20241210-234623.png"}
[3Shape Dental Design Training](docId\:gVFzxXExe-Bt8wuxEaoLq)
*Login required*
:::
:::LinkArrayItem{headerType="IMAGE" headerImage="https://api.archbee.com/api/optimize/uXbZOKjJTGpPhjapQ8fvM-NTc0AuVLsnfZ_y1Dk3CU7-20241210-234817.png"}
[exocad Dental Design Training](docId\:YAJgoZRTEKQVmKCHZc041)
*Login required*
:::
::::
## Full Palate Models
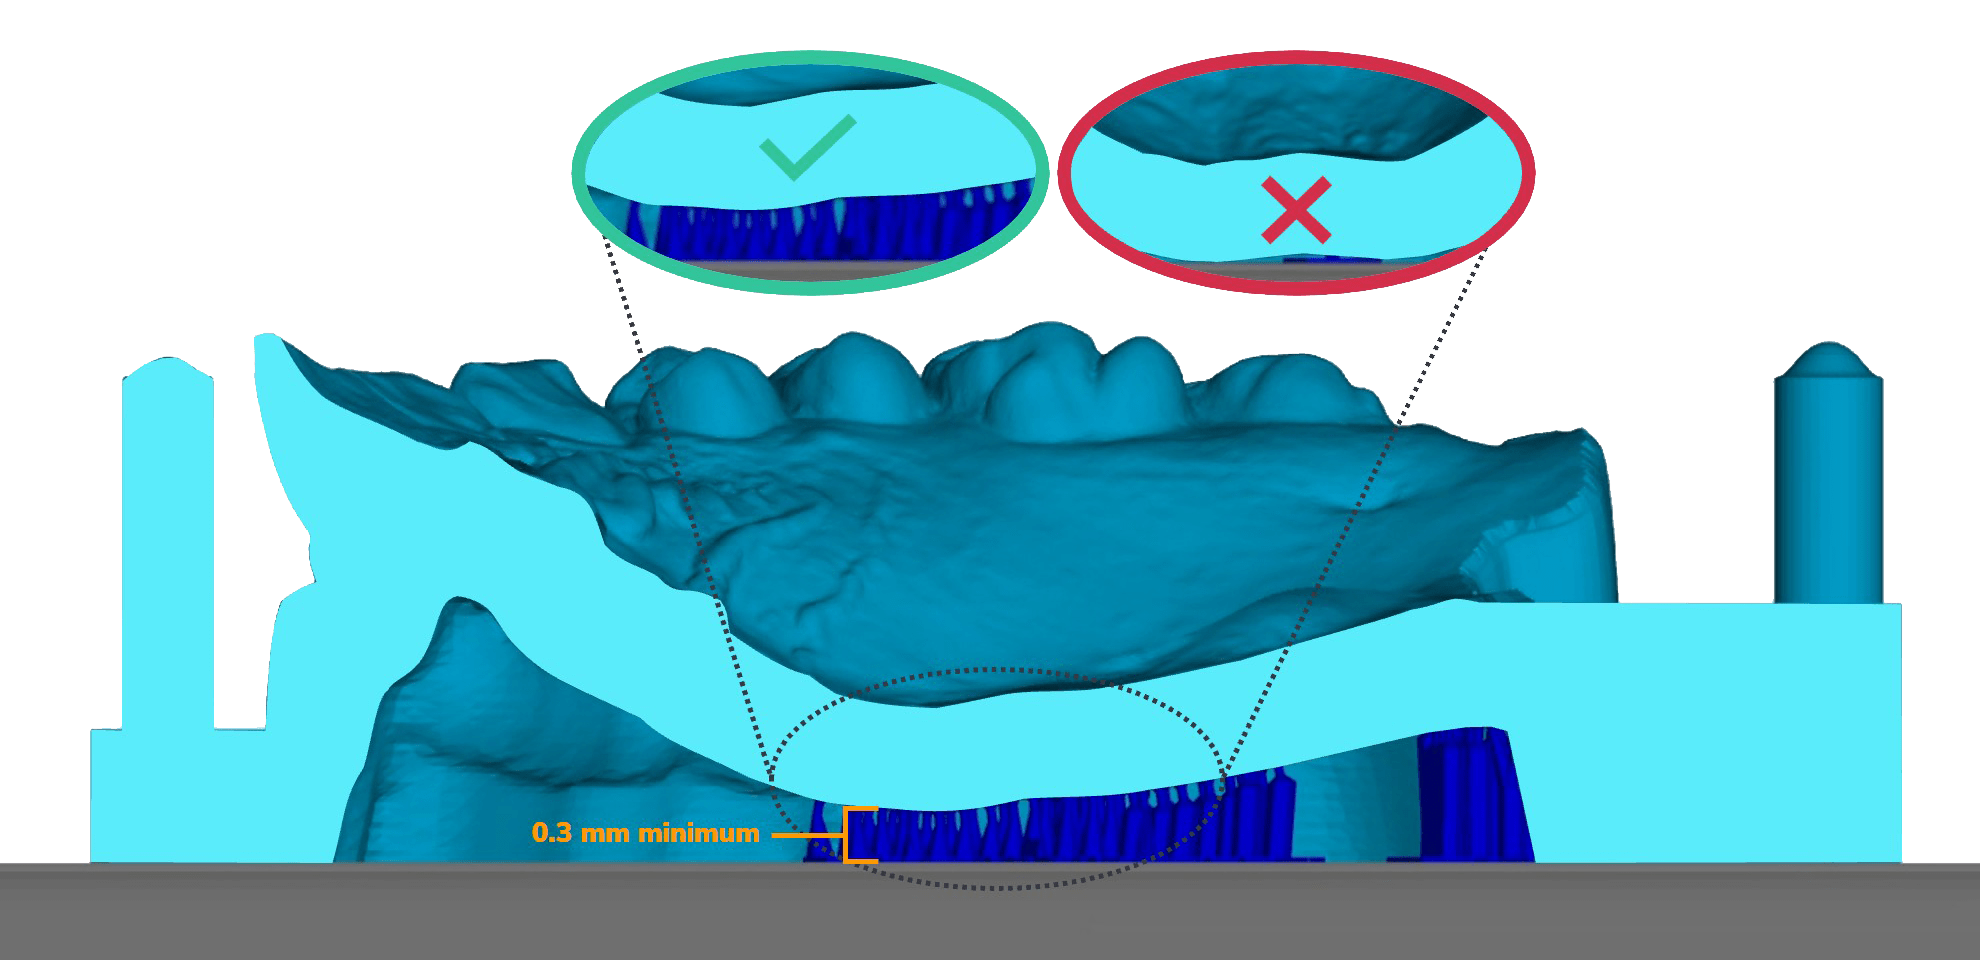
The recommended Carbon DPR 10 settings will result in a proper model height in the majority of cases. In rare cases, full palate models may require an increased height **if the palate is especially deep** and does not leave **enough space for rafted supports**.
**Increase the height** of extra deep palate models to allow a **minimum of 0.3 mm** between the palate and the platform.
## Wall Thickness
::Image[]{src="https://api.archbee.com/api/optimize/3CesIL2dYMCHPZvRjp8S0/xYWVVAmbPCEZC8KqQJO3o_wall-thickness.png" size="80" width="2467" height="1191" position="flex-start" alt="Section through mandibular model" darkWidth="2467" darkHeight="1191" showCaption="false"}
- Recommended wall thickness: **2.5 mm**
- This thickness represents a good balance of resin usage, print speed and accuracy.
- Thinner walls could yield less accurate parts that can crack during part removal
- Variable wall thickness functionality is built into dental CAD programs. This feature will thicken walls as the part progresses, yielding fewer islands and more accurate parts.
:::hint{type="info"}
**The Carbon 3Shape DME file will automatically apply this setting.**
:::
## Vent Creation
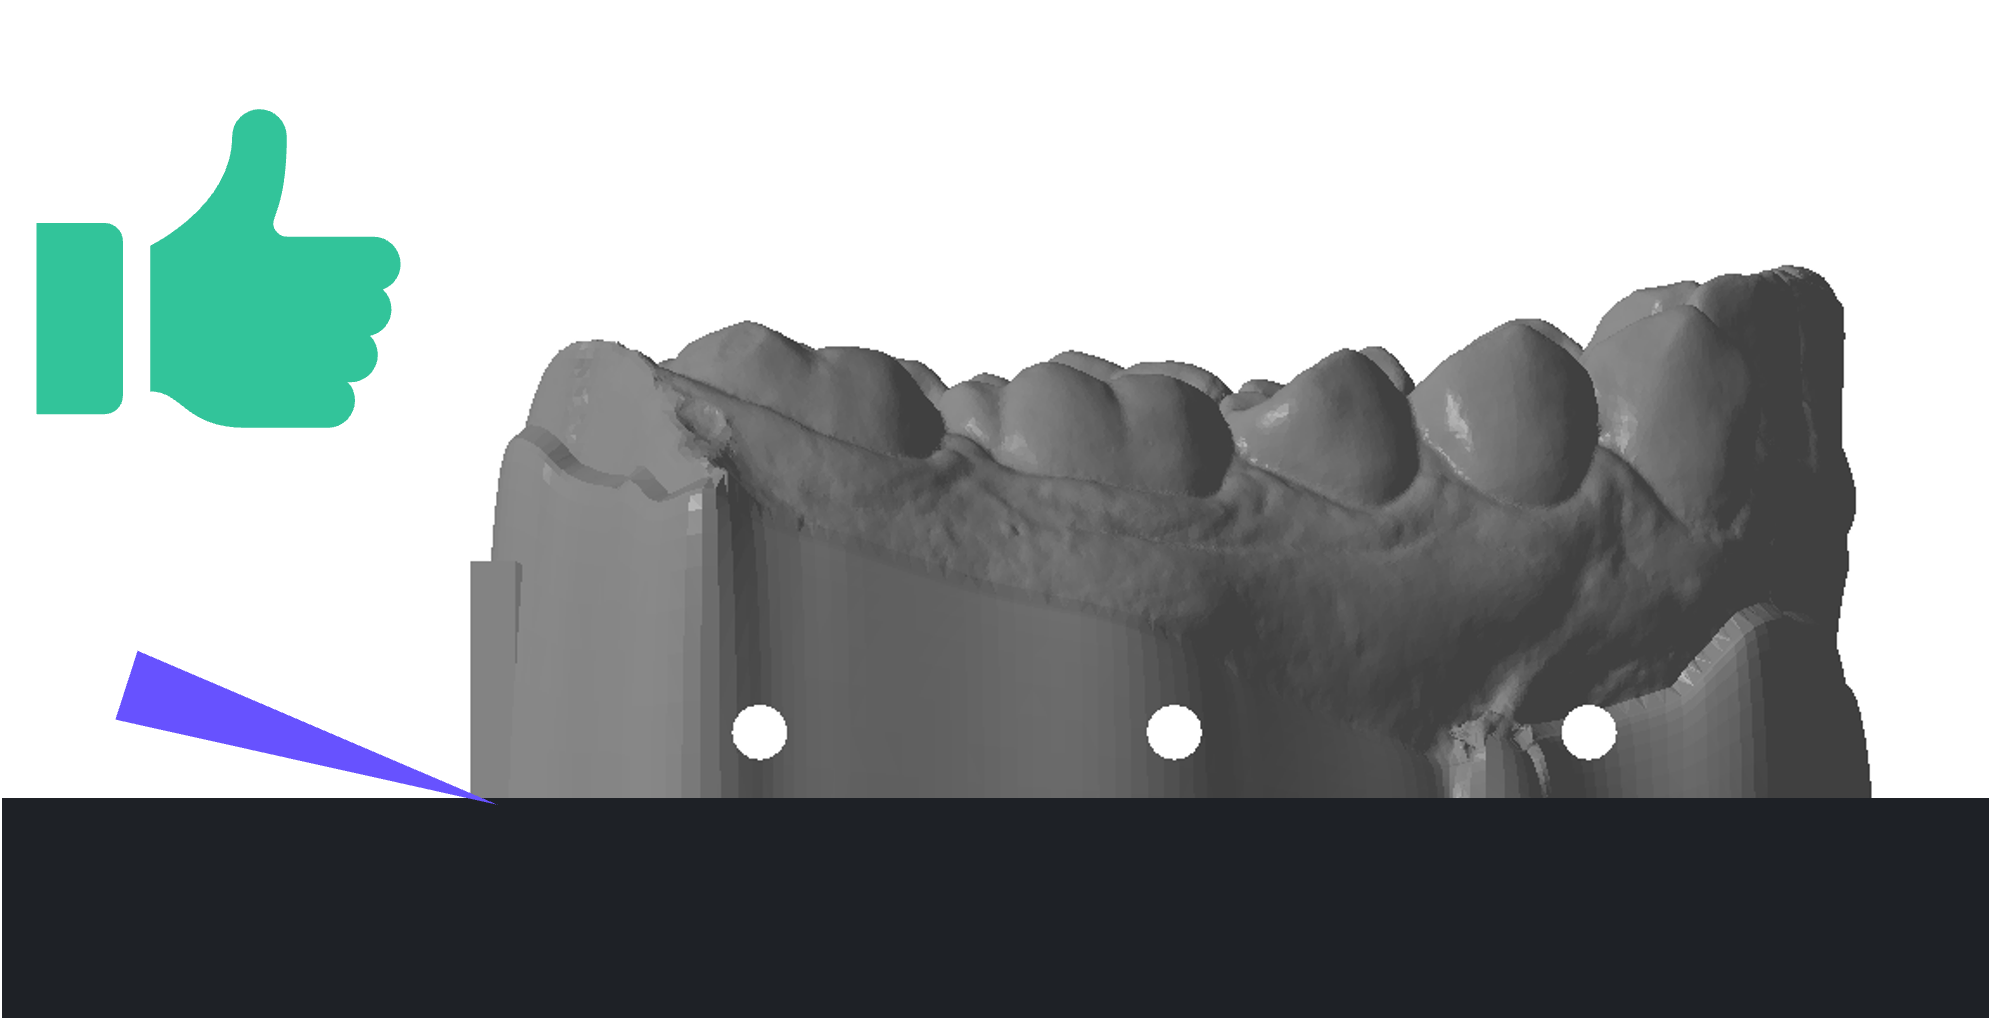
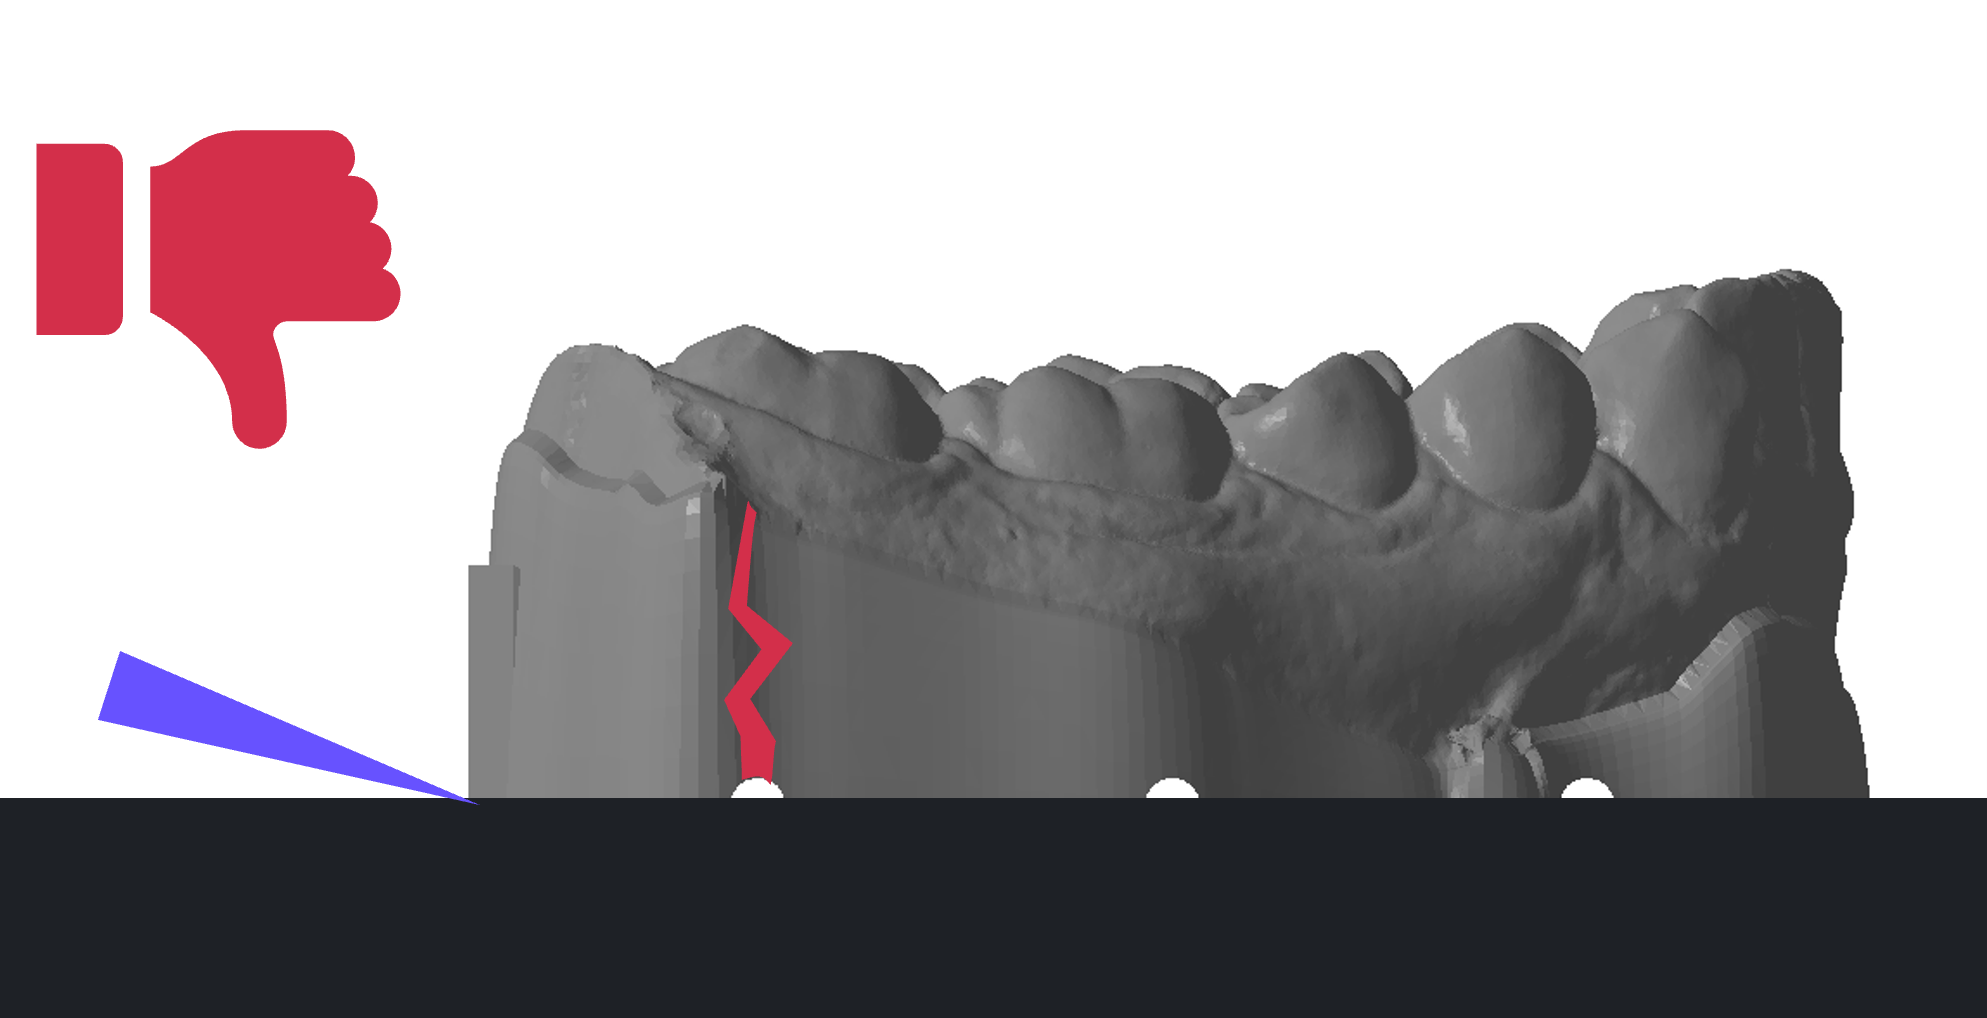
After hollowing, parts require **vents **(known as Side Drain Holes in 3Shape) to allow the free flow of resin and air into the interior of your part during printing. This prevents print failures due to internal vacuum forces within the part, uses less resin, and speeds up prints.
- **2-3 mm** in diameter.
- Located at least **1 mm** above the platform.
:::hint{type="info"}
**The Carbon 3Shape DME file will automatically apply these settings. **
:::
::::VerticalSplit{layout="middle"}
:::VerticalSplitItem
**Vents above platform**
- Part is stronger at platform
- Lower chances of cracking during removal from platform
:::
:::VerticalSplitItem
**Vents at platform**
- Vent can become point of failure during removal from platform
- Chances of cracking increase during removal from platform
:::
::::
## Carbon Customer Support and HIPAA
HIPAA ([Health Insurance Portability and Accountability Act of 1996](https://aspe.hhs.gov/reports/health-insurance-portability-accountability-act-1996)) is United States legislation that provides data privacy and security provisions for safeguarding medical information.
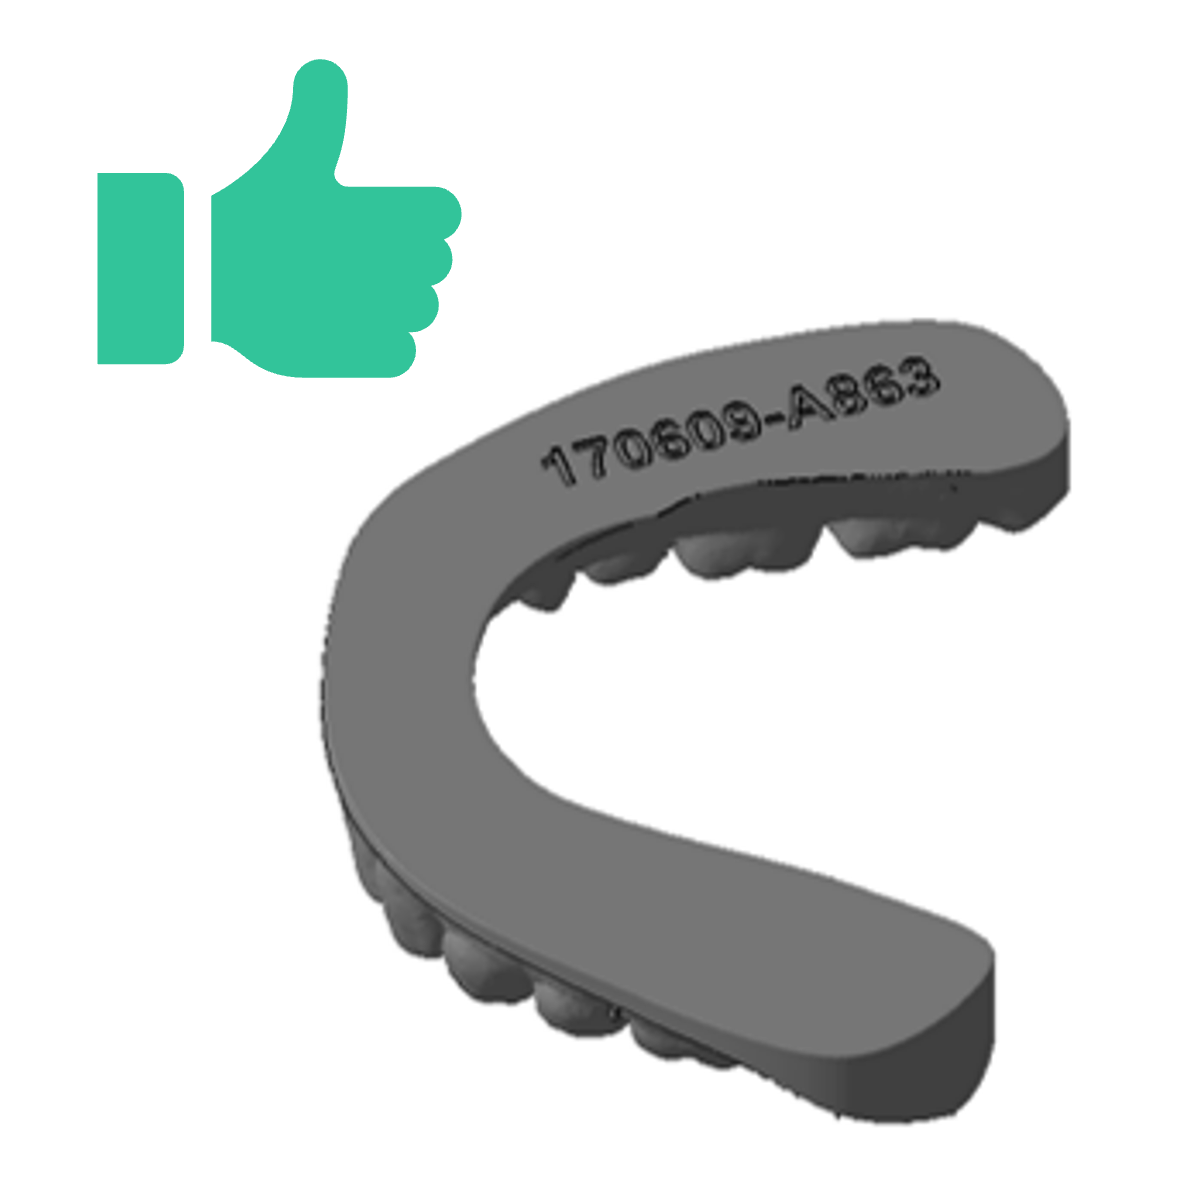
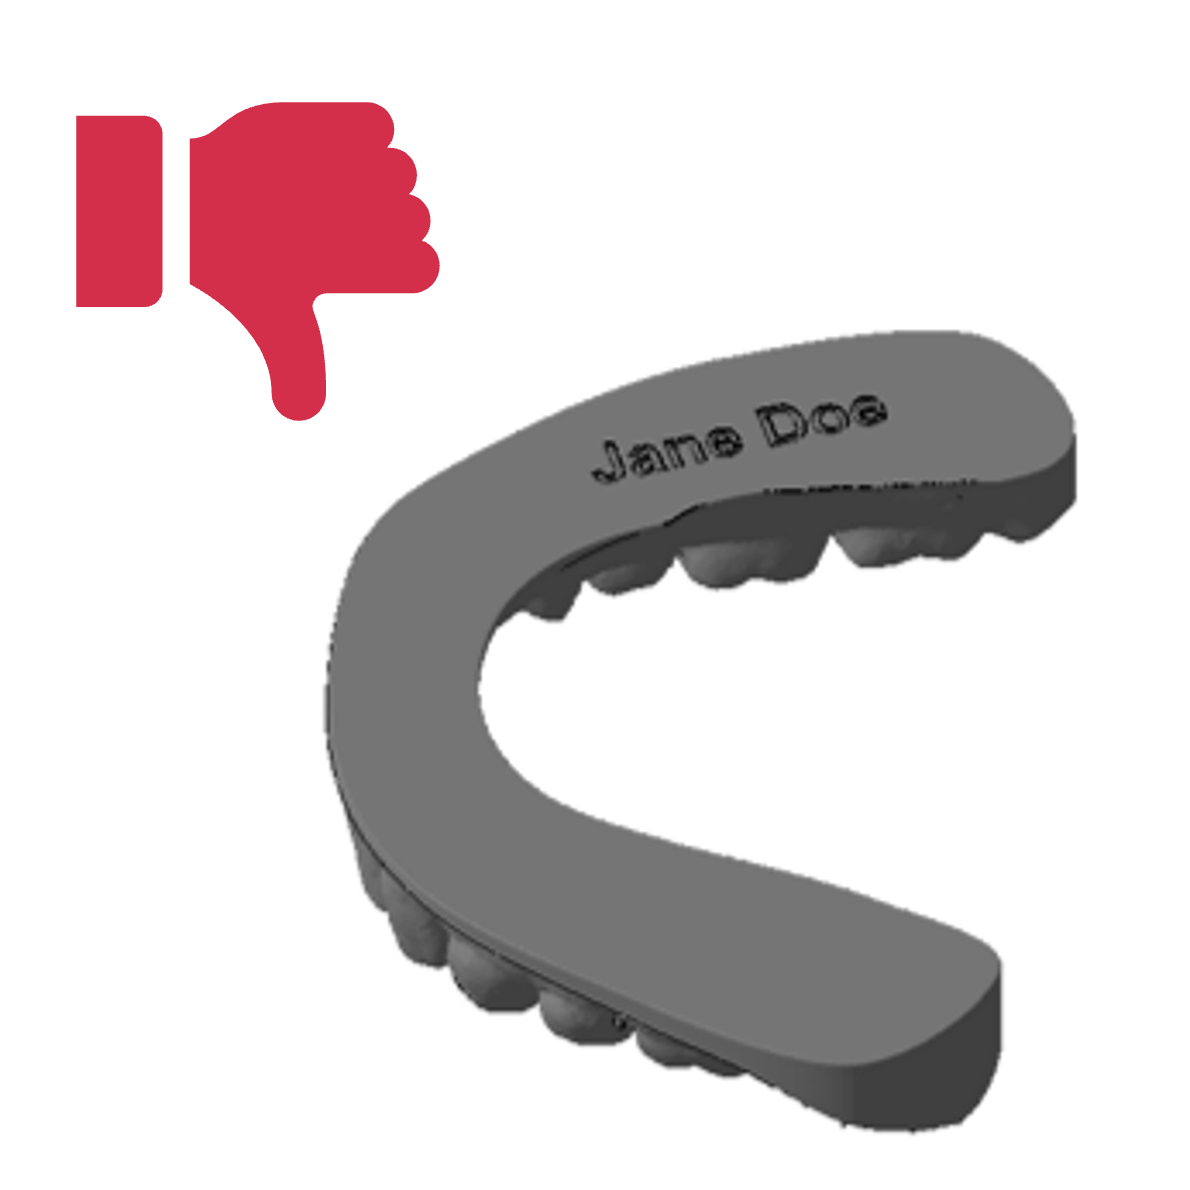
- Due to HIPAA regulations, Carbon cannot receive files that have patient names in the file name or imprinted on the geometry.
:::hint{type="warning"}
**If you need to send files to Carbon for technical support, remove the patient name from the file name and from the geometry.**
:::
::::VerticalSplit{layout="middle"}
:::VerticalSplitItem
:::
:::VerticalSplitItem
:::
::::
# General Orientation & Support Information
## Hide the Platform
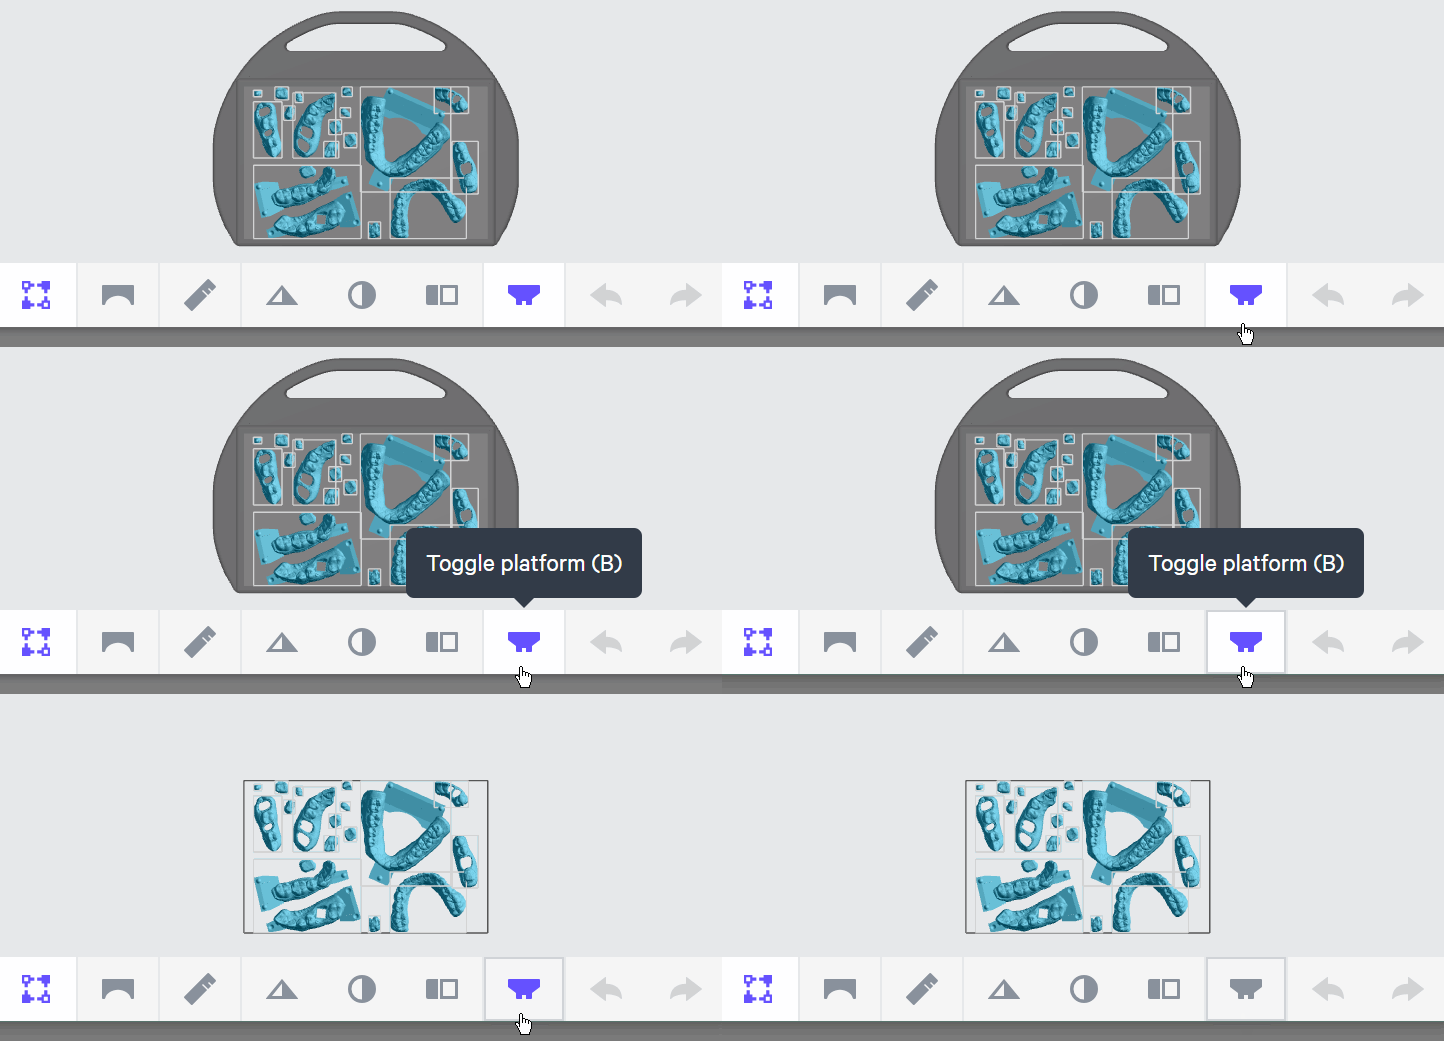
Use **Toggle platform** (or press **B**) to hide the platform before orienting parts. This will make it easier to see overhangs and place supports.
:::::ExpandableHeading
## Use the Patch Feature to Create Supports
::::VerticalSplit{layout="middle"}
:::VerticalSplitItem
### Patch tool
- The **Patch **tool speeds up support creation by automatically supporting an area with just a few clicks. It is useful for supporting **larger areas** of overhang that would take longer to support manually.
- It is often useful to support your parts with this tool **before **manually adding supports.
:::
:::VerticalSplitItem

:::
::::
## Support Creation Workflows
### Enter Support mode
1. Click **Support tab or Shift + S** in the top bar.
2. Select the part you want to support.
3. Under **Part Position**, select **On** to keep parts on the platform. This setting is useful for most dental models because they have flat bases/edges that adhere to the platform.
::Image[]{src="https://api.archbee.com/api/optimize/3CesIL2dYMCHPZvRjp8S0/zE7gnp0RIhGKifPhw3j0t_image.png" size="70" width="1680" height="671" position="flex-start" alt="Printer UI" darkWidth="1680" darkHeight="671" showCaption="false"}
### Patch workflow
1. Select the part to be supported.
2. Orient the camera so that the overhangs are clearly visible.
3. Check that **Patch **is selected.
4. Click on each large overhang to select it. A green patch will appear over each overhang. Repeat until all the large overhangs are selected.
5. Under **Support Attributes → Primary Support Type,** select **Bar.**
6. The other Support Attributes should remain their default values.
7. Click **Generate All** to create the supports.
:::hint{type="danger"}
**Never use fence supports for models that will be printed in Automatic Mode on the AO Backpack. Automatic Mode models require bar supports with base rafts. See **[Supporting Models for Automatic Mode](docId\:FqWGs0QdBgiIkD7JDDnl6)** for more information.**
:::
:::hint{type="info"}
**Review **[Supports](docId\:VUbpoAitbLM11aM9-qJ1p)** in **[Printer UI](docId\:oId4ZNZtZYeltTPVJ984a)** course for more information.**
:::
:::::
# Digital Prep
## Setup your Print
***
### Connect to Printer
::::VerticalSplit{layout="left"}
:::VerticalSplitItem
Connect to the printer software using your web browser.
:::
:::VerticalSplitItem
::Image[]{src="https://res.cloudinary.com/carbon3d/image/upload/t_auto_quality_format/Education/Materials/dental/__General_Use/Connect-printer_thumbnail.png" size="70" width="774" height="319" darkWidth="774" darkHeight="319" position="flex-start" alt="Connect to Printer" showCaption="false"}
:::
::::
::::::::ExpandableHeading
*Expand for steps*
:::::::WorkflowBlock
:::::WorkflowBlockItem
::::VerticalSplit{layout="middle"}
:::VerticalSplitItem
**Open browser**
Enter [https://print.carbon3d.com](https://print.carbon3d.com/) in the URL field.
:::
:::VerticalSplitItem
:::
::::
:::hint{type="info"}
Latest version of Chrome recommended.
:::
:::::
:::::WorkflowBlockItem
::::VerticalSplit{layout="middle"}
:::VerticalSplitItem
If you are not automatically logged in, enter your email and password and **click Log In****.**
:::
:::VerticalSplitItem
::Image[]{src="https://res.cloudinary.com/carbon3d/image/upload/t_auto_quality_format/Education/Materials/dental/__General_Use/Connect-login.png" size="60" width="561" height="677" darkWidth="561" darkHeight="677" position="center" alt="Carbon Log In" showCaption="false"}
:::
::::
:::::
::::::WorkflowBlockItem
:::::VerticalSplit{layout="middle"}
::::VerticalSplitItem
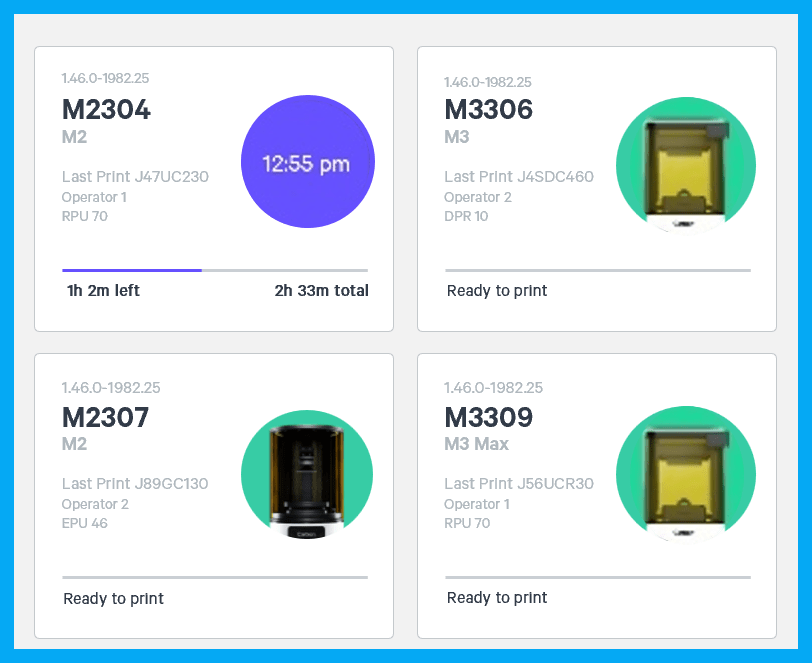
If you have multiple printers, **select the printer** that you wish to use to create the project.
:::hint{type="info"}
You may queue the build to other printers.
:::
::::
:::VerticalSplitItem
:::
:::::
::::::
:::::::
::::::::
***
### Create project
::::VerticalSplit{layout="left"}
:::VerticalSplitItem
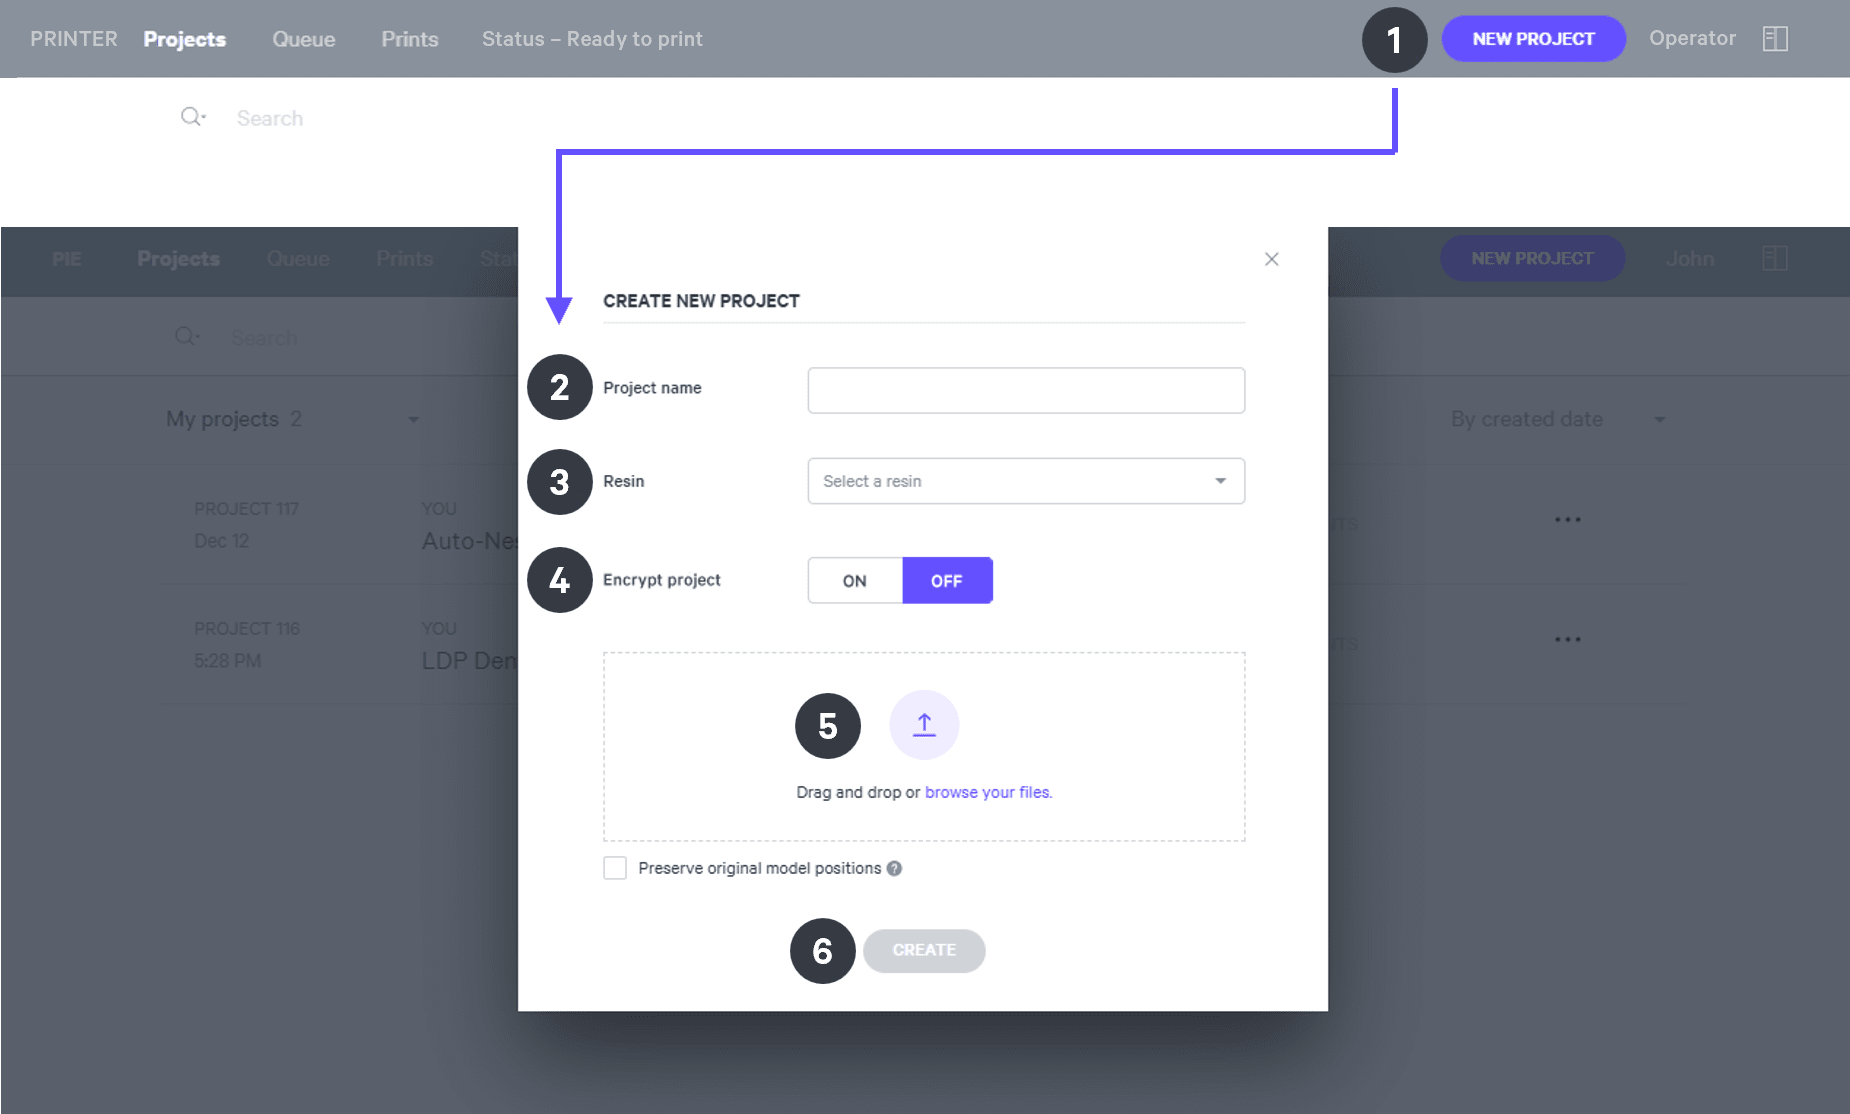
After you have chosen the printer, you must create a new project.
:::
:::VerticalSplitItem
::Image[]{src="https://res.cloudinary.com/carbon3d/image/upload/t_auto_quality_format/Education/Materials/dental/__General_Use/Create-project_thumbnail.png" size="70" width="673" height="247" darkWidth="673" darkHeight="247" position="flex-start" alt="Create Project" showCaption="false"}
:::
::::
::::::ExpandableHeading
*Expand for steps*
:::::WorkflowBlock
:::WorkflowBlockItem
Click **New Project.**
You can also drag your files from a file browser window and drop it on top of the **New Project** icon.
:::
:::WorkflowBlockItem
Enter a new **Project name.**
:::
:::WorkflowBlockItem
In the Resin dropdown, select **your resin.**
:::
::::WorkflowBlockItem
Only use [Encrypt project](docId:1bT3mas8msvxq9CDza67C) if you want to require a password to access the project.
:::hint{type="warning"}
**Carbon cannot provide support** for encrypted projects.
:::
::::
:::WorkflowBlockItem
**Drag and drop** your part files into the dotted box or click **browse your files **and select them in a file browser window.
:::
:::WorkflowBlockItem
Click **Create**
After a few moments you will see the project printer interface with your parts on the platform.
:::
:::::
::::::
***
::::ExpandableHeading
## Orientation
:::hint{type="warning"}
Proper orientation of models and dies is critcal to achieve the required accuracy. Failure to orient these files according to these instructions may impact accuracy and part quality.
:::
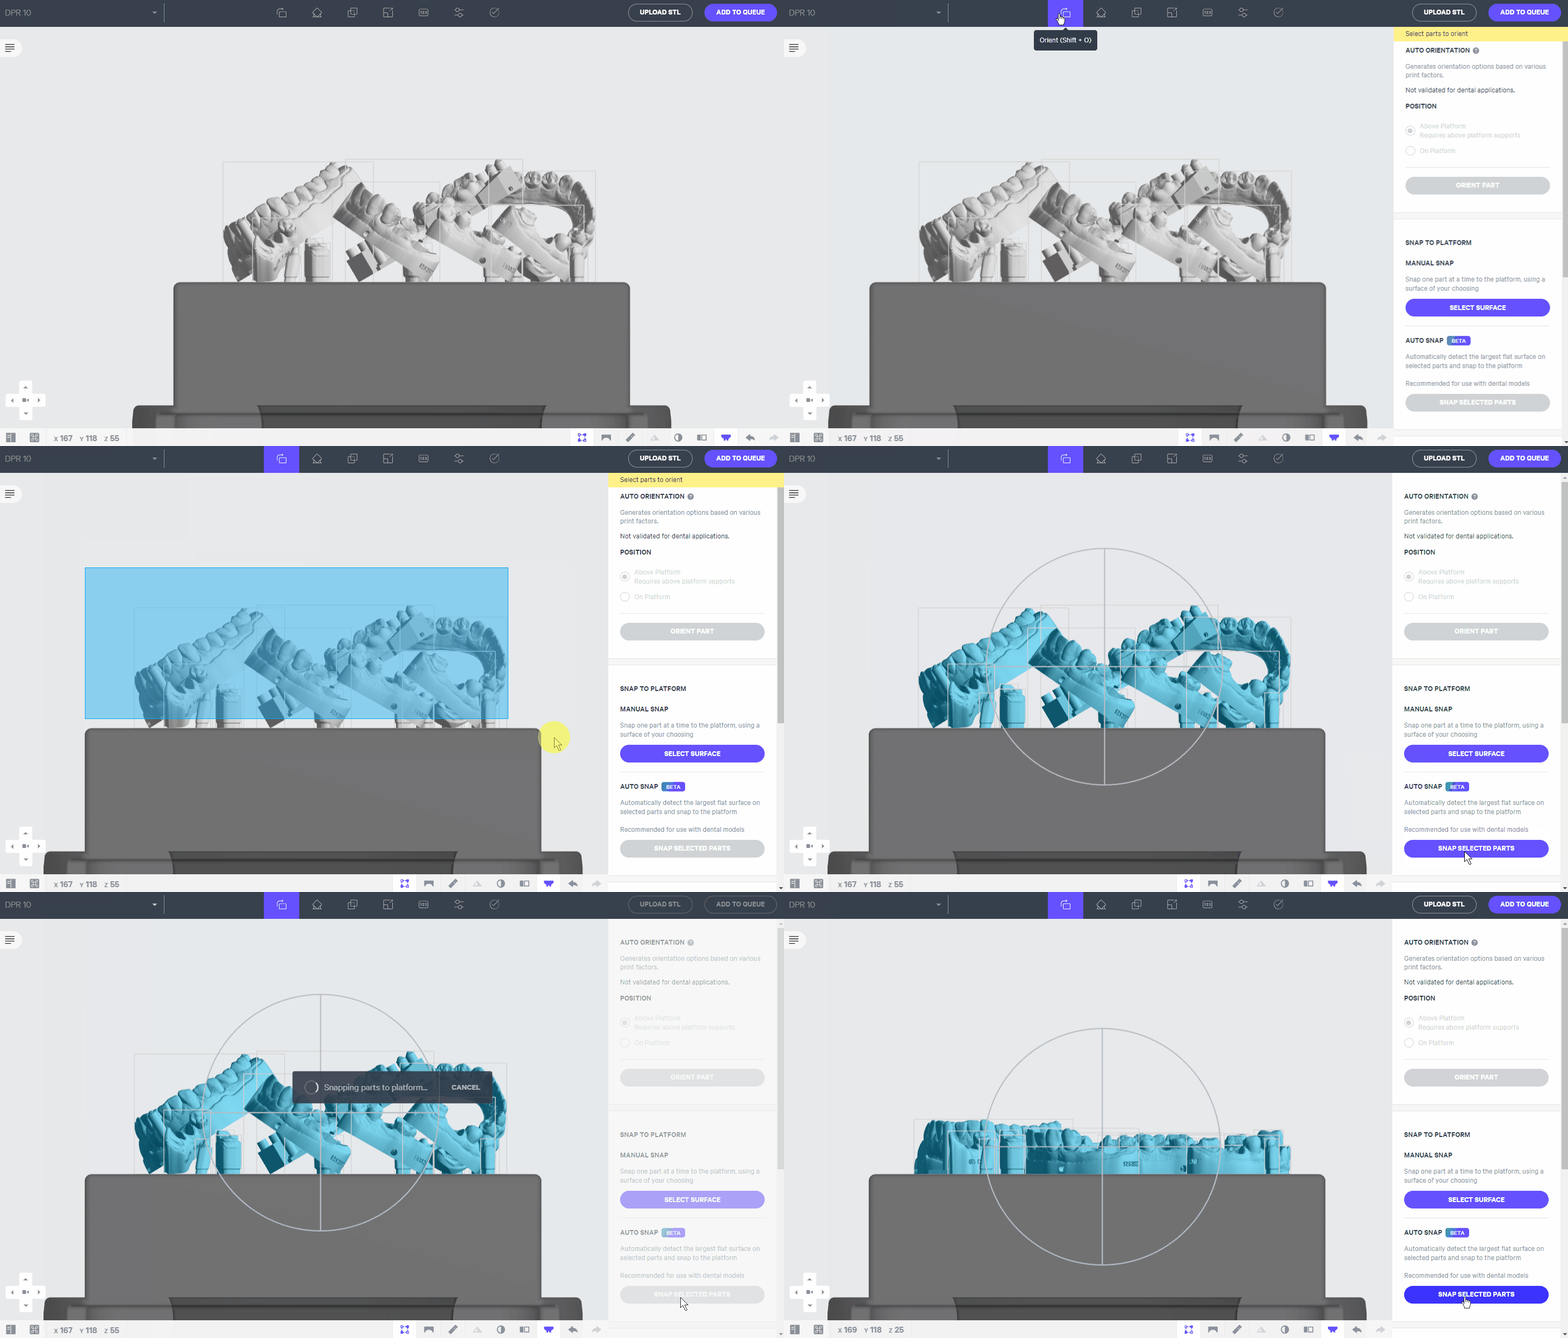
Most dental models (arches, quads and dies) have flat bases that can be printed directly on the platform.
1. Click the **Orient** tab in the menu bar or press **Shift + O.**
2. Select the parts.
3. Click **Snap Selected Parts.**
- After a short time, the models should all be oriented with their flat bases parallel with the platform.
4. Be sure to check that each model is properly oriented.
::::
:::::ExpandableHeading
## Supporting Arches, Quads and Dies
Full arch models, quads and dies designed using Carbon's 3Shape DME settings do not require supports because they are printed directly on the platform.
:::hint{type="warning"}
**Dies with small cylindrical pins should not be printed as they can easily detach from the platform during printing and lead to failed prints and potentially cause cassette damage.**
:::
::::VerticalSplit{layout="middle"}
:::VerticalSplitItem
**Dies designed without Carbon's 3Shape DME**

:::
:::VerticalSplitItem
**Dies designed with Carbon's 3Shape DME**

:::
::::
:::::
:::::ExpandableHeading
## Supporting Full Palette Models
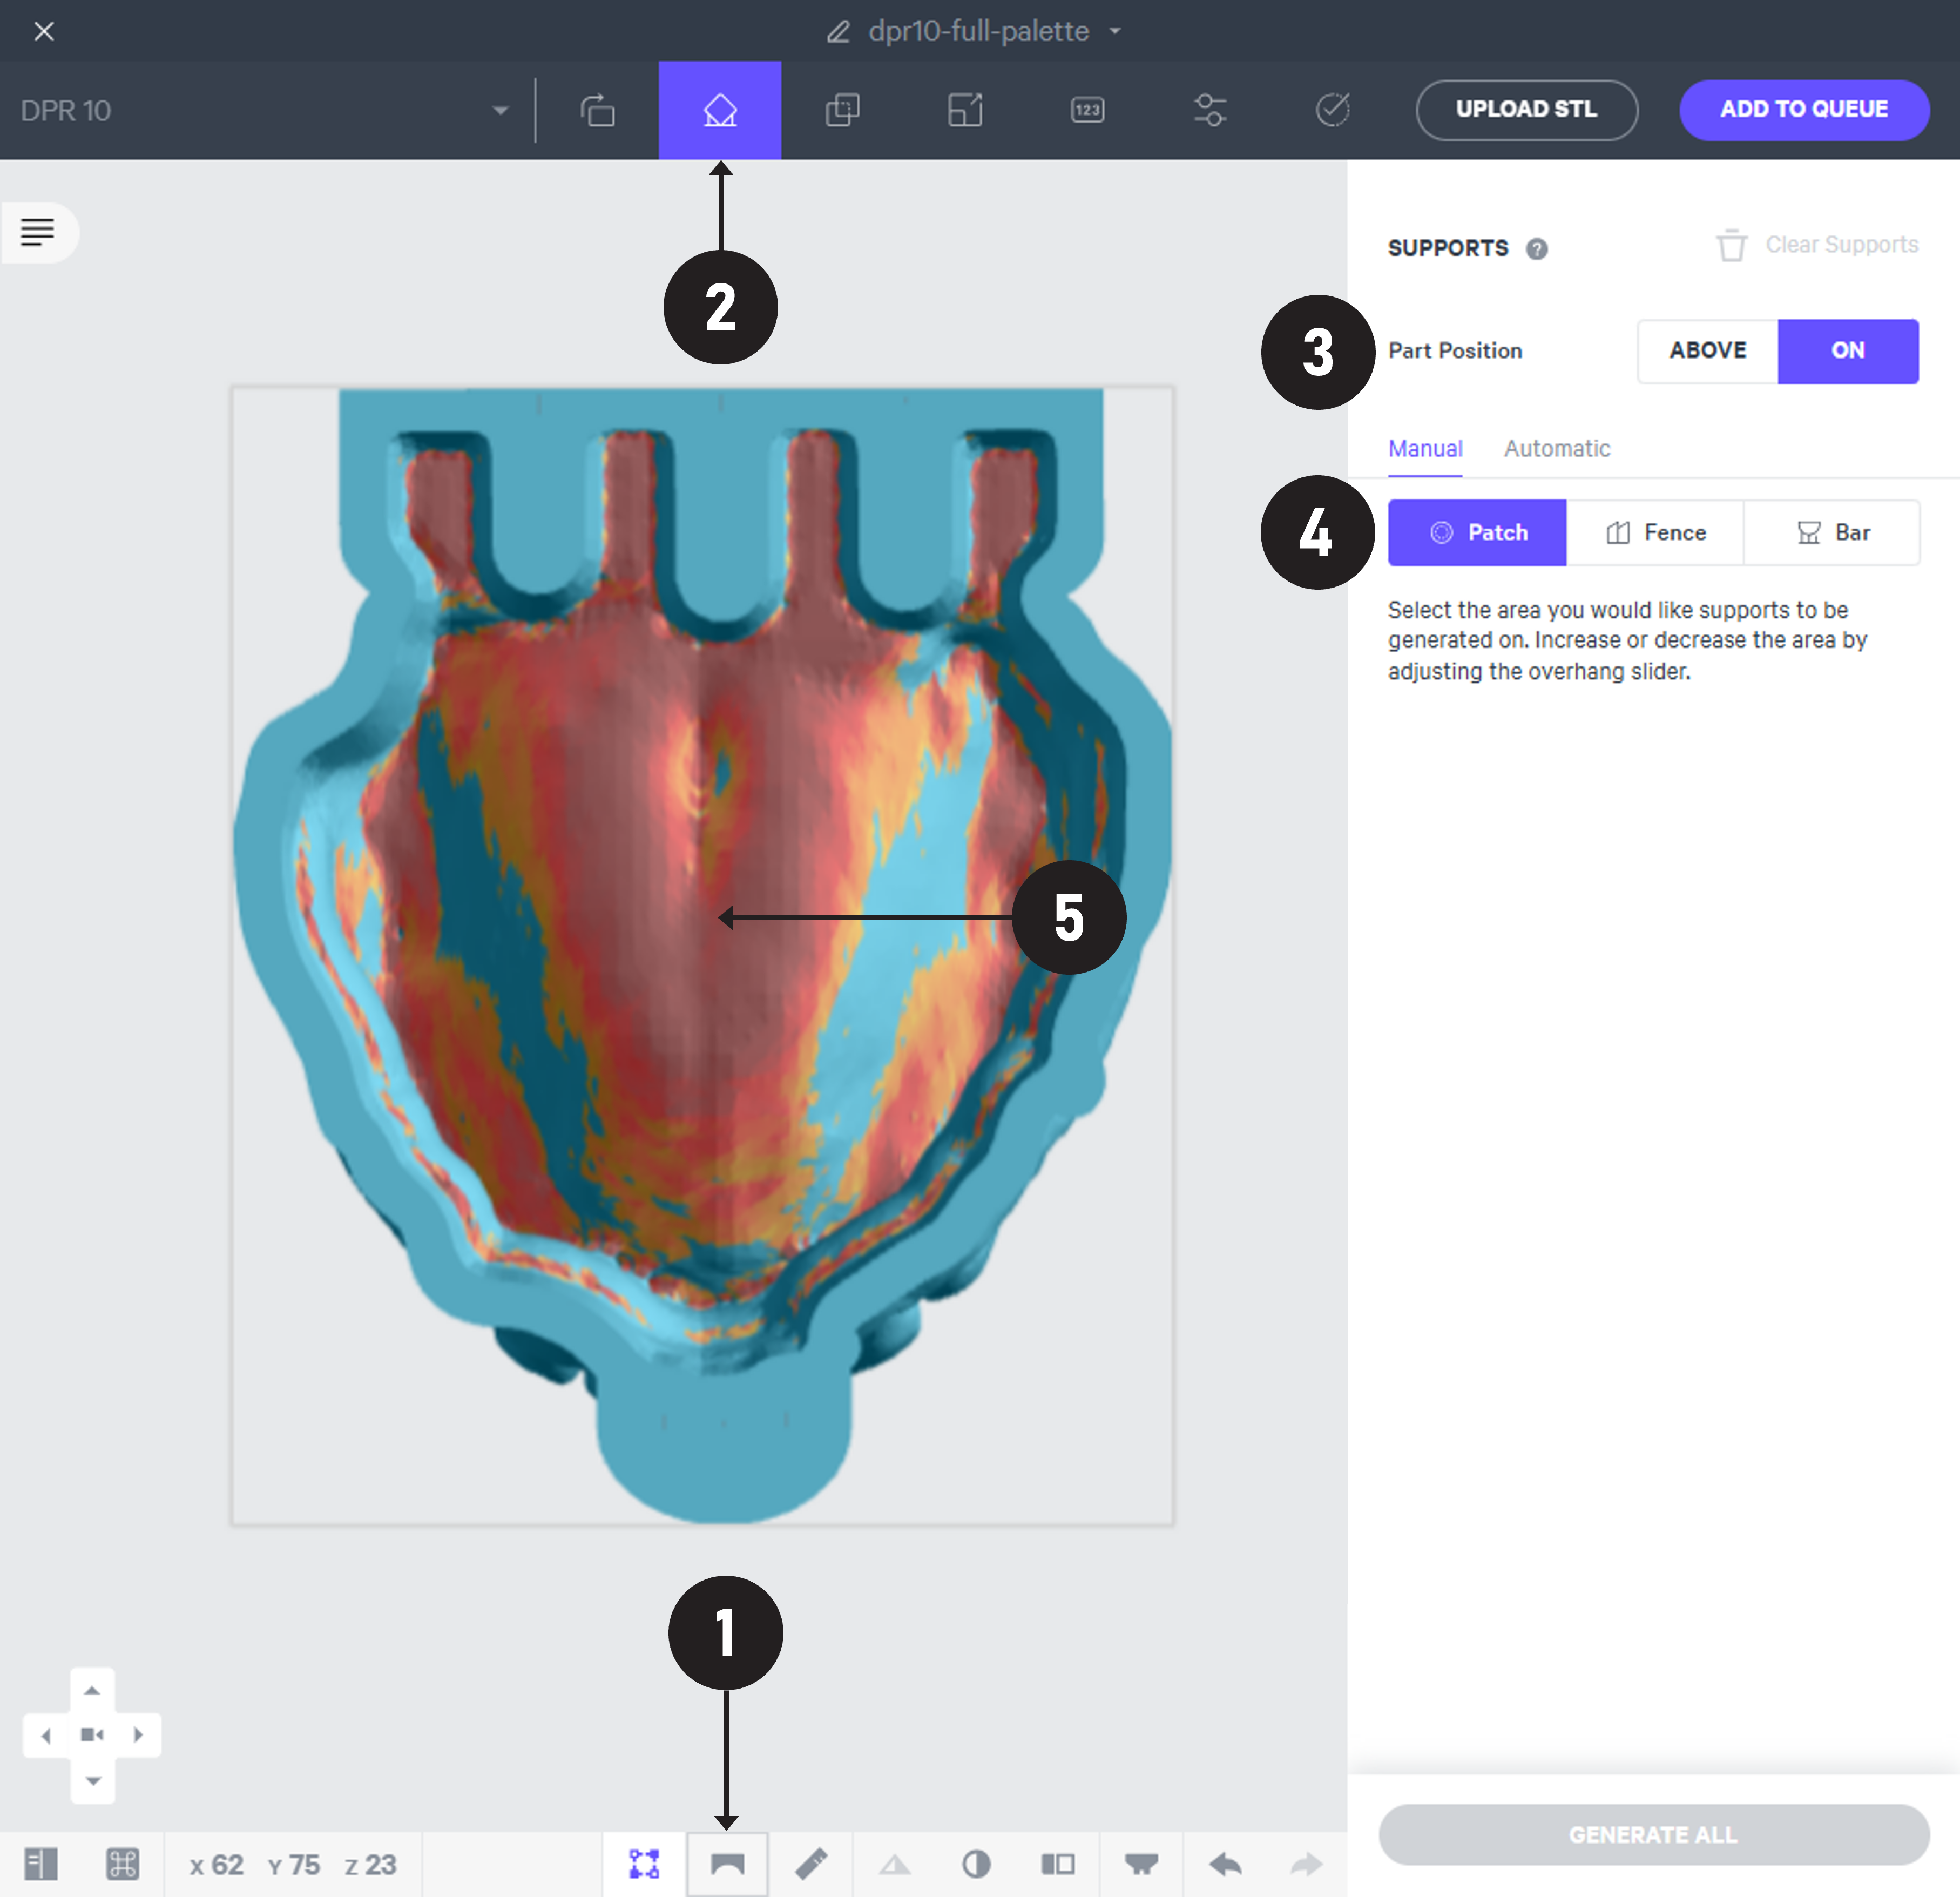
The palette surface typically requires supports. Use the Patch tool to quickly add supports.
### Select a patch
::::VerticalSplit{layout="middle"}
:::VerticalSplitItem
1. In the bottom tool bar, click **Overhang detection **(or press V) to highlight areas that may require supports.
2. Click the **Supports **tab in the menu bar or press **Shift + S. **The Supports menu will appear on the right.
3. Under Part Position, select **On **to keep the model positioned directly on the platform for printing.
4. Under the Manual tab select **Patch.**
5. Click on a large area of overhang to select a patch. This will create a green highlighted area.
:::
:::VerticalSplitItem
:::
::::
### Adjust Patch Settings
::::VerticalSplit{layout="middle"}
:::VerticalSplitItem
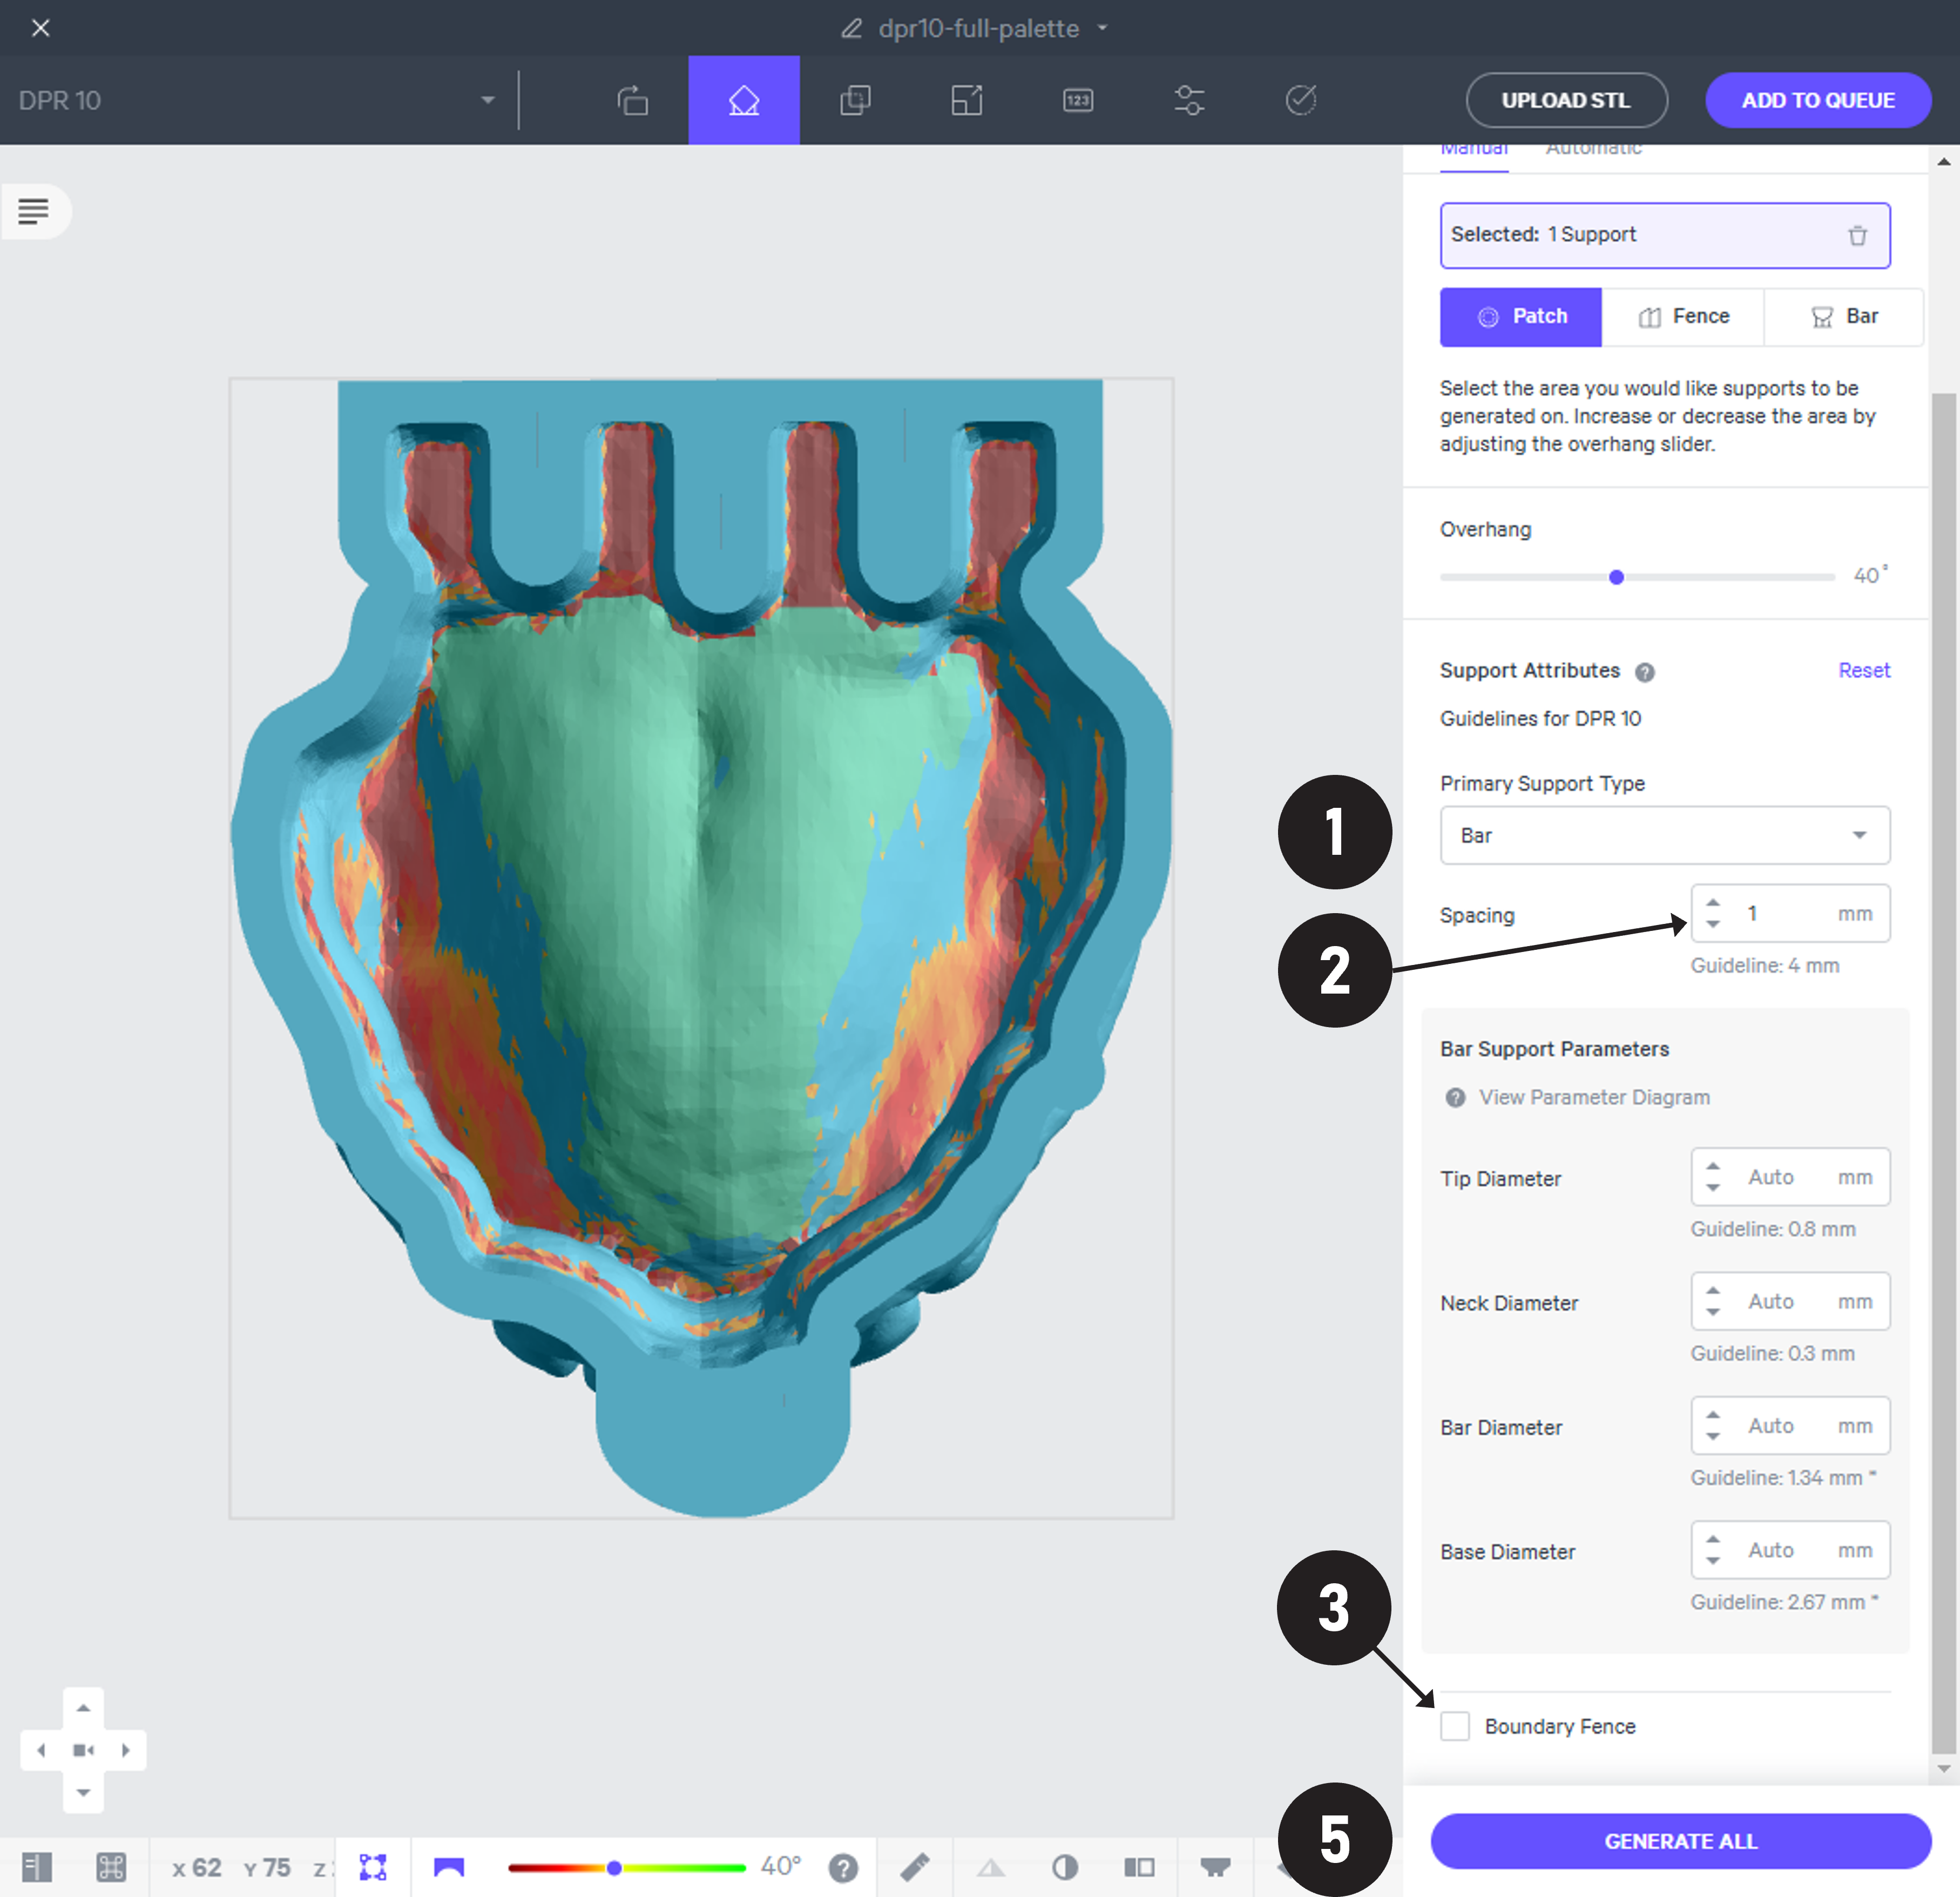
1. In the Supports menu, under **Primary Support Type** select **Bar.**
2. Under **Spacing,** type or use the arrows to set **1 mm.**
3. Uncheck **Boundary Fence.**
4. If necessary, select more patches.
5. Click **Generate All** in the lower right corner to create supports.
:::
:::VerticalSplitItem
:::
::::
:::hint{type="danger"}
**Never use fence supports for models that will be printed in Automatic Mode on the AO Backpack. Automatic Mode models require bar supports with base rafts. **
**See **[Supporting Models for Automatic Mode](docId\:FqWGs0QdBgiIkD7JDDnl6)** for more information.**
:::
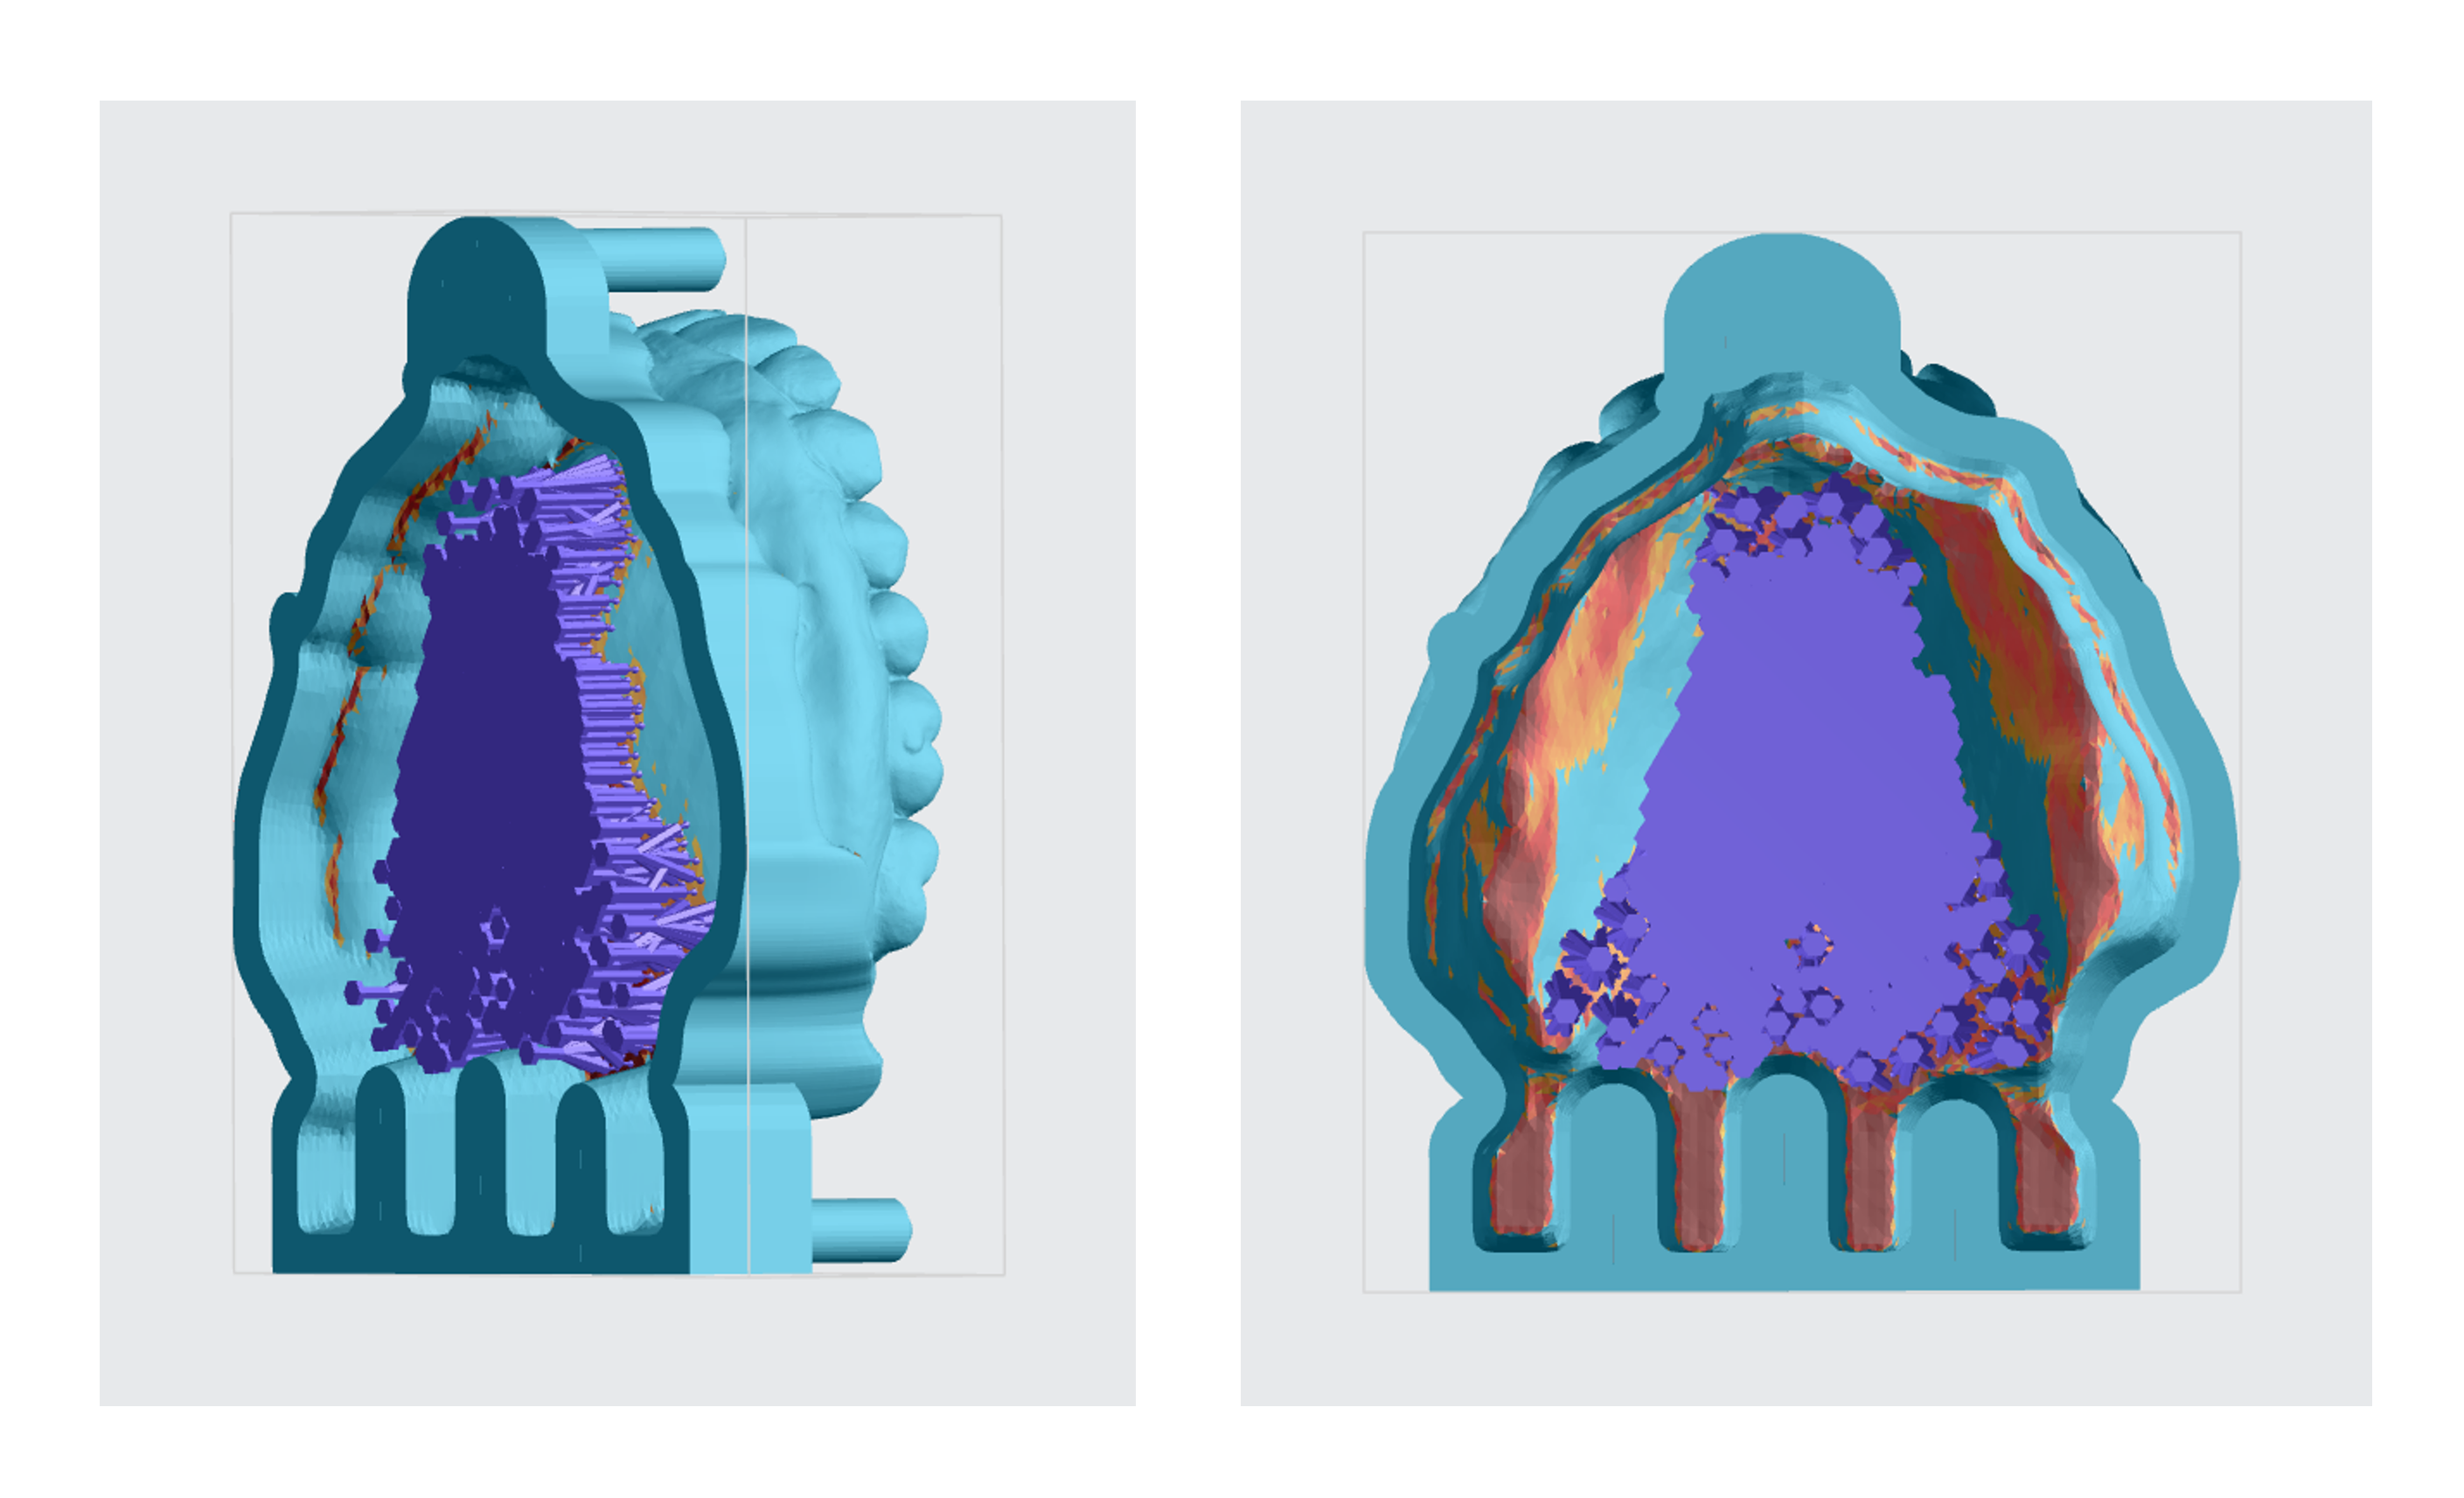
### Properly Supported Full Palette Model
:::::
## Nesting

::::VerticalSplit{layout="right"}
:::VerticalSplitItem
1. Select the **Layout tab**** (Shift + L)** in the top menu bar.
2. Under **Auto Layout,** select **Gen2.**
- Gen2 usually gives the most effecient packing for dental devices.
3. Enter at least **0.5 mm** in **Padding.**
- Models require a minimum of 0.1 mm of space between them.
4. **Optimize starting rotation**
- ON for models only or mixed builds
- OFF for dies only
5. Leave **Allowed rotations** at the default setting.
- This gives the software maximum flexibility to fit the most possible parts on the build platform.
6. Press the **Auto Layout** button to arrange your parts.
:::
:::VerticalSplitItem

:::
::::
If necessary, nesting can be changed manually:
- Click and drag parts to adjust their position.
- Modify Z rotation by using the **Spin **tool or manual rotations under the **Orient tab** **(Shift + O).**
- Use the **Part List tab **as needed to more easily select models and focus on them.
## Print Preparation
### Print Controls
Click **Print Controls** or **Shift + P** in the top menu bar.

### Print Profiles
Two print profiles for use with DPR 10 are available to all customers to provide Dental Labs with more control over print outcomes: **DPR 10 Loosen Fit **and **DPR 10 Tighten Fit.**
:::hint{type="info"}
Reference [Print Controls](docId\:N9rCrE4j391HMxwvP-udG) for more information.
:::
### Slicing
For **standard models,** Carbon recommends a Slice Thickness of **Standard (100 µ)**.
For **crown and bridge, die fit, and analog implant models,** Carbon recommends a Slice Thickness of **Fine (50 µ)**.
### Project Analysis
1. Select the **Project Analysis** tab.
2. Click **Start Analysis** and wait for the processing to complete.
1. Note the required resin volume and print time.
3. Click **Add to Queue.**

# Printing
Consult the [protocol sheet](https://app.archbee.com/public/PREVIEW-zcb4gnPuJF6Z6RpjVjCEp/PREVIEW-Y2PWbCu6_Ifchm2sdgN0R#y1d6o) for information about resin storage, dispensing, washing and curing.
## Tips
:::hint{type="info"}
If you have an AO Backpack, see [Operation](docId\:Z5J06e2yhoHwLisiFaRFT) for information about using Automatic Mode for unattended printing.
:::
# Washing
## Remove Parts from the Platform before Manual Washing
To facilitate part cleaning, be sure to remove parts from the platform before washing.
::embed[]{url="https://player.vimeo.com/video/527521205?dnt=1"}
:::ExpandableHeading
**Video Text**
- When print is complete, open printer door using foot switch.
- Lift platform out of build arm and place on tray covered with aluminum foil. The tray limits the spread of liquid resin.
- Long side of platform should be laying flat on tray.
- Position scraper at the base of each model and carefully tap with dead blow hammer to remove.
- Always cut down towards the tray.
- Repeat as needed.
- If needed, rotate the platform and lay it on its short side.
- Larger models will require more work than smaller ones.
- Keep scraper at a low angle to the platform.
- Your parts are now ready for washing.
:::
### Tip: Removing arches from the platform
::::VerticalSplit{layout="middle"}
:::VerticalSplitItem
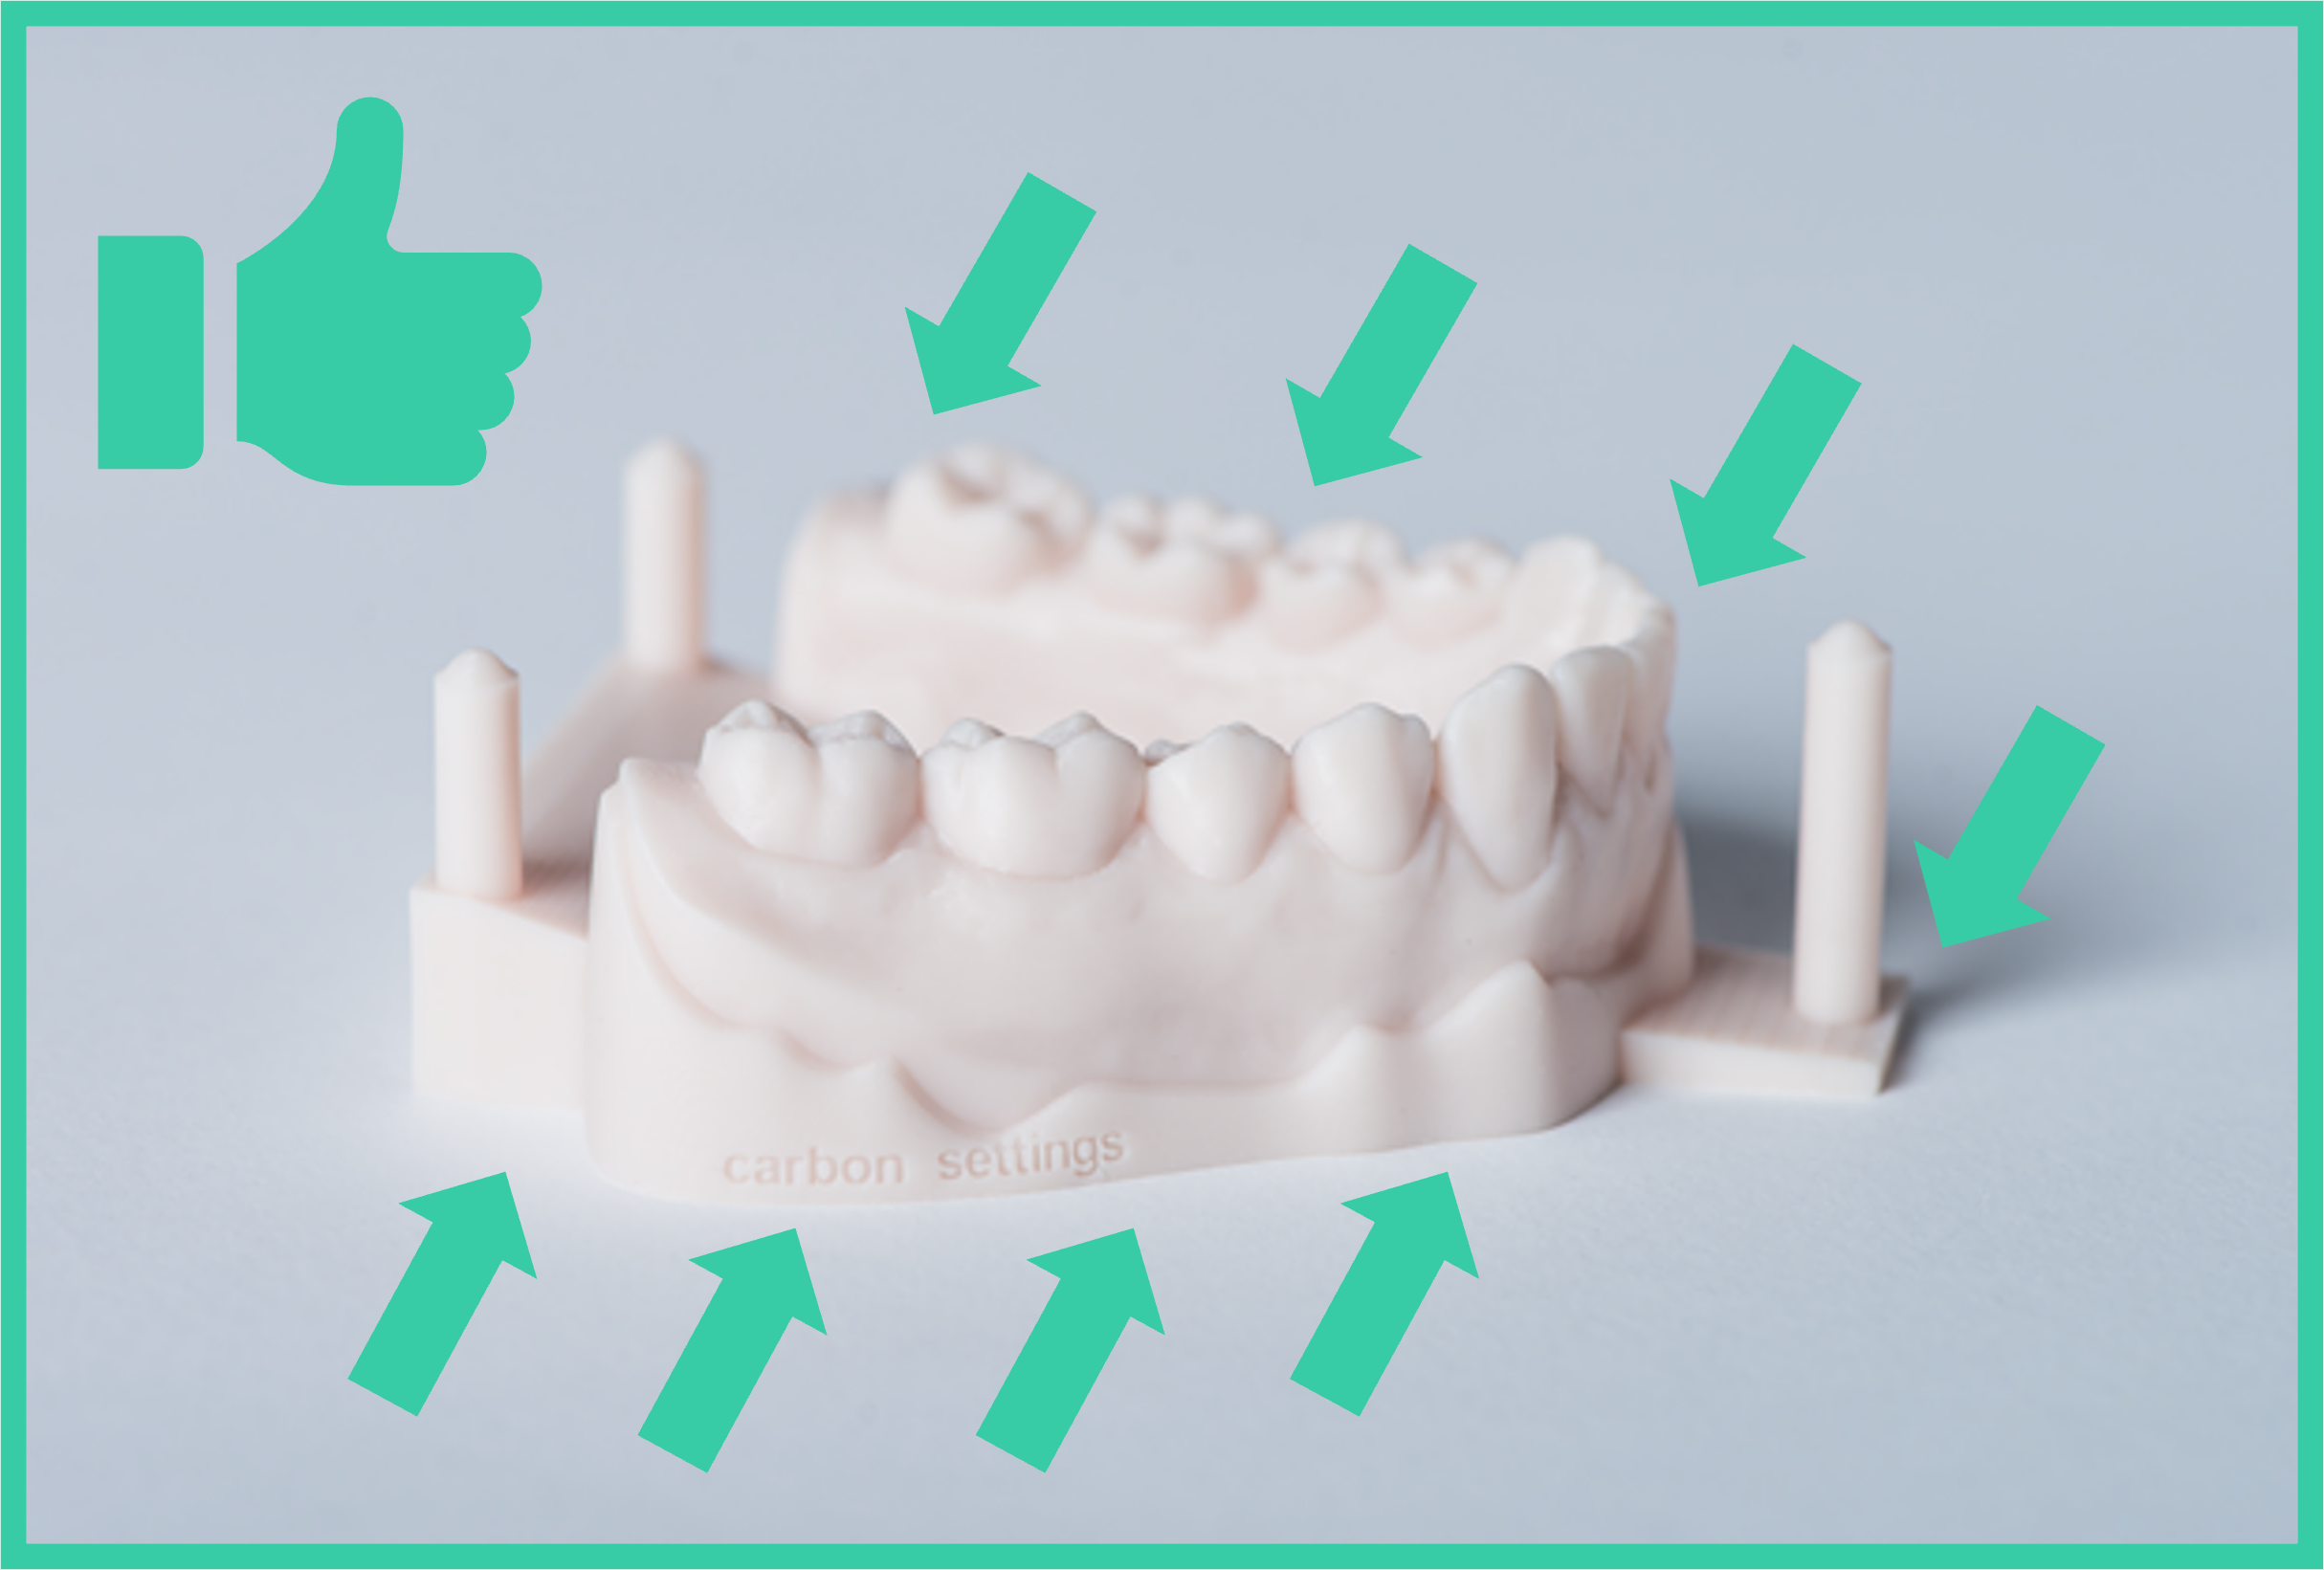
Remove arches by putting the scraper under thick, strong features. The sides of this model are the thickest and strongest part with the smallest chance of breaking.
Apply less force at several locations rather than a large force at one location.
:::
:::VerticalSplitItem
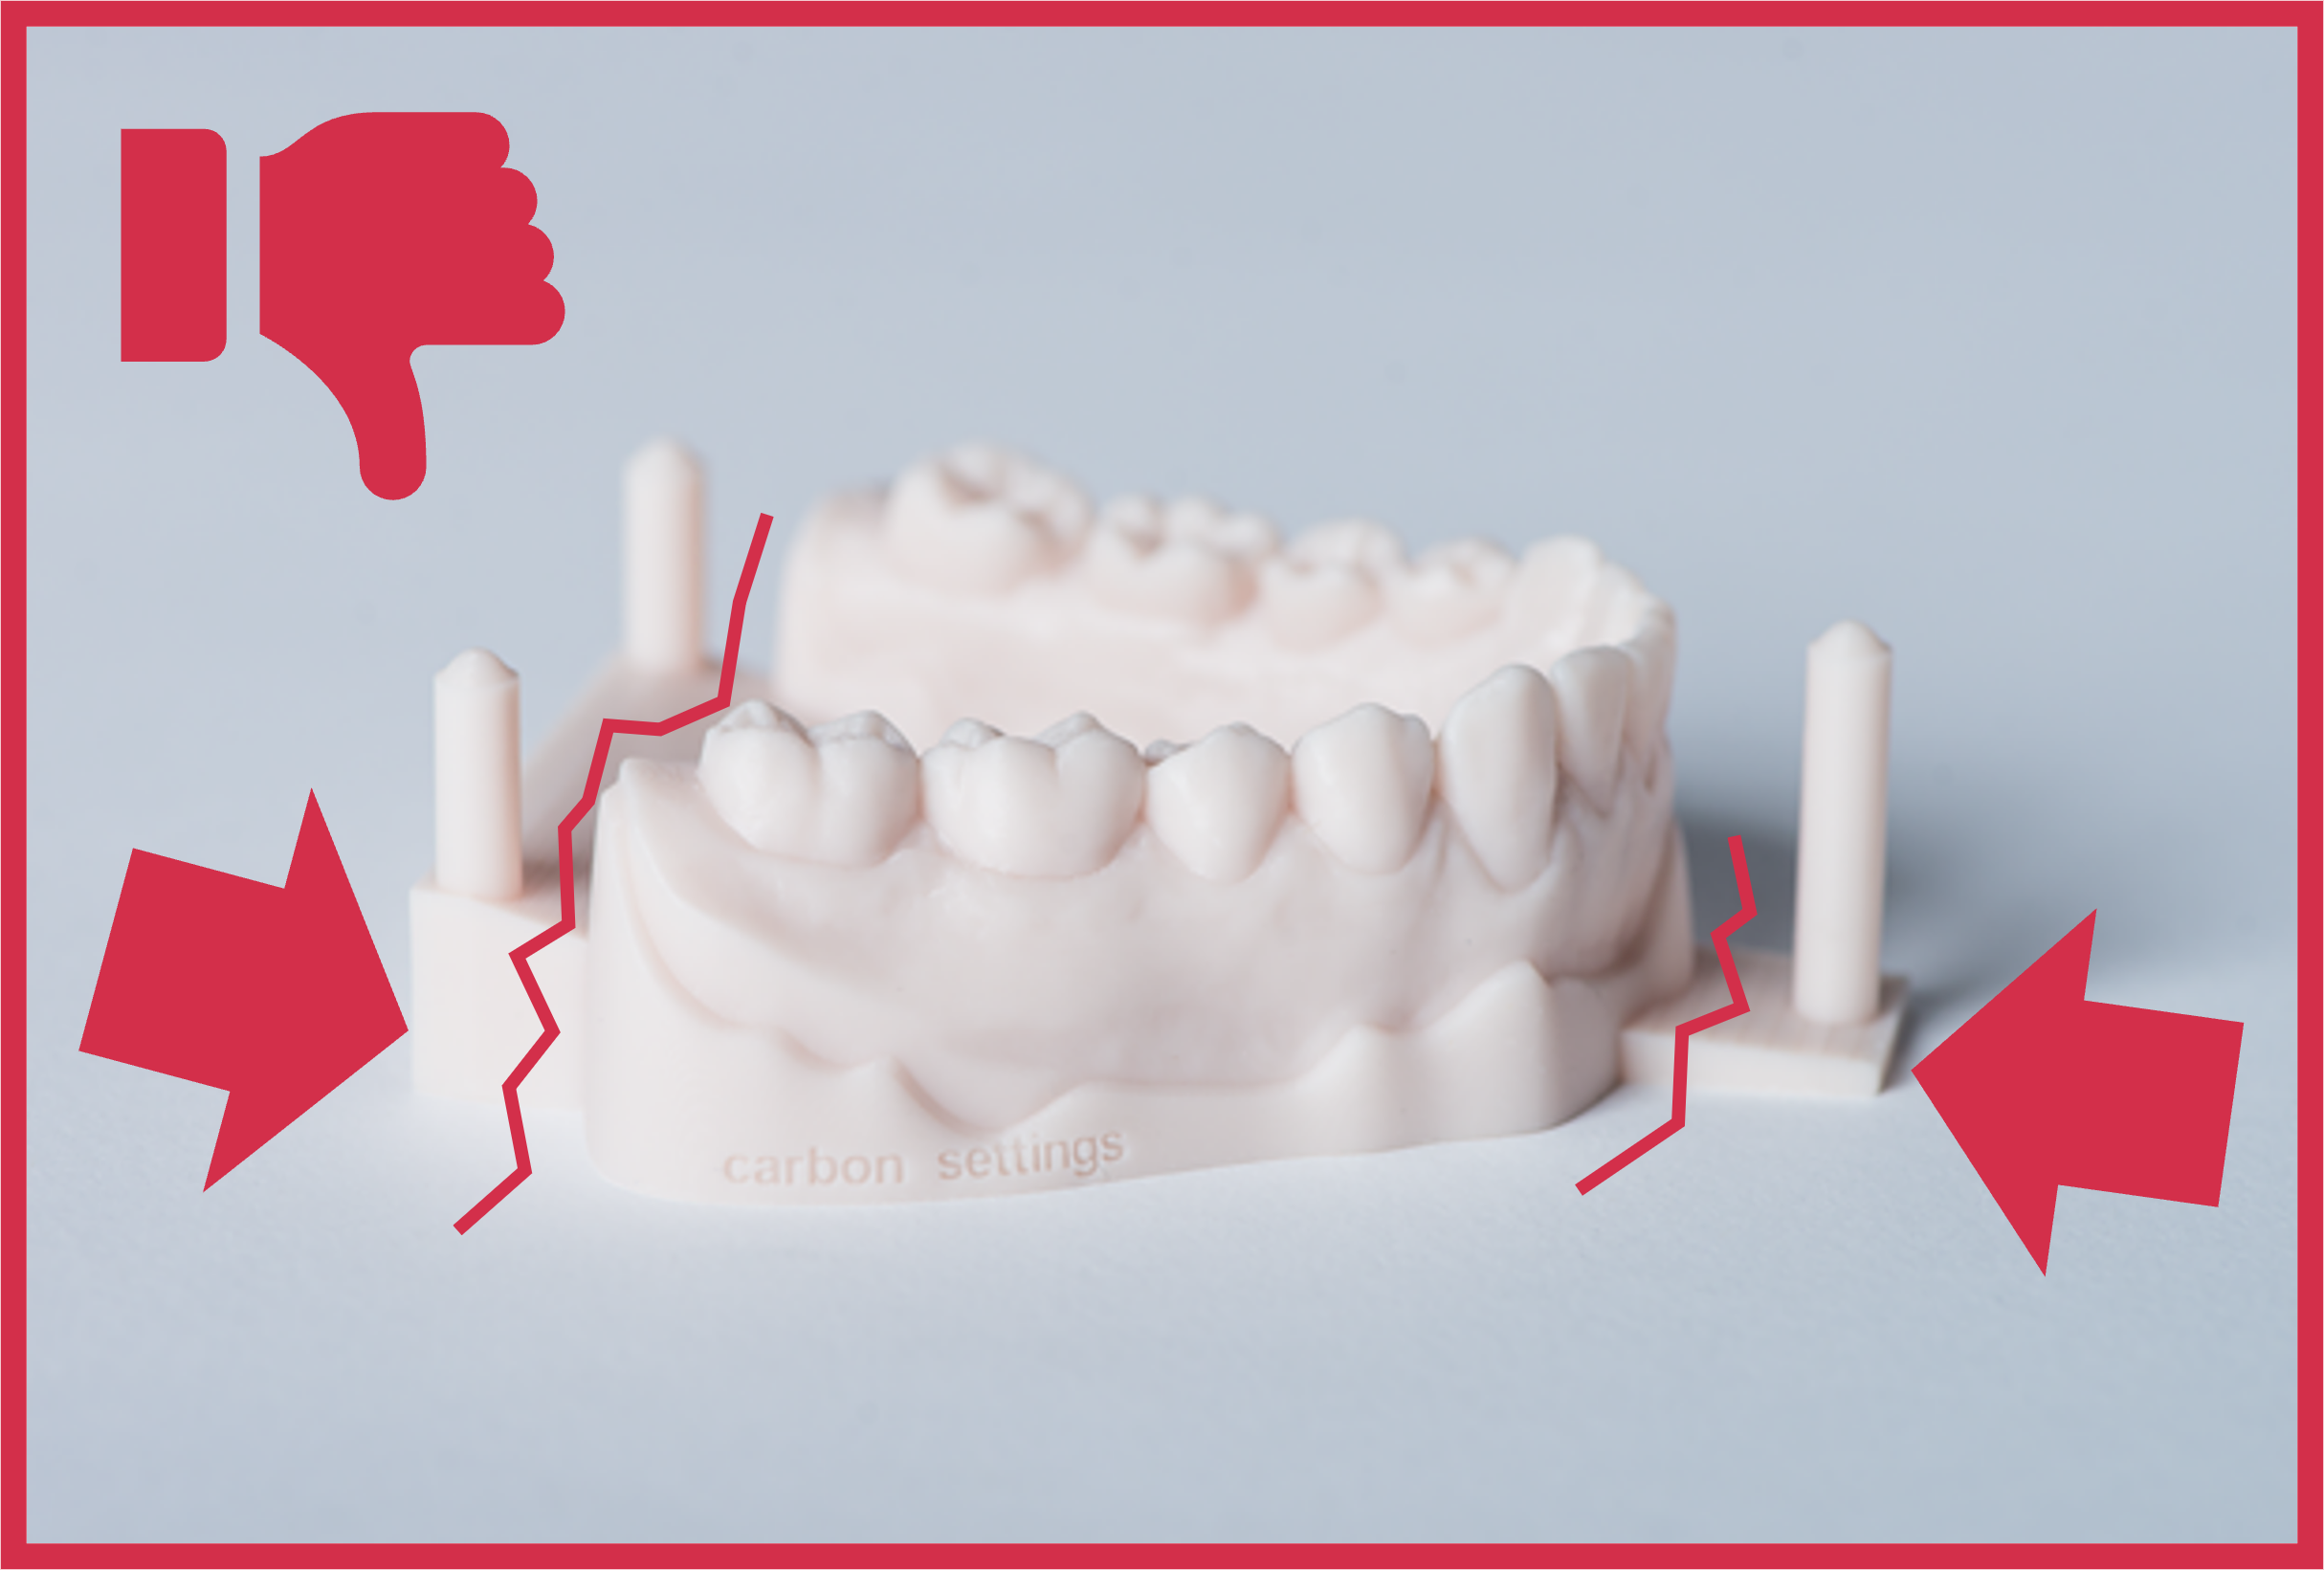
Be patient when removing models by putting the scraper blade under delicate features, as they can break during part removal.
:::
::::
## Washing Process
::embed[]{url="https://player.vimeo.com/video/527523080?dnt=1"}
:::ExpandableHeading
Video Text
1. Place parts in washing container filled with fresh IPA.
2. If double gloved, remove outer soiled gloves. Or dispose of solied gloves and put on new clean gloves.
3. Securely fasten lid to washing container to prevent splashing.
4. Set timer to 3 minutes and start orbital shaker.
5. When timer beeps, stop orbital shaker and remove parts from washing container.
6. Place empty container on orbital shaker.
7. Move models to empty container.
8. Seal first container and move to the side.
9. Fill container with fresh IPA until models are approximately 75% covered.
- Be sure to lock lid in place before activating orbital shaker.
10. Set timer for 2 minutes.
11. Start timer and start orbital shaker.
12. Prepare a clean tray with a shop towel.
13. When timer sounds, remove models from IPA and place on towel.
14. Set tray aside and allow parts to air dry for up to 30 minutes.
Your models are now ready to be cured.
:::
## Solvent Swapping for Manual Washing
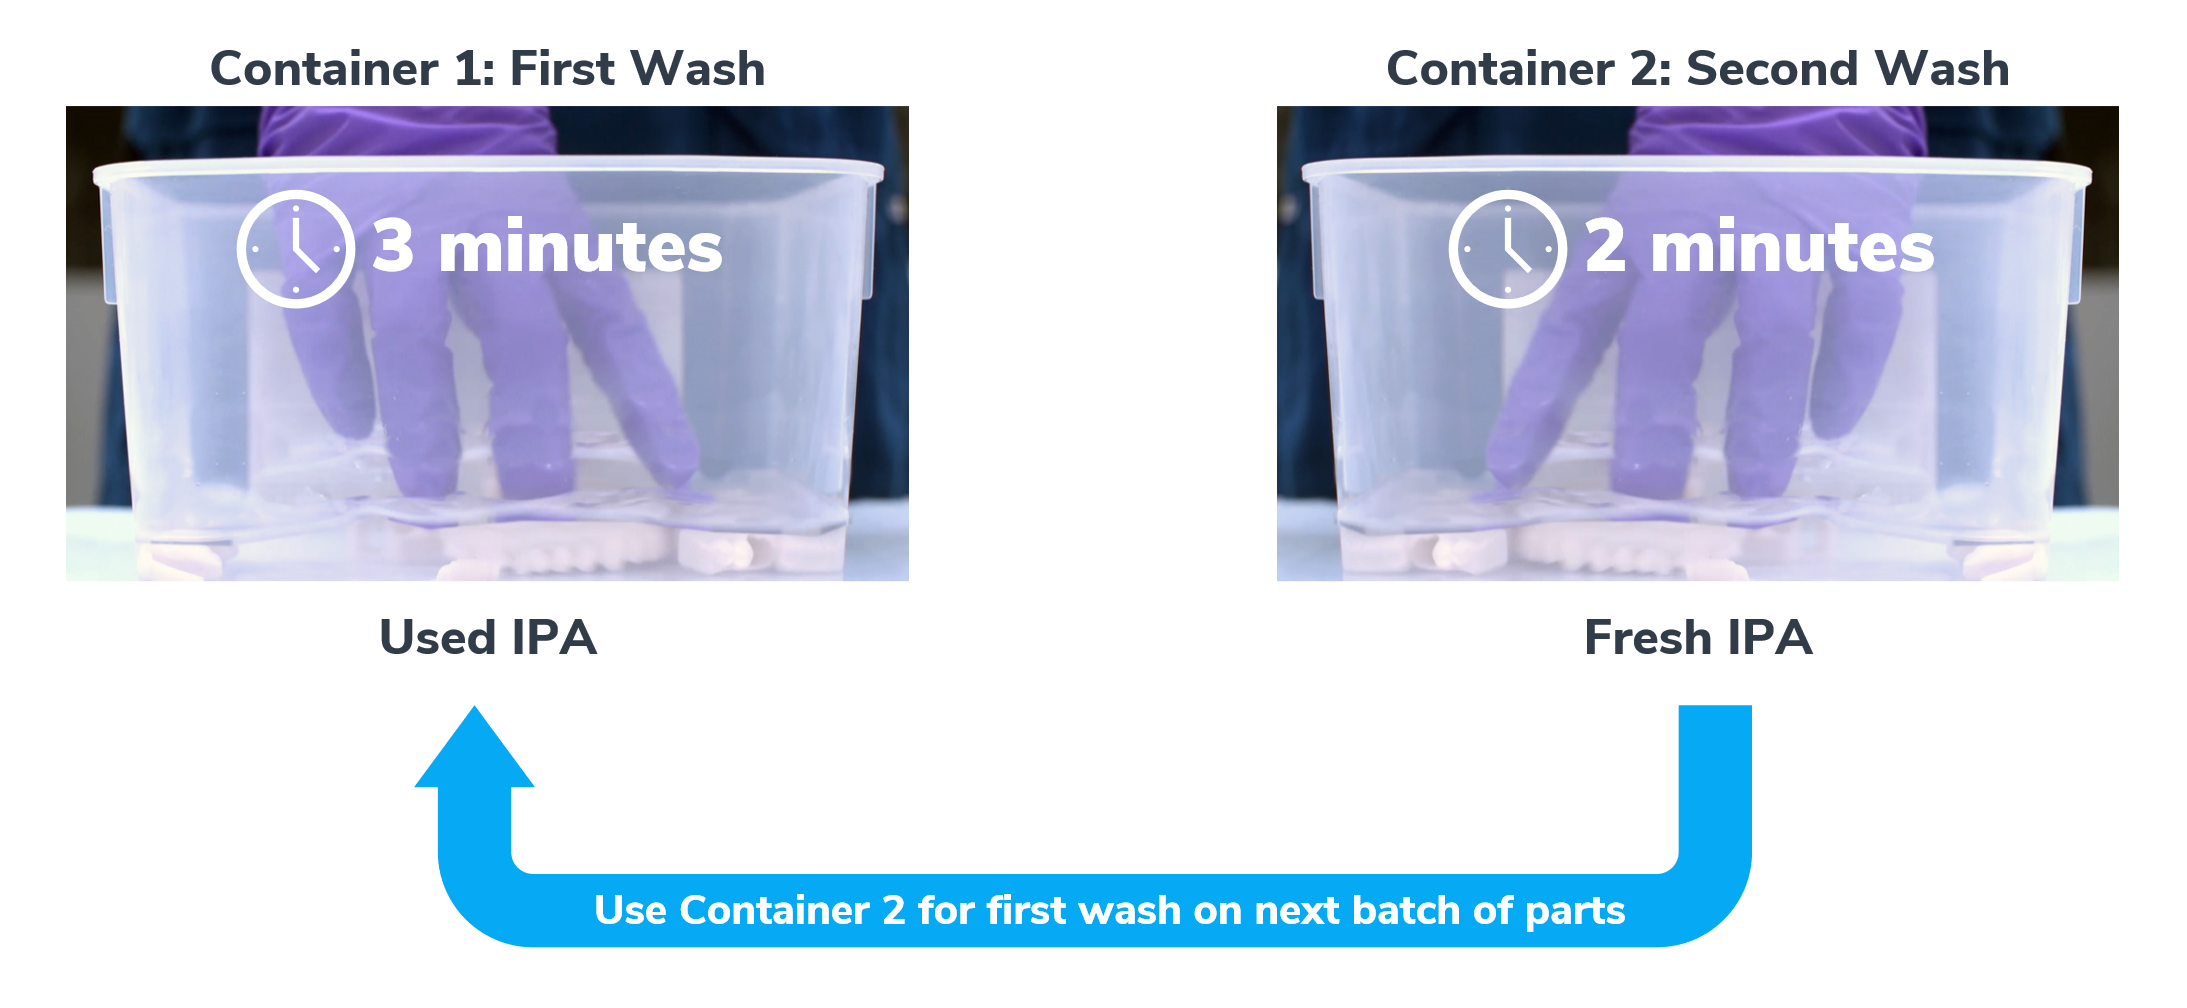
Cleaning DPR 10 models with an orbital shaker requires two washes:
- First wash: 3 minutes in Container 1 with used IPA
- Second wash: 2 minutes in Container 2 with fresh IPA
:::hint{type="info"}
**"Used IPA" has cleaned one full platform of models.**
:::
Carbon recommends the following process for manual washing:
1. First build of the day
- Fill both containers with fresh IPA.
- Perform both washes.
2. Next build (see graphic below)
- Use Container 2 for first wash.
- Dispose of the used IPA from Container 1, refill with fresh IPA and use for second wash.
3. Subsequent builds
- Continue the process from step 2 above.
:::hint{type="warning"}
**Dispose of used IPA according to local regulations.**
:::
# Curing
## Curing Process for Dreve PCU LED
::embed[]{url="https://player.vimeo.com/video/527516435?dnt=1"}
:::ExpandableHeading
**Video Text**
1. Place dry models in curing chamber of Dreve PCU LED.
1. Leave 3-5 mm of space between parts to ensure all surfaces can receive UV light.
2. Close cover.
3. Turn control knob to select DPR 10.
4. Push control knob once to confirm DPR 10 selection and again to activate cure program.
1. The curing process takes approximately 3 minutes to complete.
2. After curing, models may be safely handled without gloves.
5. Curing is complete when happy face is displayed.
6. Push control knob to exit to main menu.
7. Remove gloves to keep uncured resin from contaminating cured models.
8. Remove cured models from cure chamber and place on clean surface.
9. Close cover when complete to keep cure chamber free of dust and debris.
Your dental models are now ready for use!
:::
# Reclaiming Resin with the Pour Stand
The following video demonstrates resin reclamation using an M2 cassette with the M2 Pour Stand.
For instructions on using the newest accessory, go to [M Series Pour Stand](docId:3iBYF_bQEQklKHdnpbE1Y).
::embed[]{url="https://player.vimeo.com/video/527521892?dnt=1"}
:::ExpandableHeading
**Video Text**
- Place cassette with unused resin near pour stand.
- Turn cassette so the curved side is facing away from you.
- Place cassette into cassette mount on our stand.
- Curved side of cassette should face curved pour stand handle.
- Remove cap from resin bottle and place under circular holder.
- Place paper funnel in wire holder with tip in resin bottle.
- Funnel tip must sit in bottle.
- Unfold strainer and place in funnel. Straner will capture any solid debris from cassette.
- Tilt cassette mount up to start pouring resin through strainer and cone into bottle.
- Use a clean, flexible, undamaged silicone spatula to assist resin drainage.
- Continue wiping until only a small residue of resin remains.
- Lower cassette mount.
- Remove cassette from pour stand.
- Dispose of funnel and strainer, put cap back on bottle and move resin bottle to storage.
You have finished reclaiming resin from your cassette. It is now ready to be cleaned.
:::