---
title: Desktop Health Flexcera Base and Flexcera Base Ultra+
slug: materials/desktop-health-flexcera-base
description: Discover the ultimate guide for using Flexcera™ Base and Flexcera™ Base Ultra+ biocompatible resins in creating high-quality denture bases. This comprehensive document provides essential workflows for 3D printing full and partial dentures.
docTags:
createdAt: 2024-07-09T16:31:05.433Z
---
# Overview
::::VerticalSplit{layout="middle"}
:::VerticalSplitItem
**Flexcera™ Base** is now available to produce denture bases. The material is a durable, biocompatible resin that produces premium dentures.
**Flexcera™ Base Ultra+** is available to produce full and partial denture bases.
:::
:::VerticalSplitItem

:::
::::
:::hint{type="success"}
Flexcera Base is compatible with the [AO Polishing Cassette](docId\:iFFh3q8-WLk-LIqr87bd5).
:::
## Resource Links
### Flexcera Base
::::LinkArray{contentSource="CUSTOM"}
:::LinkArrayItem{headerType="IMAGE" headerImage="https://api.archbee.com/api/optimize/uXbZOKjJTGpPhjapQ8fvM-IOQIJkNnkbUAw9Q-ap1FV-20241115-235121.jpg"}
**[About the Material](https://www.carbon3d.com/materials/flexcera-base)**
:::
:::LinkArrayItem{headerType="IMAGE" headerImage="https://api.archbee.com/api/optimize/3CesIL2dYMCHPZvRjp8S0/cJAKqDDnRUAeJAXNRThMm-20251016-221334.png"}
**[Instructions for Use](https://knowledge.desktophealth.com/hc/en-us/articles/4420538637079-Flexcera-Base-Instructions-for-Use)**
:::
:::LinkArrayItem{headerType="IMAGE" headerImage="https://api.archbee.com/api/optimize/3CesIL2dYMCHPZvRjp8S0/1r3fpdvMUMFVZGfey2Tjn-20251016-221405.jpg"}
**[Safety Data Sheet](https://knowledge.desktophealth.com/hc/en-us/articles/4420368707095-Flexcera-Base-Safety-Data-Sheets)**
:::
::::
### Flexcera Base Ultra+
::::LinkArray{contentSource="CUSTOM"}
:::LinkArrayItem{headerType="IMAGE" headerImage="https://api.archbee.com/api/optimize/uXbZOKjJTGpPhjapQ8fvM-IOQIJkNnkbUAw9Q-ap1FV-20241115-235121.jpg"}
**[About the Material](https://www.carbon3d.com/materials/flexcera-base-ultra)**
:::
:::LinkArrayItem{headerType="IMAGE" headerImage="https://api.archbee.com/api/optimize/3CesIL2dYMCHPZvRjp8S0/cJAKqDDnRUAeJAXNRThMm-20251016-221334.png"}
**[Instructions for Use](https://knowledge.desktophealth.com/hc/en-us/articles/13003470689559-Flexcera-Base-Ultra-Instructions-for-Use)**
:::
:::LinkArrayItem{headerType="IMAGE" headerImage="https://api.archbee.com/api/optimize/3CesIL2dYMCHPZvRjp8S0/1r3fpdvMUMFVZGfey2Tjn-20251016-221405.jpg"}
**[Safety Data Sheet](https://knowledge.desktophealth.com/hc/en-us/articles/4420599797527-Flexcera-Smile-Ultra-Safety-Data-Sheets)**
:::
::::
## Protocol Sheet
This downloadable handout provides important usage information, including instructions about storage and post-processing. Print it out and bring it into the lab!
:::hint{type="info"}
**This protocol sheet applies to both Flexcera Base and Flexcera Base Ultra+.**
:::
::File{src="https://api.archbee.com/api/presign/uXbZOKjJTGpPhjapQ8fvM-qtEO_TymG5jWgLmFMmwPN-20241109-001637.pdf" label="Flexcera Base and Base Ultra+ protocol v02.00.pdf"}
## Dental Post-Processing Grids
::::VerticalSplit{layout="right"}
:::VerticalSplitItem
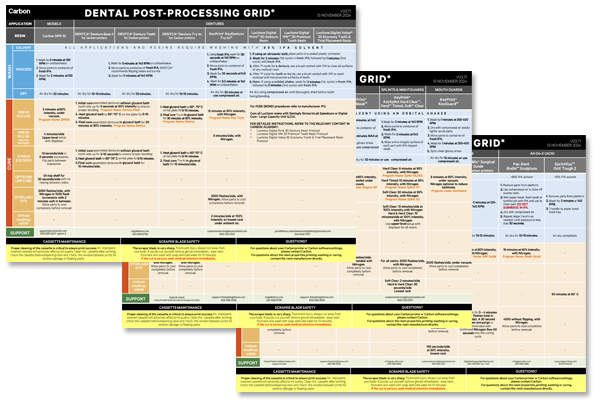
One of our most popular downloads! This table provides washing and curing instructions for all supported dental resins.
Print it and use it in the lab as a quick reference.
:::
:::VerticalSplitItem
:::
::::
::::VerticalSplit{layout="left"}
:::VerticalSplitItem
**English**
:::
:::VerticalSplitItem
::File{src="https://api.archbee.com/api/presign/3CesIL2dYMCHPZvRjp8S0/vQ2WsRger2d-CoLrn-m5f_dental-post-processing-grids-v0501.pdf" label="Dental-Post-Processing-Grids_v0501.pdf"}
:::
::::
::::VerticalSplit{layout="left"}
:::VerticalSplitItem
**German/Deutsch**
:::
:::VerticalSplitItem
::File{src="https://api.archbee.com/api/presign/uXbZOKjJTGpPhjapQ8fvM-seBSLAiWUzNDRI1GCLlop-20241125-214312.pdf" label="ZAHNÄRZTLICHES NACHBEARBEITUNGSGITTER v03.71 DE Deutsch.pdf"}
:::
::::
::::VerticalSplit{layout="left"}
:::VerticalSplitItem
**Spanish/Español**
:::
:::VerticalSplitItem
::File{src="https://api.archbee.com/api/presign/uXbZOKjJTGpPhjapQ8fvM-2i0UhzOfuA4aYJFusL1v2-20241203-180542.pdf" label="Rejilla de Posprocesamiento Dental v03.71 ES Espanol Spanish.pdf"}
:::
::::
## Preparation Options
There are two options to properly prepare your denture bases for printing:
- **manually**
- **automatically **using [Automate: Automatic Print Preparation (APP)](docId\:RdxnuAgHPa5GQfBl5QYSb)
:::hint{type="info"}
This guide provides instruction for **manual preparation.**
Reference [Denture Bases Automation Guidelines](docId\:ncGcxXQeyt610ogaVBKLe) if using APP. *`login required`*
:::
:::hint{type="success"}
Reference all [Printer UI](docId\:oId4ZNZtZYeltTPVJ984a) content for functionality and instructions not explicitly covered on this page.
:::
# General Orientation & Support Information
## Hide the Platform
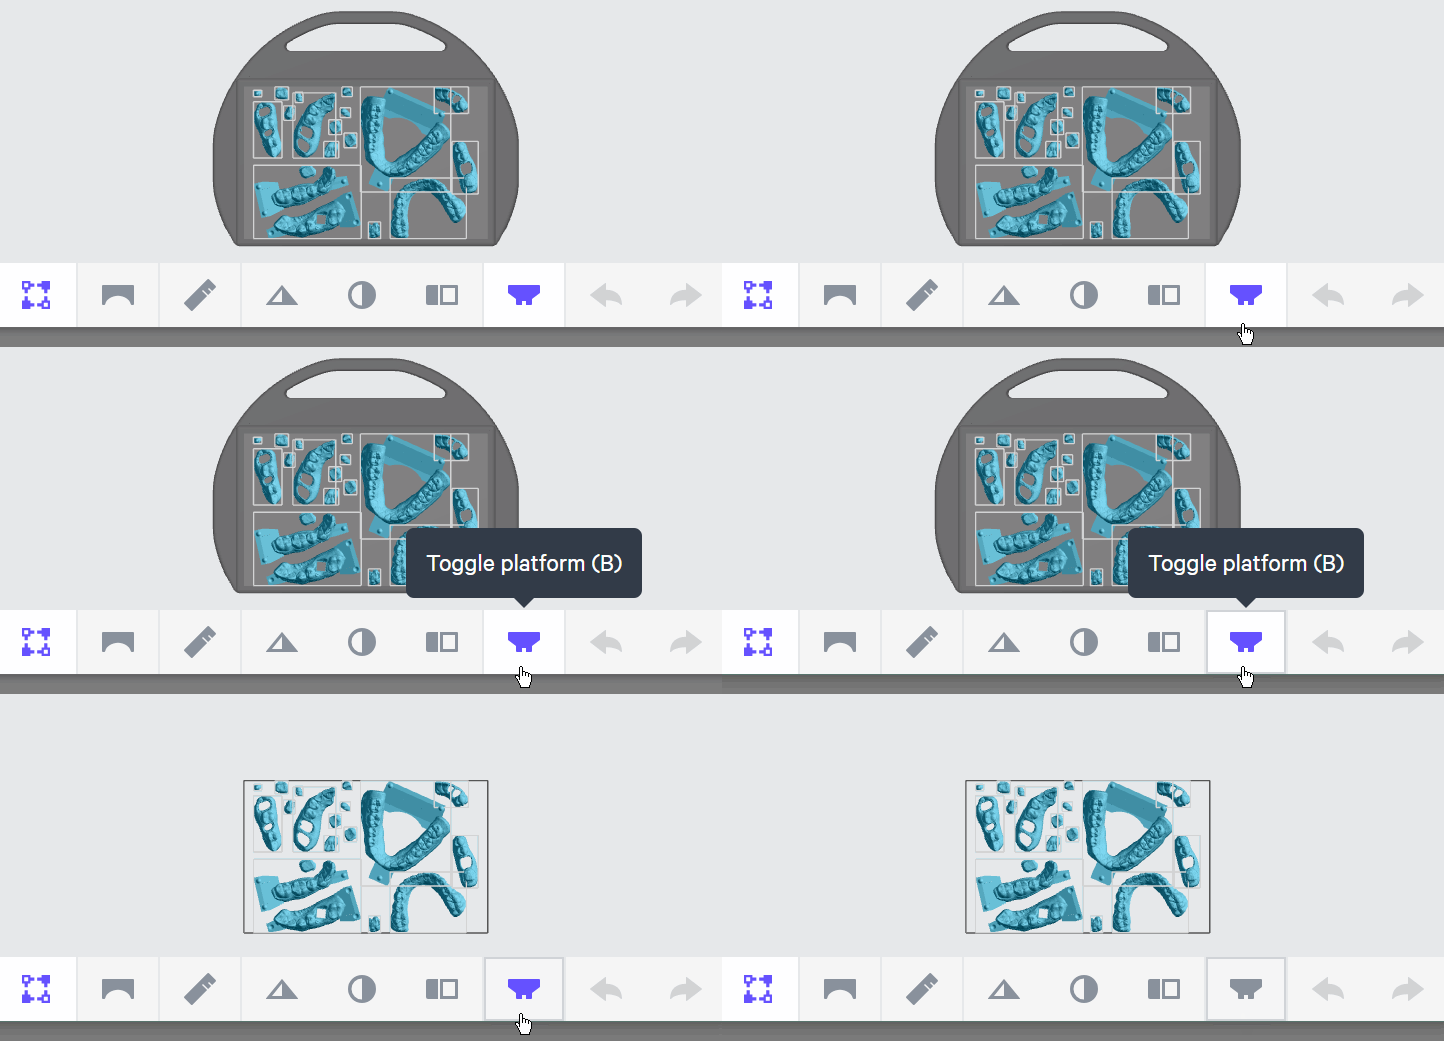
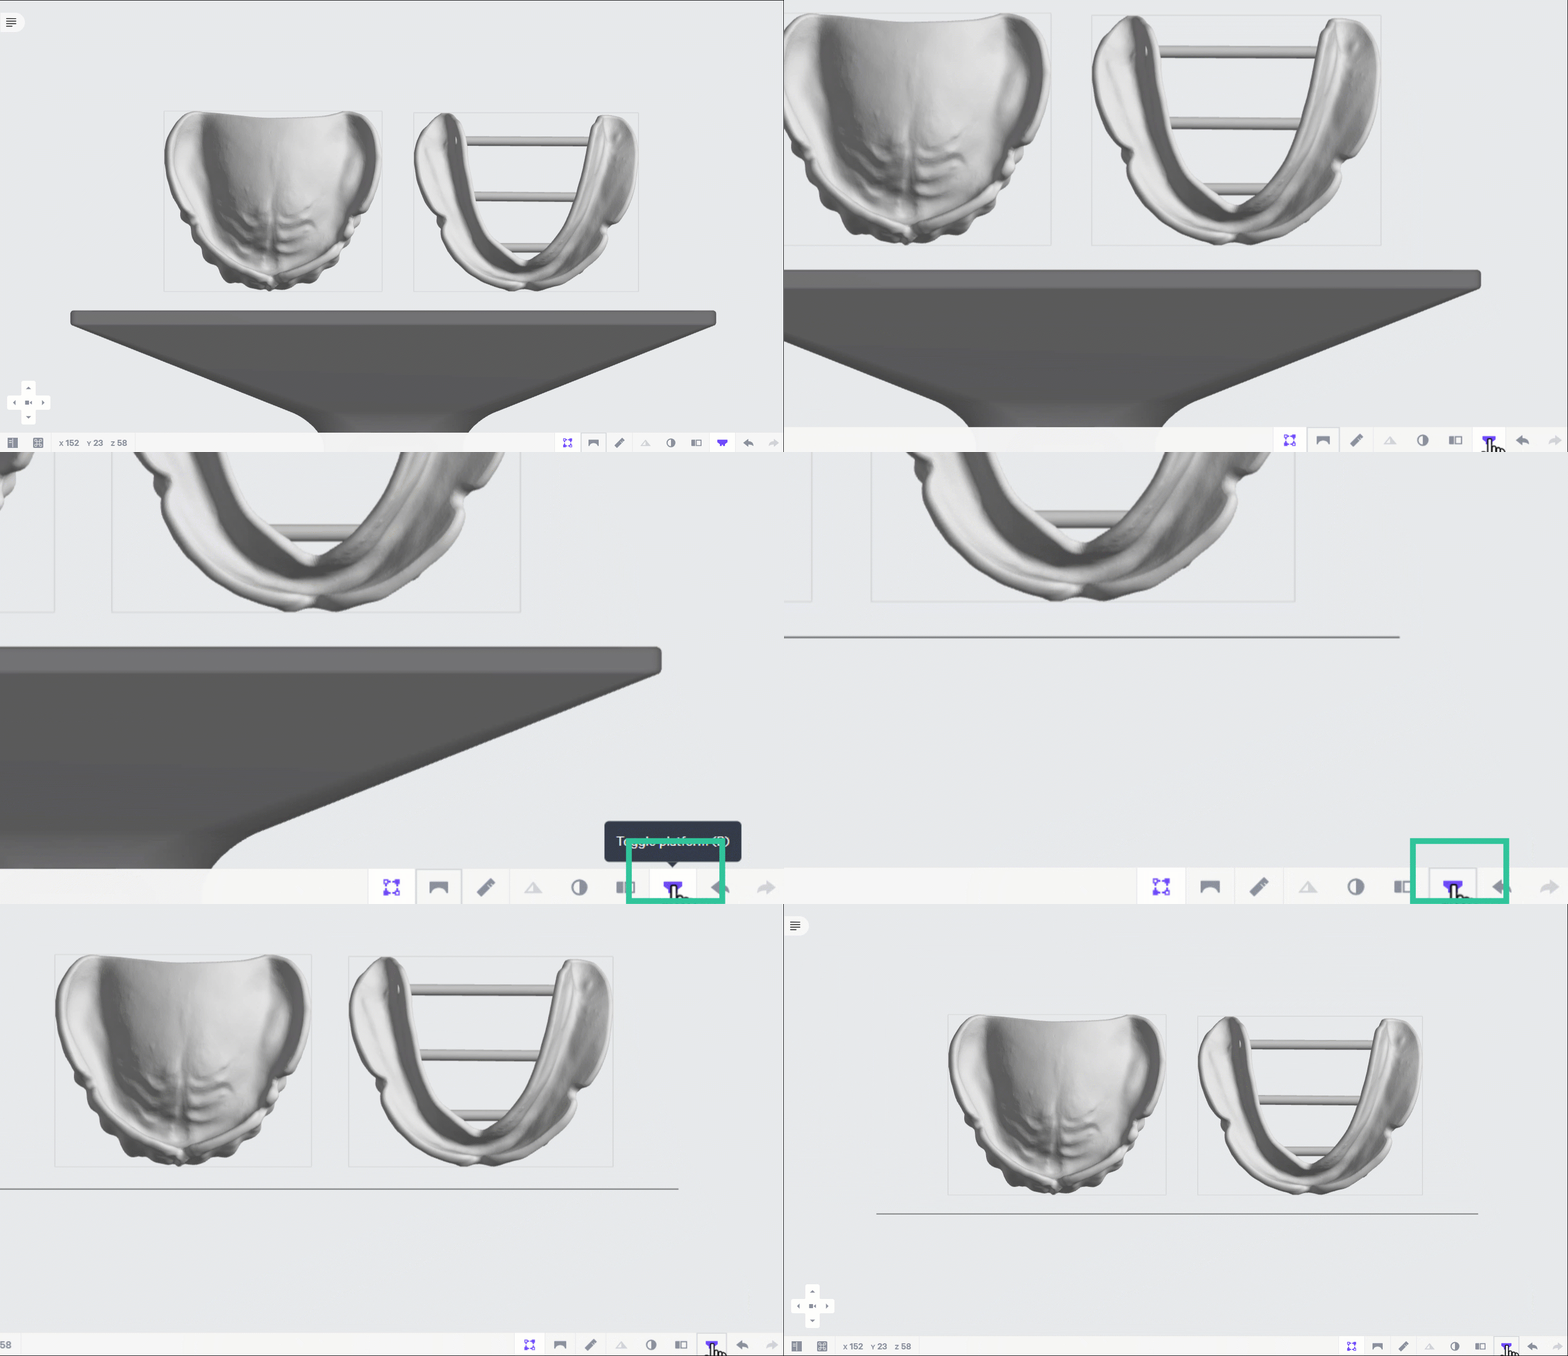
Use **Toggle platform** (or press **B**) to hide the platform before orienting parts. This will make it easier to see overhangs and place supports.
## Use Patch and Fence tools to create supports
::::VerticalSplit{layout="middle"}
:::VerticalSplitItem
### Patch tool
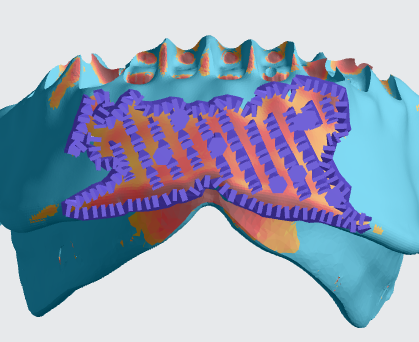
- The [Patch tool](docId\:VUbpoAitbLM11aM9-qJ1p) speeds up support creation by automatically supporting an area with just a few clicks. It is useful for supporting **larger areas** of overhang that would take longer to support manually.
- It is often useful to support your parts with this tool **before **manually adding supports.
::Image[]{src="https://res.cloudinary.com/carbon3d/image/upload/v1741914725/Education/Materials/dental/__General_Use/standard-support-menu-patch.png" size="50" width="208" height="73" position="flex-start" showCaption="false"}
:::
:::VerticalSplitItem
:::
::::
::::VerticalSplit{layout="middle"}
:::VerticalSplitItem
### Fence tool
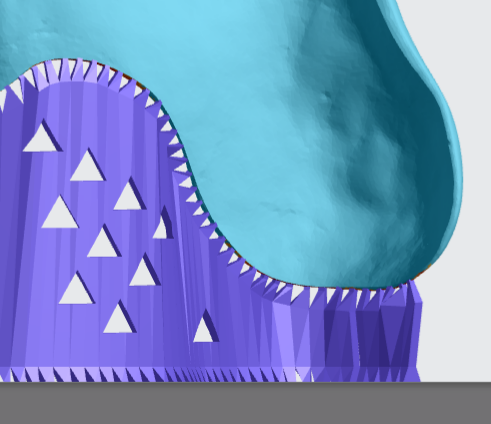
- [Fence supports](docId\:VUbpoAitbLM11aM9-qJ1p) are manually placed by the user and are best suited on **linear overhangs **or smaller areas.
- Fences provide stability while leaving smaller nubs than the default Bars option.
::Image[]{src="https://res.cloudinary.com/carbon3d/image/upload/v1741914724/Education/Materials/dental/__General_Use/standard-support-menu-fence.png" size="50" width="214" height="77" position="flex-start" showCaption="false"}
:::
:::VerticalSplitItem
:::
::::
## Support Creation Workflows
### Enter Support mode
1. Click **Support tab or Shift + S** in the top bar.
2. Select the part you want to support.
3. Under **Position**, select **Above Platform** to lift parts off the platform.
::Image[]{src="https://api.archbee.com/api/optimize/3CesIL2dYMCHPZvRjp8S0/zE7gnp0RIhGKifPhw3j0t_image.png" size="70" width="1680" height="671" position="center" alt="Support mode button" showCaption="false"}
### Patch workflow
1. Select the part to be supported.
2. Orient the camera so that the overhangs are clearly visible.
3. Check that **Patch **is selected.
4. Click on each large overhang to select it. A green patch will appear over each overhang. Repeat until all the large overhangs are selected.
5. Under **Support Attributes → Primary Support Type,** select **Fence.**
6. The other Support Attributes should remain their default values.
7. Click **Generate All** to create the support fences.
### Fence workflow
1. Select **Fence **tool.
2. Click a **series of points** in an area of overhang to define the fence.
3. Target long, narrow overhangs and small overhangs.
4. Click **ESC key **to finish adding points to a polyline.
5. Hold down **E key** to reposition points.
6. Click off of the part and drag a box to select points. Press **Backspace **to delete.
7. Click a polyline to select for editing.
8. Support Attributes should remain their default values.
9. Click **Generate All** to create the support fences.
10. Repeat steps 1 - 5 as needed.
11. Alternately, you can add multiple polylines as needed and then click **Generate All** to create multiple fences at once.
:::hint{type="info"}
Review [Supports](docId\:VUbpoAitbLM11aM9-qJ1p) in [Printer UI](docId\:oId4ZNZtZYeltTPVJ984a) course for more information.
:::
# Orientation & Support of Full Dentures
:::hint{type="info"}
**This information applies to both Flexcera Base and Flexcera Base Ultra+.**
:::
***
### Connect to Printer
::::VerticalSplit{layout="left"}
:::VerticalSplitItem
Connect to the printer software using your web browser.
:::
:::VerticalSplitItem
::Image[]{src="https://res.cloudinary.com/carbon3d/image/upload/t_auto_quality_format/Education/Materials/dental/__General_Use/Connect-printer_thumbnail.png" size="70" width="774" height="319" darkWidth="774" darkHeight="319" position="flex-start" alt="Connect to Printer" showCaption="false"}
:::
::::
::::::::ExpandableHeading
*Expand for steps*
:::::::WorkflowBlock
:::::WorkflowBlockItem
::::VerticalSplit{layout="middle"}
:::VerticalSplitItem
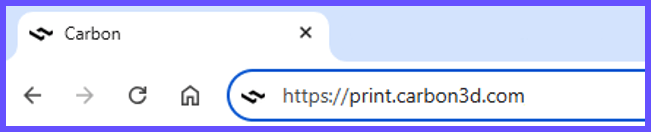
**Open browser**
Enter [https://print.carbon3d.com](https://print.carbon3d.com/) in the URL field.
:::
:::VerticalSplitItem
:::
::::
:::hint{type="info"}
Latest version of Chrome recommended.
:::
:::::
:::::WorkflowBlockItem
::::VerticalSplit{layout="middle"}
:::VerticalSplitItem
If you are not automatically logged in, enter your email and password and **click Log In****.**
:::
:::VerticalSplitItem
::Image[]{src="https://res.cloudinary.com/carbon3d/image/upload/t_auto_quality_format/Education/Materials/dental/__General_Use/Connect-login.png" size="60" width="561" height="677" darkWidth="561" darkHeight="677" position="center" alt="Carbon Log In" showCaption="false"}
:::
::::
:::::
::::::WorkflowBlockItem
:::::VerticalSplit{layout="middle"}
::::VerticalSplitItem
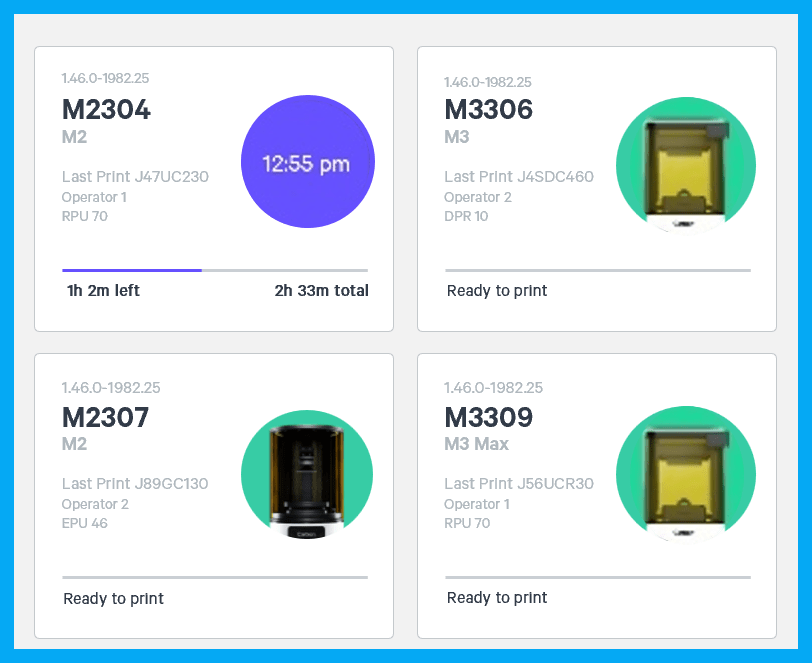
If you have multiple printers, **select the printer** that you wish to use to create the project.
:::hint{type="info"}
You may queue the build to other printers.
:::
::::
:::VerticalSplitItem
:::
:::::
::::::
:::::::
::::::::
***
### Create Project
::::VerticalSplit{layout="left"}
:::VerticalSplitItem
After you have chosen the printer, you must create a new project.
:::
:::VerticalSplitItem
::Image[]{src="https://res.cloudinary.com/carbon3d/image/upload/t_auto_quality_format/Education/Materials/dental/__General_Use/Create-project_thumbnail.png" size="70" width="673" height="247" darkWidth="673" darkHeight="247" position="flex-start" alt="Create Project" showCaption="false"}
:::
::::
::::::ExpandableHeading
*Expand for steps*
:::::WorkflowBlock
:::WorkflowBlockItem
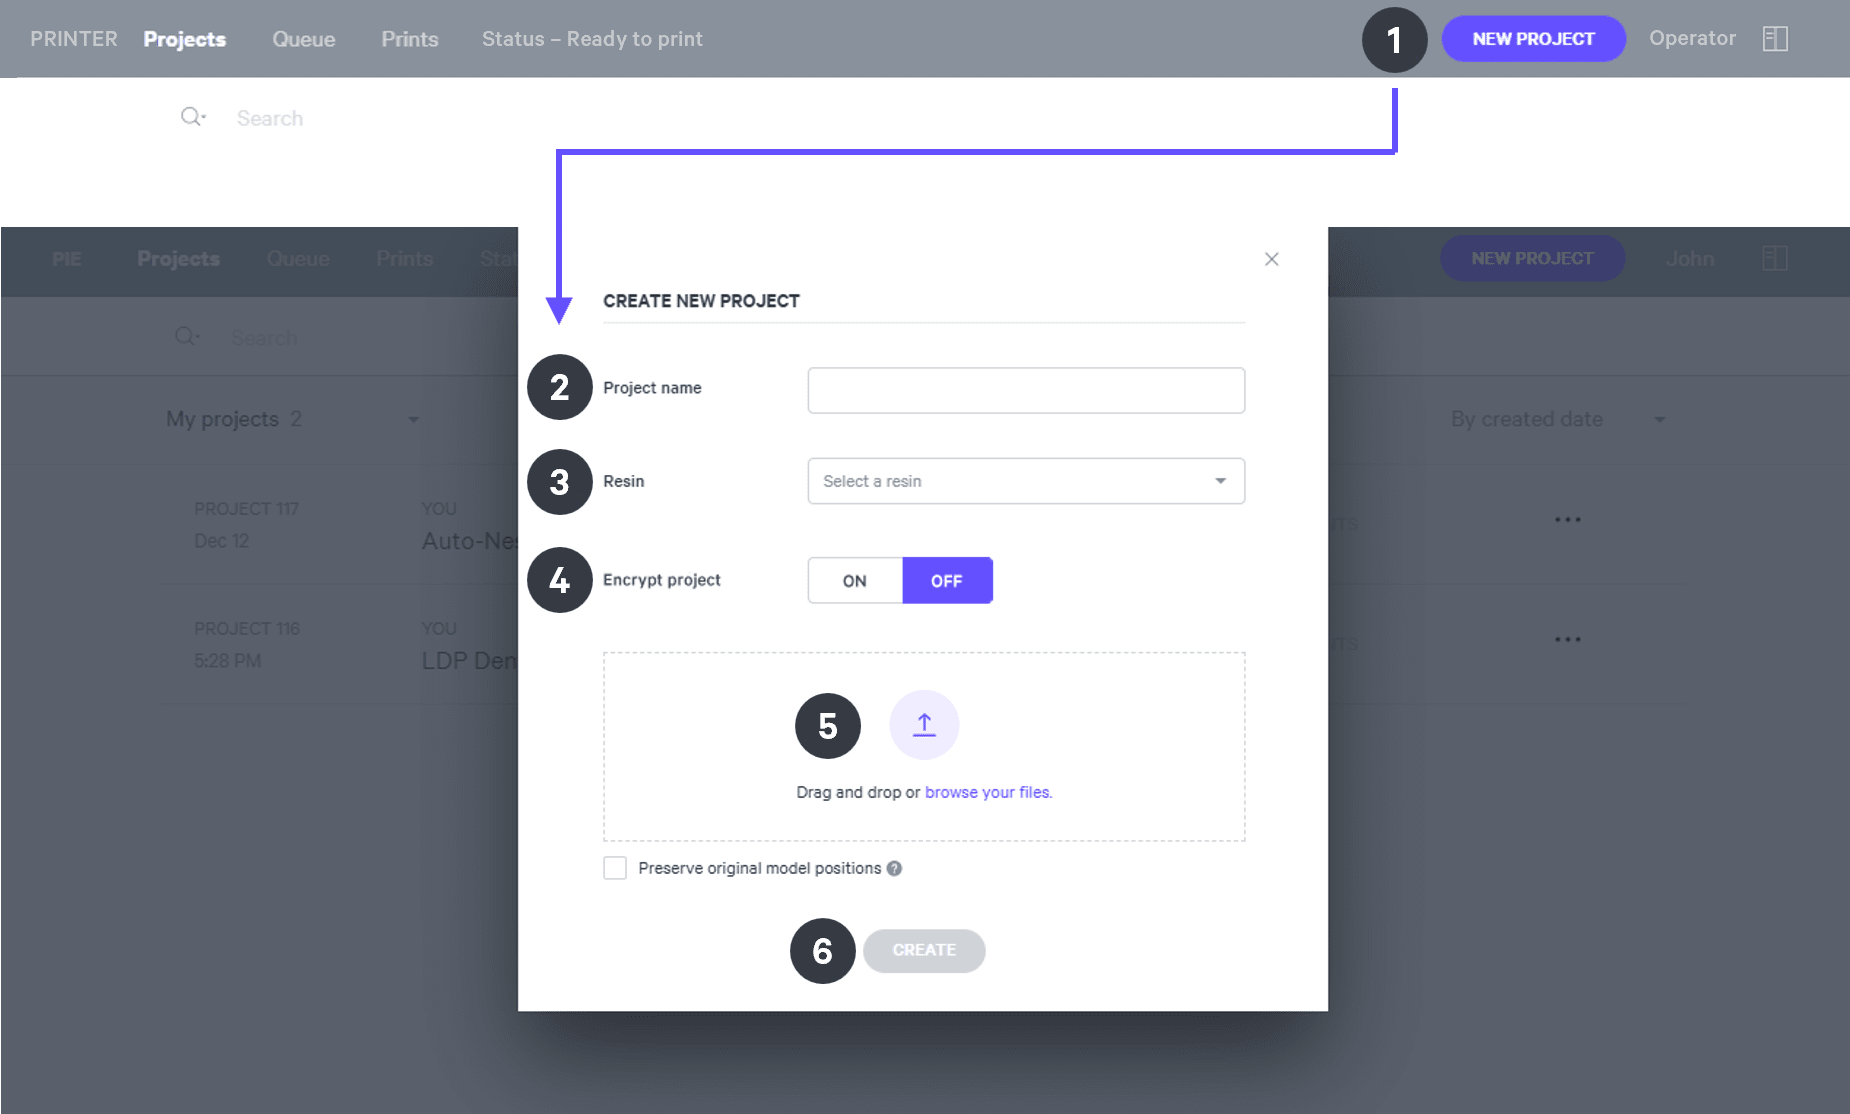
Click **New Project.**
You can also drag your files from a file browser window and drop it on top of the **New Project** icon.
:::
:::WorkflowBlockItem
Enter a new **Project name.**
:::
:::WorkflowBlockItem
In the Resin dropdown, select **your resin.**
:::
::::WorkflowBlockItem
Only use [Encrypt project](docId:1bT3mas8msvxq9CDza67C) if you want to require a password to access the project.
:::hint{type="warning"}
**Carbon cannot provide support** for encrypted projects.
:::
::::
:::WorkflowBlockItem
**Drag and drop** your part files into the dotted box or click **browse your files **and select them in a file browser window.
:::
:::WorkflowBlockItem
Click **Create**
After a few moments you will see the project printer interface with your parts on the platform.
:::
:::::
::::::
***
## Manual Orientation
:::::::WorkflowBlock
::::::WorkflowBlockItem
:::::ExpandableHeading{isOpen="true"}
### Select Resin
::::VerticalSplit{layout="middle"}
:::VerticalSplitItem

:::
:::VerticalSplitItem
1. Click the resin drop down menu in the top left corner of the menu bar.
2. Select **Flexcera Base** or **Flexcera Base Ultra+** as needed.
:::
::::
:::::
::::::
::::::WorkflowBlockItem
:::::ExpandableHeading{isOpen="true"}
### Orientation of Denture Bases
:::hint{type="warning"}
**Proper orientation of bases is critical to achieve the required accuracy. Failure to orient denture bases according to these instructions may impact accuracy and part quality.**
:::
::::VerticalSplit{layout="middle"}
:::VerticalSplitItem
**LOWER DENTURE BASE**
- Oriented vertically at a **90 degree** angle.
- **Anterior** touches the platform.
:::
:::VerticalSplitItem

:::
::::
::::VerticalSplit{layout="middle"}
:::VerticalSplitItem
**UPPER DENTURE BASE**
- Oriented vertically at a **90 degree** angle.
- **Anterior** touches the platform.
:::
:::VerticalSplitItem

:::
::::
**Step 1: Minimize Footprint**
::::VerticalSplit{layout="middle"}
:::VerticalSplitItem

:::
:::VerticalSplitItem
**Minimize footprint**
1. Click **Orient** or press **Shift + o** in the main bar in the printer software.
2. Click **Minimize Footprin****t** button. This will orient the base roughly perpendicular to the platform.
:::
::::
**Step 2: Tilt into Position**
1. Make sure the denture is selected.
2. Click on the axis loop and rotate the denture into place.
3. The **anterior **of each denture should be touching the platform.
**For both the lower and upper denture bases, rotate 90 degrees.**
::::VerticalSplit{layout="middle"}
:::VerticalSplitItem

:::
:::VerticalSplitItem
:::
::::
:::::
::::::
:::::::
**Your denture bases are now properly oriented and ready to be supported.**
## Manual Support
### Support Strategy
::::VerticalSplit{layout="middle"}
:::VerticalSplitItem

:::
:::VerticalSplitItem
Denture bases are supported using two tools:
- **The Patch tool** automatically creates a field of supports. It is used to create supports for the **anterior facial region**.
- **The Fence tool** is used to manually place a thin wall of supports. Fences are placed along the lingual and buccal edges for lower dentures and along lingual edges on upper dentures. In some cases, fences are needed on T-bars or the posterior edges of upper dentures.
:::
::::
:::hint{type="danger"}
**Note\: Do not put supports on intaglio surfaces.**
:::
### Support Setup
Before starting, optimize the interface for adding fences.
::::VerticalSplit{layout="middle"}
:::VerticalSplitItem
- Click **Toggle Platform button** in the lower tool bar or press the **B key** to hide the platform. This will enable better visibility during fence creation.
:::
:::VerticalSplitItem
:::
::::
::::VerticalSplit{layout="middle"}
:::VerticalSplitItem
- Click **Overhang Detection button**** (V key)** to find areas that need support.
- Set the angle to **40-60 degrees**.
:::
:::VerticalSplitItem

:::
::::
### Enter Support Mode
::::VerticalSplit{layout="middle"}
:::VerticalSplitItem

:::
:::VerticalSplitItem
1. Click **Supports** in the dark gray bar.
2. Under **Part Position**, select **Above** to create room between the platform and the part.
3. Click the **Manual** tab and select **Patch****.**
4. Leave the **Support Attributes **at the default values.
:::
::::
### Support Denture
**Support Anterior Area and edges with Patch Supports**
::::VerticalSplit{layout="middle"}
:::VerticalSplitItem
The outer anterior area is typically a large overhang that requires dense fence supports. This area must be supported with the **Patch **support tool. This is required for **both upper and lower dentures. **The example pictured is an **upper denture.**
1. While in the **Supports **menu, click the **Manual **tab and select **Patch**.
2. **Click in the large overhang on the anterior of the upper base**. A green patch will appear.
3. Under **Support Attributes **click **Primary Support Type **and select **Fence**.
4. In the **Spacing **box, spalce supports between **3-5 mm**.
5. Scroll down to the bottom of the Supports menu and turn **Boundary Fence ****on**.
6. Adjust the **Overhang **slider untile the highlighted overhang areas are covered by the green patch. Typically this will be between **40 and 60 degrees**.
7. Click **Generate all**.
:::
:::VerticalSplitItem

:::
::::
**See a demonstration of using the Patch tool in the video below.**
::embed[]{url="https://player.vimeo.com/video/890098694?dnt=1"}
::::VerticalSplit{layout="middle"}
:::VerticalSplitItem
:::
:::VerticalSplitItem
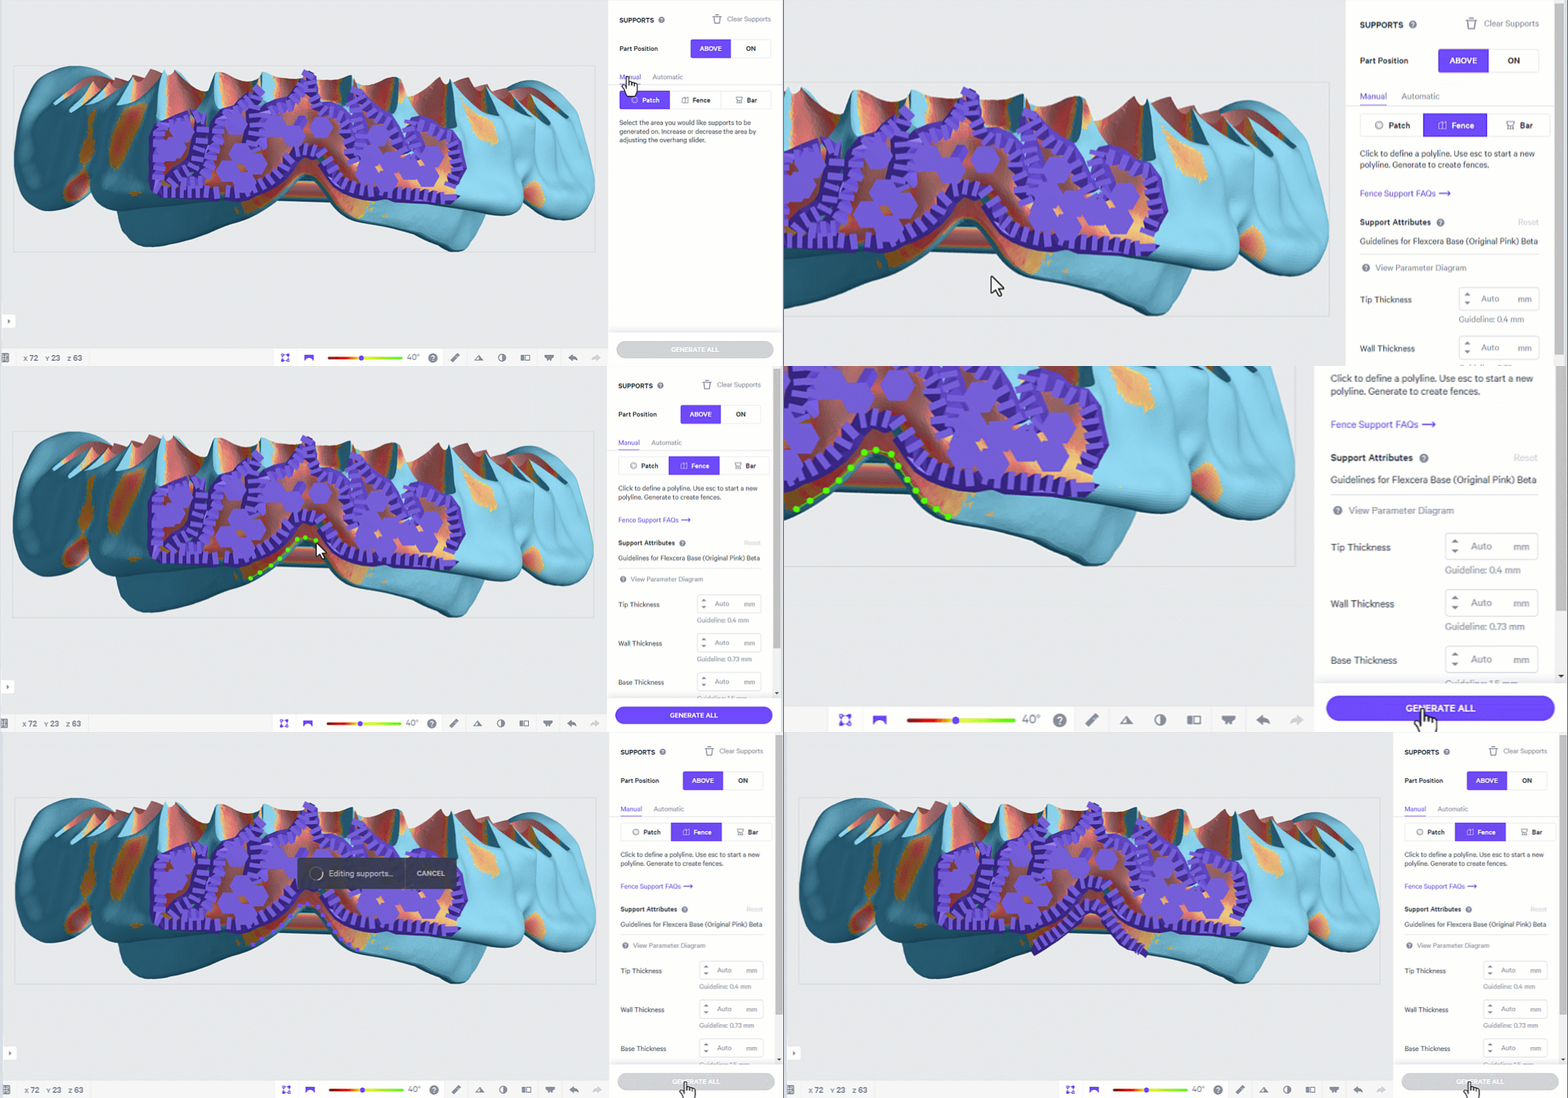
**Inner edge of lower denture**
The inner edge of the lower denture requires manual **fence supports**:
1. Click a series of points along the edge to define the fence.
2. Click **Esc** key on the keyboard to end a fence and begin another.
3. Hold down the **E** key and click with the mouse to reposition points.
4. Click **Generate All **to create the fence geometry. This may take a few minutes.
:::
::::
:::hint{type="warning"}
**Be sure to set Part Position to ABOVE before you begin adding supports.**
:::
::::VerticalSplit{layout="middle"}
:::VerticalSplitItem
**Error: Support couldn't be added**
**Sometimes an error will occur when you try to generate a new fence**.
If this happens the points will turn pink and an error messsage will appear.
Try making multiple shorter fences or try adding the fence in a slightly different place.
:::
:::VerticalSplitItem

:::
::::
::::VerticalSplit{layout="middle"}
:::VerticalSplitItem

:::
:::VerticalSplitItem
**Posterior edge of upper denture**
Although **upper dentures** do not have an inner edge, they may require **supports along the posterior edge** to ensure proper accuracy**.**
:::
::::
::::VerticalSplit{layout="middle"}
:::VerticalSplitItem
**Lower denture T-bars**
1. Click a series of points along the bottom surface of the T-bars to define the fence.
2. Click **Esc** key on the keyboard to end a fence and begin another.
3. Hold down the **E **key and click with the mouse to reposition points.
4. Click **Generate All** to create the fence geometry. This may take a few minutes.
:::
:::VerticalSplitItem

:::
::::
### Well Supported Dentures
Use the images below as a reference for well supported upper and lower dentures. Click the images to zoom in.
::::VerticalSplit{layout="middle"}
:::VerticalSplitItem

:::
:::VerticalSplitItem

:::
::::
::::VerticalSplit{layout="middle"}
:::VerticalSplitItem

:::
:::VerticalSplitItem

:::
::::
# Orientation & Support of Partial Dentures
## Manual Orientation
:::hint{type="info"}
**This information applies to Flexcera Base Ultra+**
:::
***
### Connect to Printer
::::VerticalSplit{layout="left"}
:::VerticalSplitItem
Connect to the printer software using your web browser.
:::
:::VerticalSplitItem
::Image[]{src="https://res.cloudinary.com/carbon3d/image/upload/t_auto_quality_format/Education/Materials/dental/__General_Use/Connect-printer_thumbnail.png" size="70" width="774" height="319" darkWidth="774" darkHeight="319" position="flex-start" alt="Connect to Printer" showCaption="false"}
:::
::::
::::::::ExpandableHeading
*Expand for steps*
:::::::WorkflowBlock
:::::WorkflowBlockItem
::::VerticalSplit{layout="middle"}
:::VerticalSplitItem
**Open browser**
Enter [https://print.carbon3d.com](https://print.carbon3d.com/) in the URL field.
:::
:::VerticalSplitItem

:::
::::
:::hint{type="info"}
Latest version of Chrome recommended.
:::
:::::
:::::WorkflowBlockItem
::::VerticalSplit{layout="middle"}
:::VerticalSplitItem
If you are not automatically logged in, enter your email and password and **click Log In****.**
:::
:::VerticalSplitItem
::Image[]{src="https://res.cloudinary.com/carbon3d/image/upload/t_auto_quality_format/Education/Materials/dental/__General_Use/Connect-login.png" size="60" width="561" height="677" darkWidth="561" darkHeight="677" position="center" alt="Carbon Log In" showCaption="false"}
:::
::::
:::::
::::::WorkflowBlockItem
:::::VerticalSplit{layout="middle"}
::::VerticalSplitItem
If you have multiple printers, **select the printer** that you wish to use to create the project.
:::hint{type="info"}
You may queue the build to other printers.
:::
::::
:::VerticalSplitItem

:::
:::::
::::::
:::::::
::::::::
***
### Create Project
::::VerticalSplit{layout="left"}
:::VerticalSplitItem
After you have chosen the printer, you must create a new project.
:::
:::VerticalSplitItem
::Image[]{src="https://res.cloudinary.com/carbon3d/image/upload/t_auto_quality_format/Education/Materials/dental/__General_Use/Create-project_thumbnail.png" size="70" width="673" height="247" darkWidth="673" darkHeight="247" position="flex-start" alt="Create Project" showCaption="false"}
:::
::::
::::::ExpandableHeading
*Expand for steps*

:::::WorkflowBlock
:::WorkflowBlockItem
Click **New Project.**
You can also drag your files from a file browser window and drop it on top of the **New Project** icon.
:::
:::WorkflowBlockItem
Enter a new **Project name.**
:::
:::WorkflowBlockItem
In the Resin dropdown, select **your resin.**
:::
::::WorkflowBlockItem
Only use [Encrypt project](docId:1bT3mas8msvxq9CDza67C) if you want to require a password to access the project.
:::hint{type="warning"}
**Carbon cannot provide support** for encrypted projects.
:::
::::
:::WorkflowBlockItem
**Drag and drop** your part files into the dotted box or click **browse your files **and select them in a file browser window.
:::
:::WorkflowBlockItem
Click **Create**
After a few moments you will see the project printer interface with your parts on the platform.
:::
:::::
::::::
***
:::::::WorkflowBlock
::::::WorkflowBlockItem
:::::ExpandableHeading{isOpen="true"}
### Select Resin
::::VerticalSplit{layout="middle"}
:::VerticalSplitItem

:::
:::VerticalSplitItem
In the resin menu, double check that **Flexcera Base Ulta+ **has been selected.
:::
::::
:::::
::::::
::::::WorkflowBlockItem
:::::ExpandableHeading{isOpen="true"}
### Orientation of Partial Denture Bases
:::hint{type="danger"}
**Proper orientation of bases is critical to achieve the required accuracy. Failure to orient denture bases according to these instructions may impact accuracy and part quality.**
:::
::::VerticalSplit{layout="middle"}
:::VerticalSplitItem
**Cameo **surfaces face the platform. In other words, intaglio surfaces face away from platform.
:::
:::VerticalSplitItem

:::
::::
::::VerticalSplit{layout="middle"}
:::VerticalSplitItem
Oriented **parallel **with platform
:::
:::VerticalSplitItem

:::
::::
### Manually orient partial denture
::::VerticalSplit{layout="middle"}
:::VerticalSplitItem

:::
:::VerticalSplitItem
1. Click** Orient **or press **Shift + o** in the main bar in the printer software.
2. Use the handles to manually orient the partial denture so it is **parallel to the platform** with cameo surfaces facing the platform.
:::
::::
:::::
::::::
:::::::
**Your partial denture bases are now properly oriented and ready to be supported. **
## Manual Support
### Support Strategy
::::VerticalSplit{layout="middle"}
:::VerticalSplitItem

:::
:::VerticalSplitItem
Partial denture bases are supported using two tools:
- **The Patch tool** automatically creates a field of supports. It is used to create supports for the **anterior facial region**.
- **The Fence tool** is used to manually place a thin wall of supports. Fences are placed along the lingual and buccal edges for lower dentures and along lingual edges on upper dentures. In some cases, fences are needed on T-bars or the posterior edges of upper dentures.
:::
::::
:::hint{type="warning"}
**Support only intaglio surfaces. Leave cameo surfaces free from supports.**
:::
### Support Setup
Before starting, optimize the interface for adding fences.
::::VerticalSplit{layout="middle"}
:::VerticalSplitItem
- Click **Toggle Platform button** in the lower tool bar or press the **B key** to hide the platform. This will enable better visibility during fence creation.
:::
:::VerticalSplitItem

:::
::::
::::VerticalSplit{layout="middle"}
:::VerticalSplitItem
- Click **Overhang Detection button**** (V key) ** to find areas that need support.
- Set the angle to **40-60 degrees**.
:::
:::VerticalSplitItem

:::
::::
### Enter Support mode
::::VerticalSplit{layout="middle"}
:::VerticalSplitItem

:::
:::VerticalSplitItem
1. Click **Supports** in the dark gray bar.
2. Under **Part Position**, select **Above** to create room between the platform and the part.
3. Click the **Manual** tab and select **Patch**.
4. Leave the Support Attributes at the default values.
:::
::::
:::hint{type="warning"}
**Be sure to set Part Position to ABOVE before you begin adding supports.**
:::
### Support Partial Denture
::::VerticalSplit{layout="middle"}
:::VerticalSplitItem
**Support large overhangs with Patch supports**
Large overhangs are most easily supported with the **Patch **support tool. The example pictured is an **upper partial denture.**
1. While in the **Supports** menu, click the **Manual **tab and select **Patch**
2. **Click in the large overhang at the anterior. **A green patch will appear.
3. Under **Support Attributes ** click **Primary Support Type** and select **Fence**.
4. In the **Spacing** box, space supports between **3-5 mm**.
5. Scroll down to the bottom of the Supports menu and turn **Boundary Fence on**.
6. Adjust the **Overhang** slider until the highlighted overhang areas are covered by the green patch. Typically this iwll be between **40 and 60 degrees**.
7. Click **Generate All**.
:::
:::VerticalSplitItem

:::
::::
::::VerticalSplit{layout="middle"}
:::VerticalSplitItem

:::
:::VerticalSplitItem
**Edges and tooth cups**
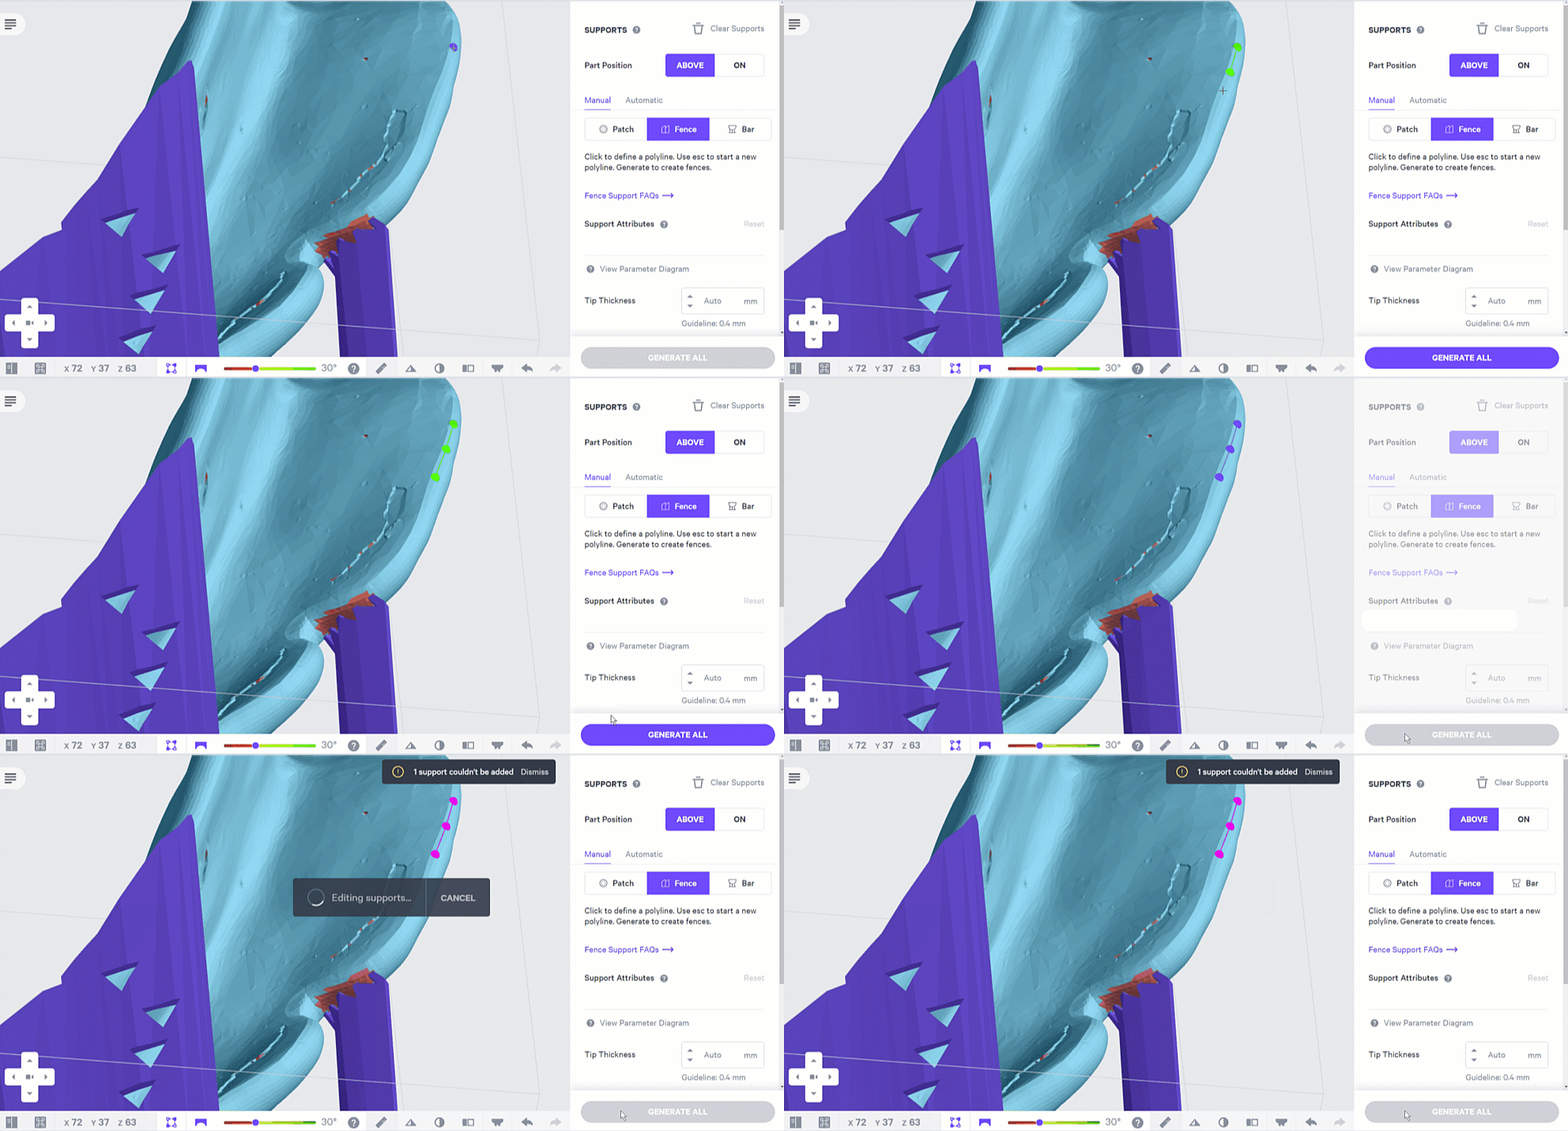
Edges and tooth cups (islands) require manual **fence supports**:
1. Click a **series of points** along the edge/tooth cup to define the fence.
2. Click Esc key on keyboard to end a fence and begin another.
3. Hold down the E key and click with the mouse to reposition points.
4. Click Generate All to create the fence geometry. This may take a few minutes.
5. Repeat as needed until all edges and tooth cups are supported.
:::
::::
::::VerticalSplit{layout="middle"}
:::VerticalSplitItem
**Error: Support couldn't be added**
**Sometimes an error will occur when you try to generate a new fence.**
If this happens, the points will turn pink and an error message will appear.
Try making multiple shorter fences or try adding the fence in a slightly different place.
:::
:::VerticalSplitItem
:::
::::
### Well Supported Partial Denture
Use the images below as a reference for a well supported partial denture. Click the images to zoom in.
::::VerticalSplit{layout="middle"}
:::VerticalSplitItem

:::
:::VerticalSplitItem

:::
::::
# Nesting
Once full or partial dentures have been properly oriented and supported, they should be nested for printing.
1. Select the **Layout** tool in the top menu bar.
2. Under **Auto Layout** select **Gen1** or **Gen2**.
1. Gen1 is Carbon's standard tool
2. Gen2 is Carbon's more recent algorithm that can improve nesting performance.
3. Enter **5 mm in Padding. **Values as low as **1-2 mm** can also be used.
4. For Gen1 auto layout, check **Overlap bounding boxes. **This gives the software maximum flexibility to fit the most possible parts on the build platform.
5. For Gen2 auto layout, 3 options are available for part rotation:** Default** (0°, 90°, 180°, 270°), **Limited** (0°, 180°), **Do not rotate** (0°).
6. Press the **Auto Layout** button to automatically nest the dentures.
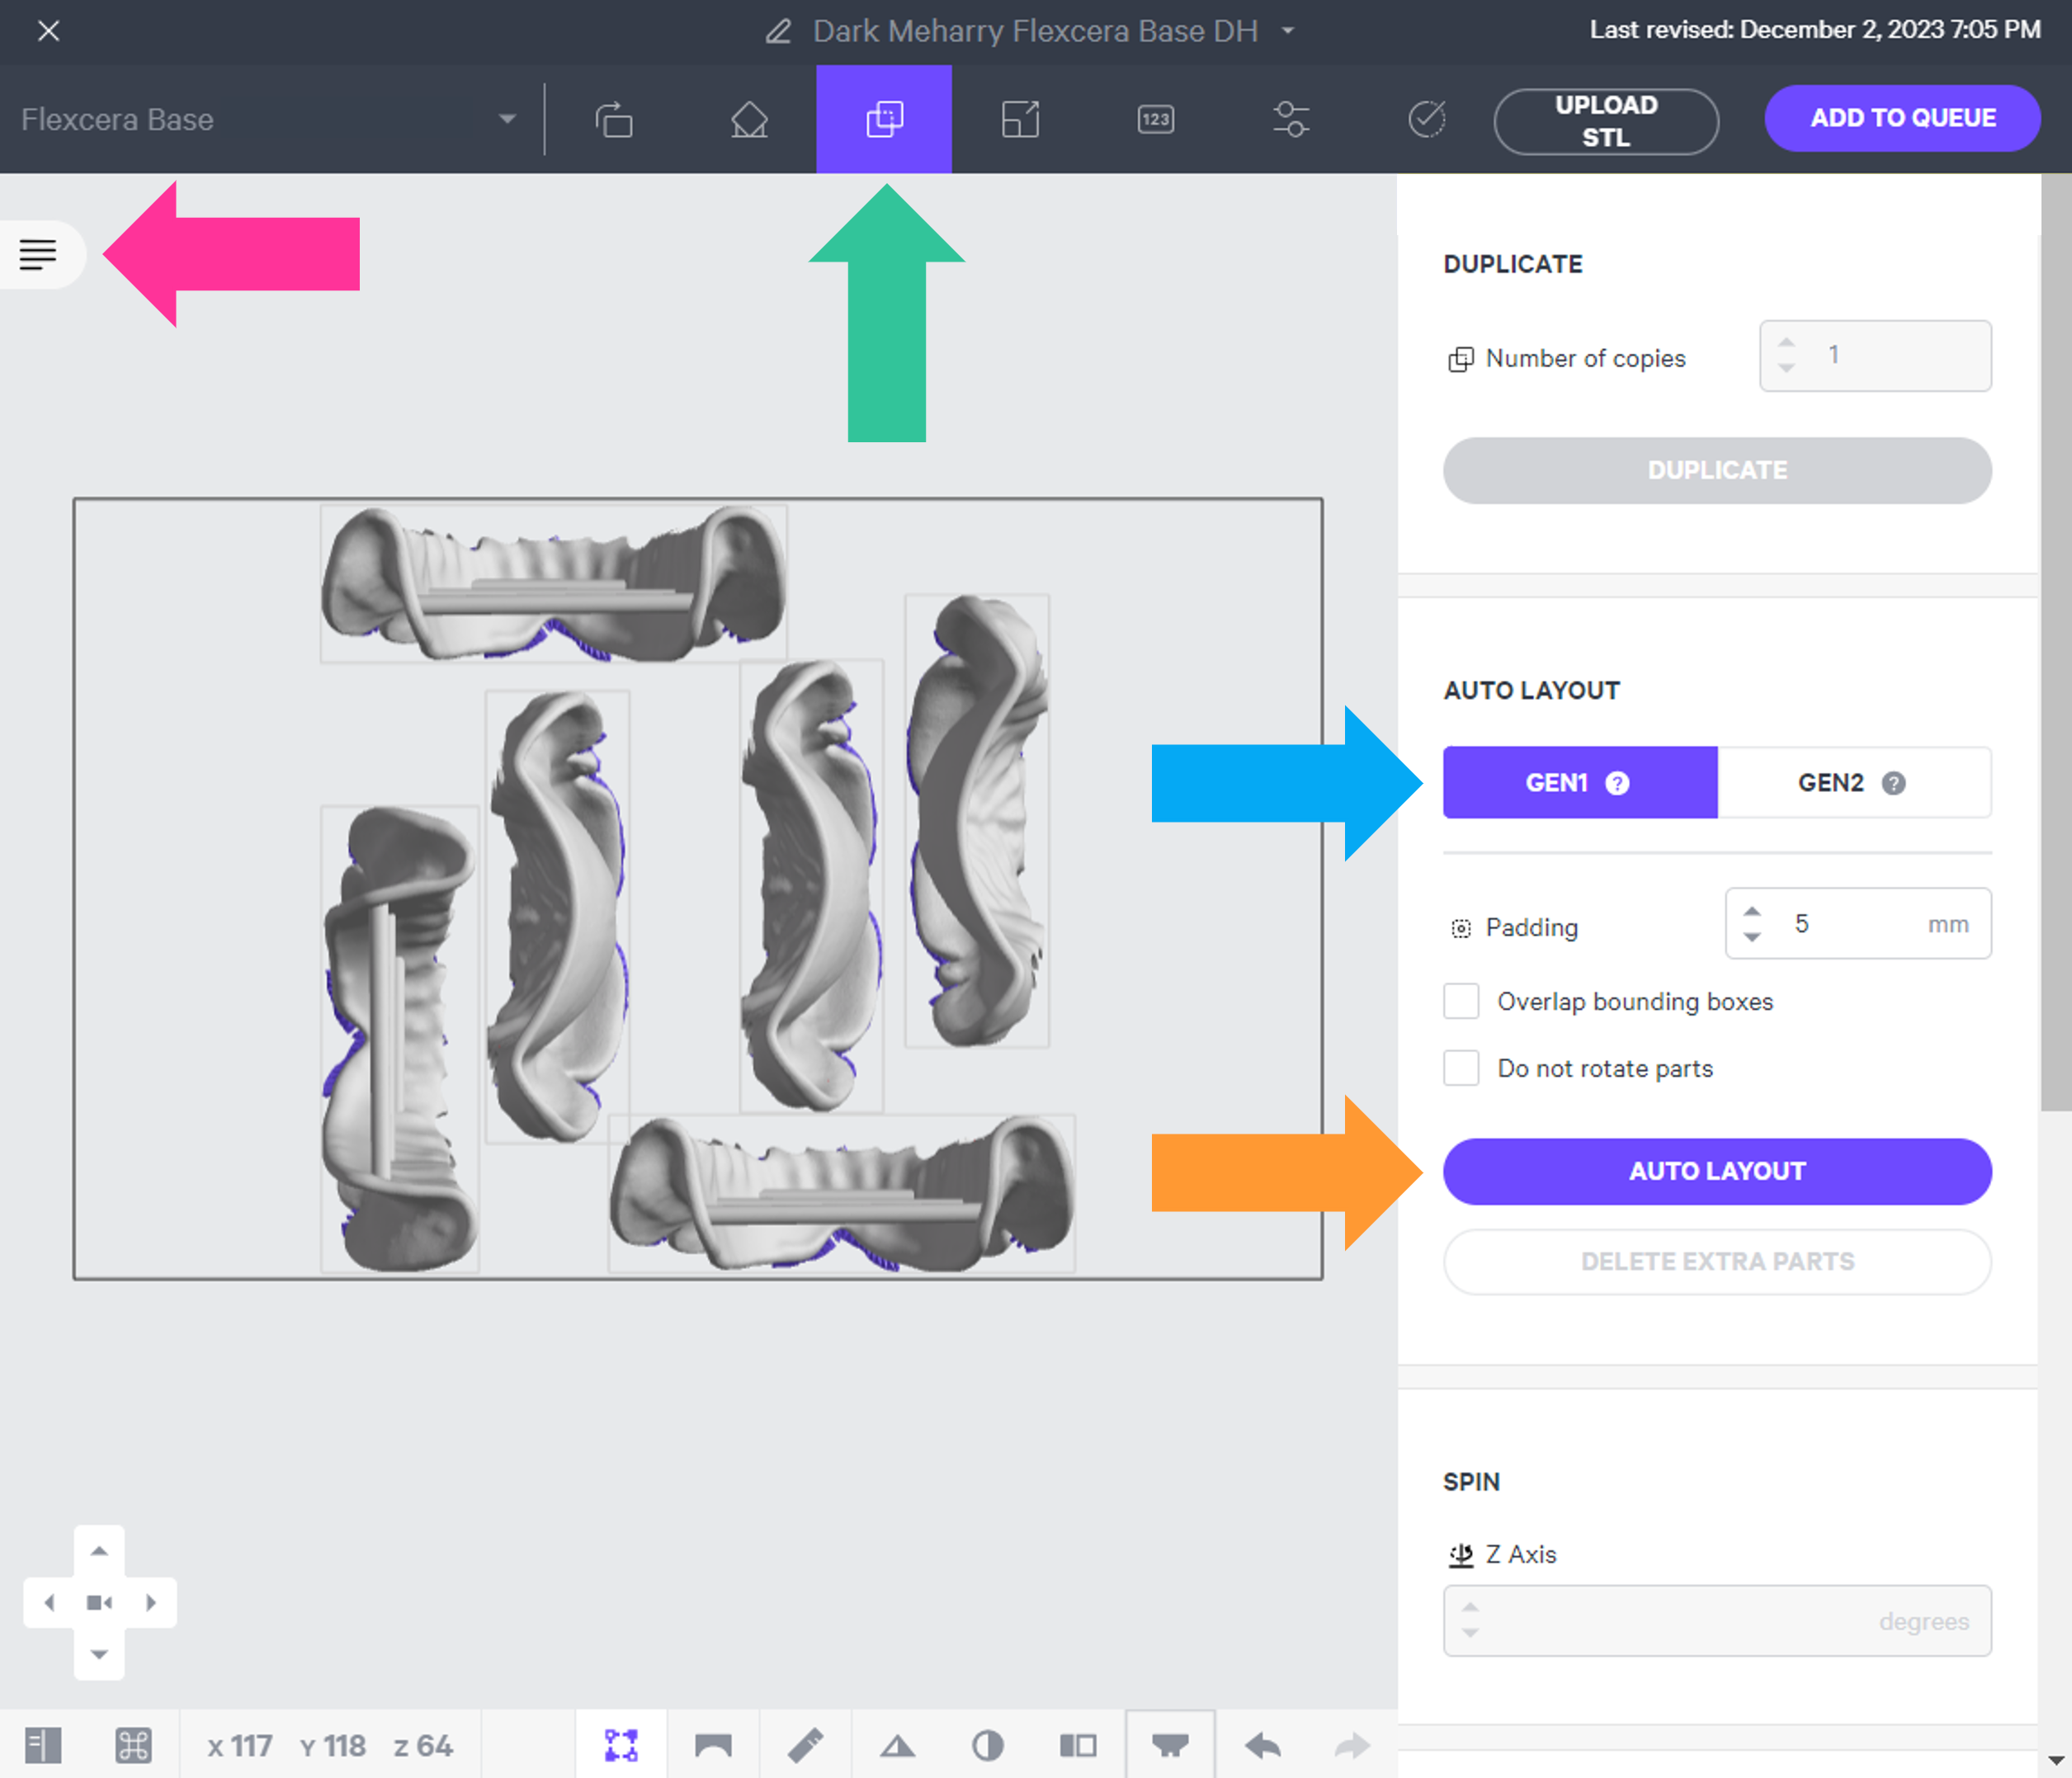
**If necessary, nesting can be changed manually: **
1. Click and drag parts to adjust their position.
2. Modify Z rotation by using the **Spin** tool or by selecting the **Orient **button in the main menu bar and using the Z axis loop.
3. Use the **Part List tab** as needed to more easily select models and focus on them.
The video below shows the process described above.
::embed[]{url="https://vimeo.com/890710211?dnt1=0"}
# Print Preparation
## Print Controls
Click **Print Controls** or **Shift + P** in the top menu bar.

### Slicing
Slice Thickness should be **Standard.**
:::hint{type="warning"}
**Reducing the slice thickness will increase print time and may reduce part quality and accuracy.**
:::
## Project Analysis
1. Select the **Project Analysis** tab.
2. Click **Start Analysis** and wait for the processing to complete.
1. Note the required resin volume and print time.
3. Click **Add to Queue.**

# Manufacturer Instructions for Use
## Flexcera Base
::::LinkArray{contentSource="CUSTOM"}
:::LinkArrayItem{headerType="IMAGE" headerImage="https://api.archbee.com/api/optimize/3CesIL2dYMCHPZvRjp8S0/cJAKqDDnRUAeJAXNRThMm-20251016-221334.png"}
**[Instructions for Use](https://knowledge.desktophealth.com/hc/en-us/articles/4420538637079-Flexcera-Base-Instructions-for-Use)**
:::
::::
## Flexcera Base Ultra+
::::LinkArray{contentSource="CUSTOM"}
:::LinkArrayItem{headerType="IMAGE" headerImage="https://api.archbee.com/api/optimize/3CesIL2dYMCHPZvRjp8S0/cJAKqDDnRUAeJAXNRThMm-20251016-221334.png"}
**[Instructions for Use](https://knowledge.desktophealth.com/hc/en-us/articles/13003470689559-Flexcera-Base-Ultra-Instructions-for-Use)**
:::
::::
# Questions & Support
**For questions about the resin properties, printing, washing or curing your parts, please contact the Desktop Health support team:**
- Submit support ticket: [https://health.desktopmetal.com/support/ticket/](https://health.desktopmetal.com/support/ticket/)
For questions about your **Carbon printer** or **Carbon software settings** used for this resin, please [contact Carbon](https://learn.carbon3d.com/carbon-support):
- Email: [support@carbon3d.com](mailto\:support@carbon3d.com)
- Phone:
- **U.S. and Canada** 1-650-285-6307 option 2
- **Germany** +49 6102 5790849
- **UK **+44 (0) 2082 647484
- Printer UI: On the dashboard, select the **Prints** tab. **Select one of the printed projects.** Click **Request Help** in the lower right corner.
::Image[]{src="https://api.archbee.com/api/optimize/3CesIL2dYMCHPZvRjp8S0/YY6yCChSIB8SevmBwY76W_request-help-01.png" size="70" width="6541" height="3371" position="flex-start" alt="Location of button in the printer software" showCaption="false"}