---
title: Carbon DB 4000
slug: materials/carbon-db-4000
description: Workflow guide for printing Carbon DB 4000 denture resin, including orientation, support setup, layout prep, printer settings, and post-processing.
docTags:
createdAt: 2026-01-29T16:49:05.264Z
---
:::hint{type="success"}
**June 02, 2026 - **FDA cleared for dental devices for fully edentulous patients.
:::
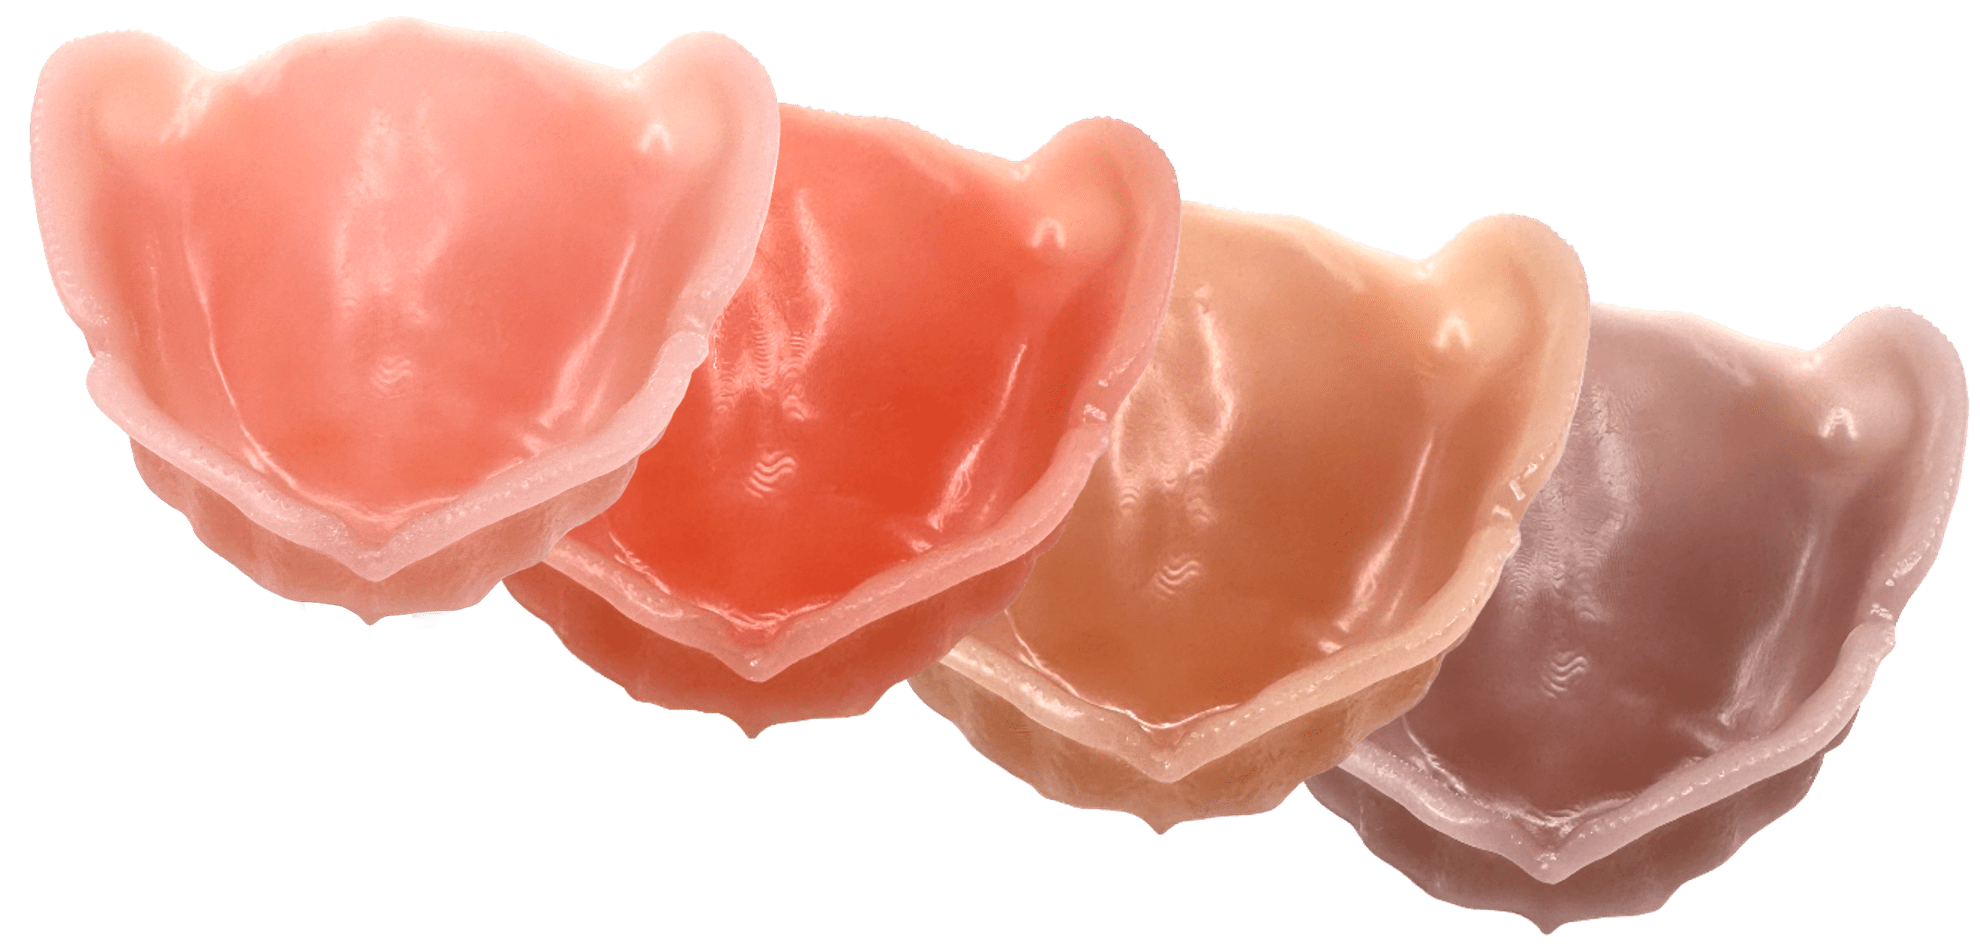
Carbon’s **DB 4000** is an FDA-cleared & ISO 20795-1 compliant, high-impact denture base resin designed for durable, accurate digital dentures.
::::VerticalSplit{layout="left"}
:::VerticalSplitItem
DB 4000 delivers industry-leading fracture toughness and consistent print accuracy with a simple single-cure workflow and seamless integration into the Carbon ecosystem.
Labs can produce reliable, aesthetic denture bases efficiently.
:::
:::VerticalSplitItem

:::
::::
:::hint{type="info"}
**Open Tooth-System Architecture** - Compatible with multiple tooth 3-D printed materials and milled PMMA.
:::
:::hint{type="warning"}
This resin is *not* compatible with the [AO Polishing Cassette](docId\:iFFh3q8-WLk-LIqr87bd5).
:::
## Resource Links
### About the Material
:::::LinkArray{contentSource="CUSTOM"}
::::LinkArrayItem{headerType="IMAGE" headerImage="https://api.archbee.com/api/optimize/3CesIL2dYMCHPZvRjp8S0/FtRbF_oK62PVtl23ORToA_about-the-material.png"}
[About the Material](https://go.carbon3d.com/material-db4000-labs)
:::BlockQuote
*Promotional Content*
:::
::::
:::LinkArrayItem{headerType="IMAGE" headerImage="https://api.archbee.com/api/optimize/3CesIL2dYMCHPZvRjp8S0/OH0belUHXQbntq3FSTCIC-20260603-020408.png"}
**Symbol Glossary**
::File{src="https://api.archbee.com/api/presign/3CesIL2dYMCHPZvRjp8S0/WZ2lpomvT7lPX8dNH1x_J_125693-01-a-db-4000-symbol-glossary.pdf" label="125693-01-A_DB 4000 Symbol Glossary.pdf"}
:::
:::::
### TDS, IFU, SDS
:::::LinkArray{contentSource="CUSTOM" customOrder="fmcqgAh6y2Wux55gFYpTg,VF43CiopHYq55DXcpNhGI,rzh_6tKyGN6bKkmPF8g0D"}
:::LinkArrayItem{headerType="IMAGE" headerImage="https://api.archbee.com/api/optimize/3CesIL2dYMCHPZvRjp8S0/meEa1m4VN4HOvIJpjIIld-20251016-220433.jpg"}
[Technical Data Sheet ](https://docs.carbon3d.com/files/technical-data-sheets/tds_carbon_db4000.pdf)**(TDS)**
:::
:::LinkArrayItem{headerType="IMAGE" headerImage="https://api.archbee.com/api/optimize/3CesIL2dYMCHPZvRjp8S0/cJAKqDDnRUAeJAXNRThMm-20251016-221334.png"}
[Instructions for Use ](https://res.cloudinary.com/carbon3d/image/upload/v1784048619/Carbon_DB4000_IFU_PRINT.pdf)**(IFU)**
:::
::::LinkArrayItem{headerType="IMAGE" headerImage="https://api.archbee.com/api/optimize/3CesIL2dYMCHPZvRjp8S0/1r3fpdvMUMFVZGfey2Tjn-20251016-221405.jpg"}
[Safety Data Sheet](https://www.carbon3d.com/stewardship)** (SDS)**
:::BlockQuote
*Search and login required*
:::
::::
:::::
### Protocol
**Material Protocol Sheet**
This downloadable handout provides important usage information, including instructions about storage and post-processing. Print it out and bring it into the lab!
In this document, you will find the following information.
::::VerticalSplit{layout="middle"}
:::VerticalSplitItem
- Validated Hardware
- Storage Conditions
- Design Guidelines
- Print Preparation Guidelines
:::
:::VerticalSplitItem
- Resin Mixing and Dispensing
- Washing
- Curing
:::
::::
::File{src="https://api.archbee.com/api/presign/3CesIL2dYMCHPZvRjp8S0/6Zy5bP9gXbsTBq62S_8rg_125690-01-b-db-4000-protocol.pdf" label="125690-01-B_DB 4000 Protocol.pdf"}
# Print Preparation
There are two options to properly prepare your denture bases for printing:
- **manually**
- **automatically **using [Automate: Automatic Print Preparation (APP)](docId\:RdxnuAgHPa5GQfBl5QYSb)
:::hint{type="info"}
This guide provides instruction for **manual preparation.**
Reference [Denture Bases Automation Guidelines](docId\:ncGcxXQeyt610ogaVBKLe) if using APP. `login required`
:::
:::hint{type="success"}
Reference all [Printer UI](docId\:oId4ZNZtZYeltTPVJ984a) content for functionality and instructions not explicitly covered on this page.
:::
***
### Connect to Printer
::::VerticalSplit{layout="left"}
:::VerticalSplitItem
Connect to the printer software using your web browser.
:::
:::VerticalSplitItem
::Image[]{src="https://res.cloudinary.com/carbon3d/image/upload/t_auto_quality_format/Education/Materials/dental/__General_Use/Connect-printer_thumbnail.png" size="70" width="774" height="319" darkWidth="774" darkHeight="319" position="flex-start" alt="Connect to Printer" showCaption="false"}
:::
::::
::::::::ExpandableHeading
*Expand for steps*
:::::::WorkflowBlock
:::::WorkflowBlockItem
::::VerticalSplit{layout="middle"}
:::VerticalSplitItem
**Open browser**
Enter [https://print.carbon3d.com](https://print.carbon3d.com/) in the URL field.
:::
:::VerticalSplitItem
:::
::::
:::hint{type="info"}
Latest version of Chrome recommended.
:::
:::::
:::::WorkflowBlockItem
::::VerticalSplit{layout="middle"}
:::VerticalSplitItem
If you are not automatically logged in, enter your email and password and **click Log In****.**
:::
:::VerticalSplitItem
::Image[]{src="https://res.cloudinary.com/carbon3d/image/upload/t_auto_quality_format/Education/Materials/dental/__General_Use/Connect-login.png" size="60" width="561" height="677" darkWidth="561" darkHeight="677" position="center" alt="Carbon Log In" showCaption="false"}
:::
::::
:::::
::::::WorkflowBlockItem
:::::VerticalSplit{layout="middle"}
::::VerticalSplitItem
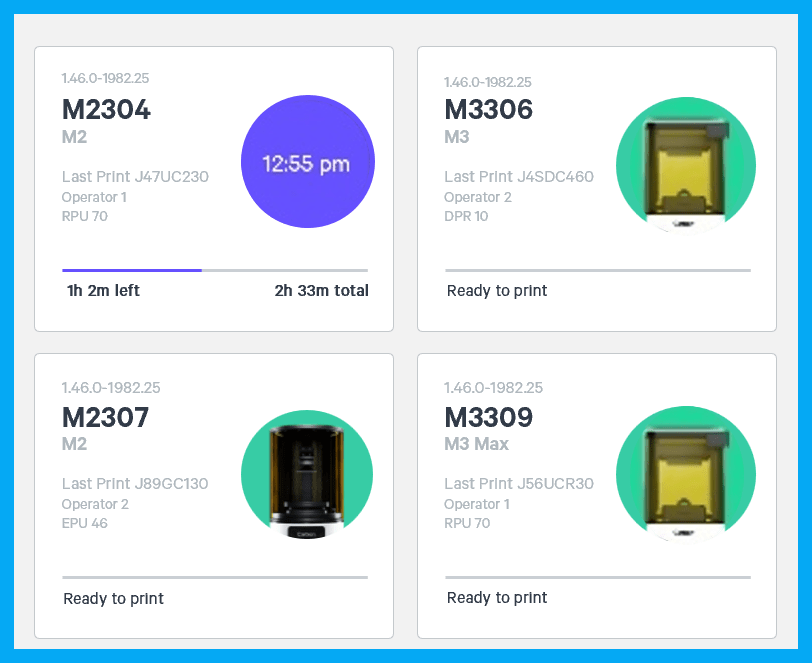
If you have multiple printers, **select the printer** that you wish to use to create the project.
:::hint{type="info"}
You may queue the build to other printers.
:::
::::
:::VerticalSplitItem
:::
:::::
::::::
:::::::
::::::::
***
### Create Project
::::VerticalSplit{layout="left"}
:::VerticalSplitItem
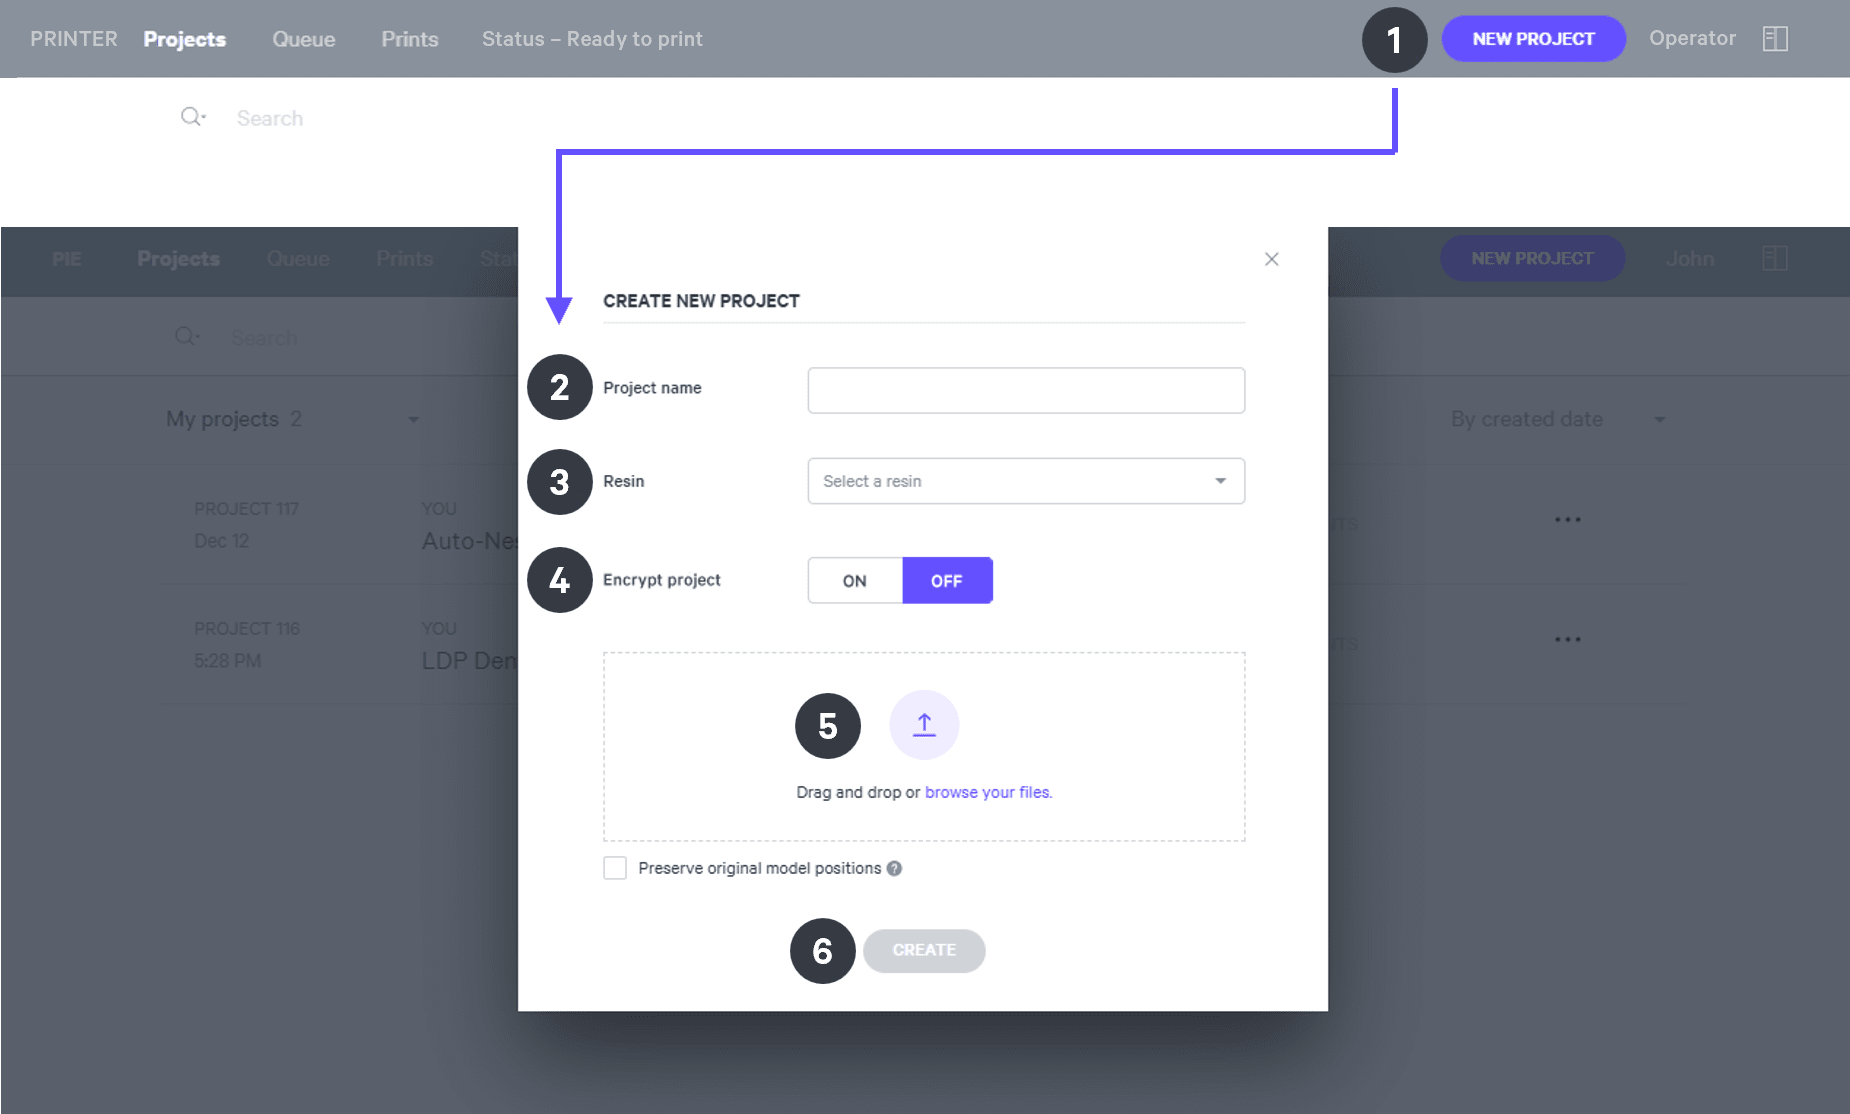
After you have chosen the printer, you must create a new project.
:::
:::VerticalSplitItem
::Image[]{src="https://res.cloudinary.com/carbon3d/image/upload/t_auto_quality_format/Education/Materials/dental/__General_Use/Create-project_thumbnail.png" size="70" width="673" height="247" darkWidth="673" darkHeight="247" position="flex-start" alt="Create Project" showCaption="false"}
:::
::::
::::::ExpandableHeading
*Expand for steps*
:::::WorkflowBlock
:::WorkflowBlockItem
Click **New Project.**
You can also drag your files from a file browser window and drop it on top of the **New Project** icon.
:::
:::WorkflowBlockItem
Enter a new **Project name.**
:::
:::WorkflowBlockItem
In the Resin dropdown, select **your resin.**
:::
::::WorkflowBlockItem
Only use [Encrypt project](docId:1bT3mas8msvxq9CDza67C) if you want to require a password to access the project.
:::hint{type="warning"}
**Carbon cannot provide support** for encrypted projects.
:::
::::
:::WorkflowBlockItem
**Drag and drop** your part files into the dotted box or click **browse your files **and select them in a file browser window.
:::
:::WorkflowBlockItem
Click **Create**
After a few moments you will see the project printer interface with your parts on the platform.
:::
:::::
::::::
***
::::::::::WorkflowBlock
:::::::::WorkflowBlockItem
## Orientation and Supports
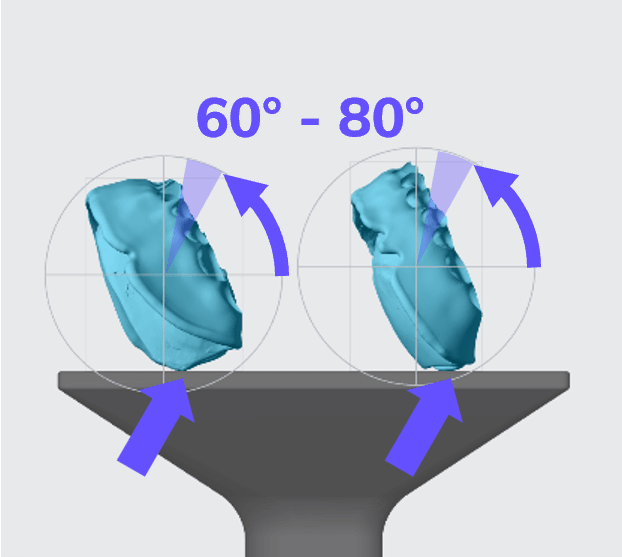
Orientation and Supports for DB 4000 utilizes the **posterior at platform **orientation strategy. `Orientation also used automatically by APP`
::::::ExpandableHeading
### Orient
::::VerticalSplit{layout="middle"}
:::VerticalSplitItem
**Lower and Upper Dentures Bases**
Goal
- **60° - 80°** tilt
- Intaglio surface faces platform
- **Posterior **touches platform
:::
:::VerticalSplitItem
:::
::::
:::::WorkflowBlock
:::WorkflowBlockItem
Click on **Orient **`Shift + O` in the top bar in the printer interface.

:::
:::WorkflowBlockItem
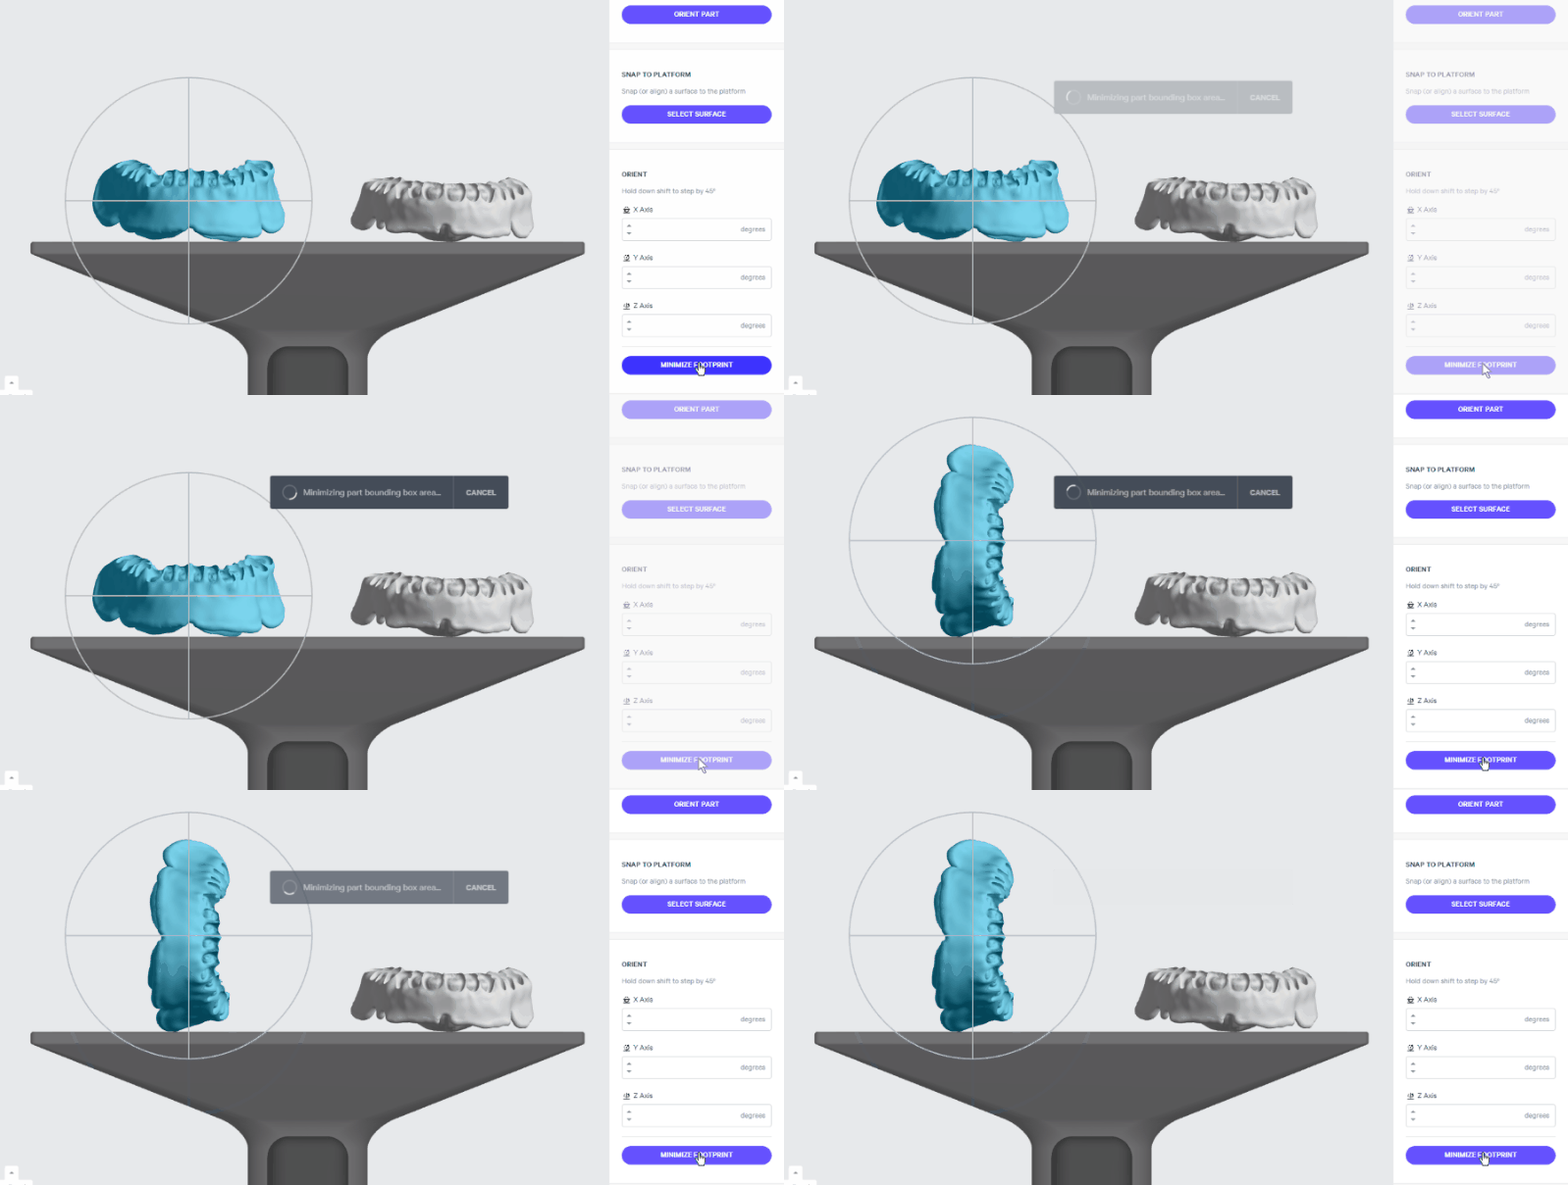
Click **Minimize Footprint** button.
This will orient the base roughly perpendicular to the platform.
:::
::::WorkflowBlockItem
**Manually **lay the** denture flat.**
The intaglio surface (tissue side) should face the platform.
- Click on the denture to select it.
- Hover over the axis loop seen while looking at the front of the denture.
*The ****green*** *Y axis in this example.*
- Click and hold on the axis loop and rotate until the denture is roughly parallel to the platform.

:::hint{type="info"}
💡Change views and adjust as needed until the denture is positioned. *Adjusting the ****red**** X axis in this example from the side view.*
Hold **Shift** while rotating to move in 45 degree increments.
:::
::::
:::WorkflowBlockItem
**Tilt** Into Position
- Click on the denture to select it.
- Hover over the axis loop seen while looking at the side of the denture. *The * *X axis in this example.*
- Click and hold on the axis loop and rotate to the specified angle so the **posterior** of the denture is touching the platform. *70*° *rotation in this example.*
::Image[]{src="https://api.archbee.com/api/optimize/l3qPiIkNKH_ws5f331N8f-nodMTrKPbINGUU77InU-v-20240920-230457.gif" size="86" width="600" height="600" darkWidth="600" darkHeight="600" position="center" caption="Rotate 60° - 80°" alt="Rotate 60° - 80°" showCaption="true"}
:::
:::::
::::::
::::::::ExpandableHeading
### Supports
:::hint{type="danger"}
**No** supports on **intaglio surfaces**.
:::
:::::::WorkflowBlock
:::::WorkflowBlockItem
**Set Up** UI for Supports
::::VerticalSplit{layout="middle"}
:::VerticalSplitItem
**Toggle Platform OFF**

- Click **Toggle Platform **in the bottom bar
`B`` shortcut`
:::
:::VerticalSplitItem
**Overhang Detection 30°**
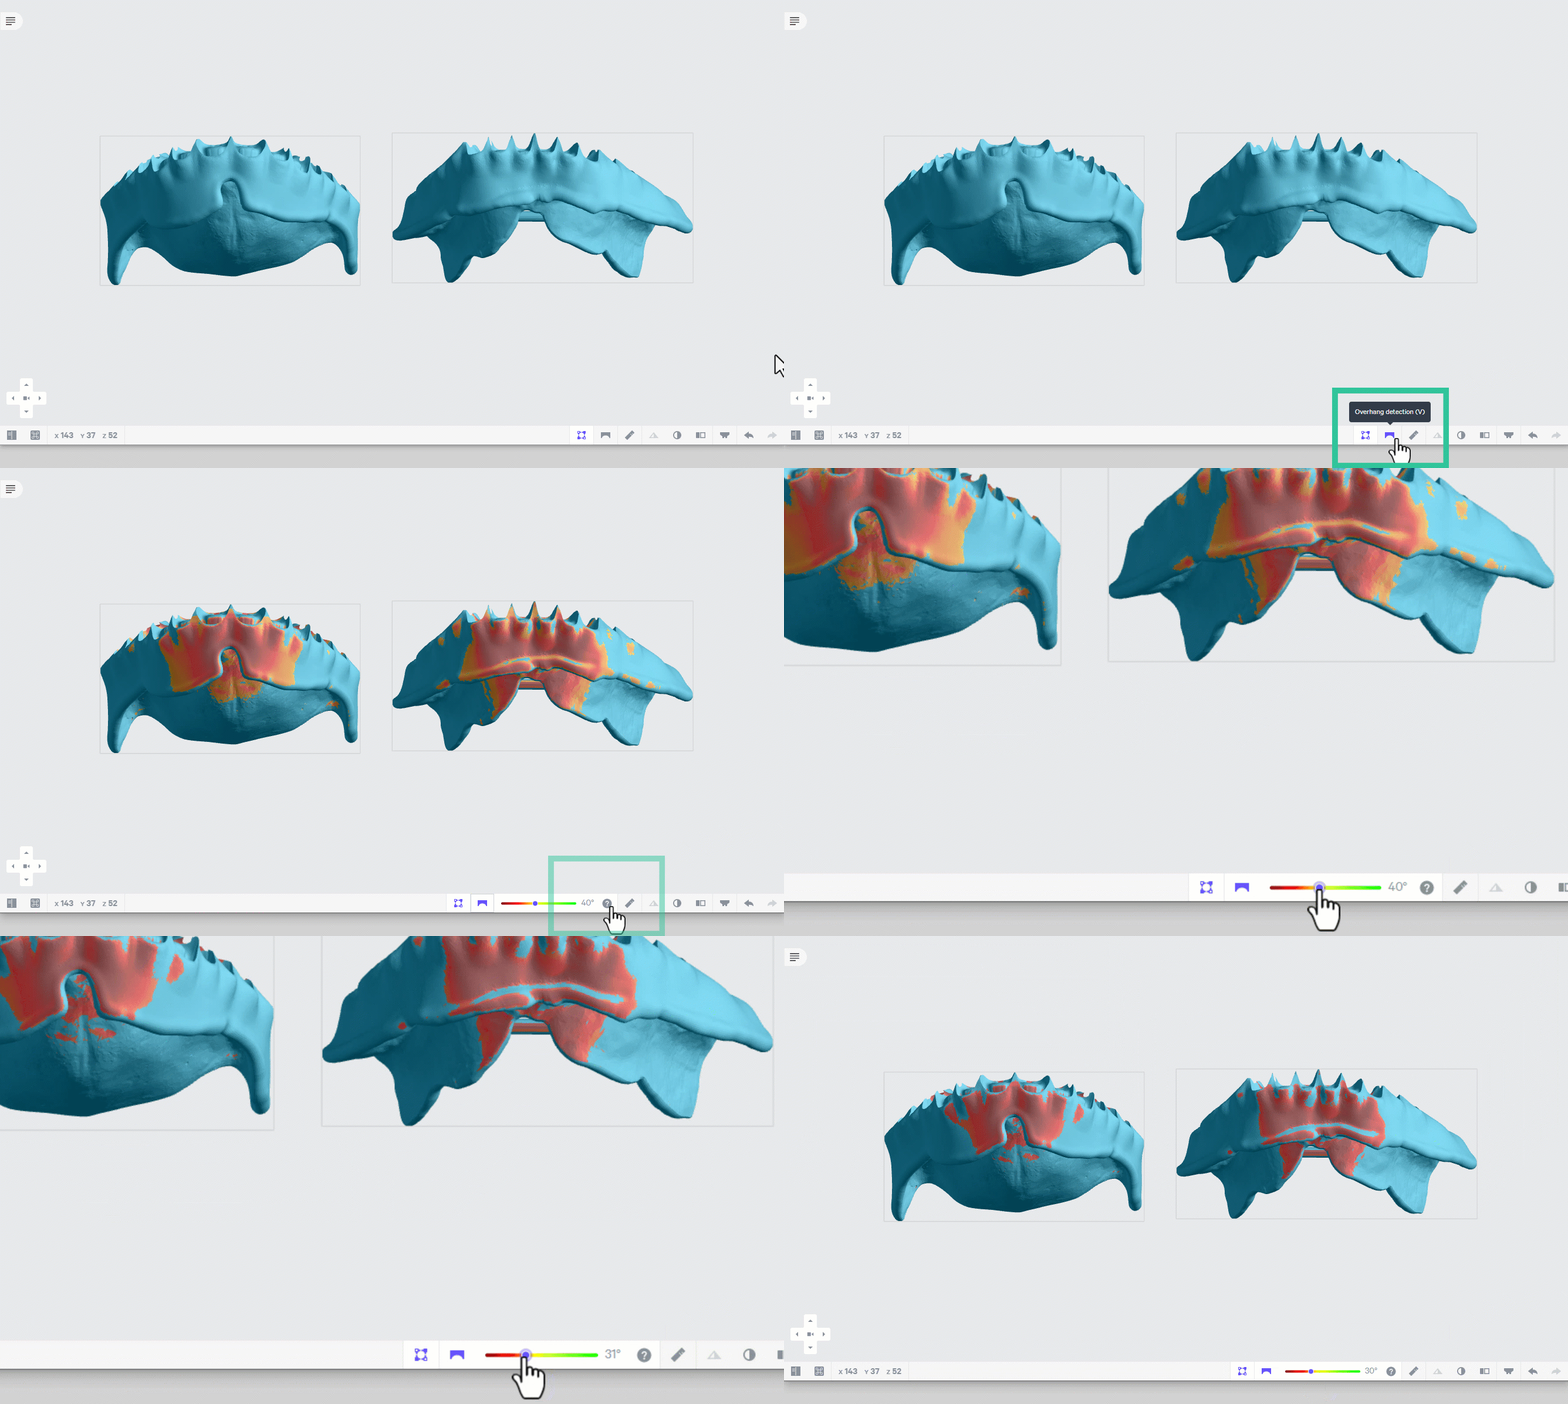
- Click **Overhang Detection **in the bottom bar
`V`` shortcut`
- Set angle to **30°**
:::
::::
:::::
::::::WorkflowBlockItem
Enter **Manual Fence** Support Mode
:::::ExpandableHeading
::::WorkflowBlock
:::WorkflowBlockItem
Click on **Supports **`Shift + S` in the top bar in the printer interface.

:::
:::WorkflowBlockItem
Under **Part Position**, select **Above** to create room between the platform and the part.
::Image[]{src="https://res.cloudinary.com/carbon3d/image/upload/t_auto_quality_format/Education/Materials/dental/__General_Use/Support-part-position-above.png" size="80" width="355" height="62" darkWidth="355" darkHeight="62" position="center" alt="Part Position - Above" showCaption="false"}
:::
:::WorkflowBlockItem
Click the **Manual** tab and select **Fence**.
::Image[]{src="https://res.cloudinary.com/carbon3d/image/upload/t_auto_quality_format/Education/Materials/dental/__General_Use/Support-fence-menu.png" size="82" width="350" height="110" darkWidth="350" darkHeight="110" position="center" alt="Manual Tab - Fence Mode" showCaption="false"}
:::
:::WorkflowBlockItem
Leave the **Support Attributes** at the default values.
:::
::::
:::::
**Manual Fence Supports**
Place fence supports for the following denture base conditions where illustrated in the examples below.
- Denture Base Edges
- T-bars
:::::ExpandableHeading
Manual Fence Workflow
::::WorkflowBlock
:::WorkflowBlockItem
Click a series of points along the **edge of red areas** to define the fence.
:::
:::WorkflowBlockItem
Click **Esc** key on keyboard to end a fence and begin another.
:::
:::WorkflowBlockItem
Hold down the **E** key and click with the mouse to **reposition points**.
:::
:::WorkflowBlockItem
Click **Generate All** to create the fence geometry. *This may take a few minutes.*
:::
::::
:::::
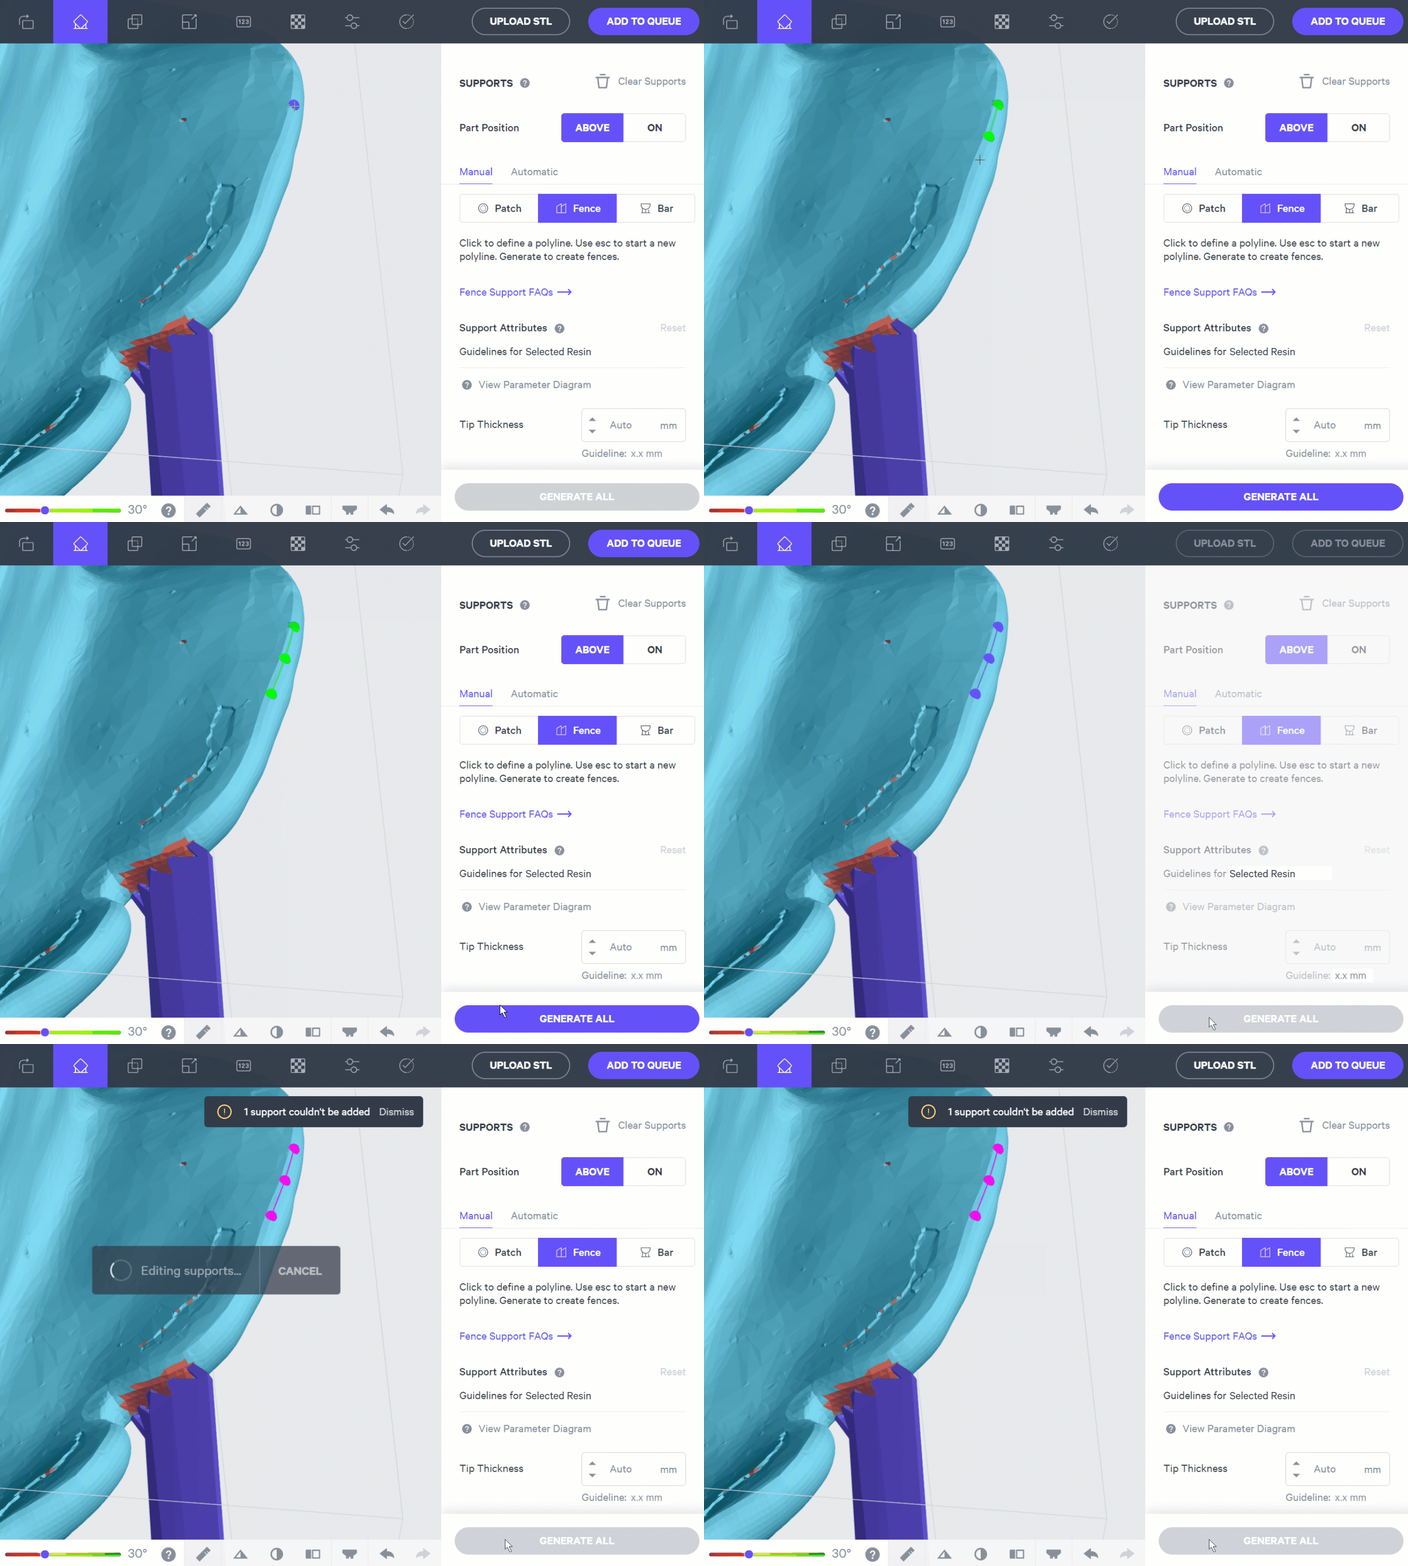
**Error: Support Couldn't Be Added**
::::VerticalSplit{layout="left"}
:::VerticalSplitItem
Sometimes an **error **will occur when you try to generate a new fence.
If this happens, the points will turn **pink** and an error message will appear.
:::
:::VerticalSplitItem
:::
::::
:::hint{type="info"}
💡Try making multiple shorter fences or try adding the fence in a slightly different place.
:::
::::::
:::::WorkflowBlockItem
Support **Denture Edges**
::::VerticalSplit{layout="left"}
:::VerticalSplitItem
Click along **red areas on edges**, indicated by the Overhang Detection tool.
:::
:::VerticalSplitItem

:::
::::
::::VerticalSplit{layout="middle"}
:::VerticalSplitItem

:::
:::VerticalSplitItem

:::
::::
:::::
:::::WorkflowBlockItem
Support **T-Bars**
::::VerticalSplit{layout="left"}
:::VerticalSplitItem
Click along **red areas on edges**, indicated by the Overhang Detection tool.
:::
:::VerticalSplitItem

:::
::::
:::::
::::::WorkflowBlockItem
Support **Cameo Surface**
The last area requiring supports will use the **Patch** support tool to fill the area with fence supports. The lingual cameo surface is typically a large overhang that requires dense supports.
This is required for **lower dentures**.
:::::ExpandableHeading

::::WorkflowBlock
:::WorkflowBlockItem
While in the Supports menu, click the **Manual** tab and select **Patch**.
:::
:::WorkflowBlockItem
**Click in the large overhang** on the cameo surface. A green patch will appear.
:::
:::WorkflowBlockItem
Under **Support Attributes** click **Primary Support Type** and select **Bar**.
:::
:::WorkflowBlockItem
In the **Spacing** box, type **3.5 mm**.
:::
:::WorkflowBlockItem
Scroll down to the bottom of the Supports menu and turn **Boundary Fence ON**.
:::
:::WorkflowBlockItem
Adjust the **Overhang** slider until the red highlighted overhang areas are covered by the green patch. Typically this will be between **35° - 45°**.
:::
:::WorkflowBlockItem
Click **Generate All**.
:::
::::
:::::
::::::
:::::::
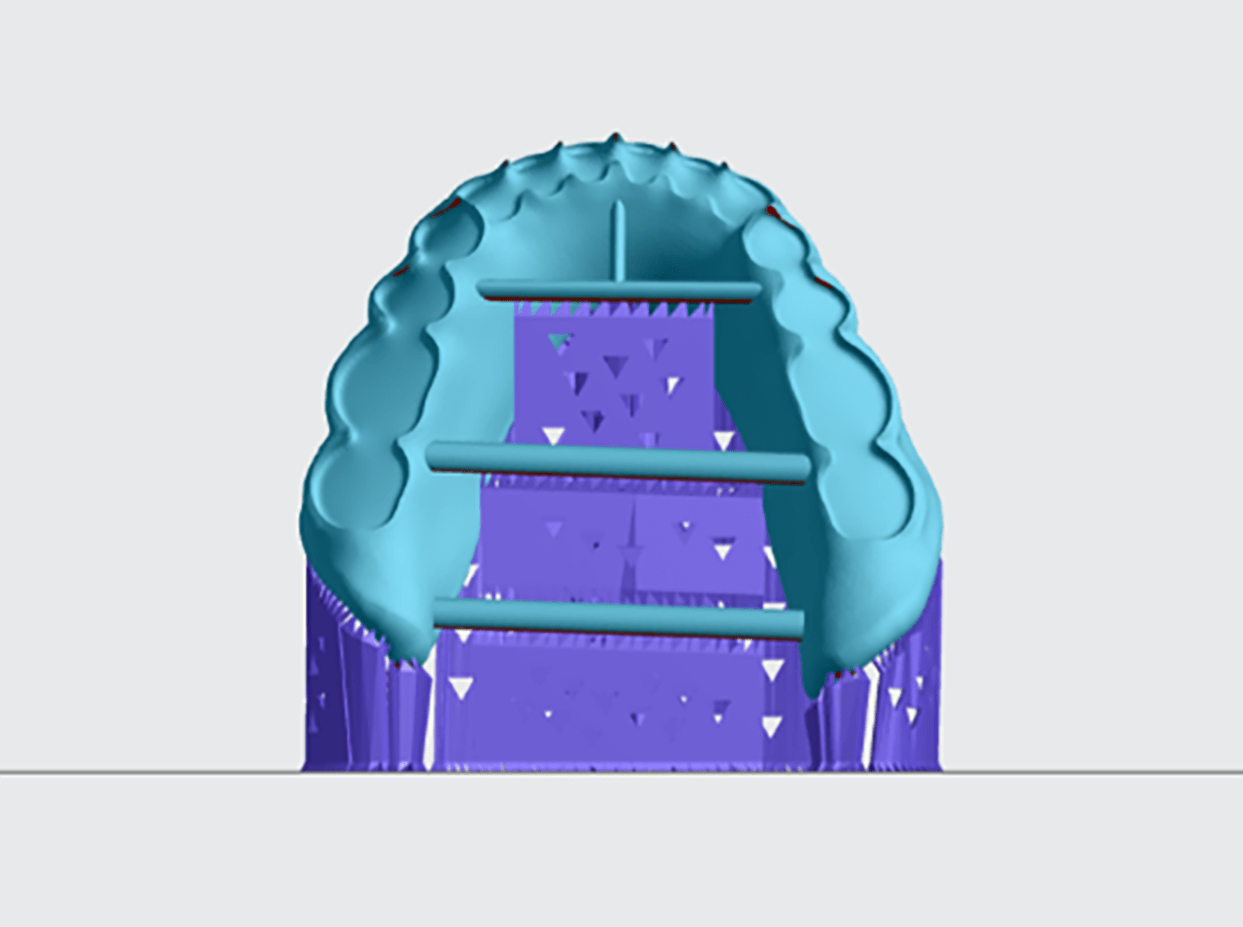
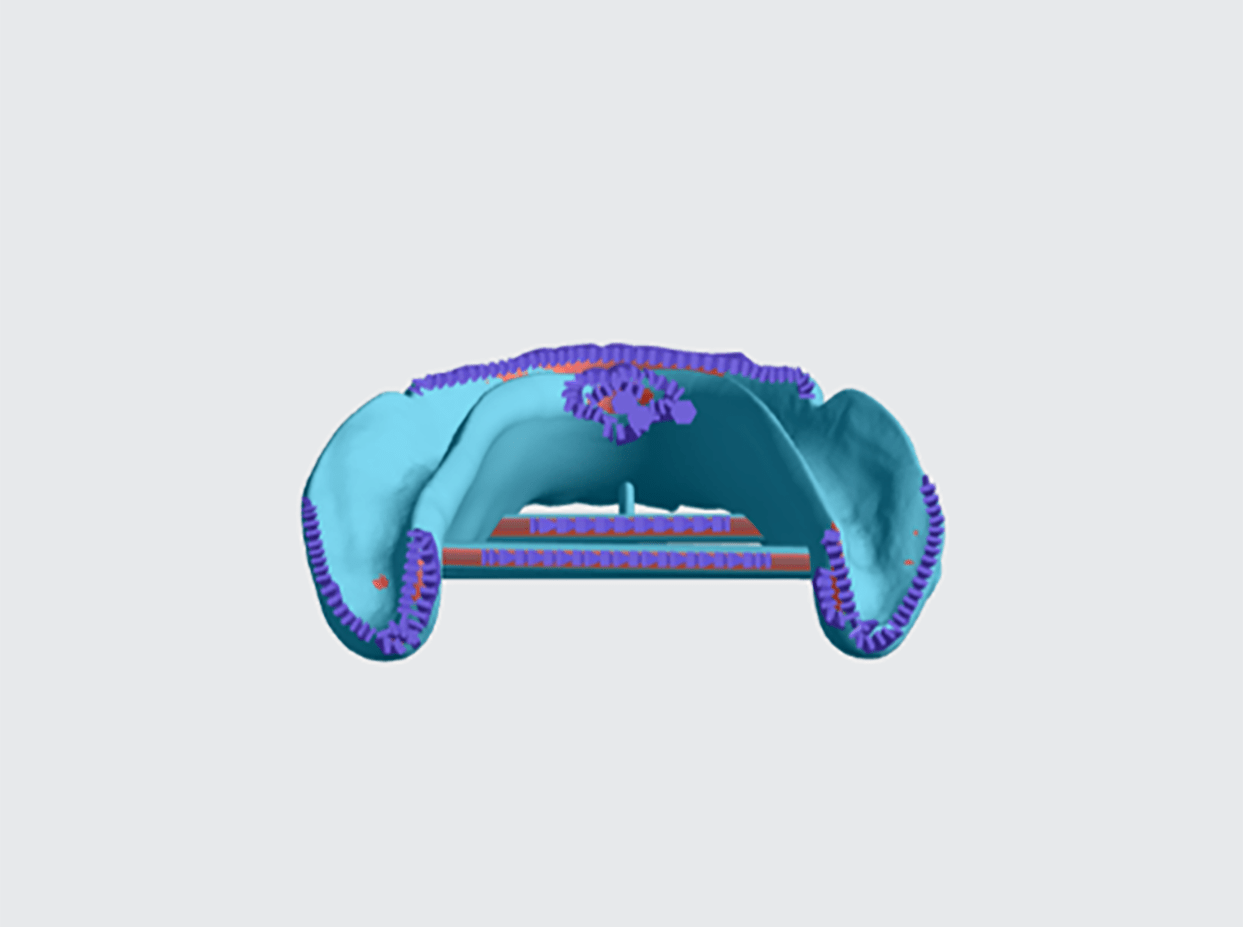
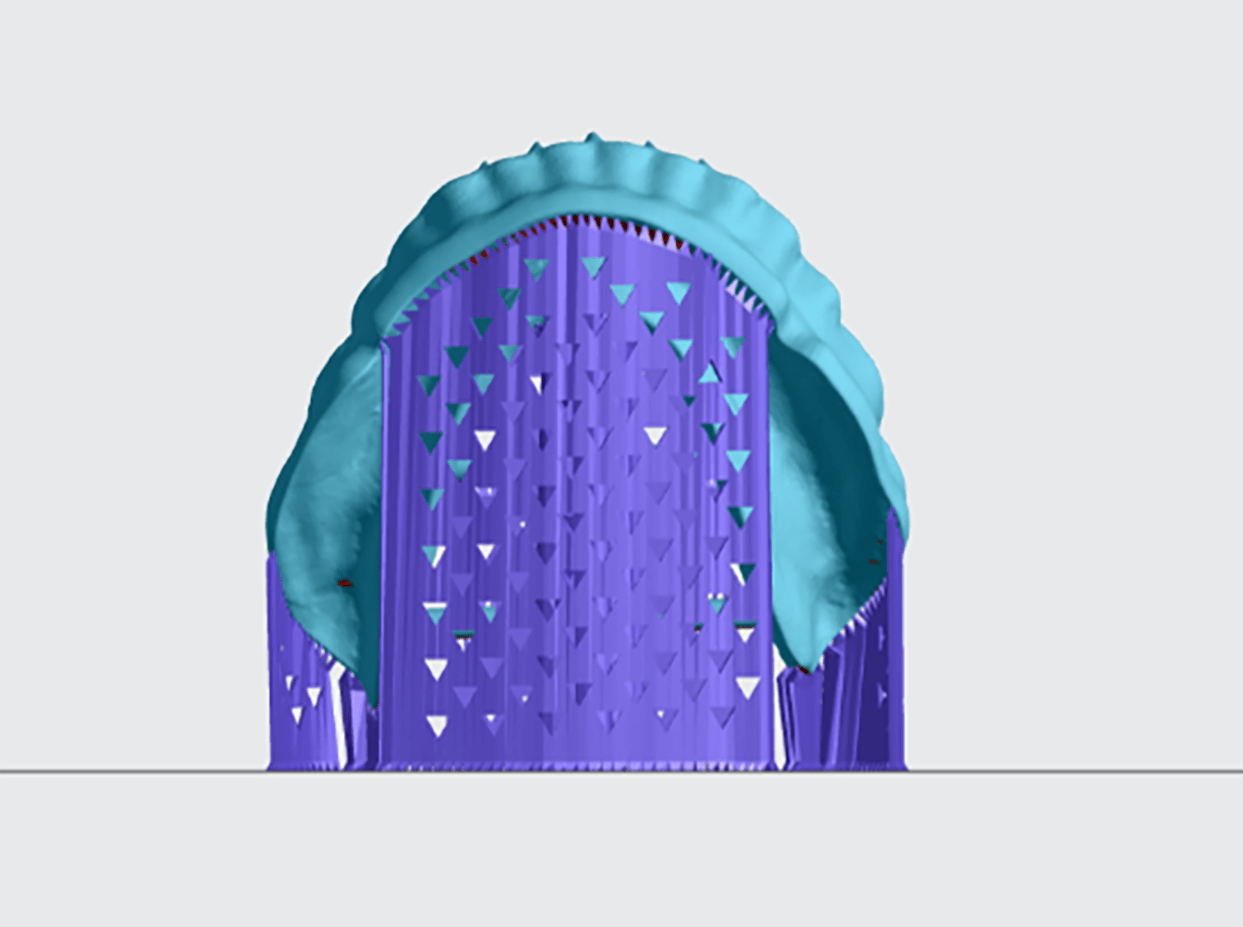
**Examples of Well Supported Dentures**
Use the images below as a reference for well supported upper and lower dentures using the posterior at platform orientation.
::::VerticalSplit{layout="middle"}
:::VerticalSplitItem
**Upper Denture**

:::
:::VerticalSplitItem
**Lower Denture**
:::
::::
::::VerticalSplit{layout="middle"}
:::VerticalSplitItem

:::
:::VerticalSplitItem
:::
::::
::::VerticalSplit{layout="middle"}
:::VerticalSplitItem

:::
:::VerticalSplitItem
:::
::::
::::::::
:::::::::
::::::WorkflowBlockItem
## Layout
:::::ExpandableHeading
::::WorkflowBlock
:::WorkflowBlockItem
Click on **Layout **`Shift + L` in the top bar in the printer interface.

:::
:::WorkflowBlockItem
Under **Auto Layout**, select **Gen2**.
:::
:::WorkflowBlockItem
Enter at least **1 mm** in **Padding**.
:::
:::WorkflowBlockItem
Leave **Optimize starting rotation** **unchecked**.
:::
:::WorkflowBlockItem
Leave **Allowed rotations** at the** default **setting.
:::
:::WorkflowBlockItem
Press the **Auto Layout **button to arrange your parts.
:::
::::
::Image[]{src="https://res.cloudinary.com/carbon3d/image/upload/t_auto_quality_format/Education/Materials/dental/__General_Use/layout-numbered02.png" size="54" width="761" height="952" position="center" alt="Auto Layout" darkWidth="761" darkHeight="952" showCaption="false"}
If necessary, part layout can be changed manually:
- Click and drag parts to adjust their position.
- Modify Z rotation by using the **Spin **tool.
- Use the **Part List tab **as needed to more easily select models and focus on them.
:::::
::::::
::::::::WorkflowBlockItem
## Print Controls
:::::::ExpandableHeading
::::::WorkflowBlock
:::WorkflowBlockItem
Click on **Print Controls **`Shift + P` in the top bar in the printer interface.

:::
:::::WorkflowBlockItem
::::VerticalSplit{layout="middle"}
:::VerticalSplitItem
Set Slice Thickness to **Standard (100 µm).**
:::
:::VerticalSplitItem

:::
::::
:::hint{type="warning"}
**Reducing** the slice thickness will **increase print time** and may **reduce part quality and accuracy**.
:::
:::::
::::::
:::::::
::::::::
::::::WorkflowBlockItem
## Project Analysis
:::::ExpandableHeading
::::WorkflowBlock
:::WorkflowBlockItem
Click on **Project Analysis **`Shift + A` in the top bar in the printer interface.

:::
:::WorkflowBlockItem
Click **Start Analysis** and wait for the processing to complete.
:::
:::WorkflowBlockItem
Note the following [Print Stats](docId\:gfR-GoC-Irq_L9_KanC-X)
- **Required Resin Volume**
You will use this number to dispense the correct amount of resin.
- Print Time
- Estimated Increase in Soil Load
:::
:::WorkflowBlockItem
Review warnings for
- [Unvented Volumes](docId\:gfR-GoC-Irq_L9_KanC-X)
- [Slices](docId\:gfR-GoC-Irq_L9_KanC-X)
- [Islands](docId\:gfR-GoC-Irq_L9_KanC-X)
:::
:::WorkflowBlockItem
Click **Add to Queue**
:::
::::
:::::
::::::
::::::::::
# Post-Processing
Follow instructions in the linked documents per step.
| ### Washing | ### Curing | ### Assembly | ### Finishing |
| ----------------------------------------- | ----------------------------------------- | ------------------------------------ | ------------------------------------ |
| [IFU](docId\:lz7WZgEeJFvHiF5UyX9IR) | [IFU](docId\:lz7WZgEeJFvHiF5UyX9IR) | [IFU](docId\:lz7WZgEeJFvHiF5UyX9IR) | [IFU](docId\:lz7WZgEeJFvHiF5UyX9IR) |
| [Protocol](docId\:lz7WZgEeJFvHiF5UyX9IR) | [Protocol](docId\:lz7WZgEeJFvHiF5UyX9IR) | | |
# Handling Instructions
Clinicians and patients should follow instructions in the linked documents.
| ### Patient Cleaning | | | |
| ------------------------------------ | - | - | - |
| [IFU](docId\:lz7WZgEeJFvHiF5UyX9IR) | | | |
| | | | |
# Questions & Support
## Carbon
For questions about your **Carbon printer** or **Carbon software settings** used for this resin, please [contact Carbon](https://learn.carbon3d.com/carbon-support):
- Email: [support@carbon3d.com](mailto\:support@carbon3d.com)
- Phone:
- **U.S. and Canada** 1-650-285-6307 option 2
- **Germany** +49 6102 5790849
- **UK **+44 (0) 2082 647484
- Printer UI: On the dashboard, select the **Prints** tab. **Select one of the printed projects.** Click **Request Help** in the lower right corner.
::Image[]{src="https://api.archbee.com/api/optimize/3CesIL2dYMCHPZvRjp8S0/YY6yCChSIB8SevmBwY76W_request-help-01.png" size="70" width="6541" height="3371" position="flex-start" alt="Location of button in the printer software" showCaption="false"}