---
title: M Series Pour Stand
slug: hardware/m-series-pour-stand
description: Optimize your resin handling with the M Series Pour Stand, a key accessory for M series printers. Designed for efficient resin drainage, it features a hinged lid, secure base, and adjustable funnel bracket.
docTags:
createdAt: 2024-07-03T23:25:08.299Z
---
:::hint{type="success"}
The M Series Pour Stand is a vital accessory for M series printers. It makes emptying the cassette much easier by securely holding it while emptying resin.
:::
# Overview
::::VerticalSplit{layout="middle"}
:::VerticalSplitItem
The **M Series pour stand** is a vital accessory for [M2](docId:__6PWz7Jx_jb4L5_xWKOJ), [M3 and M3 Max](docId:3YymGGIHdvaOwG01EAY6l) printers. The pour stand is designed to securely hold cassettes to facilitate the recycling or disposal of resin.
Operation is simple and applies to all M series cassette sizes:
1. Place cassette in cassette mount on lid.
2. Place resin container (resin bottle or waste container) in front of pour stand.
3. Raise lid to begin pouring resin.
4. Lower lid and remove cassette.
:::
:::VerticalSplitItem

:::
::::
# Features
## Components

:::::WorkflowBlock
::::WorkflowBlockItem
:::ExpandableHeading{isOpen="true"}
**Stand lid**
The lid hinges at the front enabling the user to smoothly raise and lower the cassette.

:::
::::
::::WorkflowBlockItem
:::ExpandableHeading{isOpen="true"}
**Base holes**
There are 2 holes in the base of the pour stand. These can be used to secure the base to the surface it sits on if required by local regulations.

:::
::::
::::WorkflowBlockItem
:::ExpandableHeading{isOpen="true"}
**Cassette mount**
The cassette mount holds the cassette in place and ensures alignment with the bottle or waste container below.
The left bumper is lower than the right. This provides space for the user's fingers when holding the cassette handles.

:::
::::
::::WorkflowBlockItem
:::ExpandableHeading{isOpen="true"}
**Funnel bracket**
The funnel bracket supports the funnel and filter when pouring uncured one-part resin back into its original container. Its height is adjustable to accommodate different containers.

:::
::::
:::::
## Specifications
**Dimensions (W x D x H)**
** Lid closed**: 418 x 610 x 570 mm (16.6 x 24.0 x 22.4 in)
**Lid open**: 418 x 610 x 845 mm (16.6 x 24.0 x 33.3 in)
**Weight**: 17 kg
::Image[]{src="https://api.archbee.com/api/optimize/3CesIL2dYMCHPZvRjp8S0/rmNYZhtMgfTurneuO-uTs_xiffel5hnktoyx14-hscrkotigusnkxwh.gif" size="70" width="1920" height="1920" position="flex-start" alt="Stand with each cassette size" darkWidth="1920" darkHeight="1920" showCaption="false"}
## Compatibility
The pour stand is compatible with all M-series printers: **M1, M2, M3 and M3 Max.**
:::hint{type="warning"}
The pour stand is not compatible with L1 printers.
:::
## Recommended Worksurface
:::::VerticalSplit{layout="right"}
::::VerticalSplitItem
Due to the height of the pour stand and the combined weight of the cassette and resin, users may find it helpful to place the pour stand on a surface that is lower than the usual workbench height of 30 inches (approximately 75 cm).
:::hint{type="info"}
Reference [example steel and wood top options](docId:95TwE3ttL-5ihI6dNl4XI) for purchasing links.
:::
::::
:::VerticalSplitItem
::Image[]{src="https://res.cloudinary.com/carbon3d/image/upload/t_auto_quality_format/Education/Hardware/Accessories/M-Series-Pour-Stand/Pour-stand-table_18-steel.png" size="70" width="803" height="608" position="center" darkWidth="803" darkHeight="608" alt="Low-Profile Steel Table" showCaption="false"}
::Image[]{src="https://res.cloudinary.com/carbon3d/image/upload/t_auto_quality_format/Education/Hardware/Accessories/M-Series-Pour-Stand/Pour-stand-table_24-vinyl-wood.png" size="70" width="739" height="652" position="center" darkWidth="739" darkHeight="652" alt="Low-Profile Vinyl-Coated Composite Wood Table" showCaption="false"}
:::
:::::
# Operation
## Before You Begin
Be aware of what kind of resin you are working with.
:::ExpandableHeading{isOpen="true"}
**1-part resins**
1-part resins do not have a pot life and uncured resin may be reused (after filtering).
Use the pour stand along with a **funnel** **and paint strainer** to pour resin back into the original container.

:::
:::ExpandableHeading{isOpen="true"}
**2-part resins**
2-part resins have a **pot life** and must be **disposed **when their pot life has been reached.
Use the pour stand to pour resin into a waste container.

:::
:::hint{type="info"}
**💡Tip - **The M-series pour stand is designed for the operator to stand on **the side with the Carbon logo**. Doing so makes it simple to place the cassette on the pour stand and gives easy access to **the lid** and **funnel holder**.

:::
## Workflow
Perform the following steps after printing has finished.
1. Place the cassette in the cassette mount.
2. Position the resin container in front of the pour stand.
3. Place funnel in funnel holder.
4. Tilt lid up to pour resin.
5. Use silicone spatula to assist resin drainage.
6. Lower lid and remove empty cassette.
7. Clean up.
:::hint{type="info"}
The process below shows **reclaiming one-part resin.**
A **two-part resin** at the end of its pot life would need to be **discarded **into a hazardous waste container according to local regulations.
:::
::::WorkflowBlock
:::WorkflowBlockItem
**Place the cassette in the cassette mount**
1. Remove the cassette from the printer.
2. **Approach pour stand from the side with the Carbon logo.**
3. Lift the cassette and place it on the lid so that it rests securely in the cassette mount.
**Notes**
- **All cassettes: **The cassette mount **accommodates the user's hand** when properly placing the cassette.
- **M1 and M2: ****Curved side faces the back of the pour stand** when placed in the cassette mount.
- **M3 Max: ****Pour spout should face the front of the pour stand** when placed in the cassette mount.

:::
:::WorkflowBlockItem
**Position the resin container under the funnel holder**
There are two different containers that can be used:
- **Resin bottle: **Use the resin bottle if you are recapturing 1-part resin to use later. The resin will need to be filtered using a paint strainer.
- **Waste container: **If you are disposing of resin (1-part or 2-part), you can pour the resin directly into a hazardous waste container or you can pour into a secondary container and then into hazardous waste.
1. Place resin container under the funnel holder.
2. Adjust the container so that it is centered.
3. Reposition the funnel holder as needed.

:::
:::WorkflowBlockItem
**Place funnel in funnel holder**
1. Place the **funnel **in the funnel holder. The tip of the funnel must align with the top of the container.
2. Adjust the funnel holder as needed.
3. For 1-part resin reuse: Place a **paint strainer** in the funnel.
- **The paint strainer is critical to filter out solids. **Without filtering, these solids can damage the cassette window.

:::
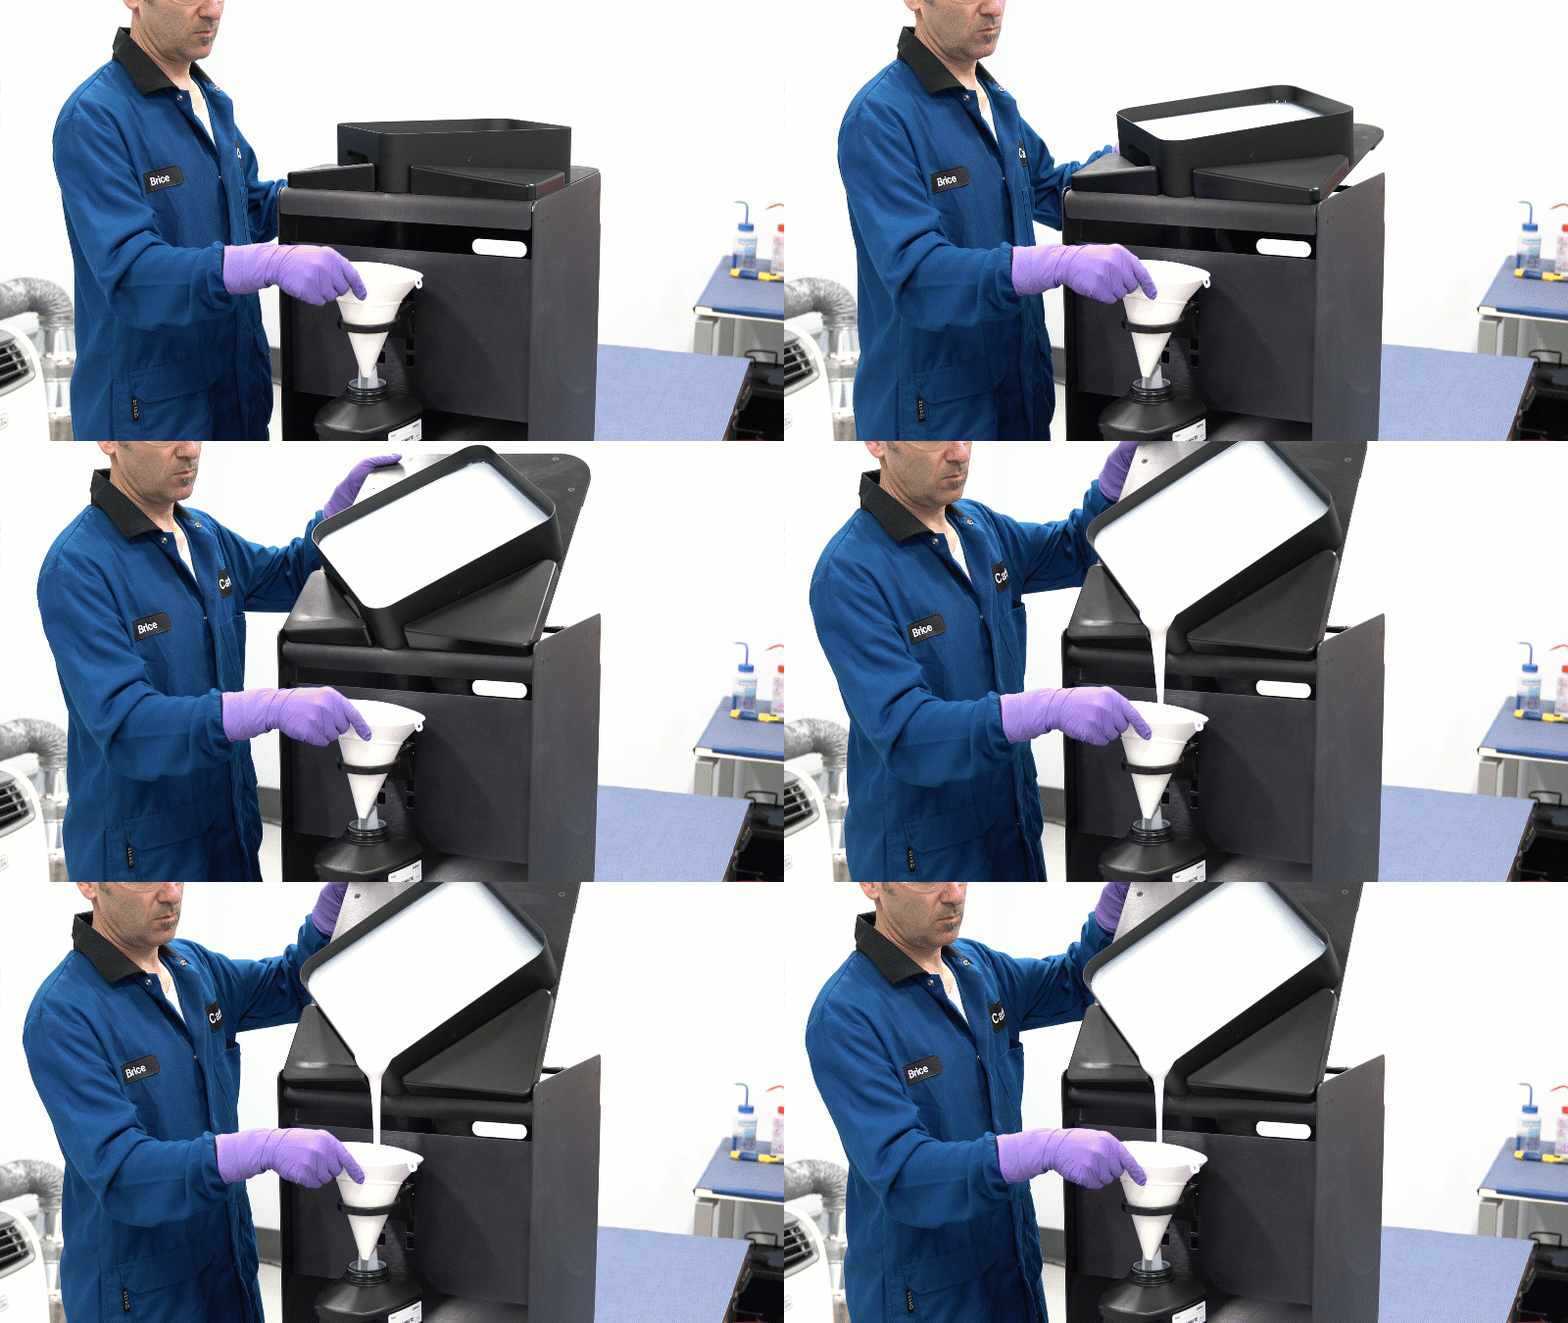
:::WorkflowBlockItem
**Tilt lid up to pour resin**
1. Stand at the Carbon logo side of the pour stand.
2. Pull up lid to begin pouring resin through the funnel into the container.
- **M1 and M2: **For these smaller cassettes, quickly tilt the lid until it stops. This will ensure that resin pours out cleanly without dribbling down the side of the cassette.
- **M3 and M3 Max: **For these larger, heavier cassettes, tilt the lid slowly and watch how the resin is pouring out.
- The lid will hold at any angle up to its maximum.
3. **Monitor the resin flow **so that it does not pour too quickly and cause the funnel to overflow. If the resin flow is too fast, modify the angle of the lid as needed. Keeping increasing the tilt height to ensure steady flow.
:::
:::WorkflowBlockItem
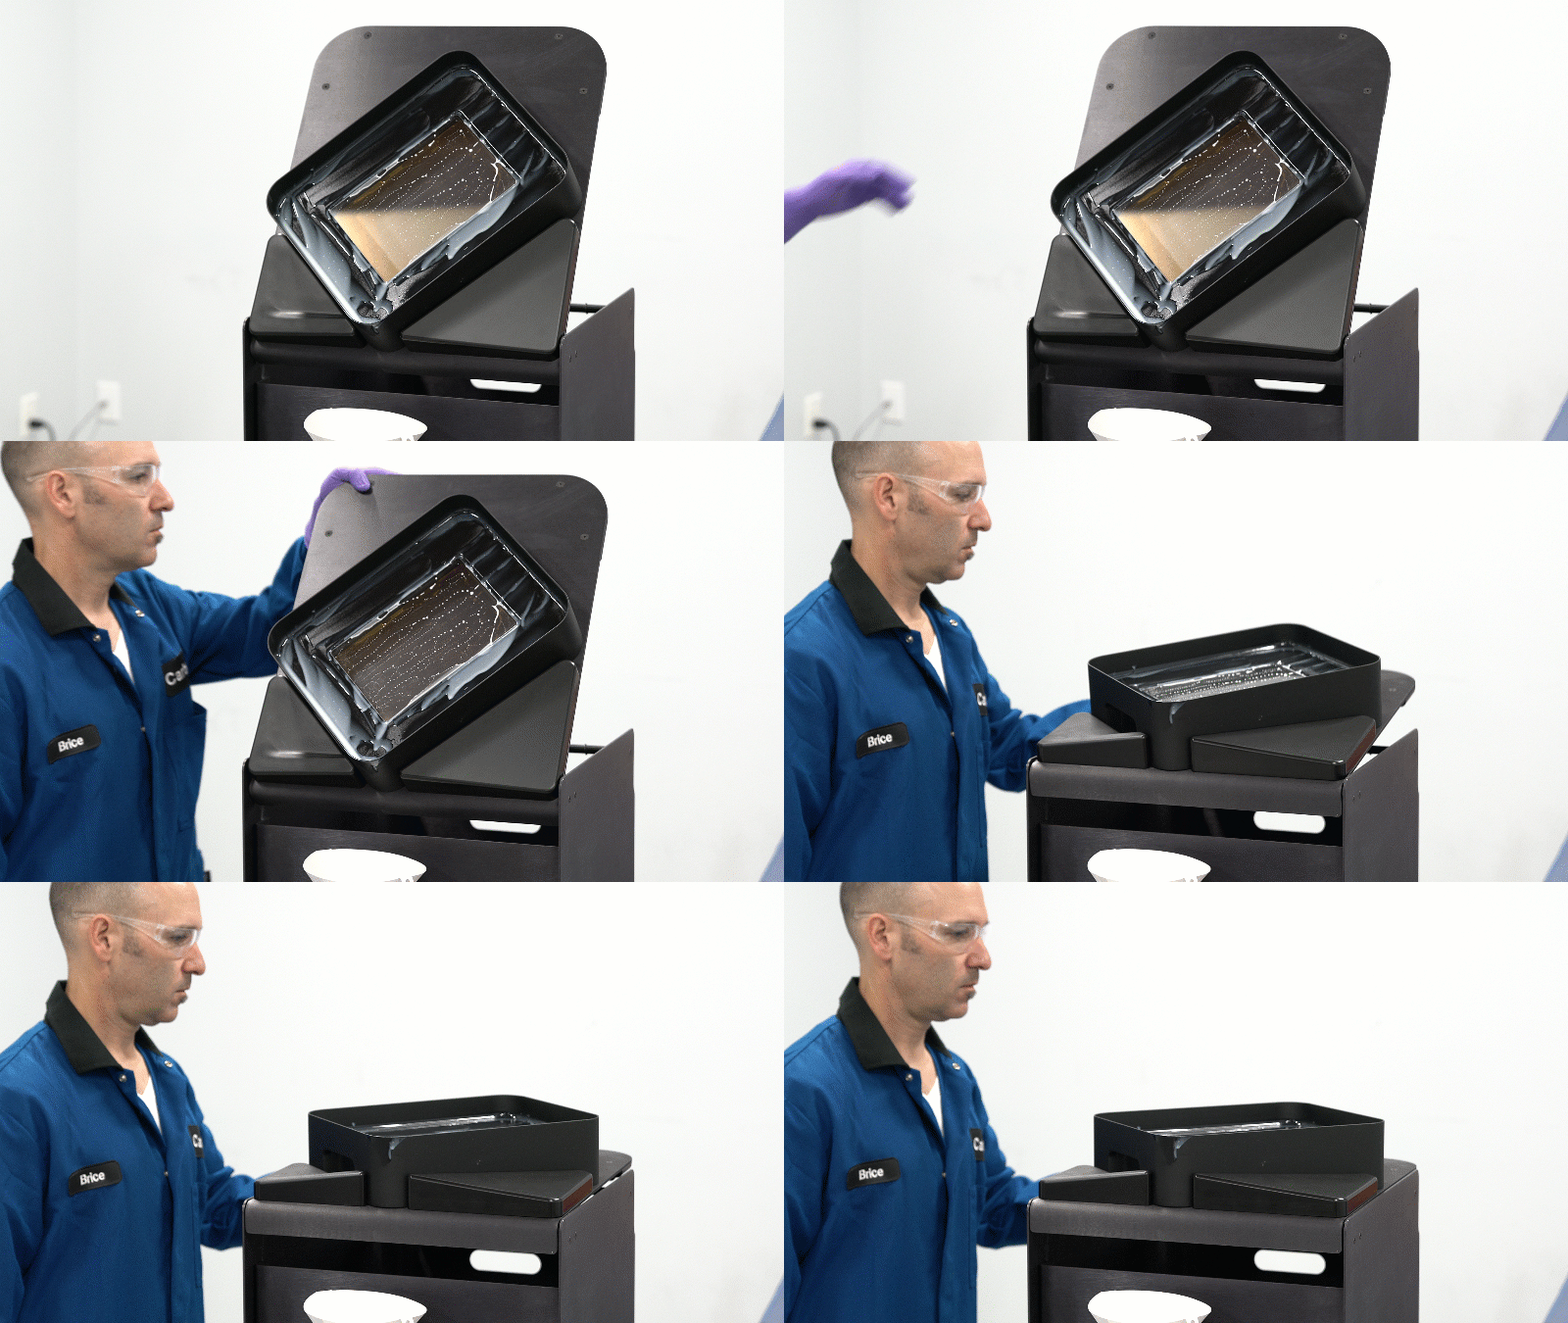
**Use silicone spatula to assist resin drainage**
1. Use a clean, undamaged silicone spatula to wipe excess resin from the cassette and window surface.
2. Continue wiping until only a small amount of residual resin is left in the cassette.
3. Use a towel as needed to wipe up drips or spills.
4. Clean the spatula with towel and IPA as needed.
- Never use acetone to clean the silicone spatula. Acetone damages silicone.

:::
:::WorkflowBlockItem
**Lower lid and remove empty cassette**
1. When the cassette is empty, slowly lower the lid.
2. Remove the cassette from the pour stand.
:::
:::WorkflowBlockItem
**Clean up**
1. **If reusing 1-part resin:**
1. Dispose of paper funnel.
2. Dispose of paint strainer.
3. Screw cap back on bottle.
4. Store bottle per recommended guidelines.
2. **If disposing of expired resin:**
1. Close hazardous waste container.
3. Check pour stand and work area for any drips or spills.
1. Clean as needed with towel and appropriate solvents.
:::
::::
## Clean the Cassette
Now that the cassette is empty, it needs to be cleaned. Go to [Cassette Care](docId\:Y_IMi7AeVLyJbsATEXxdB) to learn more.
## Resin Handling After Printing
To see how the pour stand fits into the broader workflow, check out [Resin Mixing and Dispensing](docId:4lwK3k36RFqf2RAOVXszx).
[Resin Handling After Printing](docId\:kQYgmwDX_5LNp-uy81_Xt) contains useful information for handling resin after printing is complete.